Page is loading ...

DL-417ST-TB
Copyright © Gianni Industries, Inc. All rights reserved.
P-MU-DL-417ST-TB Published: 2020.04.29
Power Transfer Door Loop
(With Plug-in Terminal Block)
Installation Instructions
【Suitable for metal door
frames with square drilling
holes】
ಏҜ;mm
1.
1.
1.
1.
1.
Installation Steps
5 x13 screws x 4
3
4
21
Accessories
5 x13 screws x 4
4.
4.
4.
4.
4.
Concealed Door Loop
Measure the dimension
of DL-417ST-TB as per
diagram on the left and
mark on the frame.
Drill holes in the
marked positions on
the door and frame.
Wire
Wire
Wire
Connect the wires to the terminal block located on
Use 5x13 screws to secure the unit and fix tightly
the both ends of DL-417ST-TB and test the unit.
with the front locking piece.
Make sure the
DL-417ST-TB
is completely
embedded into
the door and
frame.
2.
2.
2..
2..
2.
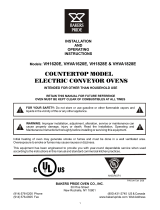
Terminal Block Wiring Diagram
2 Green
Blocks
3 Blue
Blocks
3 Green
Blocks
78
J2 J3 J4
6
7
8
123456
J1
1
2
3
4
5
Grey
White
Orange
Yellow
Green
Purple
Red +
NC
COM
NO
NC
COM
NO
1
2
3
4
5
6
7
8
Black -
Grey
White
Orange
Yellow
Green
Purple
Red
+
NC
COM
NO
NC
COM
NO
1
2
3
4
5
6
7
8
Black
-
2
3
3
Wire Terminal Block
Green
Blocks
Blue
Blocks
Green
Blocks
Note:
Wire color numbers match terminal block
numbers, and the terminal blocks on both
sides are labeled with the same number.
For each side, the Red wire 1 is connected
to the terminal 1 of the Green Block, the
Black wire 2 is connected to the terminal 2
of the Green Block, and so on.
3.
3.
3.
3.
3.
Door Opening Angle &
Max 30mm
Max 30mm
1
1
0
°
Installaiotn Distance
Installation
Unit: mm
290
276
24.4
24.2
35
290
/