Page is loading ...

3.0/0517/TG
MODEL NUMBERS*:
EMBASSY™ HIGH CHAIR
00933 - Natural
00934 - Cherry
00936 - Espresso
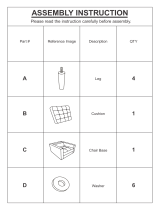
Assembly Instructions. Adult Assembly Required.
Read all instructions before use.
This manual is part of the product and
must be kept for future reference.
VERSION CODE*:
3.0/0517/TG
* Model and Version numbers are needed
if replacement parts are requested
Badger Basket, PO Box 227, Edgar, WI 54426-0227 USA • Web: www.badgerbasket.com
U.S. Based Customer Service Toll-Free (Mon-Thurs 7:00 AM-4:00 PM CST): 1-800-236-1310
Phone: 715-352-2311 • Fax: 715-352-3163
FOR REPLACEMENT PARTS:
http://www.badgerbasket.com/parts

3.0/0517/TG
/!\ Read all instructions before beginning /!\
CARE AND CLEANING INSTRUCTIONS:
Wipe with a damp cloth after each use; dry thoroughly to prevent water
from damaging the wood surfaces. Do not use detergent or soap on the
wood parts. Plastic insert tray is dishwasher safe (do not put wood tray
in dishwasher). To protect the color/nish, do not expose the chair to
bright sun for long periods of time.
Seat Cushion Cover can be machine washed in cold
water, gentle cycle, do not bleach, do not iron; air dry for longer life,
or tumble dry low or no heat.
Seat cushion can be wiped clean with a damp cloth.
BEFORE YOU BEGIN ASSEMBLY:
Check all parts and hardware. If anything is missing or not
satisfactory, please DO NOT call the store or return the
product to them. Please go online to
http://www.badgerbasket.com/parts
for assistance. Most problems are resolved promptly
without you needing to leave home. When contacting us, please
have this instruction manual, your product model
number, and your product version code ready.
Your Product Model Number: See Cover Page
Your Product Version Code is: 3.0/0517/TG

3.0/0517/TG
• READ ALL INSTRUCTIONS before use of this product. Keep instructions for future use.
• Use only the parts and hardware provided by Badger Basket.
• Do not use the product if it is damaged, broken, torn, or missing parts.
• Hardware may include small parts. Choking Hazard! Keep unassembled parts out of the reach of
small children.
• No product is a replacement for adult supervision.
• DO NOT allow anyone to climb, stand on, or play on or inside of this product.
It is not a step stool or ladder.
• It is recommended that the high chair be used only by children capable of sitting
upright unassisted. This is usually around six (6) months of age.
• The TRAY and FRONT BAR are only for use in the TOP seating position.
• NEVER use the TRAY without the CURVED FRONT RAIL.
• NEVER use the chair without the CURVED BACK PIECE.
• PREVENT SERIOUS INJURY OR DEATH FROM FALLS OR SLIDING OUT.
• Your child MUST ALWAYS be secured with the 5-point seat harness regardless of
child’s age and position of the seat until the child is approximately 3 years old.
• The tray is not designed to hold the child in the chair.
• ALWAYS keep your child in view while in the chair.
• NEVER leave your child unattended, not even for “just a minute”.
• ALWAYS ensure the chair is on a at, level surface.
• BE AWARE of what items are in the area around the chair that your child can reach, grab, or
pull that could be a choking, electrical, strangulation, injury, or other type of hazard.
• DO NOT make adjustments to the seat height while child is in the chair.
• Once the chair is assembled and all the bolts are tightened, the seat and footrest
platforms SHOULD NOT HAVE ANY MOVEMENT front to back or side-to-side.
• If your seat and/or footrest is NOT FIRMLY HELD IN POSITION, DO NOT USE THE CHAIR until
you have contacted Badger Basket Co. for assistance.
• Check the t of the 5-Point Harness regularly and ensure it’s tted properly and comfortably.
• Keep the harness buckled and out of reach when not in use. Loose, dangling straps
may be an entanglement and/or strangulation hazard.
• NEVER place the chair near re or open ame nor other sources of intense heat.
• Chair can be used for children and adults weighing up to 175 pounds/79.5 kg.
• Chair is compliant with ASTM F404 safety standards.
WARNING! FAILURE TO FOLLOW THESE
WARNINGS AND THE INSTRUCTIONS MAY
RESULT IN SERIOUS INJURY OR DEATH.
NEVER LEAVE CHILD UNATTENDED.

3.0/0517/TG
NOTICE!
Proper maintenance of your Embassy™ chair will ensure
years of use and enjoyment. Retain these instructions and
review and follow them regularly.
Check and retighten all hardware 1-2 weeks after initial assembly. Thereafter, check to make sure all the
hardware remains tight at least on a monthly basis.
Loosen the hardware before adjusting height/position of the seat and footrest panels, or when you add/remove the
front bar or wood tray, to ensure you don’t damage the parts or wood nish. Be sure to retighten the hardware securely
after any adjustments.
Also, please level the chair when assembling for the rst time and when making any adjustments. Level the chair
by standing it up on a at, level oor/surface when the hardware is still slightly loose, and then tighten all the hardware
securely.
After initial assembly, keep the ALLEN WRENCH in a safe place!
Please note that if your table has a wide apron under the
table top it makes it easier for your child to push his/her
legs against the table and tilt backwards. For this reason,
you must ALWAYS use the Glide Extenders included with
the chair and ALWAYS supervise your child while in the
chair.
To prevent instability when your child is climbing in and
out of the chair, the front edge of the Foot Rest Platform
should NEVER stick out past the front edge of the chair
legs at oor level.
The Embassy™ chair is designed to
slide on the oor and remain in an
upright position, assuming a proper
oor surface is used. Always use the
Embassy™ High Chair on a level,
stable, hard oor surface that doesn’t
prevent it from gliding backwards. Soft
surfaces, such as rugs, carpets, and
foam padding or any surface the chair
can sink into, are not safe nor suitable
for the Embassy™ chair. Any uneven
surface, such as tiled oors, is also
unsuitable. The chair and glide extend-
ers and the oor must always be kept
clean.

3.0/0517/TG
PROPER USE OF THE 5 POINT SEAT HARNESS:
SEE FIGURE A (BELOW) - YOUR MODEL OF CHAIR MAY VARY FROM SHOWN BUT SEAT HARNESS
WORKS THE SAME WAY:
When your child is sitting in the high chair, the shoulder straps (3) come up BEHIND the chair and OVER THE
TOP OF the CURVED BACK PIECE and then down over the child’s shoulders to hook to the harness buckle
in front.
The waist straps (4) go around the child’s waist and snap into the harness buckle in front, and the crotch strap
(5) will rest beneath the child and between the legs.
IMPORTANT: It is essential that you install the TRAY WITH THE CROTCH RESTRAINT BELT per the
instructions and do not leave them out when you are using the seat platform in the top position! See
STEP 3 of assembly.
FIGURE B - The Embassy™ Chair can be used for infant through adult!
FIGURE A

Parts list
A B C D E F
1x Left Side 1x Right Side 1x Bottom Rail 1x Curved Back Piece 1x Wood Tray 1x Curved Front Rail
G H I J K L
1x Seat Platform 1x Foot Rest 1x Seat Cushion 1x 5 Point Seat Harness 2x Connecting 1x Plastic Tray
M N O P Q R
1x Allen Wrench 4x Long Bolts 4x Medium Bolts 2x Small Bolts 4x Large Barrel 2x Small Barrel
M6x 50mm M6x 40mm M5x 40mm M6x 12mm M5x 9mm
Save this wrench for
future use!
1x Seat Cushion
See STEP 2 for information.
T U V W
4x Glide Extenders 8x Short Bolts 8x Washer 8x Spring Washer
Platform
Rods
Nuts Nuts
Cover

1
IMPORTANT: DO NOT TIGHTEN THE BOLTS UNTIL THE CHAIR IS FULLY
ASSEMBLED or you will not be able to insert the Seat and Footrest Platforms
and the Tray.
PLEASE ASSEMBLE THE CHAIR ON A CARPETED SURFACE OR ON TOP
OF THE BOX IT CAME IN TO PREVENT SCRATCHES OR DAMAGE DURING
ASSEMBLY.
M N O Q T U V W
1x Allen Wrench 4xLong Bolts 2xMedium Bolts 4xLarge Barrel Nuts 4xGlide Extenders 8xShort Bolts 6xWasher 6xSpring Washer
M6 x 50mm M6 x 40mm M6 x 12mm
TOOL
A
B
C
K
K
T
T
Q
Q
U
U
N
O
V
W
N
D
F
Q
Q
U
U
V
W
N
V
W
N
V
W
V
W
O
V
W
U
U
T
U
U
T

3
2
The 5 POINT SEAT HARNESS is pre-attached to
the SEAT PLATFORM.
It is not shown in the diagrams because no
assembly is needed.
P
E
G
H
R
R
P
1. The FOOT REST PLATFORM must be
inserted into the slot at least two (2) inches deep
to ensure proper grip and stability.
2. The SEAT PLATFORM must be inserted and
centered in the slot so that equal portions stick
out the front and back.
3. You must follow these guidelines for the seat
and foot rest panels regardless of which
slot/position is chosen for each one.
4. When the child is no longer using the tray with
crotch strap and the strap retainer, you may use
the seat platform with either the flat edge or
rounded edge in front BUT you must still comply
with guideline #2 above.
5. Of course, you will adjust the chair more often
in your child's early years. Thereafter be sure to
check the position of the platforms at least once
a year.
M P R
1x Allen Wrench 2xSmall Bolts 2xSmall Barrel Nuts
M5 x 40mm M5 x 9mm
TOOL
To ensure proper grip and stability:
K
K
O
V
W
O
V
W
M O V W
1x Allen Wrench 2xMedium Bolts 2xWasher 2xSpring Washer
M6 x 40mm
TOOL

To check the position of the seat and foot rest use these guidelines:
SEAT HEIGHT: Your child's elbows should be at the same height as where the tray
attaches.
FOOT REST POSITION: Your child's feet should rest comfortably flat on the foot rest
so his/her lower legs are straight.
The Connecting Rods are a little bit shorter than the distance between the left
and right sides to ensure the parts clamp together properly. PLEASE TIGHTEN
THE BOLTS EQUALLY ON BOTH SIDES.
4
Put the chair into its upright position on a flat,
level floor.
Level the chair, and then securely tighten ALL
of the bolts!
IMPORTANT: DO NOT DISCARD THE ALLEN.
WRENCH. You MUST regularly check the bolts
and retighten as needed using the ALLEN
WRENCH included with the chair! Check and
retighten 1-2 weeks after initial assembly.
Thereafter, check on at least a monthly basis.
As your child grows you can loosen the bolts
to remove the tray and change the position of
the seat and foot rest platforms.
Be sure to level the chair and then retighten the
bolts securely whenever adjustments are made.
Put Seat Cushion and Plastic Tray onto the chair.
I
L
/