
Version: 1.0
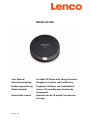
Model CD-010
User Manual
Portable CD Player with Charge Function
Gebruiksaanwijzing
Draagbare cd-speler met laadfunctie
Bedienungsanleitung
Tragbarer CD-Player mit Ladefunktion
Mode d'emploi
Lecteur CD portable avec fonction de
chargement
Manual del usuario
Reproductor de CD portátil con función
de carga
Page is loading ...

3
English
CD-010
CAUTION:
Usage of controls or adjustments or performance of procedures other than those specified herein
may result in hazardous radiation exposure.
This unit should not be adjusted or repaired by anyone except qualified service personnel.
PRECAUTIONS BEFORE USE
KEEP THESE INSTRUCTIONS IN MIND:
1. Do not use this device near water.
2. Clean only with a slightly damp cloth.
3. Do not cover or block any ventilation openings. When placing the device on a shelf, leave
5 cm (2”) free space around the whole device.
4. Install in accordance with the supplied user manual.
5. * Don’t step on or pinch the power adaptor. Be very careful, particularly near the plugs and the
cable’s exit point. Do not place heavy items on the power adaptor, which may damage it. Keep
the entire device out of children’s reach! When playing with the power cable, they can
seriously injure themselves.
6. * Unplug this device during lightning storms or when unused for a long period.
7. Keep the device away from heat sources such as radiators, heaters, stoves, candles and other
heat-generating products or naked flame.
8. Avoid using the device near strong magnetic fields.
9. Electrostatic discharge can disturb normal usage of this device. If so, simply reset and restart
the device following the instruction manual. During file transmission, please handle with care
and operate in a static-free environment.
10. Warning! Never insert an object into the product through the vents or openings. High voltage
flows through the product and inserting an object can cause electric shock and/or short circuit
internal parts. For the same reason, do not spill water or liquid on the product.
11. Do not use in wet or moist areas such as bathrooms, steamy kitchens or near swimming pools.
12. Do not use this device when condensation may occur.
13. Although this device is manufactured with the utmost care and checked several times before
leaving the factory, it is still possible that problems may occur, as with all electrical appliances.
If you notice smoke, an excessive build-up of heat or any other unexpected phenomena, you
should disconnect the plug from the main power socket immediately.
14. This device must operate on a power source as specified on the specification label. If you are
not sure of the type of power supply used in your home, consult your dealer or local power
company.
15. * The socket outlet must be installed near the equipment and must be easily accessible.
16. * Do not overload ac outlets or extension cords. Overloading can cause fire or electric shock.
17. * Devices with class 1 construction should be connected to a main socket outlet with a
protective earthed connection.
18. * Devices with class 2 construction do not require a earthed connection.
19. Keep away from rodents. Rodents enjoy biting on power cords.
20. * Always hold the plug when pulling it out of the main supply socket. Do not pull the power
cord. This can cause a short circuit.
21. Avoid placing the device on any surfaces that may be subject to vibrations or shocks.
22. To clean the device, use a soft dry cloth. Do not use solvents or petrol based fluids. To remove
severe stains, you may use a damp cloth with dilute detergent.
23. The supplier is not responsible for damage or lost data caused by malfunction, misuse,
modification of the device or battery replacement.
24. Do not interrupt the connection when the device is formatting or transferring files. Otherwise,
data may be corrupted or lost.
25. If the unit has USB playback function, the usb memory stick should be plugged into the unit
directly. Don’t use an usb extension cable because it can cause interference resulting in failing
of data.

4
26. The apparatus shall not be exposed to dripping or splashing and make sure that no objects
filled with liquids, such as vases, are placed on or near the apparatus.
27. * To completely disconnect the power input, the mains plug of the apparatus shall be
disconnected from the mains, as the disconnect device is the mains plug of apparatus.
28. If the unit works with battery, Battery shall not be exposed to excessive heat such as sunshine,
fire or the like.
29. Attention should be drawn to the environmental aspects of battery disposal.
30. The apparatus can only be used in moderate extremely cold or climates warm environments
should be avoided.
31. The rating label has been marked on the bottom or back panel of the apparatus.
32. This device is not intended for use by people (including children) with physical, sensory or
mental disabilities, or a lack of experience and knowledge, unless they’re under supervision or
have received instructions about the correct use of the device by the person who is responsible
for their safety.
33. This product is intended for non professional use only and not for commercial or industrial use.
34. Make sure the unit is adjusted to a stable position. Damage caused by using this product in an
unstable position or by failure to follow any other warning or precaution contained within this
user manual will not be covered by warranty.
35. Never remove the casing of this apparatus.
36. Never place this apparatus on other electrical equipment.
37. Do not use or store this product in a place where it is subject to direct sunlight, heat, excessive
dust or vibration.
38. Do not allow children access to plastic bags.
39. Only use attachments/accessories specified by the manufacturer.
40. Refer all servicing to qualified service personnel. Servicing is required when the apparatus has
been damaged in any way, such as the power supply cord or the plug, when liquid has been
spilled or objects have fallen into the apparatus, when the apparatus has been exposed to rain
or moisture, does not operate normally, or has been dropped.
41. * Do not use a damaged power cord or plug or a loose outlet. Doing so may result in fire or
electric shock.
42. Prolonged exposure to loud sounds from personal music players may lead to temporary or
permanent hearing loss.
INSTALLATION
• Unpack all parts and remove protective material.
• * Do not connect the unit to the mains before checking the mains voltage and before all other
connections have been made.
* Those instruction are related only to products using power cable or AC power adaptor.
Page is loading ...

6
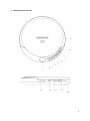
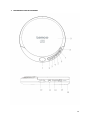
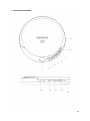
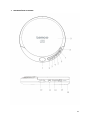
1. LCD DISPLAY
2. PLAY/PAUSE button
3. STOP button
4. SKIP-/SEARCH button
5. SKIP+/SEARCH button
6. PROGRAM button
7. MODE button
8. OPEN SWITCH button
9. CD DOOR
10. VOLUME button
11. PHONE JACK
12. DC INPUT JACK
13. BATTERY CHARGE SWITCH
14. BATTERY COMPARTMENT
ACCESSORY
1. Stereo Earphone
2. USB plug to DC jack cable

7
2. Function
POWER ON
Use with regular batteries (not included)
1. Open the battery compartment door, located on the bottom of the unit, by sliding the door and
lift it up. (Do not remove the battery door).
2. Insert 2 x 1.5V/UM-3/AA size alkaline batteries, following the correct polarity, as indicated in the
battery compartment.
3. Close the battery compartment door.
4. Make sure that the battery charging switch (13) on the side is in OFF position. NEVER USE
REGULAR BATTERIES WITH THE CHARGE SWITCH ON!
Use with AC/DC adaptor or USB adapter (not included)
1. Insert the DC plug, at the end of the AC/DC adaptor cord or connect USB Plug to DC jack cable
with USB adapter, into the DC 4.5 V INPUT socket (12) located on the side of the unit.
2. Connect the AC/DC or USB adaptor into a 100-240V ~ 50/60 Hz AC power outlet.
Notes:
If the AC/DC or USB adaptor is connected when regular batteries are installed, the power supply
automatically switches to the AC power source.
If you want to use a AC/DC adaptor, please use only 4.5V model with the correct polarity.
Make sure that the AC/DC or USB adaptor matches with your household voltage before connecting it
into the wall outlet.
When not using AC power, disconnect the AC/DC or USB adaptor from the wall outlet.
Do not touch the AC/DC or USB adaptor with wet hands.
Use rechargeable batteries (not included)
1. Disconnect the AC/DC or USB adaptor from the wall outlet if it is being connected to the unit.
2. Open the battery compartment door as mentioned previously.
3. Insert 2 rechargeable batteries, following the correct polarity as indicated in the battery
compartment.
4. Close the battery compartment door.
5. Move the BATTERY CHARGE SWITCH (13) to ON to start recharging function.
6. After 15 hours of charging set the BATTERY CHARGE SWITCH (13) to OFF.

8
Indication about playing time of fully charged rechargeable batteries
2 x 700 mAh should play about 3-4 hours.
2 x 2800 mAh should play about 12-14 hours.
Cautions:
DO NOT mix the rechargeable and regular batteries.
DO NOT charge continuously for 24 hours or more, otherwise it will deteriorate the performance of
the rechargeable batteries.
DO NOT try to charge normal (not rechargeable) batteries. They can explode!
Notes:
If the rechargeable batteries are being charged for the first time, it will take approximately 15 hours
to be fully charged. If the operating time decreases drastically even when the rechargeable batteries
are properly recharged, purchase a new set of rechargeable batteries.
EARPHONES
Connect the stereo earphones (included) to the Phones jack (11).
CD PLAYBACK
1. Connect the earphones (included) or optional headphones into the Phones jack.
2. Press the Door Open button (8) to open the CD compartment door.
3. Insert a disc with the label side facing up.
4. Close the CD compartment door until a click is heard.
5. Set the VOLUME control (10) to minimum.
6. The unit power will turn on automatically and show the number of the tracks and time. Playback
starts. During playback, the actual, track and the elapsed time appear in display.
7. Adjust the VOLUME control to your desired listening level.
8. To stop playback temporarily, press the PLAY/PAUSE button (2) once. The elapsed time will flash
and track number appears on the display. Press the PLAY/PAUSE button again to resume
playback.
9. To stop playback, press the STOP (3) button once.
10. To turn the unit off, press the STOP (3) twice.

9
Notes:
When the CD door is accidentally opened during playback, “Open” will appear on the display.
Wait until the disc is fully stopped before pressing the OPEN (8) button.
LOCATING A PARTICULAR TRACK OR POINT OF THE TRACK
1. Press the BACKWARD (4) button once to go back to the beginning of the current track.
2. Press the BACKWARD button repeatedly to go back to previous tracks.
3. Press the FORWARD (5) button repeatedly to go to next tracks.
4. Press and hold either FORWARD or BACKWARD button to search backwards or forwards, at high
speed, a particular point of track. Low level audio will be heard during the search process to assist in
locating the correct point in the track.
REPEAT PLAYBACK
1. Press the PLAY/PAUSE button (2).
2. To repeat the same track, press the MODE button (7) once during PLAYBACK. “「」1” will appear on
the display. CD will start single track repeat playback until STOP button (3) is pressed. Press the
MODE button (7) 4imes to cancel single repeat. The ‘REP 1’ indicator disappears from the display.
3. To repeat the entire press the MODE button (7) twice. “「」 ALL” will appear on the display. Press
the MODE button (7) 3 times to cancel all Album repeat. The ‘「」 ALL’’ indicator disappears from
the display.
RANDOM PLAY
1. Press the MODE button (7) 3 times to enter the Random mode. “RND” appears on the display,
then the CD start playback of all tracks of all album in Random order.
2. Press SKIP button to go to next Random track.
3. Press the MODE button (7) twice more to return to the Normal Playback mode.
INTRO PLAY
1. Press the PLAY/PAUSE button (2).
2. Press the MODE button (7) 4 times to enter the Intro mode, 'INTRO' appears on the display.
3. Press PLAY, the CD start play the first 10 seconds of each track of each album on the CD.
4. Press MODE button (7) one more to cancel Intro playback and resume normal playback.
5. Power is turned off automatically after 60 seconds, when all tracks have been played.

10
PROGRAM PLAY
1. Press the PLAY/PAUSE button (2) and after 8 seconds the STOP button (3).
2. Press the PROG button (6), the following will appear on the display: (00 01) and the 00 will flash.
3. Press the SKIP Forward and Backward (4,5) buttons to select the desired track to be
programmed and press PROG button (6) once to confirm.
4. Repeat the step 3 to program up to 20 tracks.
5. Press PLAY/PAUSE button (2) once to start programmed playback.
6. To cancel programmed playback, press the STOP button (3) once.
ENERGY SAVING
If the unit cannot play for about 30 seconds, it turns off automatically.
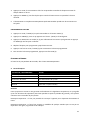
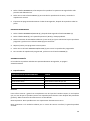
3. Specifications
PORTABLE CD/MP3 PLAYER
CD-010
Plays discs
CD Audio
Anti-shock protection
No
Output connector
3.5mm earphone socket
Mains Power
4.5V
Battery
3V 2x AA (not included)
Guarantee
Lenco offers service and warranty in accordance with the European law, which means that in case of
repairs (both during and after the warranty period) you should contact your local dealer.
Important note: It is not possible to send products that need repairs to Lenco directly.
Important note: If this unit is opened or accessed by a non-official service center in any way, the
warranty expires.
This device is not suitable for professional use. In case of professional use, all warranty obligations of
the manufacturer will be voided.
Disclaimer
Updates to Firmware and/or hardware components are made regularly. Therefore some of the
instruction, specifications and pictures in this documentation may differ slightly from your particular
situation. All items described in this guide for illustration purposes only and may not apply to
particular situation. No legal right or entitlements may be obtained from the description made in
this manual.

11
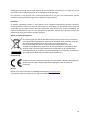
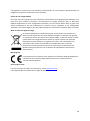
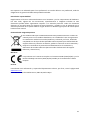
Disposal of the Old Device
This symbol indicates that the relevant electrical product or battery should not be
disposed of as general household waste in Europe. To ensure the correct waste
treatment of the product and battery, please dispose them in accordance to any
applicable local laws of requirement for disposal of electrical equipment or
batteries. In so doing, you will help to conserve natural resources and improve
standards of environmental protection in treatment and disposal of electrical
waste (Waste Electrical and Electronic Equipment Directive).
CE Marking
Products with the CE marking comply with the EMC Directive (2014/30/EU) and
the Low Voltage Directive (2014/35/EU) issued by the Commission of the European
Community.
Service
For more information and helpdesk support, please visit www.lenco.com
Lenco Benelux BV, Thermiekstraat 1a, 6361 HB, The Netherlands.
Page is loading ...
Page is loading ...
Page is loading ...

15
1. LCD-SCHERM
2. AFSPELEN/PAUZE-toets
3. STOP-TOETS
4. VORIGE-/TERUGSPOEL-toets
5. VOLGENDE+/VOORUITSPOEL-toets
6. PROGRAMMEERTOETS
7. MODUS-toets
8. OPENSCHAKELAAR
9. KLEPJE VOOR CD
10. Volumeknop
11. TELEFOONAANSLUITING
12. DC-INGANG
13. SCHAKELAAR BATTERIJLADER
14. BATTERIJVAK
ACCESSOIRE
1. Stereo oortelefoon
2. Kabel met USB-stekker naar DC-aansluiting
Page is loading ...
Page is loading ...
Page is loading ...
Page is loading ...
Page is loading ...
Page is loading ...
Page is loading ...
Page is loading ...
Page is loading ...
Page is loading ...
Page is loading ...
Page is loading ...
Page is loading ...
Page is loading ...
Page is loading ...
Page is loading ...
Page is loading ...

33
1. ÉCRAN LCD
2. Bouton LECTURE/PAUSE
3. Bouton ARRÊT
4. Bouton PASSER- / RECHERCHE
5. Bouton PASSER+ / RECHERCHE
6. Bouton PROGRAMME
7. Bouton MODE
8. Bouton OUVRIR COMMUTER
9. PORTE CD
10. Bouton VOLUME
11. PRISE POUR ÉCOUTEURS
12. PRISE JACK DC
13. COMMUTATEUR DE CHARGE DE BATTERIE
14. COMPARTIMENT À PILES
ACCESSOIRES
1. Ecouteurs stéréo
2. Prise USB vers câble jack DC
Page is loading ...
Page is loading ...
Page is loading ...
Page is loading ...
Page is loading ...
Page is loading ...
Page is loading ...
Page is loading ...
Page is loading ...
Page is loading ...
Page is loading ...
Page is loading ...
Page is loading ...
Page is loading ...
-
 1
1
-
 2
2
-
 3
3
-
 4
4
-
 5
5
-
 6
6
-
 7
7
-
 8
8
-
 9
9
-
 10
10
-
 11
11
-
 12
12
-
 13
13
-
 14
14
-
 15
15
-
 16
16
-
 17
17
-
 18
18
-
 19
19
-
 20
20
-
 21
21
-
 22
22
-
 23
23
-
 24
24
-
 25
25
-
 26
26
-
 27
27
-
 28
28
-
 29
29
-
 30
30
-
 31
31
-
 32
32
-
 33
33
-
 34
34
-
 35
35
-
 36
36
-
 37
37
-
 38
38
-
 39
39
-
 40
40
-
 41
41
-
 42
42
-
 43
43
-
 44
44
-
 45
45
-
 46
46
-
 47
47


Ask a question and I''ll find the answer in the document
Finding information in a document is now easier with AI
in other languages
- français: Lenco CD-010 Manuel utilisateur
- español: Lenco CD-010 Manual de usuario
- Deutsch: Lenco CD-010 Benutzerhandbuch
- Nederlands: Lenco CD-010 Handleiding
Related papers
-
Lenco CD-200 User manual
-
Lenco CD-201 User manual
-
-
Lenco CD-011PK Portable CD player Owner's manual
-
Lenco EPB-460 User guide
-
-
-
-
Lenco SB-080 User manual
-
Lenco MPR-034 Owner's manual
