Page is loading ...

CD PLAYER WITH 2 INTEGRATED MICROPHONES
LECTEUR CD AVEC MICROS INTÉGRÉS
Mode d’emploi
Instruction Manual
Manuale de instrucciones
Manual de instruções
Manuale di istruzioni
Bedienungsanleitung
Handleiding
RCDK100series
booklet size: 104(W) x 144(H)mm
RCDK100seriesIM2240_293_V22.idml 1 12/6/20 11:40 am

11
English
11
Ce produit est couvert par notre garantie de 2 ans. Pour toute mise en œuvre de la garantie ou du
service après-vente, vous devez vous adresser à votre revendeur muni de votre preuve d’achat.
Notre garantie couvre les vices de matériel ou de montage imputables au constructeur à l’exclusion
de toute détérioration provenant du non-respect de la notice d’utilisation ou de toute intervention
intempestive sur l’article (telle que démontage, exposition à la chaleur ou à l’humidité…).
Note : Veuillez garder ce mode d’emploi, il contient d’importantes informations. Le contenu de
ce mode d’emploi peut changer sans préavis. Aucune partie de ce mode d’emploi ne doit être
reproduite sans le consentement écrit du fabricant.
ATTENTION ! Ne convient pas aux enfants de moins de 3 ans. Risque de suffocation en raison des
petites pièces.
Référence : RCDK100series
Conçu et développé en Europe – Fabriqué en Chine
©LEXIBOOK®
LEXIBOOK S.A,
6 avenue des Andes
91940 Les Ulis
France
Pour vos demandes concernant un problème SAV ou une réclamation, écrivez à
www.lexibook.com
IMPORTANT SAFETY INSTRUCTIONS
1. Read these instructions.
2. Keep these instructions.
3. Heed all warnings.
4. Follow all instructions
5. Do not use this product near water and moisture, for example: near a bathtub, washbowl,
kitchen sink or laundry tub; in a wet basement; or near a swimming pool.
6. Clean only with a dry cloth. Unplug this product from the wall outlet before cleaning. Do not
use liquid cleaners or aerosol cleaners. It may damage the screen.
7. Do not block any ventilation openings. Install in accordance with manufacturer’s
instructions.
8. Do not install near any heat sources such as radiators, heat registers, stoves, or other
apparatus (including ampliers) that produce heat.
9. The socket-outlet shall be installed near the equipment and shall be easily accessible.
10. Only use attachments/accessories specied by the manufacturer.
11. Unplug this apparatus during lightning storms or when unused for long periods of time.
12. Refer all servicing to qualied service personnel. Servicing is required when the apparatus
has been damaged in any way, such as power-supply cord or plug is damaged, liquid has
been spilled or objects have fallen into the apparatus, the apparatus has been exposed to
rain or moisture does not operate normally, or has been dropped.
13. Do not overload wall outlet. Use only power source as indicated.
14. Use replacement parts as specied by the manufacturer.
15. Never push objects of any kind into this product through openings as they may touch
dangerous voltage points or short out parts that could result in re or electric shock.
Never spill or spray any type of liquid on the product.
16. The product may be mounted to a wall only if recommended by the manufacturer.
17. Upon completion of any service or repairs to this product, ask the service technician to
perform safety checks.
18. The apparatus should be operated only from the type of power source indicated on the
marking label. If you are not sure of the type of power supply to your home, consult your
appliance dealer or local power company. For apparatus intented to operate from battery
power, or other sources, refer to the operating instructions.
19. Do not attempt to service the apparatus yourself as opening or removing covers may
expose you to dangerous voltage or other hazards. Refer all servicing to qualied service
personnel.
20. The apparatus shall not be exposed to dripping or splashing and no object lled with
CLASS 1
LASER PRODUCT
SAFETY PRECAUTIONS
Invisible laser radiation when open and interlock failed or defeated. Avoid direct exposure to
laser beam.
LASER SAFETY
This unit employs an optical laser beam system in the CD mechanism, designed
with built in safeguards. Do not attempt to disassemble, refer to qualied service
personnel. Exposure to this invisible laser light beam may be harmful to the
human eye.
THIS IS A CLASS-1 LASER PRODUCT. USE OF CONTROLS,
OR ADJUSTMENTS OR PROCEDURES OTHER THAN THOSE
SPECIFIED HEREIN, MAY RESULT IN HAZARDOUS LASER
LIGHT BEAM EXPOSURE.
DANGER
RCDK100seriesIM2240_293_V22.idml 11 12/6/20 11:40 am

12
English
12
UNPACKING THE DEVICE
POWER SOURCES
When unpacking, ensure that the following elements are included:
1 x CD Player with 2 integrated microphones
1 x Instruction manual
WARNING: All packaging materials, such as tape, plastic sheets, wire ties and tags are not
part of this product and should be discarded.
Your CD Player operates with the AC/DC adapter 6V , 833 mA , with negative centre
.
I
nput: 100V - 240V ~ 50 / 60Hz, 0.3A or with 4 x 1.5V C/LR14 size batteries (not
included).
AC operation
1. Check that the unit is switched off.
2. Connect the adapter plug (not supplied) to the socket on the side of the unit.
3. Connect the adapter into a main socket.
Warning: Disconnect the adapter if the game is not used for a long period of time to prevent
overheating. When the game is powered by an adapter, do not play outside. Check the state
of the adapter and the connection cords regu larly. If their condition is deteriorating, do not
use the adapter until it has been repaired. The toy shall only be used with a transformer for
toys. The adapter is not a toy. The device should be disconnected from the power supply to
be cleaned if liquids are used for cleaning. The toy is not intended for children under 3 years
old. Misuse of transformer can cause electrical shock.
Parental advisory: transformer and adaptor for toys are not intended to be used as a toy.
The usage must be under parental advice.
Battery installation
1. Using a screwdriver, open the battery compartment cover located at
the back of the unit.
2. Insert 4 x 1.5V C/LR14 size batteries (not included) observing
the polarity indicated in the compartment, and as per the diagram shown
opposite.
3. Close the battery compartment and tighten the screw.
Note: The AC adapter must be disconnected from the AC socket on the
side of the unit in order for the product to operate on battery power.
If the screen displays ER or 1/2, and the device operates on and off you may replace the
batteries that are running low.
liquids, such as vases, shall be placed on the apparatus.
21. Keep a minimum distance around the apparatus for sufcient ventilation.
22. No naked ame sources such as lighted candles should be placed on the apparatus.
23. Attention should be drawn to the environmental aspects of battery disposal.
24. Use the apparatus tropical and/or moderate climates.
25. Keep a minimum distance around the device for sufcient ventilation.
26. The openings should never be blocked by newspapers, curtains, tablecloths, etc.
RCDK100seriesIM2240_293_V22.idml 12 12/6/20 11:40 am

13
English
13
WARNING: Malfunction or loss of memory may be caused by strong frequency interference
or electrostatic discharge. Should any abnormal function occur, remove the batteries and
insert them again, or unplug the unit from the mains socket and re-plug it again.
CARE AND MAINTENANCE
Caring for compact discs
• Treat the disc carefully. Handle the disc only by its edges. Never
allow your ngers to come in contact with the shiny, unprinted side of
the disc.
• Do not attach adhesive tape, stickers, etc. to the disc label.
• Clean the disc periodically with a soft, lint-free, dry cloth. Never use detergents or abrasive
cleaners to clean the disc. If necessary, use a CD cleaning kit.
• If a disc skips or gets stuck on a section of the disc, it is probably dirty or damaged
(scratched).
• When cleaning the disc, wipe in straight lines from the
centre of the disc to the outer edge of the disc. Never
wipe in circular motions.
• This unit is designed to play only compact discs bearing
the identication logo as shown here. Other discs may not
conform to the CD standard and may not play properly.
• Discs should be stored in their cases after each use to avoid damage.
• Do not expose discs to direct sunlight, high temperatures or dust, etc.
• Prolonged exposure or extreme temperatures can warp the disc.
• Do not stick or write anything on either side of the disc. Sharp writing
instruments, or ink, may damage the surface.
Cleaning the unit
• To prevent re or shock hazard, disconnect your unit from the AC power source when
cleaning.
• The nish on your unit may be cleaned with a dust cloth and cared for as other furniture.
Use caution when cleaning and wiping the plastic parts.
• Mild soap and a damp cloth may be used on the front panel.
B
E
N
E
N
E
S
o
l
u
t
i
o
n
n
e
t
t
o
y
a
n
t
e
Non-rechargeable batteries are not to be recharged. Rechargeable batteries are to be
removed from the product before being charged. Rechargeable batteries are only to be
charged under adult supervision. Different types of batteries or new and used batteries
are not to be mixed. Only batteries of the same or equivalent type as recommended are
to be used. Batteries are to be inserted with the correct polarity. Exhausted batteries are
to be removed from the product. The supply terminals are not to be short circuited. Do not
throw batteries into a re. Remove the batteries if you are not going to use the game for a
long period of time. Battery shall not be exposed to excessive heat such as sunshine, re
or the like.
RCDK100seriesIM2240_293_V22.idml 13 12/6/20 11:40 am

14
English
14
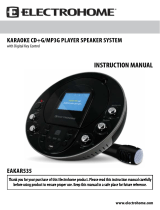
LOCATION OF CONTROLS
TURNING THE DEVICE ON AND OFF
Refer to the image p.2
1. VOL/ON/OFF knob to turn on/off the
device and adjust the volume
2. MICVOL knob to adjust microphone
volume
3. Battery compartment
4. CD compartment door
5. Microphone ON/OFF switch
6. Microphone
7. PROGRAM LED indicator
1. Make sure the AC/DC power adapter (not included) is connected to the DC jack or the
batteries correctly inserted in the compartment.
2. To turn the CD Player on, turn the VOL/ON/OFF knob to the right. You will hear a click
sound when on.
3. Turn the knob to the left to turn it off. You will hear a click sound when off.
8. LED display
9. STOP button
10. PLAY/PAUSE button
11. Forward button
12. Backward button
13. Headphone jack
14. DC adapter jack (not included)
15. PROGRAM button
16. REPEAT/ALL button
RCDK100seriesIM2240_293_V22.idml 14 12/6/20 11:40 am

15
English
15
8. LED display
9. STOP button
10. PLAY/PAUSE button
11. Forward button
12. Backward button
13. Headphone jack
14. DC adapter jack (not included)
15. PROGRAM button
16. REPEAT/ALL button
FUNCTIONS OF YOUR DEVICE
Play a CD
1. Once the device is turned on, the word « no » appears on the LED display indicating there
is no disc inside the CD compartment. Open the CD compartment door and place a disc on
the spindle with the printed label side facing up. And close the CD compartment door.
2. The LED display will show “--” for a few seconds then the total number of tracks on the disc
will appear on the screen.
3. You may press Backward or Forward button to select a specic track for playback.
4. Press Play button to start listening to music, the play indicator will light up. You can press
Backward or Forward button to select a specic track during playback as well.
5. Adjust the volume with the VOL/ON/OFF knob to the desired level.
6. During playback, you can press PLAY/PAUSE button to pause momentarily. When
pausing, the number on the display will blink.
7. To stop playback press Stop button. The play indicator will turn off.
Note: The CD player does not read burned CDs.
Repeat Playback
1. To repeat a track, rst select the track you want to repeat, then press PLAY/PAUSE button
to play the track.
2. To repeat a single track press REPEAT/ALL button once. The LED indicator in the LED
display will ash.
3. To repeat all tracks, rst select a track, then press PLAY/PAUSE button to play the track.
4. Press REPEAT/ALL button twice to repeat all tracks. The LED indicator in the LED display
will show a steady light.
5. To deactivate the Repeat/All feature, press REPEAT/ALL button until the LED indicator in
the LED display disappears.
Note: Once the “repeat all track” feature is activated, the CD player will play automatically all
the songs again and again.
Make your playlist
With the PROGRAM feature you can make your own playlist. Before starting, make sure you
placed a CD in the CD compartment.
1. Press PROGRAM button twice, the LED display will show “00” and ash along with the
PROGRAM LED indicator.
2. Press Backward or Forward button to select a track.
3. Press PROGRAM button again to register the selected track number.
4. Repeat steps 2 and 3 above to program other tracks.
5. Once you made your playlist press PLAY/PAUSE button to start the programmed playlist.
The PROGRAM LED indicator will light up. You can press Backward or Forward button to
select a specic track.
6. To cancel the programmed sequence, switch the unit off by turning the VOL/ON/OFF knob
to the left.
7. When the device is not playing you can review or change the tracks programmed by
pressing PROGRAM button repeatedly.
8. To stop press STOP button.
Note: The REPEAT/ALL feature also operates under PROGRAM mode.
A maximum of 20 tracks can be programmed to play in any order.
RCDK100seriesIM2240_293_V22.idml 15 12/6/20 11:40 am

16
English
16
MICROPHONE OPERATION
Microphone
1. Turn on the device.
2. Take your microphone and push the switch from off to on.
3. Adjust the volume to the desired level with MICVOL knob.
4. You can start talking or singing in your microphone.
5. To turn the microphone off, slide the switch from on to off.
Note: The MICVOL knob adjusts the sound for both microphones.
Note: Do not bring the microphone too close to the speakers as it may cause audio
feedback (squealing noise) through the speakers.
SPECIFICATIONS
TROUBLESHOOTING
• Output Power: DC 6V 833mA, polarity
• Input Power: AC100V – 240V 50/60 Hz, 0.3A
• Product dimension: 265 x 98 x 210mm
Problem
No sound from the microphone
No sound from the song
Solution
Ensure the volume is not too low.
When singing or speaking in the mic
ensure your mouth is close to the
microphone windscreen.
Ensure the windscreen is clean and
nothing obstructs it.
Ensure the volume is not too low.
Ensure the song is playing.
RCDK100seriesIM2240_293_V22.idml 16 12/6/20 11:40 am

17
English
17
WARRANTY
This product is covered by our 2-year warranty.
For any claim under the warranty or after sale service, please contact your distributor and
present a valid proof of purchase. Our warranty covers any manufacturing material and
workmanship defect, with the exception of any deterioration arising from the non-observance
of the instruction manual or from any careless action implemented on this item (such as
dismantling, exposition to heat and humidity, etc.). It is recommended to keep the packaging
for any further reference.
In a bid to keep improving our services, we could implement modication on the colours and
the details of the product shown on the packaging.
NOTE: Please keep this instruction manual, it contains important information.
WARNING! Not suitable for children under 3 years. Choking Hazard-Small parts.
Reference: RCDK100series
Designed and developed in Europe - Made in China
©Lexibook®
United Kingdom & Ireland
For after-sales service, please contact us at [email protected].
www.lexibook.com
Environmental Protection
Unwanted electrical appliances can be recycled and should not be discarded
along with regular household waste! Please actively support the conservation
of resources and help protect the environment by returning this appliance to a
collection centre (if available).
MAINTENANCE
Only use a soft, slightly damp cloth to clean the unit. Do not use detergent. Do not to expose
the unit to direct sunlight or any other heat source. Do not immerse the unit in water. Do not
dismantle or drop the unit. Do not try to twist or bend the unit. To prevent re or shock hazard,
disconnect your unit from the AC power source when cleaning.
RCDK100seriesIM2240_293_V22.idml 17 12/6/20 11:40 am
/