Page is loading ...

Installation Instructions
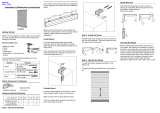
Hardware Pack Contents
C
D
Note:
If mounting in drywall or plaster
wall, use the provided plastic
screw anchors (D).
Package Contents
A
B
BB
AA
ELEGANT
HOME
ROMAN
SHADE
CORDLESS
ROOM DARKENING
™
Name
Roman Shade
Hardware Pack
Quantity
1
1
AA
BB
E
Name
Mounting Brackets
Mounting Bracket Spacers
Phillips Head Screws
Screw Anchors
Small Screws
Quantity*
2 - 3
2 - 3
6 - 9
6 - 9
2
A
B
D
C
+
* Quantities will change with size of shade.
E

Be sure to properly secure support rods before use
Use Spacers when mounting from above
Before installing shade (AA), swing the pre-assembled support rods on the bottom
section of the back of the shade (AA) into the pre-assembled brackets. Press them
firmly sideways to snap into place.
Use small screw (DD) to secure support rod in place.
The spacer is only necessary when you are mounting
from above because there is not enough clearance to
fully tilt the headrail and attach to mounting bracket during
installation.
Without use of the spacer, the top corner of the headrail
will be higher than the bracket causing it to hit the ceiling or
window frame preventing proper installation.
When mounting on the ceiling the spacer is always
necessary.
When mounting inside a window frame from above the
spacer MAY be necessary if the depth of the widow
exceeds the depth of the bracket.
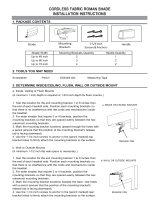
Before beginning assembly of product, make sure all parts are present. Compare parts with package contents list and hardware contents
above. If any part is missing or damaged, do not attempt to assemble the product.
Estimated Assembly Time: 15 minutes
Tools Required for Installation (not included): Pencil, Safety Goggles, Phillips Screwdriver, Tape Measure, Level.
Helpful Tools (not included): Drill with 1/16 in. Bit, Step Stool.
Please read and understand this entire manual before attempting to assemble, operate or install this product.
ATTENTION!
Safety Information
Preparation
!
!
B
A
E
B
A
2

Step 1
Step 1
Step 2
Step 2
Pencil mark the mounting screw holes then pre-drill holes for
mounting screws.
Attach mounting brackets (A) using provided mounting screws (C).
Note: If mounting in drywall or plaster wall, use the provided plastic
screw anchors (D).
Pencil mark the mounting screw holes then pre-drill holes for
mounting screws.
Place the Spacer (B) on top of Mounting Bracket (A) as shown
above. With mounting brackets level and flush with the window
frame or ceiling, using provided Mounting Screws (C), screw
through the top of the Mounting Brackets and up through the
spacers (B).
Note: If mounting in drywall or plaster wall, use the provided plastic
screw anchors (D).
Insert the top front of the headrail onto the front lip of the mounting
brackets (A).
Rotate upwards until the back of the headrail snaps into bracket.
Insert the top front of the headrail onto the front lip of the mounting
brackets (A).
Rotate upwards until the back of the headrail snaps into bracket.
Outside Mount Installation Instructions
Inside or Ceiling Mount Installation Instructions
Outside Mount
Inside Mount
Outside Mount
Inside Mount
3
Cleaning
Periodic Vacuuming with proper attachments suggested. Spot clean with mild detergent free soap, testing first in an inconspicuous area.
AA
A
A
C
A
C
B
AA
A

Operating Instructions
One Year Limited Warranty
What is covered under this warranty:
Entire product against manufacturing defects (i.e., a flaw in the product design, materials or workmanship that causes the product to no
longer function properly).
What is Not covered under this warranty:
• Normal wear and tear
Failure due to:
• abuse • exposure to salt air • improper installation • accident • extraordinary use • misuse • alterations • improper operation • improper
cleaning • misapplication • damage from pets/insects • improper handling
Any shade that has with the passing of time:
• loss of color intensity • yellowing or cracking of plastic parts
Costs that are associated with:
• shipping • product removal • transportation to and from the retailer • product remeasure • incidental or consequential damages • product
reinstallation
Note: In the event there are multiple shades in the same room, only the defective shade will be replaced.
THIS SHALL BE YOUR SOLE REMEDY UNDER THIS LIMITED WARRANTY:
If this product is found to have a manufacturing defect in materials or workmanship, we will (at our discretion) do one of the following:
• repair the product • replace the product • refund the cost of the product
Note: Colors vary from lot to lot and may not match previous purchases exactly. Discontinued items or color selections will be replaced with
the closest equivalent current product.
Your Rights under State Law: This limited warranty gives you specific legal rights, and you may have other rights, which vary from state to
state. Some states do not allow limitations on how long a warranty lasts, so the above limitations may not apply to you. No representative or
unauthorized employee has the authority to increase or alter the obligation of this warranty. This limited warranty supersedes any previous
versions.
Unlike standard corded shades/blinds, Cordless shades/blinds utilize a spring tension device to lift and lower your window treatment. When
your shade/blind is in the extended position for a long period of time you mat experience temporary lifting difficulty; this can be corrected
by completely raing the shade/blind.
The best way to operate your shade is to gently push or pull to lift and lower your shade/blind with even pressure from the middle of the
shade. This will ensure proper function of your window treatment for years to come.
Reminder
!
To lower your shade (AA), pull to the desired position and release.
To raise your shade (AA), push up to desired position and release.
Lower
Raise
4
/