Type S LM532851 Installation guide

Type
Installation guide

Type S LM532851 Smart Wheel Well Lights elevate your vehicle's exterior with vibrant customizable lighting. Unleash your creativity with 25 dazzling modes, 49 captivating colors, and adjustable brightness and speed settings. Controlled by the user-friendly TYPE S LED app, you can effortlessly switch between mesmerizing effects, save your favorite presets, and even sync your lights to music. The IP68 waterproof design ensures reliable performance in any weather condition, making these lights the perfect addition to enhance your vehicle's style and safety.

Type S LM532851 Smart Wheel Well Lights elevate your vehicle's exterior with vibrant customizable lighting. Unleash your creativity with 25 dazzling modes, 49 captivating colors, and adjustable brightness and speed settings. Controlled by the user-friendly TYPE S LED app, you can effortlessly switch between mesmerizing effects, save your favorite presets, and even sync your lights to music. The IP68 waterproof design ensures reliable performance in any weather condition, making these lights the perfect addition to enhance your vehicle's style and safety.

WP ITM. LM532851
Installation Guide & Safety Information
Important, retain for future reference:
Read carefully
SMART WHEEL WELL LIGHTS
6 Diecast Aluminium LED Pods
2
PACKAGE CONTENTS
Smart Hub
Fuse 14.2” Wire
4 x Wheel Well Lights
with 135.4” Wire
2 x Wheel Well Lights
with 194.5” Wire
51.2” Wire
3
PACKAGE CONTENTS
WHEEL WELL LIGHT ACCESSORIES
Cable Ties
x 14
Flat Rubber Seats x 6 Curved Rubber Seats x 4
M5 Spring Washers
x 12
M5 Nuts
x 12
Washers
x 12
16mm M5
Mounting Screws x 12
25mm M5
Mounting Screws x 12
25mm
Self-tapping Screws x 12
12mm M5
Mounting Screws x 8
4
SMART HUB ACCESSORIES
Cable Ties
x 2
25mm M5
Mounting Screws
x 2
3M VHB
Double-sided Tape x 1
M5 Lock Nuts
x 2
Washers
x 4
PACKAGE CONTENTS
5
Power Drill with
“#2” Phillips Driver Bit
Safety Glasses 13/64 inch Drill BitWrench
TOOLS REQUIRED (NOT INCLUDED)
6
Operating Voltage:
LED Power Consumption:
Bluetooth / App Distance:
OS Compatibility:
LED Types:
Number of modes:
LED Color:
Effective Lumens:
IP Rating of Smart Wheel Well Lights:
Replacement Fuse:
12VDC System Only
10W
30 ft Line-of-sight (Obstacles may create interference)
iOS & Android
RGB 3030
25
49
205.08LM
IP68 Waterproof* (for light pod only)
3A
TECHNICAL SPECIFICATIONS
*Although the light pods are specied for protection during water submersion of up to 1 meter for up to 30 minutes, we do not
recommend prolonged submersion of the hub under water. Waterproof is evaluated according to IEC60529 Ingress Protection
standard.
7
INSTALLATION
Choose Installation Method:
A. Install using included Self-tapping Screws
to wheel well liner.
B. Install using included Mounting Screws
to wheel well liner.
C. Install using included Curved Rubber Seats and
Cable Ties to round tubular frame.
D. Install using included Flat Rubber Seats and
Cable Ties to at tubular frame.
Choose the best type of installation for your vehicle’s application.
NOTE: Lay out all the Wheel Well Lights, Smart Hub and
wires and decide where you are going to mount the
Smart Hub and run all the wires prior to installation.
Before you install the Wheel Well Lights, it is
recommended that you loosen the screws and
remove the Wheel Well Liners for easier installation.
Be sure to power on and test the lights and
app-control prior to installation.
8
INSTALLATION
1. Drill a hole for running the wire all the
way to the location where you mount the
Smart Hub.
2. Mark your desired location on the Wheel
Well Liner.
3. Mount the Wheel Well Light on the
Wheel Well Liner with 25mm Self-tapping
Screws and tighten with Power Drill with
“#2” Philips Driver Bit.
Washer
Wheel Well Light
Wheel Well Liner
Flat Rubber Seat
M5
Spring Washer
25mm
Self-tapping Screw
A. Install using included Self-tapping Screws
to wheel well liner.
Requires: - 25mm Self-tapping Screws
- M5 Spring Washers
- Washers
- Power Drill with “#2” Philips Driver Bit
9
INSTALLATION
1. Mark your desired location and drill 2 pilot holes on
the Wheel Well Liner using a 13/64 inch drill bit.
2. Drill one more hole for running the wire all the way to
the location where you mount the Smart Hub.
3. Mount the Wheel Well Light on the Wheel Well Liner
with 25mm M5 Mounting Screws and M5 Nuts.
Tighten with screwdriver and wrench.
Washer
Wheel Well Liner
Wheel Well Light
Flat Rubber Seat
M5 Nut
M5
Spring Washer
25mm M5
Mounting Screw
B. Install using included
Mounting Screws to
wheel well liner.
Requires: - 25mm M5 Mounting Screws
- M5 Nuts
- M5 Spring Washers
- Washers
- Power Drill with “#2” Phillips Driver Bit
- 13/64 inch Drill Bit
- Wrench
10
INSTALLATION
C. Install using included Curved Rubber Seats
and Cable Ties to round tubular frame.
Requires: - 12mm M5 Mounting Screws
- M5 Nuts
- M5 Spring Washers
- Washers
- Screwdriver and wrench
- Cable Ties
1. Secure the Wheel Well Light to the Curved Rubber
Seat with 12mm M5 Mounting Screws and M5 Nuts.
Tighten with screwdriver and wrench.
2. Tight the Wheel Well Light to the round tubular frame
with Cable Ties.
Washer
M5
Spring Washer
12mm M5
Mounting Screw
Wheel Well Light
Curved Rubber Seat
M5 Nut
Round Tubular Frame
11
INSTALLATION
D. Install using included Flat Rubber Seats
and Cable Ties to at tubular frame.
Requires: - 16mm M5 Mounting Screws
- M5 Nuts
- M5 Spring Washers
- Washers
- Screwdriver and wrench
- Cable Ties
1. Secure the Wheel Well Light to the Flat Rubber
Seat with 16mm M5 Mounting Screws and M5 Nuts.
Tighten with screwdriver and wrench.
2. Tight the Wheel Well Light to the at tubular frame
with Cable Ties.
Washer M5
Spring Washer
16mm M5
Mounting Screw
Wheel Well Light
Flat Rubber Seat
M5 Nut
Flat Tubular Frame
12
INSTALLATION
Connecting the Wheel Well Lights to the Smart Hub:
Installing the Smart Hub:
Connect the Wheel Well Lights to the Smart Hub.
Make sure the weatherproof 4 pin connectors are
securely fastened and route cables away from
engine. The connectors are directional, make
sure to connect to the correct position and fasten
each end of the cap.
Secure the Smart Hub away from the car engine
or any moving components. Make sure to avoid
placing the Smart Hub or cables near any
extremely HOT location or next to the car engine.
Use 3M™ double-sided tape to secure to any at
location and use Cable Ties to tie all wiring away
from all moving components.
NOTE: Do not install the Smart Hub until after the
Wheel Well Lights have been installed.
13
Smart Hub hardwire cables are color coded, RED for POSITIVE (+) and
BLACK for NEGATIVE (-). Connect the RED cable to the POSITIVE (+)
battery clamp as illustrated. The POSITIVE battery post will be slightly
larger than the NEGATIVE post, and will be marked with a PLUS (+)
sign. There may also be a RED protective cover over the positive battery
post. Connect the BLACK cable to the NEGATIVE (-) battery clamp as
illustrated. The NEGATIVE will be marked with a MINUS (-) sign. There
may also be a BLACK plastic protective cover over the negative battery
post.
NOTE: After connecting the Smart Hub to the car battery, the LED
power indicator will ash Blue. If the LED power indicator does not ash
once connected, please double check your power connections.
The Smart Hub has built-in voltage protection to prevent car battery
from draining in case the Wheel Well Lights are accidentally left on.
The lights will be turned off automatically and the Smart Hub will
be on standby mode when the voltage drops to approximately 12V.
Once on standby mode, if the car battery is producing below 12V, do
not turn on the Wheel Well Lights until your next engine start or when
the power is back to 12V or above.
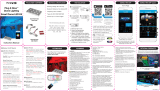
CONNECT TO POWER
Connecting the Smart Hubs to power:
Reset Button
LED Indicator
WARNING: DO NOT mix up the cables or allow the metal ends to touch together because this may damage the
battery, charging system and/or electronics on a vehicle. When installing, please make sure your engine is not running.
14
APP INSTALLATION
Install the TYPE S LED APP on your smart device. Scan below QR code or search for the TYPE S LED APP in the
APP Store or Google Play.
Compatible with phones
with Android™ 4.3 or higher.
Note: not all Android™
phones are equipped
with Bluetooth® v4.2 required
for this application.
Compatible with iPhone
4s & higher, iPad3, iPad
Mini, iPad Air & higher, and
iPod touch 5th Generation
& higher. Requires iOS 9.0
or higher.
15
USING THE APP
Home Page Smart Exterior Page
Tap “SMART EXTERIOR” icon to start.
The APP will automatically pair to the
Smart Hub when the Wheel Well Lights
and your device are powered on and
within the 30-foot Bluetooth® range.
We strongly recommend that you
setup a private password to prevent
unauthorized devices from connecting
to the Smart Hub. (Refer to password
instructions on page 18)
NOTE: The Smart Hub has built-in
voltage protection to prevent car battery
from draining in case the Wheel Well
Lights are accidentally left on. The
Wheel Well Lights will be turned off
automatically and the Smart Hub will
be on standby mode when the voltage
drops to approximately 12V. Once
on standby mode, if the car battery is
producing below 12V, do not turn on the
LED lights until your next engine start
or when power is back to 12V or above.
Master On/Off
Switch
LED Zone
Functions
Save Preset
Password
LED Modes
Brightness
Speed
A
B
D
E
F
G
C
16
USING THE APP
A. Master On/Off Switch
B. LED Zone Functions
Zone On/Off: Press the zone icon to turn LED On
or Off.
Move Zone Icon:
Press and hold the zone icon, select “Move” to
position each zone icon at your desired location.
Rename Zone Icon:
Press and hold the zone icon, select “Rename”
to rename each icon. (NOTE: Maximum 4
characters).
Select Multiple:
If you have purchased other TYPE S Smart LED
products you can assign them to different zones.
You can select and control multiple zones at
the same time. Press and hold the zone icon,
select “Select Multiple” then select your desired
zones by pressing “Conrm”. To ungroup your
selection, press and hold the zone icon and select
“Ungroup”.
LED Zone Functions
A
B
17
USING THE APP
C. Preset Functions
Save Preset:
Save your favourite settings.
After choosing your settings, press “Save Preset”
and enter your preset name. Save up to 10 Presets.
Select Preset:
To select your previously saved preset setting, simply
press “Select Preset” and choose your saved setting.
Delete Saved Preset Setting:
To delete a saved preset setting, press “Select
Preset”, press and hold the preset you wish to
delete. Press “Yes” to delete.
NOTE: Make sure the preset you wish to delete is
not currently in use.
Select Color:
Choose from up to 49 different colors. Press
“Select Color”, select your desired color and press
“Conrm”.
Select ColorPreset Functions
C
18
D. Password
You can set up a password to prevent other devices from controlling your lights. Once you
have entered your password, it will be saved in the APP and the Smart Hub.
NOTE: To set or change the password, your device must be connected to the Smart Hub
simply follow on-screen instructions. Changing the password without connecting to the Smart
Hub may cause an invalid password the next time your APP and Smart Hub are activated.
If you forget your password, simply reset by pressing the Smart Hub’s reset button for three
seconds or disconnect the power from the car battery.
E. LED Modes
Choose up to 25 different modes including
unique scan effects and Preset color themes.
F. Brightness
Slide bar to adjust brightness setting.
G. Speed
Slide bar to adjust the speed of the
movement from each LED mode.
USING THE APP
Password
Reset Button
E
D
F
G
19
WARNINGS
Important Safety Instructions:
1. SAVE THESE INSTRUCTIONS - This manual contains important safety and operating instructions for LED Kit
model LM532851.
2. NEVER use the APP while operating your vehicle. Use the APP when vehicle is stationary only.
3. Before using this LED Kit, read all instructions and cautionary markings to ensure the product is properly & safely
installed.
4. Do not expose LED Kit to rain, moisture, or snow.
5. Use of an attachment not recommended or sold by the LED Kit manufacturer may result in a risk of re, electric
shock, or injury to persons.
6. Do not operate with damaged cord.
7. Do not disassemble LED Kit; take it to a qualied serviceperson when service or repair is required. Incorrect
reassembly may result in a risk of electric shock or re.
8. To reduce risk of electric shock, disconnect all power before attempting any maintenance or cleaning. Turning off
the lights will not reduce this risk.
WARNING: Do not install or use product if it, in any way, impairs the safe operation of your vehicle. Follow manufacturer’s
instructions to ensure the product is properly & safely installed. Neither the manufacturer nor the reseller can be held
responsible or liable for consequential, incidental, or indirect damages to either person or property resulting from the
installation or improper use of this product. Check your state, provincial, or local laws before installing.
This product is not DOT approved.
20
WARNINGS
FCC Compliance Statement:
This device complies with Part 15 of the FCC rules:
(1) This device may not cause harmful interference, and
(2) this device must accept any interference received, including interference that may cause undesired operation.
WARNING: Changes or modications to this unit not expressly approved by the party responsible for compliance could
void the user’s authority to operate the equipment. The manufacturer is not responsible for any radio or TV interference
caused by unauthorized modications or change to this equipment. Such modications or change could void the user’s
authority to operate the equipment.
NOTE: This equipment has been tested and found to comply with the limits for Class B digital device, pursuant to part
15 of the FCC Rules. These limits are designed to provide reasonable protection against harmful interference in a
residential installation. This equipment generates, uses and can radiate radio frequency energy and, if not installed and
used in accordance with the instructions, may cause harmful interference to radio or television reception, which can
be determined by turning the equipment off and on, the user is encouraged to try to correct the interference by one or
more of the following measures:
- Reorient or relocate the receiving antenna.
- Increase the separation between the equipment and the receiver.
- Connect the equipment into an outlet on a circuit different from that to which the receiver is connected.
- Consult the dealer or an experienced radio/TV technician for help.
  • Page 1 1
  • Page 2 2
  • Page 3 3
  • Page 4 4
  • Page 5 5
  • Page 6 6
  • Page 7 7
  • Page 8 8
  • Page 9 9
  • Page 10 10
  • Page 11 11
  • Page 12 12
  • Page 13 13
  • Page 14 14
  • Page 15 15
  • Page 16 16
  • Page 17 17
  • Page 18 18
  • Page 19 19
  • Page 20 20
  • Page 21 21
  • Page 22 22
  • Page 23 23
  • Page 24 24

Type S LM532851 Installation guide

Type
Installation guide

Type S LM532851 Smart Wheel Well Lights elevate your vehicle's exterior with vibrant customizable lighting. Unleash your creativity with 25 dazzling modes, 49 captivating colors, and adjustable brightness and speed settings. Controlled by the user-friendly TYPE S LED app, you can effortlessly switch between mesmerizing effects, save your favorite presets, and even sync your lights to music. The IP68 waterproof design ensures reliable performance in any weather condition, making these lights the perfect addition to enhance your vehicle's style and safety.

Ask a question and I''ll find the answer in the document

Finding information in a document is now easier with AI