Page is loading ...

IMPORTANT SAFEGUARDS:
When using electrical equipment, always adhere to basic safety precautions including the following:
SAVE THESE INSTRUCTIONS
1300 South Wolf Road • Des Plaines, IL 60018 • Phone 800-323-5068 • www.junolightinggroup.com
© 2011 Juno Lighting LLC Rev 9/11 P5142 pg 1 of 2
INSTALLATION INSTRUCTIONS
JUNO TYPE IC & TC RECESSED HOUSING
WARNING: For your safety, read and understand instructions completely before starting installation.
Before wiring to power supply, turn off electricity at the fuse or circuit breaker box.
NOTE: Juno recessed fixtures are designed to meet the latest NEC requirements and are listed in full compliance with
UL1571, 1570 or 1598. Before attempting installation of any recessed lighting fixture, check your local electrical building
code. This code sets the wiring standards and installation requirements for your locality and should be understood before
starting work. Use of non-Juno trims voids Juno warranty.
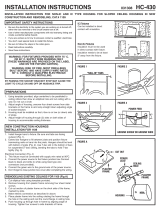
3"
Figure 1
INSTALLATION INTO
JOIST CONSTRUCTION
Step 1. Extend bar hangers to fit between
joists. Bar hanger foot is contoured to easily
align with bottom of joist (Fig. 3). Position
fixture by hammering Real-Nails
®
into joists
(Fig. 4).
(Note: Bar hanger may be shortened to fit 12"
framing or smaller by breaking at score lines).
Step 2. Slide fixture along bar hangers into
desired location. Use locking screws or slot to
secure (Fig. 5).
Step 3. Follow steps 1-4 under Electrical
Connection.
Step 4. When installing in drywall, cut
appropriate sized hole.* After installing drywall,
if necessary, adjust fixture for ceiling thickness
by loosening hex screws that attach the round
housing to the plaster frame (Fig. 3).
Relocating Fixture – Nail can be removed
with hammer claw to allow easy repositioning
of fixture without damaging bar hanger or nail
(Fig. 6).
Figure 3
Figure 4
Figure 5
Figure 6
Hex Screws
* Note: Cut a 4-1/2" (for 4" housings), 5-5/8" (for 5" housings)
or 6
-
-7/8" (for 6" housings) opening. For sloped ceiling
housings, use the provided oval hole template.
TYPE TC & PL FOR
NON-INSULATED CEILINGS
Juno Type TC & PL fixtures are designed for
installations where housing and J-Box will not
come into contact with insulation. Insulation
must be spaced 3" away from the housing
and J-Box (Fig. 1)*. Blinking light after
installation indicates that improper bulb or trim
is being used or that fixture has been
improperly covered with insulation.
Figure 2
TYPE TC & PL FOR
NON-INSULATED CEILINGS
Juno Type IC fixtures are designed for direct
contact with insulating materials which are
approved for this application (Fig. 2). Blinking
light after installation indicates that improper
bulb or trim is being used.
Use Juno Air-Loc Gaskets or Air-Loc Rated
Trims with Juno IC housings for additional
energy savings and to comply with
Washington State and other energy codes.
*In Canada, when insulation is present, Type IC
fixtures must be used.

© 2011 Juno Lighting LLC Rev 9/11 P5142 pg 2 of 2
INSTALLATION INSTRUCTIONS
WARRANTY
Juno Lighting Group warrants that its products are free from defects in material and workmanship for one year from the date of purchase. Juno
Lighting Group’s obligation is expressly limited to repair or replacement, without charge, at Juno Lighting Group’s factory after prior written
return authorization has been granted. This warranty shall not apply to products which have been altered or repaired outside of Juno Lighting
Group’s factory. This warranty is in lieu of all other warranties, expressed or implied, and without limiting the generality of the foregoing phrase,
excludes any implied warranty of merchantability. Also, there are no warranties which extend beyond the description of the product on the
company’s literature setting forth terms of sale.
Product Services Phone (888) 387-2212
1300 South Wolf Road • Des Plaines, IL 60018 • Phone 800-323-5068 • www.junolightinggroup.com
JUNO TYPE IC & TC RECESSED HOUSING
INSTALLATION INTO
SUSPENDED CEILING
Step 1. Locate center of proposed opening on
ceiling tile and cut appropriate sized hole.*
Step 2. Place ceiling tile in T-bar grid.
Step 3. Place fixture into position and snap bar
hanger foot with integral T-bar clips onto T-bars
(Fig. 7). Additional holes provided for securing
with wire or screws (Fig. 7).
Step 4. Follow Steps 1-4 under Electrical
Connection.
ELECTRICAL CONNECTION
INSTRUCTIONS
Step 1. Provide electrical service according to
your local electrical code to the wiring box
located on the plaster frame. Supply wire
insulation must be rated for at least 90°C.
Step 2. Remove wiring box cover. Remove the
appropriate knock-out(s) to accommodate the
type of electrical service to be used/allowed by
your local electrical code (Fig. 9):
Metal Conduit. Remove appropriate round
knock-out(s) and connect conduit to wiring box
with proper connectors (not supplied).
Non-Metallic (NM) Cable. Remove
appropriate D-shaped NM cable knock-out(s).
Insert NM cable through NM cable trap and
make a 90˚ L-shaped bend in cable as shown
(Fig. 10).
Step 3. J-Box with Quick Connectors: Strip
supply wire 3/8", insert each supply wire into
appropriate junction box connector. Connect
black fixture wire to hot, white fixture wire to
neutral and green fixture wire to ground.
Step 4. Place all wiring and connectors back in
wiring box and replace cover.
Figure 7
Figure 9
Figure 8
* Note: Cut a 4-1/2" (for 4" housings), 5-5/8"
(for 5" housings) or 6
-
-7/8" (for 6" housings)
opening. For sloped ceiling housings, use the
provided oval hole template.
Figure 11
TRIM INSTALLATION
Install trim using coil, leaf, torsion, or push-in
springs as provided. Remove socket paint
protector cover and install proper lamp as
listed on housing label.
Figure 10
Black
Lamp Socket
Thermal Protector
White
120V
Mark means lamp
contains mercury.
Follow disposal laws.
See www.lamprecycle.org
Hg
Hg
Metal
Conduit
Non-
Metallic
Cable
/
