Paradyne BitStorm 6200 Installation guide

Type
Installation guide

Paradyne BitStorm 6200 is a versatile device that can be mounted on a wall or desk, providing flexibility in placement. Its compact design allows for easy integration into any workspace, making it suitable for both home and office use. The BitStorm 6200 can be positioned with either the top or bottom facing inward, allowing you to customize its orientation based on your preference and the available space. Whether you need to access the front panel LED labels conveniently or prefer a specific aesthetic, the mounting bracket accommodates various scenarios.

Paradyne BitStorm 6200 is a versatile device that can be mounted on a wall or desk, providing flexibility in placement. Its compact design allows for easy integration into any workspace, making it suitable for both home and office use. The BitStorm 6200 can be positioned with either the top or bottom facing inward, allowing you to customize its orientation based on your preference and the available space. Whether you need to access the front panel LED labels conveniently or prefer a specific aesthetic, the mounting bracket accommodates various scenarios.

1
BitStorm 6200 CPE Mounting Bracket
Installation Instructions
Document Number 6200-A2-GN10-00
December 2003
The BitStorm 6200 CPE modem mounting bracket (Feature Number 6200-F1-001) can
be used to fasten the CPE to a wall, or to the side or underside of a desk.
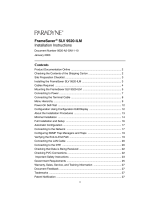
Placing the CPE in the Bracket
The CPE can be placed in the bracket with either the top or the bottom of the CPE facing
the inside of the bracket. Determine where you will mount the CPE, then place the CPE
in the bracket in the way that makes it easiest for you to read the front panel LED labels.
03-17490
TEST
PC
LINE
STATUS
POWER
2
Installing the Bracket on a Wall or Desk
Procedure
To attach the mounting bracket to a wall or to the side or underside of a desk:
1. Hold the CPE and bracket in the desired location and mark the hole positions.
2. In hardwood or steel surfaces, drill 5/64-inch (2-mm) pilot holes at the marked hole
positions.
3. For vertical mounts, it may be difficult to connect cables after the CPE is fastened.
In such cases connect the cables to the CPE before fastening it to the wall or desk.
4. Fasten the bracket using the two supplied 1/2-inch (13-mm) #6 screws. Use screw
anchors (not provided) in drywall or other soft materials.
3
03-17491
TEST
PC
LINE
STATUS
POWER
TEST
PC
LINE
STATUS
POWER
03-17492
4
Document Feedback
We welcome your comments and suggestions about this document. Please mail them to
Technical Publications, Paradyne Corporation, 8545 126th Ave. N., Largo, FL 33773, or
send e-mail to userdoc@paradyne.com. Include the number and title of this document
in your correspondence. Please include your name and phone number if you are willing
to provide additional information.
Trademarks
All products and services mentioned herein are the trademarks, service marks,
registered trademarks, or registered service marks of their respective owners.
"
*6200-A2-GN10-00*
Copyright © 2003 Paradyne Corporation. Printed in U.S.A.
  • Page 1 1
  • Page 2 2
  • Page 3 3
  • Page 4 4

Paradyne BitStorm 6200 Installation guide

Type
Installation guide

Paradyne BitStorm 6200 is a versatile device that can be mounted on a wall or desk, providing flexibility in placement. Its compact design allows for easy integration into any workspace, making it suitable for both home and office use. The BitStorm 6200 can be positioned with either the top or bottom facing inward, allowing you to customize its orientation based on your preference and the available space. Whether you need to access the front panel LED labels conveniently or prefer a specific aesthetic, the mounting bracket accommodates various scenarios.

Ask a question and I''ll find the answer in the document

Finding information in a document is now easier with AI