Quick Start Guide
HXC cameras – Release 2 (Camera Link
®
)
Product Specication
HXC cameras - Maximum Performance with CMOSIS sensors
▪ Camera Link
®
Full progressive scan CMOS camera
▪ Excellent image quality
▪ Global shutter architecture for minimized motion blur
▪ Low noise due to correlated double sampling (CDS)
▪ HDR (High Dynamic Range)
▪ Enhanced NIR sensitivity model available
▪ Binning, subsampling and true partial scan function (ROI) for increased frame
rates
▪ External synchronization via industrial compliant process interface (trigger / flash)
▪ Integrated supplementary function for flexible integration
▪ Integrated 256 MByte RAM for temporarily image data buffering
▪ Two standard 26 pin Mini-CameraLink
®
connectors
▪ Support for CameraLink
®
Base, Medium, Full and 10 tap configurations
▪ Baumer GAPI: Flexible, generic software interface for Windows
Camera Type
Sensor
Size
Resolution
Full Frames
[max. fps]
Monochrome
HXC20 2/3“ 2048 x 1088 337
HXC40 1“ 2048 x 2048 180
Color
HXC20c 2/3“ 2048 x 1088 337
HXC40c 1“ 2048 x 2048 180
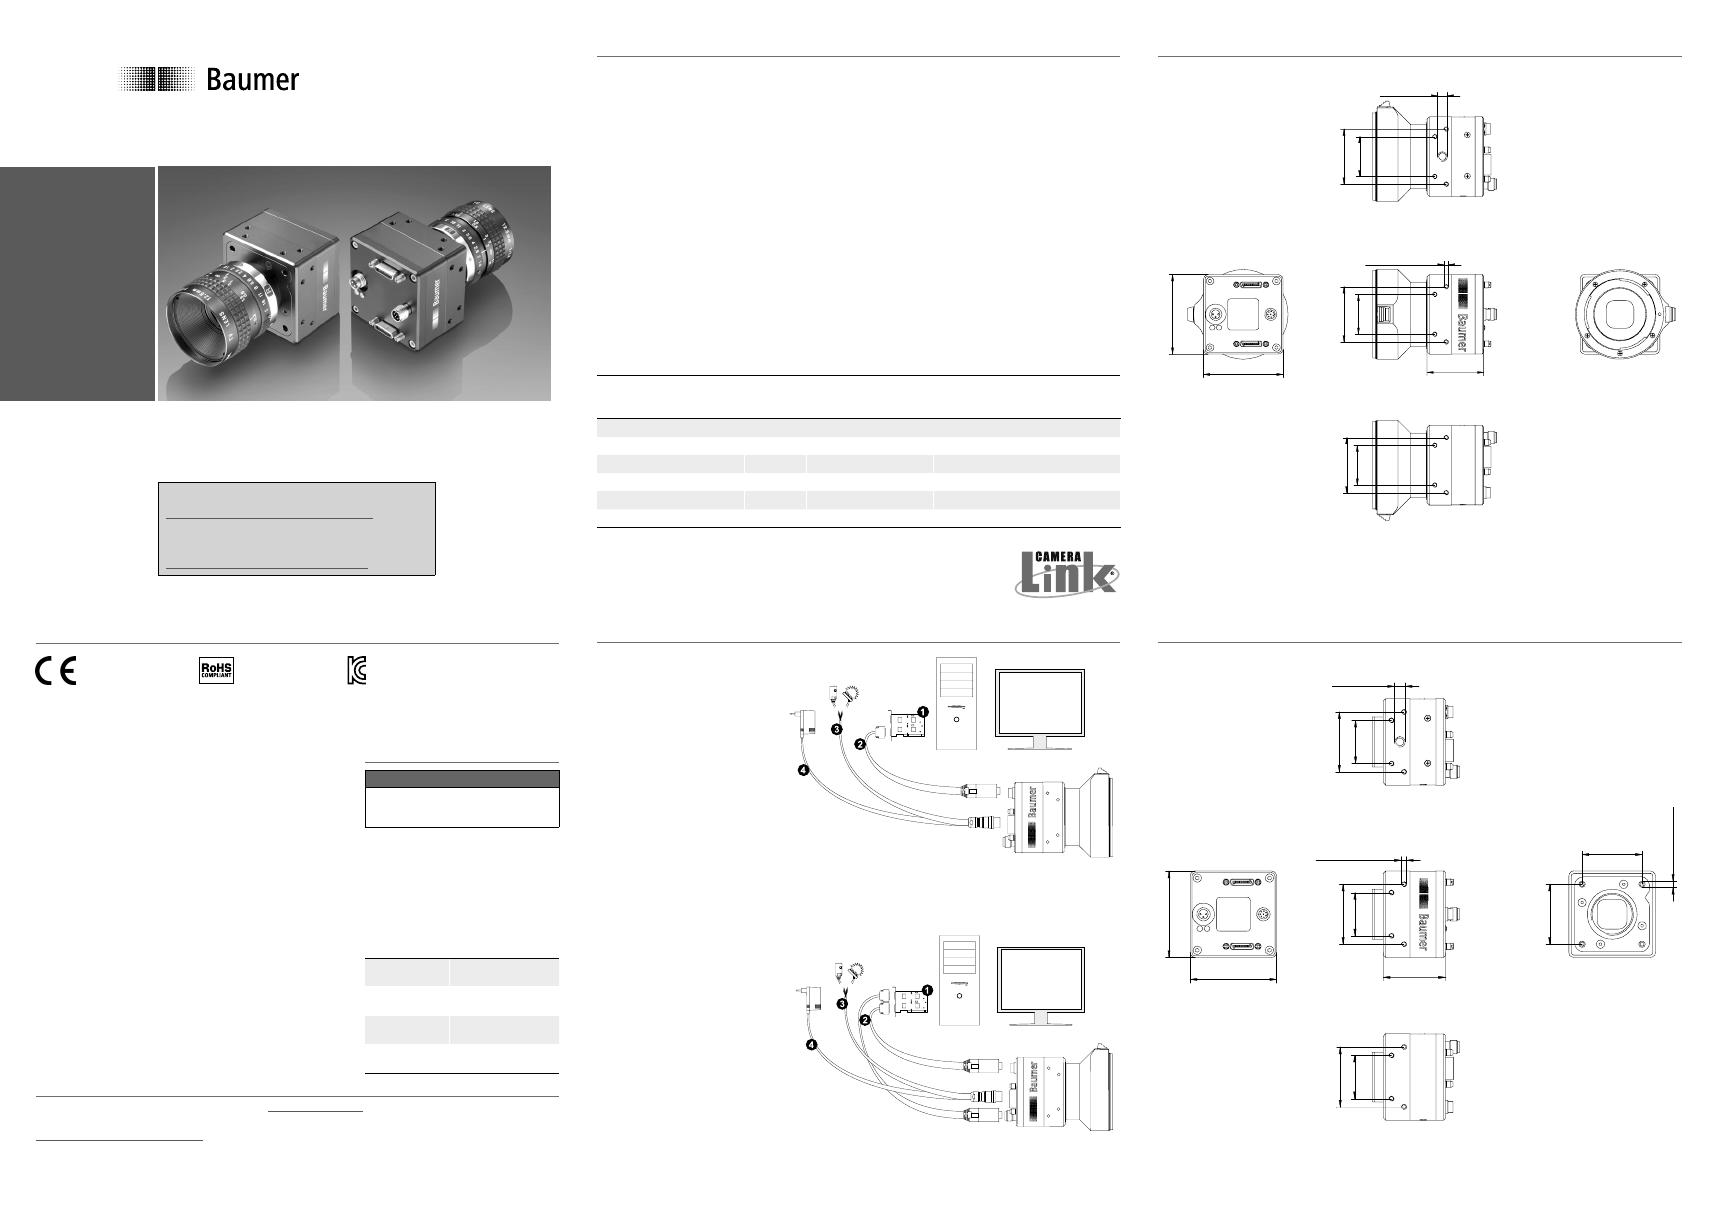
Dimensions with F-Mount
52
52
26
26
3636
UNC 1/4-20
16 x M3 depth 6
26
36
37
Dimensions Cameras with C-Mount
52
26
26
36
36
UNC 1/4-20
16 x M3 depth 6
26
36
36
36
4 x M3 depth 6
37,4
Installation
Installation using
Camera Link
®
BASE:
▪ Connect the camera using
an appropriate cable to the
framegrabber board on your
PC using the lower sdr-26
jack on the camera side
▪ If required, connect a strobe
to the connector
▪ Connect the camera to
power supply
Installation using
Camera Link
®
MEDIUM /
FULL:
▪ Connect the camera using
two appropriate cables to
the framegrabber board on
your PC (this configuration
requires the BASE and the
FULL Camera Link
®
line)
▪ If required, connect a strobe
to the connector
▪ Connect the camera to
power supply
Conformity / Safety
Further Information
For further information on our products visit www.baumer.com
For technical issues, please contact our technical support:
support.cameras@baumer.com· Phone +49 (0)3528 4386-0 · Fax +49 (0)3528 4386-86
© Baumer Optronic GmbH · Badstrasse 30 · DE-01454 Radeberg, Germany
Technical data has been fully checked, but accuracy of printed cannot be guaranteed.
Subject to change without notice. Printed in Germany 11/20. v21 11054752
FCC – Class B device
Note: This equipment has been tested and found to
comply with the limits for a Class B digital device, pursu-
ant to part 15 of the FCC Rules. These limits are designed
to provide reasonable protection against harmful interfer-
ence in a residential environment. This equipment gener-
ates, uses, and can radiate radio frequency energy and, if
not installed and used in accordance with the instructios,
may cause harmful interference to radio communications.
However, there is no guarantee that interference will not
occure in a particular installation. If this equipment does
cause harmful interference to radio or television reception,
which can be determined by turning the equipment off an
on, the user is encouraged to try to correct the interference
by one or more of the following measures:
▪ Reorient or relocate the receiving antenna.
▪ Increase the separation between the equipment and the
receiver.
▪ Connect the equipment into an outlet on a circuit different
from that to which the receiver is connected.
▪ Consult the dealer or an experienced radio/TV technician
for help.
Safety instructions
Notice
See User´s Guide for the com-
plete safety instructions!
▪ Protect the sensor from dirt and
moisture.
▪ Never open the camera housing.
▪ Avoid camera contamination by
foreign objects.
Environmental requirements:
Storage temp. -10 °C ... +70 °C
(14 °F...158 °F)
Operating temp. +5 °C ... +60 °C
(41 °F...140 °F)
Housing temp. max. +65 °C
(max. 149 °F)
Humidity 10 % ... 90 %
Non-condensing
We declare, under
our sole respon-
sibility, that the
described Baumer
HXC cameras
conform with the
directives of the CE.
All HXC camer-
as comply with
the recommen-
dation of the
European Union
concerning
RoHS Rules.
Several of the described
Baumer HXC cameras conform
with the directives of the Korean
Conformity.
Please refer for the User’s guide
or technical documentation.
Installation sample
1 - Framegrabber board; 2 - CameraLink
®
cable;
3 - Process interface cable; 4 - Power cable
Installation sample
1 - Framegrabber board; 2 - CameraLink
®
cable;
3 - Process interface cable; 4 - Power cable
Download latest camera software:
www.baumer.com/vision/software
Download latest technical documentation:
www.baumer.com/cameras/docs


