Page is loading ...

AWM-W6 Page 1 of 2
Installation Guide
AWM-W6
Wall Channel
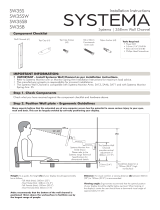
COMPONENT CHECKLIST REQUIRED TOOLS
IMPORTANT INFORMATION
! Please ensure this product is installed as per these installation instructions.
! This product is compatible with AWM Series products.
! The manufacturer accepts no responsibility for incorrect installation.
A
Wall channel
(x1)
E
Nylon
Anchor (x2)
C
Top Cap
Screws
(x2)
B
Top Cap
(x1)
D
M6 x 50mm
Countersunk
Screw (x2)
• Power Drill
• 5.5mm (
1
/
4
”) Drill Bit
• 8mm (
5
/
16
”) Drill Bit
• Phillips Head Screwdriver

AWM-W6 Page 2 of 2
3.1 Fit Top Cap
Phillips Head
Screwdriver
Top Cap
1. Install Wall Channel - Ensure all fasterners are installed
2. Fit channel clamp to wall channel
3. Fit top cap to wall channel
8mm (
5
/
16
”) holes
5.5mm (
1
/
4
”) holes
Nylon anchors
M6 x 50mm
Screws
M6 x 50mm
Screws
1.1 Masonry 1.2 Timber stud
atdec.com | atdec.co.uk | atdec.com.au
No portion of this document or any artwork contained herein should be reproduced in any way without
the express written consent of Atdec Pty Ltd. Due to continuing product development, the manufacturer
reserves the right to alter specifications without notice. ©20180801
2.1 Ensure knob is undone. 2.2 Slide clamp into channel.
Push knob to
aid insertion
2.3 Hold clamp in desired position on post
and turn knob to lock in place.
1. Ensure Knob is undone
Tip: push knob
to aid insertion
2. Slide clamp into channel
3. Hold clamp in desired position on post and turn
knob to lock in place
/