Regalo 1350 User manual

Type
User manual

Regalo 1350 is a versatile 4-in-1 play yard that can be set up as a barrier between two walls or as a freestanding enclosure. It features a durable frame with locking knobs and wall mounting brackets for added stability. The play yard can be customized to fit different spaces and can be used for a variety of purposes, including containing pets or creating a safe play area for children.

Regalo 1350 is a versatile 4-in-1 play yard that can be set up as a barrier between two walls or as a freestanding enclosure. It features a durable frame with locking knobs and wall mounting brackets for added stability. The play yard can be customized to fit different spaces and can be used for a variety of purposes, including containing pets or creating a safe play area for children.

Owner’s Manual
4 in 1 Play Yard
MODEL NO: 1350
READ ALL INSTRUCTIONS BEFORE ASSEMBLY
AND USE OF GATE.
KEEP INSTRUCTIONS FOR FUTURE USE.
Regalo International, LLC.
3200 Corporate Center Drive, Suite 100
Burnsville, MN 55306-9803, USA
Toll Free: 866-272-5274
Made in China
...........................................................................
www.regalo-baby.com
01/09/2013_EV
The four Wall Mounting Brackets must be used in securing the gate to the
wall. These brackets prevent the gate from dislodging from its opening and
becoming unstable.
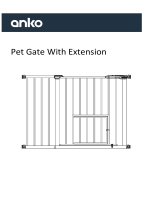
The maximum width opening for the gate is
194.5 inches.
Assembly and Installation Instructions
Contact Regalo for questions and replacement parts.
If in doubt about the use of your gate, call our customer care line 866-272-5274
Regalo International, LLC
3200 Corporate Center Drive, Suite 100
Burnsville, MN 55306-9803, USA
Made in China
Read and follow all instructions carefully to ensure that your gate and extensions are
properly installed. Improper installation could result in the gate becoming unstable or
dislodged from the doorway. Always make sure extensions is securely attached to the
gate before using. The safety of your child is your responsibility. Please keep these
instructions for your reference.
1
Intended for young children aged 6 months through 24 months.
Check the gate regularly to see if all the hardware and mountings
are tight. To prevent serious injury or death, securely install gate
or enclosure and use according to manufacturer’s instructions.
Never use with a child able to climb over or dislodge the gate or
enclosure. Never leave child unattended. Use only with the
locking/latching mechanism securely engaged. To prevent falls,
NEVER used at the top of stairs.
2
Check to make sure you have all of the parts shown:
A. Folded Gate Frame and attached Wall Mounting Assembly (8 panels)
B. 8 Wall Mounting Screws
A.
B.
ADITIONAL EXTENSIONS SOLD SEPARATELY!
Installation Option A :
To install the Play Yard as a barrier between two walls.
3
Begin by unfolding the gate frame. To do this, simply loosen the Locking Knobs
at each pivoting joint by turning the knob counter clockwise as shown in Diagram A.
Loosen the knobs enough to allow the gate to swing open freely without fully
removing the knobs.
Step 1.
Diagram A
Bring the Wall Mounting Bracket to the wall you intend to attach it to as shown in
Diagram B.
Step 2.
Diagram B
Locking Knobs
Wall Mounting Bracket
4
Use a Phillips/crosshead screwdriver to fix the Wall Mounting Bracket to the Wall as
shown in Diagram C
Step 3.
Repeat steps 2 & 3 on the other end of the gate. Arrange the panels into your desired
configuration, then tighten each of the Locking Knobs.
Step 4.
Diagram C
5
Installation Option B :
To set it up as a Play Yard enclosure.
Begin by unfolding the gate frame. To do this, simply loosen the Locking Knobs
at each pivoting joint by turning the knob counter clockwise as shown in Diagram A.
Loosen the knobs enough to allow the gate to swing open freely without fully
removing the knobs.
Step 1.
Release the vertical Metal Pivot Bars at each end of the Play Yard by removing the
following parts form the assembly:
Step 2.
Diagram D
Locking Knob (x2) Wall Mount Toothed Disk
Metal Pivot Bar (x2)
Toothed Disk (x2)
Wall Mount
Bracket (x4)
Wall Mount Bottom Cap - Male (x4)
Wall Mount Bottom Cap - Female (x4)
Position the Play Yard into your desired configuration (Example: Octagon, Square, etc.)
Then, join the free ends of the the Play Yard together at the plastic joints as shown in
Diagram E1 and E2.
Step 3.
Insert one of the previously removed Metal Pivot Bars through the opening created
by joining the upper plastic joints. Guide the Metal Pivot Bar downward into the
circular housing on the lower plastic joint. See Diagrams F1, F2 and F3.
Step 4.
Reassemble the upper locking joint by adding one of the previosly removed Toothed
Disks and Locking Knobs. See Diagram G1, G2 and G3.
Step 5.
6
Diagram E1
Diagram F1
Diagram G1 Diagram G2 Diagram G3
Diagram F2 Diagram F3
Diagram E2
Finally, tighten each of the Locking Knobs by turning them clockwise, fixing the Play
Yard into the configuration you have decided upon. To position the Play Yard into a
new configuration or shape, simply loosen each of the Locking Knobs, adjust and
re-tighten.
When adding or removing additional panel units to the configuration,
panels must be added or subtracted in sets of 2 for the pet yard to function
properly. ADDITIONAL PANELS SOLD SEPERATLY.
Step 5.
7
Diagram H
NOTE:
To fold your Play Yard
Step 1
:
To fold your Play Yard begin by loosening all of the locking
knobs so the Play Yard can move freely and becomes flexible
at the joints.
Step 2
:
Remove one of the locking knobs from the Play Yard and
remove one vertical tube.
Step 3
:
You will now be able to pull the two plastic joints and the top
and bottom of the Play Yard apart.
Step 4
:
Fold and put away.
Care and Maintenance
8
Periodically check the Play Yard for signs of damage, wear, or missing
components.
Do not use if any part is missing, worn or damaged.
Check the Play Yard regularly to ensure all the hardware and mountings are
tightened.
Do not use abrasive cleaners or bleach.
Clean by sponging with warm water and a mild detergent.
90 Days Limited Warranty:
If, during the first 90 days after consumer purchase of the item, under
reasonable and non-commercial use and conditions of maintenance, it fails
while owned by the original purchaser because of the quality of materials or
workmanship of finish and assembly, Regalo International LLC will replace or
repair it at Regalo’s option. PROOF OF PURCHASE REQUIRED.
cement Parts AvailableRepla
In the event of any damage or breakage, the following replacement parts
are available for order by contacting Regalo Customer Service.
(#10001)
Wall Mount Screws
Bottom Hinge - Male
(#13002)
Door Frame
Toothed Hinge
(#13009)
Wall Mount Bottom
Cap - Female
(#13014)
Top Hinge
(#13011)
Toothed Disk
(#13003)
Wall Mount
Toothed Disk
(#13013)
Locking Knob
(#13005)
Wall Mount
Bracket
(#13007)
Metal Pivot Bar
(#13008)
Door Frame
Bottom Hinge
(#13004)
(#13012)
Toothed Hinge
Bottom Hinge - Female
(#13006)
(#13010)
Wall Mount Bottom
Cap - Male
01/09/2013_EV
Regalo International, LLC.
3200 Corporate Center Drive, Suite 100
Burnsville, MN 55306-9803, USA
Toll Free: 866-272-5274
Made in China
  • Page 1 1
  • Page 2 2
  • Page 3 3
  • Page 4 4
  • Page 5 5
  • Page 6 6
  • Page 7 7
  • Page 8 8
  • Page 9 9
  • Page 10 10
  • Page 11 11
  • Page 12 12

Regalo 1350 User manual

Type
User manual

Regalo 1350 is a versatile 4-in-1 play yard that can be set up as a barrier between two walls or as a freestanding enclosure. It features a durable frame with locking knobs and wall mounting brackets for added stability. The play yard can be customized to fit different spaces and can be used for a variety of purposes, including containing pets or creating a safe play area for children.

Ask a question and I''ll find the answer in the document

Finding information in a document is now easier with AI