Page is loading ...

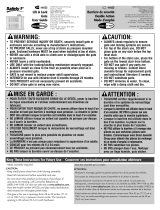
EXTRA TALL
IMPORTANT! READ AND
FOLLOW THESE INSTRUCTIONS
CAREFULLY AND KEEP FOR
FUTURE REFERENCE.
This product complies with safety standard ASTM F1004.
Up to 1.8m | (71’’)
104cm
(41’’)
Instruction Manual
Retractable
Gate
#2727 #2756 #2728
INSTALLATION VIDEO

2
TABLE OF
CONTENTS
SAFETY INFORMATION
General
Maintenance
Warnings
Mountings
WHAT’S IN THE BOX
Parts
INSTALLATION
Gate Placement
Inside Opening or Doorway
Outside Opening or Doorway
With Skirting or Baseboard
To Remove
OPERATION
How to Open
Cleaning Instructions
SUPPORT
Warranty Certicate
Warranty Card
After Sales Support
03
03
04
06
08
10
11
15
16
17
18
19
20
21
21

3
SAFETY
INFORMATION
Read this instruction manual carefully and keep it in a safe place for
future reference. The correct use and maintenance of this product is
essential.
Regularly check that the gate is functioning correctly, lubricate
hinges and moving components with a suitable spray lubricant.
Tighten and adjust mounts to ensure secure smooth operation.
Inspect all components regularly and stop using if any component is
damaged or missing.
GENERAL
MAINTENANCE

4
WARNINGS
To prevent serious injury or death, securely
install gate or enclosure and use according to
manufacturer’s instructions.
Incorrect installation can be dangerous.
Danger to older children if climbing over the
product.
Do not use the safety barrier if any components
are damaged or missing.
The safety barrier must not be tted across
windows.
Never install this product on glass doors. Install
this product against reliable doors or walls.
If the safety barrier is used at the top of the stairs,
it should not be positioned below the top level.
If the safety barrier is used at the bottom of the
stairs, it should be positioned at the front of the
lowest tread possible.
This safety barrier is for domestic use only.
This safety barrier has a manual closing system.
Never leave the child unattended when using this
product.
Children have died or been seriously injured when
gates/enclosures are not securely installed.
WARNING
WARNING
WARNING
WARNING
WARNING
WARNING
WARNING
WARNING
WARNING
WARNING
WARNING
WARNING

5
WARNINGS
WARNING
WARNING
WARNING
WARNING
WARNING
WARNING
WARNING
WARNING
WARNING
WARNING
WARNING
Always check that the safety barrier is correctly
closed.
Use only with the locking/latching mechanism
securely engaged.
Gate must be installed as close to the ground as
possible, as per the installation guides.
Never use with a child able to climb over or
dislodge/open the gate or enclosure.
Regularly check that the safety barrier is properly
installed and secure.
Always install and use as directed using all parts.
Any additional or replacement parts should be
obtained from after sales support.
Barrier must be tted between rigid surfaces
such as plaster board, timber or hard wall.
This product is intended for use with children
from 6 to 24 months or small to medium pets
from 4.5kg (10 lbs) up to 18kg (40 lbs).
Do not put any goods which can be grabbed
by children or pets near this product to prevent
injury.
Before using this product, carefully inspect for
any loose parts and whether any parts need to
be tightened.
Never use to keep child away from pool.

6
MOUNTINGS
Gate must be installed in a structurally sound opening.
Ensure mounting surface (wall, door frame, stair posts, etc.) is
strong, rigid and has an even surface.
Note: If using gate on stairs, it must be placed either on the top
step or on the lowest step at the bottom.
Select the appropriate xing method from the following list.
Drill 2mm (5/64’’) pilot holes
and use the wood screws pro-
vided screwing directly into the
wood.
WOOD MOUNTING
Locate the wood stud and
follow the wood mounting
instructions. Do not mount
into dry wall without
additional support.
DRY WALL MOUNTING
Wood Screws
FOR INSTALLATION
SAFETY INFORMATION

7
Drill 5mm (3/16’’) pilot holes,
insert anchor and secure with
screws.
Drill 5mm (3/16’’) pilot holes,
insert anchor and secure
with screws.
Wood Screws
Anchor
HARD WALL MOUNTING
BRICK
HARD WALL MOUNTING
CONCRETE
FOR
INSTALLATION
This gate must only be xed to a solid and secure surface. If unsure,
check with a qualied builder or trades person that the installation
you intend is suitable and safe within the chosen location.
PENCIL DRILL
TOOLS REQUIRED
PHILLIPS HEAD
SCREW DRIVER

8
PARTS
WHAT’S IN THE BOX
1 x
Gate Assembly
1 x Gate Mount Installation Guide
1 x Catch Mount Installation Guide

9
1 x
Upper Gate Mount
6 x
Wall Spacers
1 x
Lower Gate Mount
2 x
Catch Mounts
4 x
25mm (1”) Lower
Mount Screws
4 x 35mm (1 3/8”)
Upper Mount Screws
(use with spacers)
8 x
Wall Plugs

10
STEP 1:
GATE PLACEMENT
INSTALLATION
Outside Opening or Doorway
Inside Opening or Doorway
STEP 1:
GATE PLACEMENT
SUITABLE PLACEMENT OF GATE AND CATCH MOUNT

11
Hold guide vertically and completely outstretched against
mounting surface with the end marked “FLOOR” even with the
oor. Mark screw hole positions. Remove the template.
1.
STEP 2: INSIDE
OPENING OR DOORWAY
Note: leave at least 2cm
(3/4”) between Guide
and the edge of the
opening to ensure gate
won’t overhang edge.

12
INSTALLATION
Repeat Step 1 for the other side with the Catch Mount
Installation Guide.
2.

13
3. 4.
Align the Upper & Lower
Gate Mount on the side you
want the gate to retract from.
Use a Phillips screwdriver
to tighten Screws until each
mount is secure.
Align the Catch Mounts in
its correct position on the
side you want the gate to
retract to, use a Phillips
screwdriver to tighten
Screws until each Mount
is secure.
NOTE: Ensure correct installation of Catch Mount.
NOTE: These holes must be
used to mount inside an open-
ing or doorway.

14
5. Attach Gate Assembly to the Gate Mounts by aligning the gate
directly above and sliding straight down over Mounts. Check
that the Gate Assembly is ush against the wall and is locked
rmly in place.
NOTE: Lower Gate Mount
has a locking groove.

15
Follow step 1 & 2 from “Installation Inside Doorway or
Opening” on page 11 & 12.
Align each mount in its correct position, use a Phillips
screwdriver to tighten screws until each mount is secure.
1.
2.
INSTALLATION
STEP 3: OUTSIDE
OPENING OR DOORWAY
NOTE: These holes must be
used to mount outside an
opening or doorway.

16
STEP 4: WITH
SKIRTING OR BASEBOARD
INSTALLATION
5mm
(3/16”)
Follow step 1 & 2 from “Installation Inside Doorway or Opening”,
align Spacers and Mounts in their correct position, use a Phillips
screwdriver to tighten Screws until each Mount is secure.
Additional wall Spacers are available from after sales support.
To help correct for the offset of a skirting board or baseboard,
Spacers will be required. Measure the width of your skirting/
baseboard and use the closest number of Spacers to t this width.
Each Spacer is 5mm (3/16’’) thick.
Note: Only use
Spacers for the
Upper Gate
Mount and the
Upper Catch
Mount.

17
1.
STEP 4:
TO REMOVE
To remove gate from the Mounts, push and hold the release
button while sliding the gate upwards.

18
Note: When gate is retracting always hold the handle and guide the
gate evenly back into its original position. Never let go of handle
when gate is retracting.
HOW TO OPEN
OPERATION
1.
2.
3.
To unlock the mechanism,
simply push down and turn
the button clockwise.
There is no need to continue
to hold the button to release
the gate, pull handle in one
uid movement as stopping
will engage lock.
Pull handle and hook
onto catches.
ONE-HANDED
OPERATION VIDEO

19
CLEANING INSTRUCTIONS
Simply use a soft damp cloth to wipe gate, dry after cleaning.
Do not use chemical or abrasive cleaners.

20
WARRANTY CERTIFICATE
SUPPORT
Congratulations! You have made an excellent choice of this quality product. Our commitment to
quality also includes our service. Should you, contrary to expectations, experience defects due
to manufacturing faults, we will provide you with a warranty against defects as follows:
Warranty
The product is guaranteed to be free from defects in workmanship and parts for a period of 12
months from the date of purchase. Defects that occur within this warranty period, under normal
use and care, will be repaired, replaced or refunded at our discretion. The benets conferred
by this warranty are in addition to all rights and remedies in respect of the product that the
consumer has under the Competition and Consumer Act 2010 and similar state and territory
laws.
Our goods come with guarantees that cannot be excluded under the Australian Consumer Law.
You are entitled to a replacement or refund for a major failure and for compensation for any other
reasonably foreseeable loss or damage. You are also entitled to have the goods repaired or
replaced if the goods fail to be of acceptable quality and the failure does not amount to a major
failure.
Proof of Purchase
This warranty is valid for the original purchase and is not transferable. Please keep your
purchase docket, tax invoice or receipt as the best proof of purchase, and as proof of date on
which the purchase was made.
Extent of Warranty
This warranty is limited to defects in workmanship or parts. All defective products or parts will be
repaired or replaced. This warranty does not cover consumable items.
Normal Wear and Tear
This warranty does not cover normal wear and tear to the products or parts.
Exclusions
This warranty does not cover:
• Any defects caused by an accident, misuse, abuse, improper installation or operation,
lack of reasonable care, unauthorised modication, loss of parts, tampering or attempted
repair by a person not authorised by the distributor.
• Any product that has not been installed, operated or maintained in accordance with the
manufacturer’s operating instructions provided with the product.
• Any product that has been used for purposes other than domestic use.
To Make a Claim
If a defect in the goods appears within 12 months, you are entitled to claim a warranty. Please
contact after sales support via the link below:
www.permachildsafety.com/contact-us
Please ensure that you have a copy of proof of purchase so that we are able to respond as
quickly and efciently as possible.
/