Page is loading ...

1
EarthWerks® ▪ 10850 Train Court Houston, Texas 77041-6208 USA ▪ www.earthwerks.com
Last Updated 8.9.2016 ▪ EarthWerks®Vinyl Flooring ▪ Installation Instructions
Fold-Down Installation Instructions
GENERAL GUIDELINES
All instructions and recommendations are based on the most recent information available. They should be followed for
an ideal installation. Failure to follow these guidelines may result in installation failures. EarthWerks® is not liable for
improper installation practices beyond our guidelines and current industry standards.
1. This product should be stored in a climate controlled area with an average temperature between 55-85⁰ F (13-
29⁰ C). All areas where product will be installed must have a working heat and air conditioning source, operational
for a minimum of one week prior to installation and remain in operation during and after installation. Conditions
should be at the same temperature and humidity level expected during normal use (between 55-85⁰ F / 13-29⁰ C
with relative humidity no greater than 65%). This product should NEVER be installed outdoors.
2. Product should only be installed after the jobsite has been cleaned and cleared of debris that could potentially
damage a finished plank installation.
3. During the Fold-Down installation, mix and install planks from several different cartons to minimize shade
variation.
4. The finished Fold-Down installation should be protected from exposure to direct sunlight.
SUBFLOOR INFORMATION
Although this Fold-Down locking system is designed to be a “floating” floor installation, proper preparation of the subfloor
is still a major part of a successful installation. Roughness or unevenness of the subfloor may telegraph through the new
floor. Unevenness in the subfloor can also cause problems with the integrity of the locking system and possibly cause the
locking system to disengage. All subfloors should be smooth and flat with the tolerance not exceeding more than 1/8” in
a 6’ span. All subfloor and underlayment patching must be done with a non-shrinking, water-resistant Portland cement
patching compound.
A. Concrete Subfloors
1. Concrete subfloors must be dry, smooth, and free from dust, solvent, paint, wax, grease, oil, asphalt sealing
compounds, and other extraneous materials. The surface must be hard and dense, and free from powder or
flaking.
2. New concrete slabs must be thoroughly dry (at least six weeks) and completely cured. The final responsibility for
determining if the concrete is dry enough for installation of the flooring lies with the floor covering installer.
3. Holes, grooves, expansion joints and other depressions must be filled with a Portland cement-based underlayment
and troweled smooth and feathered even with the surrounding surface.
4. Concrete floors with a radiant heating system are acceptable, provided the heating system is embedded into
either the concrete or covered with a Portland cement based self-leveler. Heating system must be covered with
a minimum ½” separation between the flooring and heat source. The temperature of the subfloor must not
exceed 85°F at any point. Before installation, turn on the heating system to eliminate any residual moisture.
B. Wood Subfloors
1. Wood subfloors must be suspended at least 18” above the ground. Adequate cross-ventilation must be provided,
and the ground surface of a crawl space must be covered with a suitable vapor barrier.
2. Wood subfloors directly on concrete or installed over sleeper construction are NOT suitable for the installation.
3. All wood and wood composition panels, including plywood, OSB, flake board, and particle boards can be used
providing they are smooth, flat, structurally sound, and free of deflection.
4. A 1/4” underlayment panel should be installed over the subfloor if the surface of the wood subfloor is not smooth.
C. Existing Floor Coverings

2
EarthWerks® ▪ 10850 Train Court Houston, Texas 77041-6208 USA ▪ www.earthwerks.com
Last Updated 8.9.2016 ▪ EarthWerks®Vinyl Flooring ▪ Installation Instructions
1. Fold-Down Products can be installed over most existing hard–surface floor coverings provided the existing floor
surface is smooth, or can be made smooth.
2. When installing over ceramic tile it is best to smooth the grout lines and texture with a cement patch or leveling
compound. Smooth ceramic with narrow grout lines may be suitable without the need for a cementious overlay.
3. Heavily cushioned vinyl flooring or vinyl flooring consisting of multiple layers are NOT suitable subfloor for
installation.
TOOLS NEEDED: Carpenters Square or Straight Edge, Tape Measure, Pencil, Wall Spacers, White Rubber Mallet, Blue
Painters Tape, Circular Saw, Undercut Saw (if needed), Tile Cutter (if desired).
INSTALLATION
A. Getting Started
1. Before starting, first measure the width of the room, and then divide the room’s width by the width of the plank.
If this means that the last row of planks will be narrower than 2”, then you will need to cut the first row of planks
to make it narrower. Cut in such a way that both rows of planks (the first and last to be installed in the room) will
have the same approximate width for an overall continuous look. See “Installing the Last Row.”
Note: To cut the boards, always saw with the teeth cutting down into the face or top of the board. Cutting from
the top down helps protect the surface.
2. The planks install easily without glue. Simply attach the tongue on one plank
to the groove side on another plank and the planks will lock snugly together.
3. Begin the installation of the planks in the left hand corner of the room with the long direction parallel to the
incoming sunlight source or to the longest wall of the room (if this is possible). Be sure to install the first row of
boards with the tongue side facing the wall. We recommend leaving ¼” expansion space at all vertical surfaces
(columns, posts, islands, etc.) to accommodate movement of the structure and adjacent floors.
B. Position the First Row
1. With the tongue side facing the wall, align the end of the second plank with the first and lock the
end joints together by pushing it straight down on top of the first plank. If needed gently tap
downward with a white rubber mallet.
2. Lock the ends of the planks together until the first row is finished. Cut the last board in the row
to the necessary length.
• If the starting wall is out of square, it will be necessary to scribe the first row to match the
wall, allowing the opposite side of the row to present a true square base for the rest of the
floor. When the first row is complete, you must have a straight, even base established.
C. Installing the Rest of the Floor
1. To start the second row, cut a plank that is at least 8” shorter than the first plank in the first
row (you may use the leftover from the last plank of the first row). Then install this first
plank by inserting the long side tongue into the groove of the plank in the first row at a 25-
degree angle to the floor. Line up the first plank of the second row so the outside end is
even with the outside end of the first plank on the first row.

3
EarthWerks® ▪ 10850 Train Court Houston, Texas 77041-6208 USA ▪ www.earthwerks.com
Last Updated 8.9.2016 ▪ EarthWerks®Vinyl Flooring ▪ Installation Instructions
3. Lay the remaining planks in the row by first locking the long side in place, lifting the outside
edge and sliding to the previous plank. Fold down and press or tap the end joint downward to
lock together.
4. The planks cannot be forced together. If they are not lying flat then they will not align properly
during locking. If this occurs, begin again, insuring the edges of both planks meet evenly while
applying equal pressure while rotating the plank.
5. Once the third row has been clicked into place, check for a tight fit on sides and ends.
6. To install the rest of the flooring, continue placing boards from left to right, plank by plank, and
row by row.
• Under door jambs or toe kicks of cabinets, there may not be enough clearance to achieve
the required angle necessary to engage the sides. The tongue portion of the sides should
be cut away using a wood chisel, and the boards glued together using high quality white
wood (PVAC) glue.
7. To disengage the planks, lift the outside edge and remove from the long side seam(s). Lay the planks flat and slide
the ends horizontally in opposite directions to disengage. Avoid pulling upwards on the end joints to disengage
the short ends so as not to break them.
D. Installing the Last Row
Most often the entire length of the last row will need to be cut so that it is narrow enough to fit the remaining space.
When this occurs, follow this simple procedure:
1. Lay a row of boards with the tongue toward the wall, directly on top of the last row installed.
2. Take a full width scrap piece of the product that is being installed with the face down and the tongue side against
the wall. Use ¼” spaces against the wall to ensure the proper expansion space.
3. Draw a line along the row moving down the wall. The resulting line gives the proper width for the last row which,
when cut, can then be wedged into place using a pull bar.
REPAIRS
In the unlikely event that a piece of Fold-Down product is damaged for whatever reason, the simplest method of repair is
to disconnect the planks carefully (protecting the tongue and groove edges) until the damaged piece can be removed.
Then replace the damaged piece with a new one and reassemble the disconnected planks. This typically works for planks
that are closest to the two long walls of a room. For damaged pieces that are not close to the perimeter, you may have to
remove the damaged pieces and insert new pieces without the short and long end grooves.
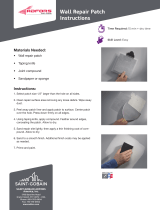
1. Using a sharp utility knife and a straight edge, cut out the damaged piece by leaving approximately 1” strip
attached to the adjacent pieces.
2. Carefully cut back from the four corners of the plank to the inside edges in space left by the cut out piece.
3. Remove the plank edges carefully from of the adjacent pieces, making sure the tongues and grooves of the
adjacent planks are not damaged.
4. Using a utility knife, remove the tongue strip on both the long and short ends of the replacement piece. In addition,
remove the groove strip of the short end of the replacement piece.
5. Place double-sided carpet tape along the three sides of the adjacent pieces, making sure the tongues and grooves
of the adjacent planks are not damaged. Only the top-side release paper should be removed. The bottom-side
release paper should NOT be adhered to the subfloor.
6. Position the replacement plank by engaging the groove of the long side into the tongue of the adjoining piece and
pushing down on the other three sides. The carpet tape will hold the replacement piece in place with its adjacent
planks. Use a hand roller to further secure the tape.

4
EarthWerks® ▪ 10850 Train Court Houston, Texas 77041-6208 USA ▪ www.earthwerks.com
Last Updated 8.9.2016 ▪ EarthWerks®Vinyl Flooring ▪ Installation Instructions
AFTER INSTALLATION
Sweep, dust mop or vacuum the floor to remove any debris.
Flooring should be one of the last items installed in a project. Protect the floors while other trades are finishing their work
prior to final cleanup and turnover to the owner. Use rosin or other breathable paper and blue painters tape to hold the
paper to the floor. Make sure no debris is under the paper.
MAINTENANCE AND PROTECTION OF YOUR NEW FLOOR
Clean up spills immediately. Sweep or vacuum the floor regularly and damp mop weekly. We recommend using Earthwerks
Floor Cleaner EWFC32 for routine cleaning. This can be purchased from the flooring dealer where the Fold-Down Product
was purchased. Do not use soap based detergents or abrasive cleaners. Earthwerks does not recommend the use of steam
cleaners on our flooring. To avoid possible permanent indentation or damage, proper floor protection devices must be
used under furniture and appliances. Exercise care when removing and replacing furniture or appliances.
Preventative maintenance is a must with any type of flooring. Please use entry mats to stop as much dirt prior to entry
of the building. Make sure all furniture is well protected, avoiding rubber products as they can cause stains. Use hard
plastic or felt pads under heavy furniture to prevent point loads. Use flat, polished metal glides with a minimum 1”
diameter under chairs and stools. These should have a rounded edge and pivot to remain in flat contact with the floor.
Non-staining felt pads can be used provided they are changed on a regular basis to prevent dirt, debris and sand buildup.
Wide, non-staining casters at least 2” in diameter or floor protectors should be used on rolling furniture such as office
chairs. Also sweeping and damp mopping the floor on a regular basis and a diligent inspection of the floor protection
installed on the furniture can be helpful. Never slide heavy furniture over unprotected floors.
These instructions are general guidelines for the proper procedures for installing and maintaining this flooring product.
For detailed instructions on Installation and Maintenance, please contact:
EarthWerks® Technical Service
800-275-7943
techdept@earthwerks.com
/