Page is loading ...

V900088
2007 FREIGHTLINER M2
7.2L Caterpillar C7 ACERT Diesel
www.vmacair.com
VR70 UNDERHOOD
AIR COMPRESSOR
INSTALLATION MANUAL


VMAC – Vehicle Mounted Air Compressors
Toll Free: 1-800-738-8622
Fax: 1-250-740-3201 1
Installation Manual for VMAC
Systems V900088
2007 Freightliner M2 7.2L Caterpillar C7
ACERT Inter-cooled Diesel
with Allison Automatic Transmission
General Information..................................................................... 3
Before You Start..................................................................... 3
Part 1: Installing the Control Components .............................. 4
1.1 Locating the Modules and Wires.................................... 5
1.2 Installing Components..................................................... 8
1.3 Connecting the Wiring..................................................... 9
Part 2: Preparing for Installation............................................... 12
Part 3: Installing the Bracket, Compressor and Cooler......... 14
3.1 Installing the Main Bracket and Compressor................ 14
3.2 Installing the Cooler......................................................... 16
Part 4: Installing the Tank and Hoses....................................... 20
4.1 Installing the Tank............................................................ 20
4.2 Connecting the Steel Lines and Hoses.......................... 21
4.3 Completing the Installation............................................. 22
4.4 Adding Oil to the System................................................. 23
Part 5: Finishing and Testing..................................................... 24
5.1 Before Starting the Engine Checklist............................. 24
5.2 After Starting the Engine Checklist................................ 24
5.3 Testing Operation............................................................. 25
5.4 Setup, Performance Testing and Adjustments............. 26
5.5 System Identification and Warnings .............................. 27
5.6 Auxiliary Air Receiver ...................................................... 28
Accessory Products from VMAC............................................... 29

VMAC – Vehicle Mounted Air Compressors
Toll Free: 1-800-738-8622
Fax: 1-250-740-3201
2
Document #1930123
Installation Manual for VMAC Systems V900088
2007 Freightliner M2 7.2L Caterpillar C7 ACERT Inter-cooled Diesel
with Allison Automatic Transmission
Changes and Revisions
Version Revision Details Revised by/date Approved by/date Implemented
000 Draft creation IB 22 June 2006 BC 17 Jul 2006 21 Jul 2006
Important Information
The information in this manual is intended for certified VMAC
installers who have been trained in installation procedures and for
people with mechanical trade certification who have the tools and
equipment to properly and safely perform the installation. Do not
attempt this installation if you do not have the appropriate
mechanical training, knowledge and experience.
Follow all safety precautions for underhood mechanical work. Any
grinding, bending or restructuring operations for correct fit in modified
trucks must follow standard shop practices.
These instructions are a general guide for installing this system on
standard production trucks and do not contain information for
installation on non-standard trucks. This system may not fit special
order models or those which have had other changes without
additional modifications. If you have difficulty with the installation,
contact VMAC.
The VMAC warranty form is located at the back of this manual. This
warranty form must be completed and mailed or faxed to VMAC at
the time of installation for any subsequent warranty claim to be
considered valid.
To order parts, contact your VMAC dealer. Your dealer will ask for
the VMAC serial number, part number, description and quantity. To
locate your nearest dealer, call 1-800-738-8622.
Copyright 2006
All trademarks used in this manual are the property of the respective copyright holder.
The contents of this manual may not be reproduced in any form without the express
written permission of VMAC, 1333 Kipp Road, Nanaimo, BC V9X 1R3.
Printed in Canada

VMAC – Vehicle Mounted Air Compressors
Toll Free: 1-800-738-8622
Fax: 1-250-740-3201 3
General Information
Before You Start
Read this manual before attempting installation so that you can
familiarize yourself with the components and how they fit on the
truck. This manual should be read completely before attempting
installation. Open the package, unpack the components and identify
them.
All fasteners must be torqued to specifications. Use manufacturers
torque values for OEM fasteners. Apply Loctite 242 or equivalent on
all engine-mounted fasteners. Torque values are with Loctite applied
unless otherwise specified.
STANDARD GRADE 8 NATIONAL COARSE THREAD
Size 1/4 5/16 3/8 7/16 1/2 9/16 5/8 ¾
Foot-pounds (ft-lb) 9 18 35 55 80 110 170 280
Newton meter (N•m) 12 24 47 74 108 149 230 379
STANDARD GRADE 8 NATIONAL FINE THREAD
Size 3/8 7/16 1/2 5/8 ¾
Foot-pounds (ft-lb) 40 60 90 180 320
Newton meter (N•m) 54 81 122 244 434
METRIC CLASS 10.9
Size M8 M10 M12 M14 M16
Foot-pounds (ft-lb) 19 41 69 104 174
Newton meter (N•m) 25 55 93 141 236
Hose Coding
Different frame designations will affect the tank mounting position. If
you have to move the tank, the lines may be too short. Measure the
hose shortfall and order a Hose Extender Kit. The following table
shows the color code used by VMAC to identify hose diameters.
Hose Diameter Colour-Coded Label
1/4 inch
5/16 inch
1/2 inch
5/8 inch
3/4 inch
1 inch
Yellow
Orange
Blue
Blue
Green
Green

VMAC – Vehicle Mounted Air Compressors
Toll Free: 1-800-738-8622
Fax: 1-250-740-3201
4
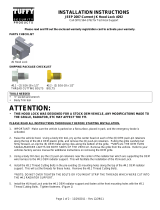
Part 1: Installing the Control
Components
White
Interface
Connector
Green4pin
connector
White
Red
R
R
e
e
d
d
Red
White
Compressor
Inlet valve
Clutch
Green
Black 3 pin
connector
Throttle
Controller
T
T
T
o
o
o
g
g
g
r
r
r
o
o
o
u
u
u
n
n
n
d
d
d
Blue
Blue
Throttle
Controller
Blue
Blue
Connect the blue wires
MANUAL TRANSMISSION
Throttle
Controller
Blue
Blue
Control Box
Black
Black
Purple
White
Orange
Chassis module
see appropriate
section for details
Engine control module
see appropriate section for details
Transmission control
module see appropriate
section for details
Do not use short
blue wire with
crimp connector
12 Volts
30
85
87
86
Relay Bulkhead module
see appropriate
section for details
10 A

VMAC – Vehicle Mounted Air Compressors
Toll Free: 1-800-738-8622
Fax: 1-250-740-3201 5
The VMAC throttle control uses the dedicated PTO
function which must be programmed by an OEM
qualified technician.
The PTO configuration must be set to:
• remote throttle
• PTO shut down time = 0 (default)
• PTO top engine limit = 2750 (default)
If the engine is programmed before the VMAC throttle is installed,
the system will check for a signal when the ignition is on in PTO
mode. The check engine light will illuminate but will shut off once the
throttle is installed.
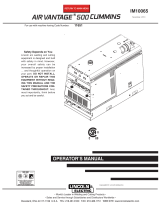
1.1 Locating the Modules and Wires
Locate the bulkhead, engine control, transmission and chassis
modules (Figure 1.1).
1.1.1 Bulkhead Module
The bulkhead module is located on the driver’s side of the engine
compartment, mounted on the firewall, with connectors on the engine
side and the cab side of the module. Remove the kick plate from
under the dash on the driver’s side to access the connectors.
Locate the wire at location “G” on the top connector inside the cab of
the truck (Figure 1.2). Test the wire with a voltmeter to ensure that
there is 12 Volts with the ignition switch in the ON position and no
Volts with the switch in the OFF position.

VMAC – Vehicle Mounted Air Compressors
Toll Free: 1-800-738-8622
Fax: 1-250-740-3201
6
B
u
lkh
ead
M
odu
l
e
C
h
ass
i
s
Co
ntr
o
l M
odu
l
e
Transmission
C
ontrol ModuleEngine
C
ontrol Module
Figure 1.1
Engine Compartment Cab Under Dash
Firewall
To p Con n e c t o r
B5 Dash Harness
A
B
C
D
H
G
F
E
Figure 1.2

VMAC – Vehicle Mounted Air Compressors
Toll Free: 1-800-738-8622
Fax: 1-250-740-3201 7
1.1.2 Chassis Module
The chassis module is located on the driver’s side frame rail under
the cab.
Locate the wire at pin “F” on connector C3 (Figure 1.3) Check
continuity between the pin and ground. There should be continuity
when the park brake is applied and an open circuit when the park
brake is released.
H
G
F
E
D
C
B
A
J
K
L
M
N
P
R
S
Bl
ac
k
w
i
re
Figure 1.3
1.1.3 Transmission Module
The transmission module is located on the driver’s side frame rail
under the cab.
For THIRD generation controls on 3000 series Allison automatic
transmissions (Figure 1.4) locate pin 2 of the gray connector.
For FOURTH generation controls on Allison 1000/2000 product
families, 3000 product families and 4000 product family automatic
transmissions, remove the harness tape and locate wire 145.
With the engine running, check for continuity to ground in both Park
and Neutral and an open circuit in all other gears.

VMAC – Vehicle Mounted Air Compressors
Toll Free: 1-800-738-8622
Fax: 1-250-740-3201
8
16 15 14 13 12 11 10 9 8 7 6 5 4 3 2 1
17 18 19 20 21 22 23 24 25 26 27 28 29 30 31 32
THIRD GENERATION CONTROLS
Figure 1.4
1.1.4 Engine Control Module
The engine control module is located on the driver’s side rear of the
engine.
1.2 Installing Components
□ Disconnect the battery ground cable.
□ Install the throttle controller inside the cab under the dash next to
the driver’s door. Attach it to the main wire harness with tie
straps.
□ If the truck has a manual transmission, cut the long blue wire
from the throttle control to about six inches and connect it to the
short blue wire with the crimp connector.
□ Install the control box in a suitable location for easy access. You
can mount it to the floor between the driver’s seat and the door
so that it can be accessed from inside or outside the cab and
route the wiring under the side door trim and under the dash.
□ Connect the white interface connector to the matching connector
from the control box.
□ Connect the two red wires from the interface connector to the red
wires with the matching connectors from the throttle controller.

VMAC – Vehicle Mounted Air Compressors
Toll Free: 1-800-738-8622
Fax: 1-250-740-3201 9
□ Route the following wires through an available access port just
above the throttle pedal:
• black wire from the interface connector
• black, orange and white wires from the throttle controller
• long red wire with the female spade connector
• if the truck has an automatic transmission, the long blue wire
from the throttle controller
• purple wire with female spade connector
• the cable with the black three pin connector from the throttle
controller
• cable with the green four pin connector from the control box
• white wire with the bullet connector from the interface
connector
□ Fasten the green throttle wire and the green interface cable wire
to an existing chassis ground.
□ Leave the cables with the three and four pin connectors and the
white wire with the bullet connector for connection to the
compressor once it is installed.
1.3 Connecting the Wiring
1.3.1 Bulkhead Module
□ Install a relay in the engine compartment next to the bulkhead
module.
□ Connect the long red wire with the female spade connector from
the interface connector to pin 30 on the relay.
□ Connect pin 85 to a good chassis ground.
□ Connect pin 87 to a 12 Volt source.
□ Connect pin 86 on the relay to connector B5 wire “G” at the
bulkhead connector using the purple wire (Figure 1.2).

VMAC – Vehicle Mounted Air Compressors
Toll Free: 1-800-738-8622
Fax: 1-250-740-3201
10
1.3.2 Engine Control Module
□ Cut the tie wraps holding the ECM cover and remove the plastic
cover.
□ Remove the rear connector (J1/P1) on the engine control module
(Figure 1.5).
1 2 3 4 5 6 7 8 9 10 11 12 13
58 59 60 61 62 63 64 65 66 67 68 69 70
14 23
24 31
32 39
40 47
48 57
Shown from wire side of connector
Black wire Orange wire
White wire
Connector
P1-J1
Figure 1.5
□ Push out the small white pin protectors at pins 3, 56 and 68 with
a small pin punch.
□ Install the ECM connector and torque the Allen head screw to 55
inch-pounds (6 Nm).
□ Insert the connectors as follows:
• black wire into pin socket 3
• orange wire into pin socket 56
• white wire into pin socket 68
□ Check each wire to make sure pins have locked in the sockets.
□ Secure all wiring away from hot or moving parts, install the
plastic ECM cover and tie-wrap all wires

VMAC – Vehicle Mounted Air Compressors
Toll Free: 1-800-738-8622
Fax: 1-250-740-3201 11
1.3.3 Transmission Control Module
□ On THIRD generation controls on 3000 series Allison automatic
transmissions, connect the long blue wire to at pin 2 of the gray
connector (Figure 1.4). Solder and seal the connection (if there is
a wire at this location) or install the supplied wire.
□ On FOURTH generation controls on Allison 1000/2000 product
families, 3000 product families and 4000 product family
automatic transmissions, solder and seal long blue wire to
transmission wire 145. Strain relief and loom the long blue wire
along the chassis wiring.
1.3.4 Chassis Module
□ Connect the black wire from the interface connector to the wire
at pin “F” on connector C3 of the chassis module (Figure 1.3).
Solder and seal the connection.

VMAC – Vehicle Mounted Air Compressors
Toll Free: 1-800-738-8622
Fax: 1-250-740-3201
12
Part 2: Preparing for Installation
□
Drain the cooling system.
□
Remove the outer bolts from the bumper extensions, loosen the
inner bolts and swing the bumper extensions forward to gain
access to the engine compartment.
□
Remove the four bolts holding the passenger side hood hinge to
the frame. Insert the 3/4 inch spacer block between the hood
hinge and the frame and insert the replacement 3/8 x 2 inch bolts
and tighten securelyly. Repeat this procedure on the driver side
hinge.
Check headlight alignment before releasing the truck
into service as the addition of the 3/4 inch spacers will
deflect the hood and the headlights upward.
□
Remove the power steering reservoir but do not disconnect the
hoses.
□
Remove the upper radiator hose and the intercooler tube on the
driver side; disconnect the radiator overflow hose from the
passenger side of the radiator.
□
Disconnect the brace bars from both sides of the top of the
radiator and move them outward slightly to make removal of the
fan and shroud easier.
□
Remove the OEM belt, then remove the fasteners from the fan
shroud and remove the fan, clutch assembly and shroud
together.
□
Remove the bolts and steel ring from the front of the crankshaft
pulley. Thoroughly clean the inside of the OEM crank pulley to
ensure a good fit for the VMAC pulley.

VMAC – Vehicle Mounted Air Compressors
Toll Free: 1-800-738-8622
Fax: 1-250-740-3201 13
□
Place the VMAC crankshaft pulley adapter and crankshaft pulley
in position over the OEM pulley, place the steel ring over the
VMAC pulley, align the holes, insert the M10 x 100 mm bolts and
torque to specifications.
□
Remove the fan from the fan clutch assembly.
□
Install the five studs into the fan spacer.
□
The fan and fan shroud must be installed together. To do this
you can attach the fan to the fan clutch assembly and install the
assembly and shroud together or install the fan clutch assembly
first; then install the shroud and the fan. Use the supplied 3/8
nuts to secure the fan onto the studs and tighten all fasteners.
□
Install the OEM belt.
□
Install the brace bars.
□
Install the radiator overflow hose on the passenger side of the
radiator.
□
Disconnect the steel lines from the fuel filter, remove the three
bolts holding the fuel filter to the engine block and remove the
filter assembly.
□
Remove and discard the small bracket attached to the engine lift
bracket, then remove the steel fuel lines from the engine fittings.
□
Install the 90 degree swivel fitting to the fuel fitting on the front of
the cylinder head.
□
Connect the 45 degree end of one of the fuel hoses to the swivel
fitting. Adjust it to clear the head and bracket, then tighten the
fittings.
□
Connect the 90 degree end of the other fuel hose to the fitting on
the back of the fuel pump.

VMAC – Vehicle Mounted Air Compressors
Toll Free: 1-800-738-8622
Fax: 1-250-740-3201
14
Part 3: Installing the
Bracket, Compressor and Cooler
3.1 Installing the Main Bracket and Compressor
□
Remove the idler pulleys and the belt tensioner from the main
bracket.
□
Place the compressor bracket in position on the driver’s side
front of the engine block. Apply Loctite and install two M10 x 60
mm bolts, one M10 x 55 mm bolt and one M10 x 35 mm bolt
(Figure 3.1). Make sure that the bracket sits flush against the
mounting points and tighten the bolts.
M10 x 60 mm
M10 x 35 mm
M10 x 55 mm
OEM 10 mm fue
l
filter mount bolts
M10 x 35 mm bolt
with flat washer
Mount fuel filter here
Figure 3.1

VMAC – Vehicle Mounted Air Compressors
Toll Free: 1-800-738-8622
Fax: 1-250-740-3201 15
During tightening, make sure that alignment is correct
and there are no gaps. Do not use the bolts to force
gaps to close, check and correct the reason for the gap.
□ Install the idler pulleys and the belt tensioner onto the main
bracket. Use Loctite on the fasteners and torque to
specifications.
□ Mount the filter housing to the front of the compressor bracket
using two of the OEM bolts and one supplied M10 x 35 mm hex
head bolt with flat washer.
□ Rotate the front fuel line fitting 90 degrees clockwise so that the
fitting points upward. Rotate the top fitting a few degrees
counterclockwise to provide clearance for the hose.
□ Connect the new fuel line hoses to the fittings on the fuel filter.
□ Prime the fuel system with the pump on the filter assembly.
If you do not clear the air in the hose between the
injector pump and the filter, air will enter the fuel
system and the engine will not start.
□ Install the power steering reservoir using the three spacers, the
supplied 3/8 x 2 inch bolts and the OEM nuts.
□ Install the intercooler tube.
□ Place the compressor in position on the bracket and fasten it in
place using the supplied bolts.
□ Install the VR compressor drive belt (Figure 3.2).

VMAC – Vehicle Mounted Air Compressors
Toll Free: 1-800-738-8622
Fax: 1-250-740-3201
16
Figure 3.2
3.2 Installing the Cooler
□
Remove the steel heater return line standoff bracket from the
engine block on the passenger side, just behind the engine oil
filter.
□
Fasten the cooler mounting plate to the passenger side of the
engine block with two M14 x 30 mm bolts into threaded holes
near the front of the block. Place the standoff bracket over the
rear hole in the mounting plate and insert an M10 x 55 mm bolt
(Figure 3.3). Tighten all fasteners.
□
Attach the cooler to the mounting plate using the supplied nuts
and washers.
□
Remove the lower radiator hose from between the radiator and
the transmission cooler. Rotate it 90 degrees so that the radiator
end of the hose faces backward.

VMAC – Vehicle Mounted Air Compressors
Toll Free: 1-800-738-8622
Fax: 1-250-740-3201 17
□
Attach the long end of the U-shaped hose to the rear spigot on
the cooler. Install the long steel coolant tube between the OEM
radiator hose and the U-shaped hose on the rear spigot of the
cooler with the longest section of the steel tube at the cooler end.
Cooler
Mounting plate
To OEM lower coolant hose
Coolant bypass hose
Line from
compressor
Line from
tank
Figure 3.3
□
Install the shorter steel coolant tube between the hose on the
front spigot of the cooler and the lower radiator hose connection,
using the supplied section of hose between the tube and the
radiator. Adjust all tubes and hoses for best fit and tighten the
clamps.

VMAC – Vehicle Mounted Air Compressors
Toll Free: 1-800-738-8622
Fax: 1-250-740-3201
18
□
Remove the plug from the fitting on the back of the thermostat
housing, inboard of the steel heater line.
□
Install the supplied ORB fitting into the head, then the spigot
fitting and connect the supplied 3/4 inch hose between the fitting
on the thermostat housing and the fitting on the steel tube at the
cooler. Tighten the clamps and secure the hose to the steel
heater return line with a nylon tie to prevent it from rubbing.
□
Connect the 90 degree end of the shortest 1/2 inch hose to the
rear fitting on the cooler, route it between the engine oil pan and
the transmission cooler and up to the compressor. Connect it to
the matching fitting on the compressor.
□
Install the supplied hose to the top radiator spigot and insert the
supplied steel coolant tube (Figure 3.4) into the other end.
Supplied steel tube
Insulated P-clip
Supplied hos
e
OEM hose
Figure 3.4
/