Page is loading ...

Instructions for Date-keeper photo calendar
The following instructions are for HP color inkjet printers, which load from the
front. If your printer loads from the back, please consult your printer's user guide.
Try printing a test page before using any specialty paper.
8.5 x 11-inch Wall calendar printing instructions
Materials
• 13 sheets of heavy 8.5 x 11-inch double-sided paper
• Ribbon, raffia, yarn, stapler, or brads
• Hole punch
Important note: Each month is made with two pages: one for your image
(artwork page) and one for the month with dates (calendar page). You will need
to save each month as an individual PDF file. There are also optional cover and
back pages to be saved as an individual PDF file.
If you want to print a two-sided wall calendar (recommended), you will need to
print the cover first with the month of January’s artwork page on the back side.
The January calendar page is printed on the front side of the next sheet of paper,
and the February artwork page is printed on the back of that page, and so on
through the rest of the months. Each page needs to be printed from two files.
See Table 1 below for printing sequence.
You can also print the calendar so that both the artwork and the calendar for an
individual month are on a single sheet of paper – see alternative instructions
below.
Instructions for 2 pages per month wall calendar:
Although a bit tricky to print and assemble, this version of the wall calendar will
provide optimal readability for the individual dates.
1. Set your print preference to Best quality.
2. Place a sheet of double-sided high quality inkjet paper in your printer tray.
3. Set Page scaling to “None” in your Paper handling options.
4. Print first page according to chart below.
5. Remove the printed page from your printer tray and, without turning it over,
return it to the loading tray.
6. Print the back side of the page and allow it to dry completely.
7. After printing all of your calendar and cover pages, gather them together in

the order outlined below, one on top of the other. Double-check the
orientation of the pages and verify that, as you lift each page, the correct
month artwork is with the correct calendar month: artwork on top, calendar
month on bottom.
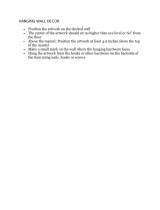
8. With the single sheets stacked together, punch three or more holes through
the top of the calendar (you can buy decorative punches in a variety of fun
shapes). Thread short lengths of ribbon, raffia, or yarn through the holes and
tie them in loose bows. Or bind them with loose-leaf rings or brass
fasteners.
9. When the calendar is bound together, punch a single hole through all the
pages at the bottom of the cover (to hang the calendar on the wall).
Alternative instructions for single page per month wall calendar:
If you wish, you can print your calendar so that each month’s artwork and
calendar page is on a single 8-1/2” x 11” page. The cover and back would not be
used for this version. Here’s how to print:
1. Set your print preference to Best quality.
2. Place a sheet of double-sided high quality inkjet paper in your printer tray.
3. In your printer dialog box, change Page scaling to “Multiple pages per sheet”
(usually in the Page handling area of the dialog box) AND go to “Properties”
area to select “Landscape” printing (typically on the “Features” tab).
4. After printing all of your calendar and cover pages, gather them together in
order.
5. With the single sheets stacked together, punch three or more holes through
the top of the calendar (you can buy decorative punches in a variety of fun
shapes). Thread short lengths of ribbon, raffia, or yarn through the holes and
tie them in loose bows. Or bind them with loose-leaf rings or brass
fasteners.
6. When the calendar is bound together, punch a single hole through all the
pages at the top of the first month (to hang the calendar on the wall).
5 x 7-inch Datebook calendar printing instructions
Materials
• 26 pages of 5 x 7-inch photo paper (or 13 sheets of heavy 8.5 x 11-inch
double-sided paper)
• Hole punch
• Ribbon, raffia, or yarn
• X-ACTO knife, ruler, and cutting mat (optional)
• Loose-leaf rings or brass fasteners (optional)
• Glue or double-sided tape (optional)

Important note: Each month is made with two pages: one for your image
(artwork page) and one for the month with its dates (calendar page). You may
wish to save each month as an individual PDF file. There are also optional cover
and back pages that may be saved as an individual PDF file.
If you want to print a two-sided calendar, please review the directions above for
the 8.5 x 11-inch Wall calendar.
Most 5 x 7-inch paper (especially photo paper) is not double-sided, so you have
two options: (a) you can print each page on a single side of the paper or, (b) you
can print on two-sided 8.5 x 11-inch paper and trim the pages to 5 x 7 inches.
If you decide to print single-sided, there are three ways you can assemble the
pages, using the table below as a guide to order them: (a) paste the backs of the
paired pages together with glue or double-sided tape; (b) slip the pages into a 5 x
7-inch album sleeve (found in Scrapbooking and hobby shops); or (c) assemble
the calendar with blank pages between each month.
Instructions:
1. Set your print preference to Best quality.
2. Set Page scaling to “None” in your Paper handling options.
Note: If you are using 5 x 7” paper be sure to select paper size 5 x 7” in
your printer dialog menu (for older printers you may need to use a user
defined paper size).
3. Print the artwork on 5 x 7-inch photo paper. Set aside to dry completely.
Note: If you must use 8.5 x 11-inch paper, trim away the white areas after
you finish printing. To do this, place the cutting mat underneath the photo
paper. Using the X-ACTO knife and the ruler as your guide, trim the white
areas.
4. After printing all of your calendar and cover pages, gather them together in
order by month and place the cover on top. If you choose, you can glue
together the matching pages, per the chart below. Punch three or more
holes through the top of the calendar (you can buy decorative punches in
a variety of fun shapes). Thread short lengths of ribbon, raffia, or yarn
through the holes and tie them in loose bows. Or bind them with small
loose-leaf rings or brass fasteners.
Table 1
Page breakdown for assembling your calendar and printing two-sided pages:
Page #
Side 1 Side 2
1 Cover (page 1of 2) January artwork (page 1 of 2)
2 January calendar (page 2 of 2) February artwork (page 1 of 2)

3 February calendar (page 2 of 2) March artwork (page 1 of 2)
4 March calendar (page 2 of 2) April artwork (page 1 of 2)
5 April calendar (page 2 of 2) May artwork (page 1 of 2)
6 May calendar (page 2 of 2) June artwork (page 1 of 2)
7 June calendar (page 2 of 2) July artwork (page 1 of 2)
8 July calendar (page 2 of 2) August artwork (page 1 of 2)
9 August calendar (page 2 of 2) September artwork (page 1 of 2)
10 September calendar (page 2 of 2) October artwork (page 1 of 2)
11 October calendar (page 2 of 2) November artwork (page 1 of 2)
12 November calendar (page 2 of 2) December artwork (page 1 of 2)
13 December calendar (page 2 of 2) Back (page 2 of 2)
/