Motorola Z3 Operating instructions
- Category
- Mobile phones
- Type
- Operating instructions
This manual is also suitable for
Page is loading ...
Page is loading ...

1
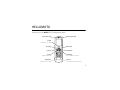
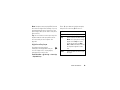
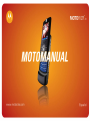
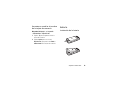
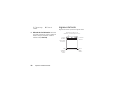
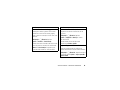
HELLOMOTO
Introducing your new
MOTO
RIZR™ Z3 GSM wireless phone.
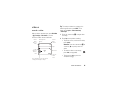
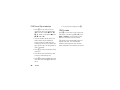
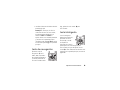
Center Key
Open main menu & select menu items.
Right Soft Key
Clear/Back Key
Power/End Key
Turn on/off, hang up, exit menus.
Bluetooth Indicator Light
t-zones Key
Left Soft Key
Send Key
Make & answer calls.
Navigation Key
Scroll up, down, left, or right.
Push Bar
Push down to close slider.
Charge Indicator Light

2
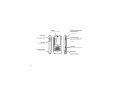
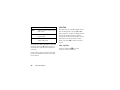
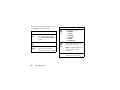
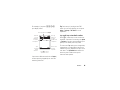
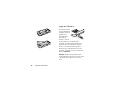
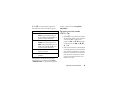
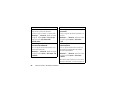
Handsfree Speaker
(on back of phone)
Volume Keys
Set ring volume when
slider is closed.
Smart Key
Select menu items.
Push Bar
Push up to open slider.
Camera Lens & High-Intensity
LED Camera Light
(on back of phone)
Camera Key
Activate camera & take photos.
Mini-USB Port
Insert battery charger
& phone accessories.
Voice Command Key
Use voice commands to make
calls & perform basic phone
functions.

3
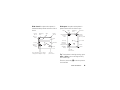
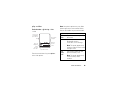
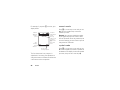
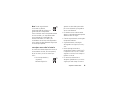
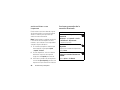
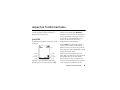
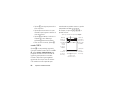
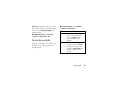
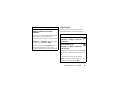
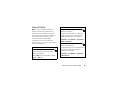
Shortcuts Main Menu
T-Mobile
10:10am
Messages
Select Exit
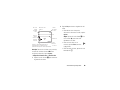
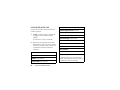
Home Screen Main Menu
Press & hold the
power key
P
until
the display lights up,
to turn on your
phone.
1
Note:
This is the standard home screen and main menu layout.
Your phone’s home screen and main menu may be different.
Press the
center key
s
to select it.
4
Press the
navigation key
S
up/down/left/right to
scroll to a menu
feature.
3
Press the
Main Menu
soft key to open the
Main Menu
.
2

4
Motorola, Inc.
Consumer Advocacy Office
1307 East Algonquin Road
Schaumburg, IL 60196
www.hellomoto.com
1-800-331-6456 (United States)
1-888-390-6456 (TTY/TDD United States for hearing impaired)
1-800-461-4575 (Canada)
Certain mobile phone features are dependent on the capabilities
and settings of your service provider’s network. Additionally,
certain features may not be activated by your service provider,
and/or the provider’s network settings may limit the feature’s
functionality. Always contact your service provider about feature
availability and functionality. All features, functionality, and other
product specifications, as well as the information contained in this
user’s guide are based upon the latest available information and
are believed to be accurate at the time of printing. Motorola
reserves the right to change or modify any information or
specifications without notice or obligation.
MOTOROLA and the Stylized M Logo are registered in the US
Patent & Trademark Office. All other product or service names are
the property of their respective owners. The Bluetooth trademarks
are owned by their proprietor and used by Motorola, Inc. under
license. Java and all other Java-based marks are trademarks or
registered trademarks of Sun Microsystems, Inc. in the U.S. and
other countries. Microsoft and Windows are registered trademarks
of Microsoft Corporation; and Windows XP is a trademark of
Microsoft Corporation.
© Motorola, Inc., 2007.
Caution:
Changes or modifications made in the radio phone, not
expressly approved by Motorola, will void the user’s authority to
operate the equipment.
Software Copyright Notice
The Motorola products described in this manual may include
copyrighted Motorola and third-party software stored in
semiconductor memories or other media. Laws in the United
States and other countries preserve for Motorola and third-party
software providers certain exclusive rights for copyrighted
software, such as the exclusive rights to distribute or reproduce
the copyrighted software. Accordingly, any copyrighted software
contained in the Motorola products may not be modified,
reverse-engineered, distributed, or reproduced in any manner to
the extent allowed by law. Furthermore, the purchase of the
Motorola products shall not be deemed to grant either directly or
by implication, estoppel, or otherwise, any license under the
copyrights, patents, or patent applications of Motorola or any
third-party software provider, except for the normal, non-exclusive,
royalty-free license to use that arises by operation of law in the
sale of a product.
Manual Number: 6809509A02-A

contents
5
contents
menu map. . . . . . . . . . . . 7
Use and Care . . . . . . . . . 9
essentials . . . . . . . . . . . 10
about this guide . . . . . 10
SIM card . . . . . . . . . . . . 11
memory card . . . . . . . 12
battery . . . . . . . . . . . . 13
turn phone on & off . . 16
make a call . . . . . . . . . 16
answer a call. . . . . . . . 16
store a phone
number. . . . . . . . . . . . 17
call a stored
phone number . . . . . . 18
search the
phonebook . . . . . . . . . 18
your phone number . . 18
main attractions . . . . . . 19
myFaves . . . . . . . . . . . 19
audio player . . . . . . . . 22
photos . . . . . . . . . . . . 24
videos . . . . . . . . . . . . . 27
slider features. . . . . . . 30
move and copy files . . . 33
cable connections. . . . . 33
Bluetooth®
wireless . . . . . . . . . . . 35
text messaging. . . . . . 40
phone updates . . . . . . 41
basics. . . . . . . . . . . . . . . 42
display . . . . . . . . . . . . 42
text entry . . . . . . . . . . 45
volume . . . . . . . . . . . . 49
navigation key. . . . . . . 49
smart key . . . . . . . . . . 49
voice commands . . . . 50
handsfree speaker . . . 52
codes & passwords . . . 53
lock & unlock phone . . . 53
customize . . . . . . . . . . . 54
ring style profiles . . . . 54
time & date. . . . . . . . . 55
wallpaper . . . . . . . . . . 55
screen saver . . . . . . . . 56
display appearance . . . . 57
multi-key answer . . . . 57
calls . . . . . . . . . . . . . . . . 58
turn off a call alert . . . . 58
delay answering . . . . . 58
recent calls . . . . . . . . . 58
redial. . . . . . . . . . . . . . 60

6
contents
return a call . . . . . . . . . 60
caller ID . . . . . . . . . . . . 60
emergency calls . . . . . 61
voicemail . . . . . . . . . . . 61
other features . . . . . . . . 63
advanced calling . . . . . 63
phonebook. . . . . . . . . . 67
messages . . . . . . . . . . 73
instant messaging . . . . 75
personalize . . . . . . . . . 76
call times . . . . . . . . . . . 79
handsfree . . . . . . . . . . 79
data & fax calls . . . . . . 81
network . . . . . . . . . . . . 81
personal organizer . . . . 82
security . . . . . . . . . . . . 84
fun & games . . . . . . . . 85
service and repairs . . . . 89
SAR Data . . . . . . . . . . . . 90
EU Conformance . . . . . . 92
Safety Information . . . . 94
Industry
Canada Notice . . . . . . . . 99
FCC Notice . . . . . . . . . . 100
Warranty. . . . . . . . . . . . 101
Hearing Aids . . . . . . . . 105
WHO Information . . . . 106
Registration . . . . . . . . . 106
Export Law. . . . . . . . . . 107
Recycling . . . . . . . . . . . 107
Perchlorate Label. . . . . 108
Driving Safety . . . . . . . 109
index. . . . . . . . . . . . . . . 111

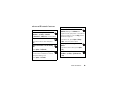
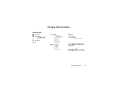
menu map
7
menu map
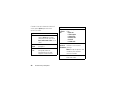
main menu
Voice Notes
s
Recent Calls
• (press
*
or
#
to scroll
through the call lists)
#
Get More
ã
IM
e
Messages
• Create Message
• New Message
•NewVoiceNote
• Message Inbox
•Voicemail
• Templates
•Drafts
• Outbox
• Browser Msgs
h
Fun & Apps
• Games & Apps
•Camera
•Pictures
• Sounds
• Videos
• Video Camera
&
Help
n
Phonebook
w
Settings
• (see next page)
This is the standard main menu layout.
Your phone’s menu may be different.
Tip:
Press
D
to exit the current menu,
or
O
to exit all menus.

8
menu map
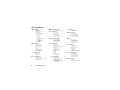
settings menu
É
To o l s
• Calculator
• Datebook
• Voice Records
•Alarm Clock
• Dialing Services
• Fixed Dial
• Web Access
• t-zones
• Bookmarks
• Stored Pages
•History
• Go to Page
•Browser Setup
• World Clock
l
Personalize
• Home Screen
• Main Menu
• Voice Dial Setup
•Skin
• Greeting
• Wallpaper
• Screen Saver
• Slide Tone
t
Ring Styles
•Style
• style Detail
E
Bluetooth Link
• [Find Me]
• [Add Audio Device]
• Setup
8
USB Settings
• Default Connection
H
Call Forward
• Voice Calls
• Fax Calls
• Data Calls
• Cancel All
• Forward Status
U
In-Call Setup
• In-Call Timer
• My Caller ID
• Answer Options
• Call Waiting
Z
Initial Setup
• Time and Date
• Speed Dial
• Display Timeout
• Backlight
•Scroll
• Slide Closed
• Text Marquee
• Language
• Brightness
•DTMF
• Master Reset
• Master Clear
m
Phone Status
• My Tel. Numbers
• Battery Meter
• Download Location
• Storage Devices
• Software Update
• Other Information
S
Headset
• Auto Answer
•Voice Dial
J
Car Settings
• Auto Answer
• Auto Handsfree
• Power-Off Delay
• Charger Time
j
Network
•New Network
•Network Setup
• Available Networks
•Network Jingle
• Call Drop Tone
u
Security
• Phone Lock
• Keypad Lock
• Lock Application
•Fixed Dial
• SIM PIN
• New Passwords
• Certificate Mgmt
c
Java™ Settings
• Java System
• Delete All Apps
• App Vibration
• App Volume
%
Airplane Mode
• Airplane Mode
• Prompt At Power Up

Use and Care
9
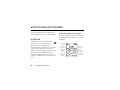
Use and Care
Use and Care
To care for your Motorola phone, please keep it away from:
liquids of any kind dust and dirt
Don’t expose your phone to water, rain,
extreme humidity, sweat, or other moisture.
Don’t expose your phone to dust, dirt, sand,
food, or other inappropriate materials.
extreme heat or cold cleaning solutions
Avoid temperatures below -10°C/14°F or
above 45°C/113°F.
To clean your phone, use only a dry soft cloth.
Don’t use alcohol or other cleaning solutions.
microwaves the ground
Don’t try to dry your phone in a microwave
oven.
Don’t drop your phone.

10
essentials
essentials
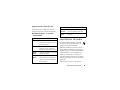
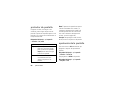
about this guide
This guide shows how to locate a menu
feature as follows:
Find it:
Main Menu
>
e Messages
>
Create Message
This means that, from the home screen:
1
Press the
Main Menu
soft key to open the
menu.
2
Press the navigation key
S
to scroll to
e Messages
, and press the center key
s
to select it.
3
Press the navigation key
S
to scroll to
Create Message
, and press the center key
s
to select it.
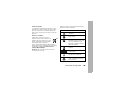
CAUTION:
Before using the
phone for the first time, read the
Important Safety and Legal
Information
included in the gray-
edged pages at the back of this
guide.

11
essentials
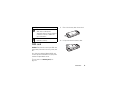
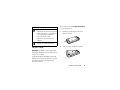
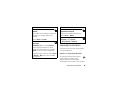
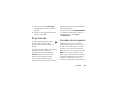
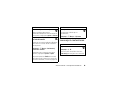
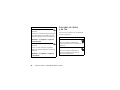
SIM card
Caution:
Don’t bend or scratch your SIM card.
Keep it away from static electricity, water, and
dirt.
Yo ur Subscriber Identity Module (SIM) card
contains personal information like your phone
number and phonebook entries.
To insert and use a
memory card
, see
page 33.
symbols
This means a feature is network,
SIM card, or subscription
dependent and may not be available
in all areas. Contact T-Mobile for
more information.
This means a feature requires an
optional accessory.
1
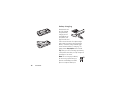
Press in the battery door release latch.
2
Lift up and remove the battery door.

12
essentials
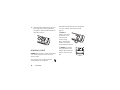
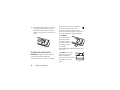
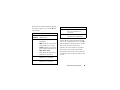
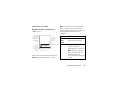
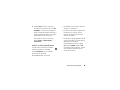
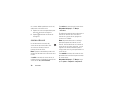
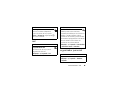
memory card
Caution:
Don’t bend or scratch your memory
card. Keep it away from static electricity,
water, and dirt.
You can store music, photos and other
multimedia files on an optional
removable microSD memory card. Your phone
can use a memory card with up to 2 GB
capacity.
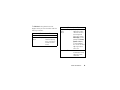
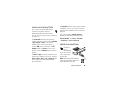
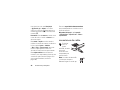
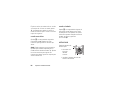
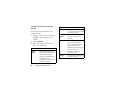
To
insert
the
memory card, hold
the memory card
with the metal
contacts facing
down, and slide the
memory card under
the metal band as shown.
To
remove
the memory
card, push down on the
retainer tab and slide the
memory card out of the
slot.
3
Hold the SIM card with the notch in the
lower right corner and the gold plate
facing down. Slide the SIM card into the
card slot as shown.

13
essentials
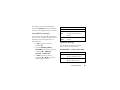
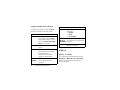
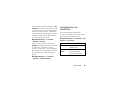
format or rename the memory
card
Find it:
Main Menu
>
w Settings
>
Phone Status
>
StorageDevices
1
Press
S
to scroll to the memory card.
2
Press
Options
to see the
StorageDevice
menu,
which lets you
Format
or
Rename
the memory
card.
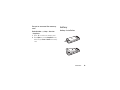
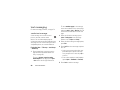
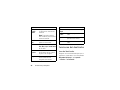
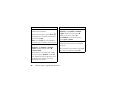
battery
battery installation

14
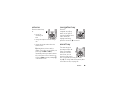
essentials
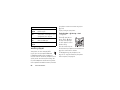
battery charging
New batteries are
not fully charged.
Plug the battery
charger into the
mini-USB port on
your phone, and
plug the other end
into an electrical outlet. Your phone might
take several seconds to start charging the
battery. The battery charge indicator light
shows when the battery is charging. The
display shows
Charge Complete
when finished.
Tip:
Relax, you can’t overcharge your battery.
It will perform best after you fully charge and
discharge it a few times.
Note:
You can charge your battery
by connecting a cable from your
phone’s mini-USB port to a USB
port on a computer. Both your

15
essentials
phone and the computer must be turned on,
and your computer must have the correct
software drivers installed. Cables and
software drivers are available in
Motorola Original data kits, sold separately.
battery tips
Battery life depends on the network, signal
strength, temperature, features, and
accessories you use.
•
Always use
Motorola Original batteries
and chargers. The warranty
does not cover damage
caused by non-Motorola batteries
and/or chargers.
•
New batteries or batteries stored for a
long time may take more time to
charge.
•
When charging your battery, keep it
near room temperature.
•
When storing your battery, keep it
uncharged in a cool, dark, dry place.
•
Never expose batteries to
temperatures below -10°C (14°F) or
above 45°C (113°F). Always take your
phone with you when you leave your
vehicle.
•
It is normal for batteries to gradually
wear down and require longer charging
times. If you notice a change in your
battery life, it is probably time to
purchase a new battery.
Contact your local recycling center for
proper battery disposal.
Warning:
Never dispose of batteries in a fire
because they may explode.
032375o

16
essentials
Before using your phone, read the battery
safety information in the “Safety and General
Information” section included in the
gray-edged pages at the back of this guide.
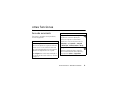
turn phone on & off
Caution:
The phone may ask for your
SIM card PIN code when you turn it on. If you
enter an incorrect PIN code three times
before the correct code, your SIM card is
disabled, and your display shows
SIM Blocked
.
Contact T-Mobile.
To turn on your phone,
press and hold the
power/end key
O
until
the keypad or display
lights up. If prompted,
enter your eight-digit
SIM card PIN code and/or four-digit unlock
code.
To turn off your phone, press and hold
O
for
a few seconds.
make a call
Open the slider, then enter a phone number
and press the send key
N
to make a call.
To
voice dial
a call, see page 50.
To “hang up,” press the power/end key
O
.
Tip:
You can make a call with the slider
closed. Select a phonebook entry, then press
the send key
N
to call the number.
answer a call
When your phone rings and/or vibrates, just
open the slider or press the send key
N
to
answer.
To “hang up,” press the power/end key
O
.

17
essentials
store a phone number
You can store a phone number in your
phone’s memory
or on your
SIM card
.
Contacts on the SIM card only have a
Name
and
Number
.
Find it:
Main Menu
>
n Phonebook
, then press
Options
>
Create New
>
Phone Contact
or
SIM Contact
1
Enter a name and other details for the
phone number. To edit details, scroll to
them and press the center key
s
.
2
Press
Done
to store the number.
To edit or delete a phonebook entry, see
page 69. To store an email address, see
page 67.
Notes about entries on your SIM card:
•
You can store only a
Name
and
Number
for
phonebook entries stored on the SIM
card.
•
To choose whether your phone stores
entries in phone memory or on the
SIM card, go to the home screen and
press
Main Menu
>
n Phonebook
, then
press
Options
>
Setup
>
Default Storage
>
Phone
or
SIM Card
.
•
Your phonebook can show the entries
stored in phone memory or on the SIM
card. To choose which entries you see,
press
Main Menu
>
n Phonebook
, then
press
Options
>
View
. You can select
Phone & SIM Card
,
SIM Card
, or
Phone Contacts
.

18
essentials
call a stored phone
number
Find it:
Main Menu
>
n Phonebook
1
Scroll to the phonebook entry.
2
Press
N
to call the entry.
To
voice dial
a phonebook entry, see
page 50.
search the phonebook
Find it:
Main Menu
>
n Phonebook
Press the keypad keys to enter the first letters
of the entry you want.
your phone number
From the home screen, press the
clear/back key
D
then
#
to see your
number.
Tip:
Want to see your phone number while
you’re on a call? Press
Options
>
My Tel. Number
.
You can edit the name and phone
number stored on your SIM card. From
the home screen, press
D#
, select
an entry, press
View
, press
Options
, and select
Edit
. If you don’t know your phone number,
contact T-Mobile.

19
main attractions
main attractions
You can do much more with your phone than
make and receive calls!
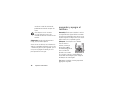
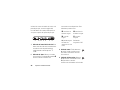
myFaves
You can use the myFaves service to
assign your five favorite contacts to
quick-access locations on your phone’s
home screen. To call a myFaves contact, just
select the contact’s picture icon in the home
screen and press the send key
N
. You can
quickly send messages to your myFaves
contacts, and share photos and voice notes
with them.
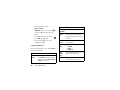
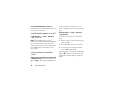
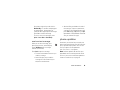
create myFaves contacts
The myFaves icons appear in the home
screen shortly after you turn on your phone.
Add Add
Add Add
Add
Press to add myFave
Press
S
left/right to
rotate
contacts &
move unused
contact to
front position.
Press the
center key
s
to add
information for
front contact.
Shortcuts Main Menu
T-Mobile 10:10am

20
main attractions
To add a new myFaves contact:
1
Press
S
left or right to move an unused
contact icon to the front position.
2
Press the center key
s
to add
information for the front contact.
3
Select
Create New
to create a new myFaves
contact.
or
Select
Get From Phonebook
to use an existing
phonebook contact.
4
Scroll to
Name
and press
Change
to enter the
contact’s name, if necessary. Press
keypad keys to enter the contact’s name
(for more information about text entry,
see page 45).
5
Scroll to
Number
and press
Change
to enter
the contact’s phone number, if necessary.
Press keypad keys to enter the number.
6
Scroll to
Icon
and press
Change
to add a
photo or select an icon for the contact.
If you take a new photo or use an existing
photo, your phone crops the photo to fit
the circular picture icon in the home
screen.
7
Scroll to
Ringtone
and press
Change
to assign
a distinctive ringtone to the contact.
8
Press
Save
to save the contact.
9
Press
Yes
to confirm the save.
T-Mobile sends you a text message to
confirm when the myFaves contact is
updated. Press
Save
to save the message, or
Delete
to delete it.
In the home screen, press
S
left or right to
move other unused contact icons to the front
and add contact information for them.
Page is loading ...
Page is loading ...
Page is loading ...
Page is loading ...
Page is loading ...
Page is loading ...
Page is loading ...
Page is loading ...
Page is loading ...
Page is loading ...
Page is loading ...
Page is loading ...
Page is loading ...
Page is loading ...
Page is loading ...
Page is loading ...
Page is loading ...
Page is loading ...
Page is loading ...
Page is loading ...
Page is loading ...
Page is loading ...
Page is loading ...
Page is loading ...
Page is loading ...
Page is loading ...
Page is loading ...
Page is loading ...
Page is loading ...
Page is loading ...
Page is loading ...
Page is loading ...
Page is loading ...
Page is loading ...
Page is loading ...
Page is loading ...
Page is loading ...
Page is loading ...
Page is loading ...
Page is loading ...
Page is loading ...
Page is loading ...
Page is loading ...
Page is loading ...
Page is loading ...
Page is loading ...
Page is loading ...
Page is loading ...
Page is loading ...
Page is loading ...
Page is loading ...
Page is loading ...
Page is loading ...
Page is loading ...
Page is loading ...
Page is loading ...
Page is loading ...
Page is loading ...
Page is loading ...
Page is loading ...
Page is loading ...
Page is loading ...
Page is loading ...
Page is loading ...
Page is loading ...
Page is loading ...
Page is loading ...
Page is loading ...
Page is loading ...
Page is loading ...
Page is loading ...
Page is loading ...
Page is loading ...
Page is loading ...
Page is loading ...
Page is loading ...
Page is loading ...
Page is loading ...
Page is loading ...
Page is loading ...
Page is loading ...
Page is loading ...
Page is loading ...
Page is loading ...
Page is loading ...
Page is loading ...
Page is loading ...
Page is loading ...
Page is loading ...
Page is loading ...
Page is loading ...
Page is loading ...
Page is loading ...
Page is loading ...
Page is loading ...
Page is loading ...
Page is loading ...
Page is loading ...
Page is loading ...
Page is loading ...
Page is loading ...
Page is loading ...
Page is loading ...
Page is loading ...
Page is loading ...
Page is loading ...
Page is loading ...
Page is loading ...
Page is loading ...
Page is loading ...
Page is loading ...
Page is loading ...
Page is loading ...
Page is loading ...
Page is loading ...
Page is loading ...
Page is loading ...
Page is loading ...
Page is loading ...
Page is loading ...
Page is loading ...
Page is loading ...
Page is loading ...
Page is loading ...
Page is loading ...
Page is loading ...
Page is loading ...
Page is loading ...
Page is loading ...
Page is loading ...
Page is loading ...
Page is loading ...
Page is loading ...
Page is loading ...
Page is loading ...
Page is loading ...
Page is loading ...
Page is loading ...
Page is loading ...
Page is loading ...
Page is loading ...
Page is loading ...
Page is loading ...
Page is loading ...
Page is loading ...
Page is loading ...
Page is loading ...
Page is loading ...
Page is loading ...
Page is loading ...
Page is loading ...
Page is loading ...
Page is loading ...
Page is loading ...
Page is loading ...
Page is loading ...
Page is loading ...
Page is loading ...
Page is loading ...
Page is loading ...
Page is loading ...
Page is loading ...
Page is loading ...
Page is loading ...
Page is loading ...
Page is loading ...
Page is loading ...
Page is loading ...
Page is loading ...
Page is loading ...
Page is loading ...
Page is loading ...
Page is loading ...
Page is loading ...
Page is loading ...
Page is loading ...
Page is loading ...
Page is loading ...
Page is loading ...
Page is loading ...
Page is loading ...
Page is loading ...
Page is loading ...
Page is loading ...
Page is loading ...
Page is loading ...
Page is loading ...
Page is loading ...
Page is loading ...
Page is loading ...
Page is loading ...
Page is loading ...
Page is loading ...
Page is loading ...
Page is loading ...
Page is loading ...
Page is loading ...
Page is loading ...
Page is loading ...
Page is loading ...
Page is loading ...
Page is loading ...
Page is loading ...
Page is loading ...
Page is loading ...
Page is loading ...
Page is loading ...
Page is loading ...
Page is loading ...
Page is loading ...
Page is loading ...
Page is loading ...
Page is loading ...
Page is loading ...
Page is loading ...
Page is loading ...
Page is loading ...
Page is loading ...
Page is loading ...
Page is loading ...
Page is loading ...
Page is loading ...
Page is loading ...
Page is loading ...
Page is loading ...
Page is loading ...
Page is loading ...
Page is loading ...
-
 1
1
-
 2
2
-
 3
3
-
 4
4
-
 5
5
-
 6
6
-
 7
7
-
 8
8
-
 9
9
-
 10
10
-
 11
11
-
 12
12
-
 13
13
-
 14
14
-
 15
15
-
 16
16
-
 17
17
-
 18
18
-
 19
19
-
 20
20
-
 21
21
-
 22
22
-
 23
23
-
 24
24
-
 25
25
-
 26
26
-
 27
27
-
 28
28
-
 29
29
-
 30
30
-
 31
31
-
 32
32
-
 33
33
-
 34
34
-
 35
35
-
 36
36
-
 37
37
-
 38
38
-
 39
39
-
 40
40
-
 41
41
-
 42
42
-
 43
43
-
 44
44
-
 45
45
-
 46
46
-
 47
47
-
 48
48
-
 49
49
-
 50
50
-
 51
51
-
 52
52
-
 53
53
-
 54
54
-
 55
55
-
 56
56
-
 57
57
-
 58
58
-
 59
59
-
 60
60
-
 61
61
-
 62
62
-
 63
63
-
 64
64
-
 65
65
-
 66
66
-
 67
67
-
 68
68
-
 69
69
-
 70
70
-
 71
71
-
 72
72
-
 73
73
-
 74
74
-
 75
75
-
 76
76
-
 77
77
-
 78
78
-
 79
79
-
 80
80
-
 81
81
-
 82
82
-
 83
83
-
 84
84
-
 85
85
-
 86
86
-
 87
87
-
 88
88
-
 89
89
-
 90
90
-
 91
91
-
 92
92
-
 93
93
-
 94
94
-
 95
95
-
 96
96
-
 97
97
-
 98
98
-
 99
99
-
 100
100
-
 101
101
-
 102
102
-
 103
103
-
 104
104
-
 105
105
-
 106
106
-
 107
107
-
 108
108
-
 109
109
-
 110
110
-
 111
111
-
 112
112
-
 113
113
-
 114
114
-
 115
115
-
 116
116
-
 117
117
-
 118
118
-
 119
119
-
 120
120
-
 121
121
-
 122
122
-
 123
123
-
 124
124
-
 125
125
-
 126
126
-
 127
127
-
 128
128
-
 129
129
-
 130
130
-
 131
131
-
 132
132
-
 133
133
-
 134
134
-
 135
135
-
 136
136
-
 137
137
-
 138
138
-
 139
139
-
 140
140
-
 141
141
-
 142
142
-
 143
143
-
 144
144
-
 145
145
-
 146
146
-
 147
147
-
 148
148
-
 149
149
-
 150
150
-
 151
151
-
 152
152
-
 153
153
-
 154
154
-
 155
155
-
 156
156
-
 157
157
-
 158
158
-
 159
159
-
 160
160
-
 161
161
-
 162
162
-
 163
163
-
 164
164
-
 165
165
-
 166
166
-
 167
167
-
 168
168
-
 169
169
-
 170
170
-
 171
171
-
 172
172
-
 173
173
-
 174
174
-
 175
175
-
 176
176
-
 177
177
-
 178
178
-
 179
179
-
 180
180
-
 181
181
-
 182
182
-
 183
183
-
 184
184
-
 185
185
-
 186
186
-
 187
187
-
 188
188
-
 189
189
-
 190
190
-
 191
191
-
 192
192
-
 193
193
-
 194
194
-
 195
195
-
 196
196
-
 197
197
-
 198
198
-
 199
199
-
 200
200
-
 201
201
-
 202
202
-
 203
203
-
 204
204
-
 205
205
-
 206
206
-
 207
207
-
 208
208
-
 209
209
-
 210
210
-
 211
211
-
 212
212
-
 213
213
-
 214
214
-
 215
215
-
 216
216
-
 217
217
-
 218
218
-
 219
219
-
 220
220
-
 221
221
-
 222
222
-
 223
223
-
 224
224
-
 225
225
-
 226
226
-
 227
227
-
 228
228
-
 229
229
-
 230
230
-
 231
231
-
 232
232
-
 233
233
-
 234
234
-
 235
235
-
 236
236
-
 237
237
-
 238
238
-
 239
239
-
 240
240
-
 241
241
-
 242
242
-
 243
243
-
 244
244
-
 245
245
-
 246
246
-
 247
247
-
 248
248
-
 249
249
-
 250
250


Motorola Z3 Operating instructions
- Category
- Mobile phones
- Type
- Operating instructions
- This manual is also suitable for
Ask a question and I''ll find the answer in the document
Finding information in a document is now easier with AI
in other languages
Related papers
Other documents
-
LG L1150 Owner's manual
-
Doro 338gsm Owner's manual
-
Doro PhoneEasy 345 Datasheet
-
Doro PhoneEasy 341gsm Datasheet
-
Allview D1 Flip User manual
-
LG L1400.TCLSV Owner's manual
-
 Haier Telecom (Qingdao) SG72015069G30P User manual
-
Premier TEL-5085S User manual
-
Samsung Highlight User manual
-
