Kohler K-8973-7-BN Installation guide
- Category
- Sanitary ware
- Type
- Installation guide
Page is loading ...

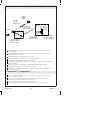
Tools/Outils/Herramientas
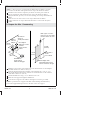
Before You Begin
NOTE: This bath filler with handshower can be mounted as a freestanding or
deck-mount installation. Refer to the proper installation sections, noted as
″Freestanding″ or ″Deck-mount″, for your installation type and the sections noted as
″All″.
For Freestanding Installations
IMPORTANT! Supply tubes K-18492 are required for freestanding installations.
NOTICE: Discard the following hardware provided with the bath filler: support plate
(1), threaded brass tubes (2), nuts (4), fiber washers (4), and screws (8).
NOTICE: Do not remove the protective wrap from the riser tubes until instructed to
do so.
For All Installations
Observe all local plumbing and building codes.
Shut off the water supply.
This product may be installed as freestanding (installed onto riser tubes) or
deck-mount (installed onto the bath deck). Follow the sections that pertain to your
particular installation.
IMPORTANT! For proper drainage of the spout, install the bath filler to a level
surface.
Avant de commencer
REMARQUE: Le remplisseur de baignoire avec douchette peut être monté en
installation autoportante ou sur comptoir. Se référer aux sections appropriées
d’installation, notées ″Autoportante″ ou ″Sur comptoir″ pour votre type d’installation
et les sections notées ″Toutes″.
Pour les installations autoportantes
IMPORTANT! Les tubes d’alimentation K-18492 sont requis pour les installations
autonomes.
Strap Wrench
Clé à sangle
Llave de correa
Solder
Fer à souder
Suelda
Drill and Hole Saw
Perceuse et scie cylindrique
Taladro y corona perforadora
Thread Sealant
Joint d'étanchéité pour
filetage
Sellador de roscas
Thermometer
Thermomètre
Termómetro
Plumbers Putty
Mastic de plombier
Masilla de plomería
Plus/Plus/Más:
• Two 12" (30.5 cm) Long, 1/2"
Copper Tubes
Deux tubes en cuivre 1/2", longueur
12" (30,5 cm)
Dos tubos de cobre de 1/2",
12" (30,5 cm) de largo
• 1-1/2" Thin Wall Socket Wrench
Clé à douilles pour mur fin de 1-1/2"
Llave de dados de pared delgada de 1-1/2"
• Hacksaw or Tubing Cutter
Scie à métaux ou coupe tubes
Sierra para metales o cortatubos
1169172-2-A 2 Kohler Co.
Page is loading ...

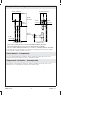
Rough-In - Freestanding
To properly plan for the installation, use the cut-out template provided with your bath
along with the roughing-in dimensions above.
Raccordement - Autoportante
Pour proprement planifier l’installation, utiliser le gabarit de découpe fourni avec la
baignoire ainsi que les dimensions de raccordement ci-dessus.
Diagrama de instalación - Autosoportada
Para planear correctamente la instalación, utilice la plantilla de corte provista con su
bañera junto con el diagrama de instalación mostrado arriba.
2-15/16" (7.5 cm)
7-7/16"
(18.9 cm)
5-3/16"
(13.2 cm)
22" (55.9 cm)
2-5/8"
(6.7 cm) D.
22-1/4"
(56.5 cm)
16-7/8"
(42.9 cm)
8-13/16" (22.4 cm)
No change in measurements if connected with drain illustrated. (K-11344)
Aucun changement de mesures si connecté au drain illustré. (K-11344)
No es necesario cambiar las medidas si se conecta con el desagüe ilustrado. (K-11344)
11-1/8" (28.3 cm)
3-5/8"
(9.2 cm)
1169172-2-A 4 Kohler Co.

Rough-In - Deck-Mount
To ensure that water will not drip outside of the bath, properly position the faucet on the
deck so the outlet will be located inside the bath.
To properly plan for the installation, use the cut-out template provided with your bath
along with the roughing-in dimensions above.
Raccordement - Sur comptoir
Pour assurer que l’eau ne s’écoulera pas à l’extérieur de la baignoire, positionner
proprement le robinet sur le comptoir de manière à ce que la sortie soit localisée à
l’intérieur de la baignoire.
Pour proprement planifier l’installation, utiliser le gabarit de découpe fourni avec la
baignoire ainsi que les dimensions de raccordement ci-dessus.
Diagrama de instalación - Montaje en cubierta
Para asegurar que el agua no goteará fuera de la bañera, coloque correctamente la
grifería en la cubierta de manera que la salida quede dentro de la bañera.
Para planear correctamente la instalación, utilice la plantilla de corte provista con su
bañera junto con el diagrama de instalación mostrado arriba.
5-15/16"
(15.1 cm)
7-7/16"
(18.9 cm)
5-3/16"
(13.2 cm)
9-1/2"
(24.1 cm)
8-13/16" (22.4 cm)
11-1/8" (28.3 cm)
3-5/8"
(9.2 cm)
Kohler Co. 5 1169172-2-A

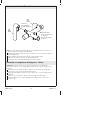
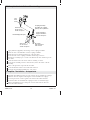
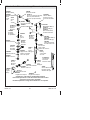
1. Assemble the Bath Filler - All
NOTE: The arms included with the bath filler are NOT identical. The screw hole on
each arm should face toward the bath filler body.
Determine the left and right-side arms. The setscrew hole for each arm should face
the bath filler body.
Apply lubricant (provided) to the O-rings on the bath filler body.
Insert the short side of the arms into the bath filler body.
Secure each arm to the bath filler body with a large setscrew.
Assembler le remplisseur de baignoire - Toutes
REMARQUE: Les bras inclus avec le remplisseur de baignoire ne SONT PAS
identiques. L’orifice de vis sur chaque bras doit faire face au corps du remplisseur de
baignoire.
Déterminer les bras gauche et droit. L’orifice de vis de retenue sur chaque bras
doit faire face au corps du remplisseur de baignoire.
Appliquer du lubrifiant (fourni) aux joints toriques sur le corps du remplisseur de
baignoire.
Insérer le côté court des bras dans le corps du remplisseur de baignoire.
Sécuriser chaque bras au corps du remplisseur de baignoire avec une vis de
retenue large.
Bath Filler Body
Corps du remplisseur
de baignoire
Cuerpo del llenador
de bañera
Arm
Bras
Brazo
Setscrew
Vis de retenue
Tornillo de fijación
Arm
Bras
Brazo
1169172-2-A 6 Kohler Co.

Ensamble el llenador de bañera - Todas
NOTA: Los brazos provistos con el llenador de bañera NO son idénticos. El orificio
para tornillo de cada brazo debe quedar hacia el cuerpo del llenador de bañera.
Determine cuál es el brazo izquierdo y el derecho. El orificio para tornillo de
fijación de cada brazo debe quedar hacia el cuerpo del llenador de bañera.
Aplique lubricante (provisto) a los arosellos (O-rings) en el cuerpo del llenador de
bañera.
Inserte el lado corto de los brazos en el cuerpo del llenador de bañera.
Asegure cada brazo al cuerpo del llenador de bañera con un tornillo de fijación
grande.
2. Prepare the Site - Freestanding
Mark the location of the water supply lines from the bath drain. Use the template
provided with the riser tubes to assist you.
Verify the distance between the centerline of the marked holes is 5-15/16” (15.1
cm) and the distance between the centerline of each marked hole to the centerline
of the drain outlet is 22” (55.9 cm).
Drill the marked holes using a 1-5/8” drill bit or hole saw.
Insert the riser support through the drilled holes.
Secure the riser support to the subfloor with eight wood screws (provided).
NOTE: To protect the riser support from debris when installing the finished floor,
position the supplied thread protectors in the holes of the riser support.
Water Supply Tube
Tube d'alimentation d'eau
Tubo de suministro de agua
Subfloor
Plancher
Subpiso
Wood Screw
Vis à bois
Tornillo para madera
5-15/16"
(15.1 cm)
22"
(55.9 cm)
Drain Outlet
Sortie de drain
Salida del desaggüe
Riser Support
Support de colonne
montante
Soporte de tubo
vertical
Finished Floor
Sol fini
Piso acabado
Male copper connection
Connection en cuivre mâle
Conexión macho de cobre
21-9/16"
(54.8 cm)
20-11/16"
(52.5 cm)
Kohler Co. 7 1169172-2-A

Prepare the Site - Freestanding (cont.)
Install the 1/2″ water supply tubing.
Install the finished floor material.
Measure and mark 20-11/16″ (52.5 cm) up from the surface of the finished floor
onto the water supply tubes. Cut the water supplies tubes to this height.
IMPORTANT! The dimensions reference a nominal height of 22-1/4″ (56.5 cm) from
the finished floor to the center of the predrilled pilot hole in the freestanding bath
(see ″Construct the Tee Assembly - Freestanding″ section). Variations of ±5/16″ (8
mm) must be added/subtracted from the supply tube connection and coupling
assembly heights.
Solder 1/2″ male copper connections to the water supply lines. The measurement
to the top of these connections should be approximately 21-9/16″ (54.8 cm) from
the surface of the finished floor.
Apply thread sealant to the male copper connections on each water supply tube.
Préparer le site - Autoportante
Marquer l’emplacement des conduites d’alimentation d’eau du drain de baignoire.
Utiliser le gabarit fourni avec les tubes élévateurs pour vous assister.
Vérifier que la distance entre la ligne centrale des orifices marqués est de 5-15/16″
(15,1 cm) et que celle entre la ligne centrale de chaque orifice marqué et la ligne
centrale de sortie du drain est de 22″ (55,9 cm).
Percer les orifices marqués en utilisant une mèche de 1-5/8” ou une scie
cylindrique.
Insérer le support de l’élévateur dans les orifices percés.
Sécuriser le support de l’élévateur au plancher avec huit vis à bois (fournies).
REMARQUE: Pour protéger le support élévateur des débris lors de l’installation du
sol fini, positionner les protecteurs de filetage fournis dans les orifices du support
élévateur.
Installer une tuyauterie d’alimentation d’eau de 1/2″.
Installer le matériau du sol fini.
Mesurer et marquer 20-11/16″ (52,5 cm) de la surface su sol fini dans les tubes
d’alimentation d’eau. Découper les tubes d’alimentation à cette hauteur.
IMPORTANT! Les dimensions font référence à une hauteur nominale de 22-1/4″
(56,5 cm) du sol fini au centre du trou-pilote préalablement percé dans la baignoire
autonome (voir la section ″Construire l’ensemble du T - Autonome″). Des variations
de 5/16″ (8 mm) doivent être ajoutées/soustraites des hauteurs de la connexion du
tube d’alimentation et de l’ensemble de couplage.
Souder les connexions en cuivre mâles de 1/2″ aux conduites d’alimentation
d’eau. La mesure au-dessus de ces connexions devrait être d’approximativement
21-9/16″ (54,8 cm) de la surface du sol fini.
Appliquer du joint d’étanchéité pour filetage aux connections en cuivre mâles sur
chaque tube d’alimentation d’eau.
Prepare el sitio - Autosoportada
Marque la ubicación de las líneas de suministro de agua desde el desagüe de la
bañera. Utilice la plantilla provista con los tubos verticales como ayuda.
Verifique que la distancia entre la línea central de los orificios marcados sea
5-15/16″ (15,1 cm) y que la distancia entre la línea central de cada orificio
marcado a la línea central de la salida del desagüe sea 22″ (55,9 cm).
1169172-2-A 8 Kohler Co.
Page is loading ...

3. Install the Riser Tubes - Freestanding
Thread the riser tubes down into the riser support until the riser tubes almost
bottom out. Do not completely tighten the riser tubes into the riser support.
NOTE: The distance from the surface of the finished floor to the top of the installed
coupling assemblies must be approximately 24-7/16″ (62.1 cm).
Thread a coupling assembly onto each water supply connection, then tighten with
a wrench.
Install the plastic pipe plugs (provided) into each coupling assembly.
Turn on the main water supply.
Check for leaks. Adjust as needed.
Turn off the main water supply.
Remove and discard the plastic pipe plugs.
Thread the riser tubes out of the riser support, then thread the riser tubes up onto
the coupling assemblies until hand-tight.
Slide an escutcheon with gasket (supplied in the bath filler hardware pack) over
each riser tube and against the surface of the finished floor. The setscrew holes on
each escutcheon should face toward the bath.
Secure each escutcheon in place with a small setscrew.
Installer les tubes élévateurs - Autoportante
Visser les tubes élévateurs dans le support élévateur jusqu’au bout. Ne pas
complètement serrer les tubes élévateurs dans le support de l’élévateur.
Finished Floor
Sol fini
Piso acabado
Water Supply Tube
Tube d'alimentation d'eau
Tubo de suministro de agua
Plastic Pipe Plug
Bouchon à tuyau en plastique
Tapón de tubo de plástico
Gasket
Joint
Empaque
Escutcheon
Applique
Chapetón
24-7/16"
(62.1 cm)
Setscrew
Vis de retenue
Tornillo de fijación
Riser tube
Tube d'élévation
Tubo vertical
Coupling Assembly
Ensemble de couplage
Montaje de acoplamiento
Riser tube
Tube d'élévation
Tubo vertical
1169172-2-A 10 Kohler Co.
Page is loading ...

4. Construct the Tee Assembly - Freestanding
Thread the fastener support into the side of the bath with a 1/4″ hex wrench. Do
not overtighten.
Ensure the distance from the head of the fastener support to the bath surface is
approximately 1/2″ (1.3 cm).
Thread the fastener rod into the fastener support.
Thread a bracket onto one end of tee rod until hand-tight.
Slide the tee rod through the center hole of the tee.
Hand tighten the remaining bracket onto the other end of the tee rod to construct
the tee assembly.
Ensure the center-to-center distance between the brackets aligns with the
center-to-center distance of the installed riser tubes.
Slide the tee assembly down onto the installed riser tubes. Do not secure the tee
assembly at this time.
Construire le T - Autoportante
Visser le support de fixation dans le côté de la baignoire avec une clé hexagonale
de 1/4″. Ne pas trop serrer.
S’assurer que la distance de la tête du support de fixation à la surface de la
baignoire soit d’approximativement 1/2″ (1,3 cm).
Visser la tige de fixation dans le support de fixation.
Visser un support dans une extrémité de la tige T jusqu’au serrage à main.
Tee/T/T
Tee rod
Tige en T
Varilla de la T
Fastener Support
Support de fixation
Soporte de fijación
Fastener Rod
Tige de fixation
Varilla de fijación
1/2"
(1.3 cm)
Bracket
Support
Soporte
Bath
Baignoire
Bañera
Fastener Rod
Tige de fixation
Varilla de fijación
Fastener Support
Support de fixation
Soporte de fijación
1169172-2-A 12 Kohler Co.
Page is loading ...

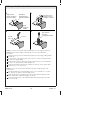
5. Complete the Installation - Freestanding
Apply lubricant (supplied) to the O-rings on the coupling assemblies.
Insert the arms of the bath filler onto the coupling assemblies.
Ensure the arms are flush against the top of the riser tubes.
Secure the arms to the coupling assemblies with the large setscrews.
Slide the tee assembly up to cover the seam between the arms and the top of the
riser tubes.
Insert the fastener rod to the center of the tee assembly, as shown.
Secure the tee assembly, with two small setscrews, below the center of the tee
assembly.
Remove the protective wrap from the riser tubes.
Secure the brackets at this location with small setscrews.
Proceed to the ″Install the Handshower - All″ section.
Compléter l’installation - Autoportante
Appliquer du lubrifiant (fourni) aux joints toriques sur les ensembles de couplage.
Insérer les bras du remplisseur de baignoire sur les ensembles de couplage.
S’assurer que les bras soient à égalité contre le dessus des tubes élévateurs.
Sécuriser les bras aux ensembles de couplage avec des vis de retenue larges.
Glisser l’ensemble du T vers le haut pour couvrir la fente entre les bras et le
dessus des tubes élévateurs.
Bracket/Support/Soporte
Riser tube
Tube d'élévation
Tubo vertical
Arm
Bras
Brazo
Setscrew
Vis de retenue
Tornillo de fijación
Coupling Assembly
Ensemble de couplage
Montaje de acoplamiento
Setscrew
Vis de retenue
Tornillo de fijación
Fastener Support
Support de fixation
Soporte de fijación
1169172-2-A 14 Kohler Co.
Page is loading ...

6. Prepare the Site - Deck-Mount
NOTE: Provide an access panel under the bath deck for water supply connections.
NOTE: Reference the ″Rough-In - Deck-Mount″ section of this guide before
proceeding.
Place the support plate onto the bath deck where the water supply tubing will be
located. (1)
Trace the holes of the support plate at this location to set the centerline distances
for the water supply tubing.
Verify that the location of the support plate will allow the spout of the bath filler
to reach over the bath deck and into the bath. (2)
Verify that the distance between the centerline of the holes on the support plate
will be 5-15/16” (15.1 cm) ±0. (3)
NOTE: If a hole saw will be used to drill the holes, drill outside the line of the
marked holes.
Drill the marked holes on the bath deck using a 1-9/16” drill bit or 1-1/2″ hole
saw. Remove any debris from the drilling process.
Verify the diameter of the drilled holes will accommodate the diameter of the
tubes. Adjust the hole diameter slightly, if needed.
Secure the support plate to the unfinished bath deck with the eight (provided)
wood screws. (4)
Wood Screw
Vis à bois
Tornillo para madera
Support Plate
Plaque de support
Placa de soporte
Bath Deck
Comptoir arrière
Cubierta de bañera
1-1/2" D.
Check the reach.
Vérifier la portée.
Verifique el alcance.
Bath
Baignoire
Bañera
12
3
4
5-15/16"
(15.1 cm)
1169172-2-A 16 Kohler Co.
Page is loading ...

7. Install the Spout - Deck Mount
Thread the tubes into the support plate.
Place a fiber washer and nut over the tubes, both above and below the deck.
Hand tighten the nuts.
Verify the top of the tube is flush with the surface of the intended finished deck
height.
Securely tighten the nuts with a wrench.
Solder a 1/2″ male copper connection (not supplied) to the outside of a 12″ (30.5
cm) section of each water supply line.
Apply thread sealant to each male copper connection.
Securely tighten the coupling assemblies to each male copper connection.
Connect the supply lines under the deck to the main water supply.
Insert the plastic pipe plugs into the coupling assemblies.
Turn on the water supply.
Check all connections for leaks. Adjust as needed.
Turn off the water supply, then remove and discard the plastic pipe plugs.
Finish the bath deck and surround.
Solder together.
Souder ensemble.
Suelde juntos.
Nut/Écrou/Tuerca
Plug
Bouchon
Tapón
Fiber Washer
Rondelle en fibres
Arandela de fibra
Water Supply Tubing
Tuyauterie
d'alimentation d'eau.
Tubo de suministro
de agua.
Apply thread sealant.
Appliquer un ruban
d'étanchéité pour filetage.
Aplique cinta selladora
de roscas.
12"
(30.5 cm)
Coupling Assembly
Ensemble de couplage
Montaje de acoplamiento
Male copper connection
Connection en cuivre mâle
Conexión macho de cobre
1169172-2-A 18 Kohler Co.
Page is loading ...

8. Install the Bath Filler - Deck Mount
Place a gasket and escutcheon over each coupling assembly.
Face the setscrew hole on each escutcheon toward the outside of the bath.
Apply lubricant (supplied) to the O-rings on the coupling assemblies.
Slide the arms of the bath filler over the coupling assemblies.
Secure the arms to the coupling assemblies with the large setscrews.
Secure each escutcheon in place with a small setscrew.
Proceed to the ″Install the Handshower - All″ section.
Installer le remplisseur de la baignoire - Sur comptoir
Positionner un joint et une applique sur chaque ensemble de couplage.
Orienter l’orifice de vis de retenue sur chaque applique vers l’extérieur de la
baignoire.
Appliquer du lubrifiant (fourni) aux joints toriques sur les ensembles de couplage.
Glisser les bras du remplisseur de baignoire sur les ensembles de couplage.
Sécuriser les bras aux ensembles de couplage avec des vis de retenue larges.
Sécuriser chaque applique avec une petite vis de retenue.
Procéder à la section ″Installer la douchette - Toutes″.
Gasket
Joint
Empaque
Escutcheon
Applique
Chapetón
Setscrew
Vis de retenue
Tornillo de fijación
Coupling Assembly
Ensemble de couplage
Montaje de acoplamiento
Arm/Bras/Brazo
Setscrews
Vis de retenue
Tornillos de fijación
Bath Filler
Remplisseur de baignoire
Llenador de bañera
1169172-2-A 20 Kohler Co.

Instale el llenador de bañera - Montaje en cubierta
Coloque un empaque y chapetón en cada ensamble de acoplamiento.
Oriente el orificio para tornillo de fijación de cada chapetón hacia el exterior de la
bañera.
Aplique lubricante (provisto) a los arosellos (O-rings) en los montajes de
acoplamiento.
Deslice los brazos del llenador de bañera sobre los montajes de acoplamiento.
Fije los brazos a los montajes de acoplamiento con tornillos de fijación grandes.
Fije cada chapetón en su lugar con un tornillo de fijación pequeño.
Continúe en la sección ″Instale la ducha de mano - Todas″.
9. Install the Handshower - All
Thread the hose end with O-ring and screen washer to the handshower.
Thread the hose end with nut and washer to the diverter outlet on the underside
of the bath filler body.
Securely tighten both ends of the hose with a wrench.
Slide the handshower into the handshower bracket.
Installer la douchette -Toutes
Visser l’extrémité du tuyau avec le joint torique et la rondelle à grille sur la
douchette.
Visser l’extrémité du tuyau avec l’écrou et la rondelle à la sortie de l’inverseur
au-dessous du corps du remplisseur de baignoire.
Serrer fermement les deux extrémités du tuyau à l’aide d’une clé.
Visser la douchette dans le support de celle-ci.
Washer
Rondelle
Arandela
Diverter Outlet
Sortie inverseur
Salida del desviador
Handshower Bracket
Support de douchette
Soporte de ducha de mano
Hose Collar
Collier de tuyau
Collarín de la
manguera
Hose Nut
Écrou de tuyau
Tuerca de la manguera
Handshower
Douchette
Ducha de mano
Screen Washer
Rondelle à grille
Arandela de rejilla
Kohler Co. 21 1169172-2-A

Instale la ducha de mano - Todas
Enrosque el extremo de la manguera con el arosello y la arandela de rejilla a la
ducha de mano.
Enrosque el extremo de la manguera con tuerca y arandela a la salida del
desviador en la parte de abajo del cuerpo del llenador de bañera.
Apriete bien ambos extremos de la manguera con una llave.
Deslice la ducha de mano en el soporte de la ducha de mano.
10. Complete the Installation - All
NOTE: The black inserts located in the spout and handshower holder can be
exchanged with the provided white or green inserts.
Ensure all connections are tight.
Gently remove the colored trim piece by lifting up and sliding it out of the spout
end.
Turn on the main water supply.
Tilt down and rotate the faucet handle to the full hot position. Run hot water
through the spout for one minute to remove any debris.
Rotate the faucet handle to the full cold position. Run cold water through the
spout for about one minute to remove any debris.
Check for leaks. Adjust as needed.
Lift the handshower out of the handshower bracket.
Pull the diverter button to activate the handshower.
Check for leaks at each end of the handshower hose. Adjust as needed.
Return the handle to a level position to turn the water off.
Place the handshower back into the handshower bracket.
Lubricate the spout insert with soap and reinstall it.
Handshower
Douchette
Ducha de mano
Diverter Button
Bouton inverseur
Botón del desviador
Insert
Insertion
Inserto
Insert
Insertion
Inserto
Handle
Poignée
Manija
Bath Filler
Remplisseur de baignoire
Llenador de bañera
1169172-2-A 22 Kohler Co.
Page is loading ...

Care and Cleaning
For best results, keep the following in mind when caring for your KOHLER product:
•
Use a mild detergent such as liquid dishwashing soap and warm water for
cleaning. Do not use abrasive cleaners that may scratch or dull the surface.
•
Carefully read the cleaner product label to ensure the cleaner is safe for use on the
material.
•
Always test your cleaning solution on an inconspicuous area before applying to
the entire surface.
•
Do not allow cleaners to sit or soak on the surface.
•
Wipe surfaces clean and rinse completely with water immediately after cleaner
application. Rinse and dry any overspray that lands on nearby surfaces.
•
Use a soft, dampened sponge or cloth. Never use an abrasive material such as a
brush or scouring pad to clean surfaces.
For detailed cleaning information and products to consider, visit www.kohler.com/clean.
To order Care & Cleaning information, call 1-800-456-4537.
Entretien et nettoyage
Pour obtenir les meilleurs résultats possibles, prendre ce qui suit en considération lors de
l’entretien de votre produit KOHLER:
•
Utiliser un détergent doux tel que liquide pour vaisselle et de l’eau chaude pour
nettoyer. Ne pas utiliser de nettoyants abrasifs car ils pourraient rayer ou abîmer
la surface.
•
Lire l’étiquette du produit de nettoyage avec le plus grand soin pour assurer qu’il
peut être utilisé sans danger sur le matériau.
•
Toujours tester la solution de nettoyage sur une surface non visible avant de
l’appliquer sur l’ensemble de la surface.
•
Ne pas laisser les nettoyants reposer ou tremper sur la surface.
•
Essuyer les surfaces et rincer complètement avec de l’eau immédiatement après
l’application du nettoyant. Rincer et sécher tout éclaboussement sur les surfaces
avoisinantes.
•
Utiliser une éponge ou un chiffon doux et humide. Ne jamais utiliser de matériau
abrasif tel qu’une brosse ou une éponge à récurer pour nettoyer les surfaces.
Pour obtenir des informations détaillées sur le nettoyage et les produits à considérer,
consulter le site www.kohler.com/clean. Pour commander des informations sur
l’entretien & le nettoyage, appeler le 1-800-456-4537.
Cuidado y limpieza
Para obtener los mejores resultados, tenga presente lo siguiente al limpiar su producto
KOHLER:
•
Para la limpieza, utilice solamente un detergente suave como el jabón líquido para
lavar platos y agua tibia. No utilice limpiadores abrasivos que puedan rayar u
opacar la superficie.
•
Lea atentamente la etiqueta del producto de limpieza para asegurar que no
presente riesgos al usarse en el material.
•
Siempre pruebe la solución de limpieza en un área oculta antes de aplicarla a toda
la superficie.
•
No deje por tiempo prolongado los limpiadores en la superficie.
•
Limpie con un trapo y enjuague completa e inmediatamente con agua después de
aplicar limpiadores. Enjuague y seque las superficies cercanas que se hayan
rociado.
•
Utilice una esponja o trapo suave y húmedo. Para limpiar las superficies nunca
utilice materiales abrasivos como cepillos o estropajos de tallar.
1169172-2-A 24 Kohler Co.

Cuidado y limpieza (cont.)
Para obtener información detallada de limpieza y los limpiadores a considerar, visite
www.kohler.com/clean. Para solicitar información sobre el cuidado y la limpieza, llame
al 1-800-456-4537.
Warranty
KOHLER
®
Faucet Lifetime Limited Warranty
Kohler Co. warrants its Faucets* manufactured after January 1, 1997, to be leak and drip
free during normal residential use for as long as the original consumer purchaser owns
his or her home. If the Faucet should leak or drip during normal use, Kohler Co. will,
free of charge, mail to the purchaser the cartridge necessary to put the Faucet in good
working condition. This warranty applies only to Kohler Faucets installed in the United
States of America, Canada or Mexico (″North America″).
Kohler Co. also warrants all other aspects of the faucet or accessories (″Faucet″)*, (except
gold, non-Vibrant
®
, non-chrome finishes) to be free of defects in material and
workmanship during normal residential use for as long as the original consumer
purchaser owns his or her home. This warranty applies only to Kohler Faucets installed
in North America. If a defect is found in normal residential use, Kohler Co. will, at its
election, repair, provide a replacement part or product, or make appropriate adjustment.
Damage to a product caused by accident, misuse, or abuse is not covered by this
warranty. Improper care and cleaning will void the warranty**. Proof of purchase
(original sales receipt) must be provided to Kohler Co. with all warranty claims. Kohler
Co. is not responsible for labor charges, installation, or other incidental or consequential
costs. In no event shall the liability of Kohler Co. exceed the purchase price of the
Faucet.
If the Faucet is used commercially or is installed outside of North America, or if the
finish is gold, non-Vibrant or a painted or powder coated color finish, Kohler Co.
warrants the Faucet to be free from defects in material and workmanship for one (1) year
from the date the product is installed, under Kohler Co.’s standard one-year limited
warranty.
If you believe that you have a warranty claim, contact Kohler Co., either through your
Dealer, Plumbing Contractor, Home Center or E-tailer, or by writing Kohler Co., Attn.:
Customer Care Center, 444 Highland Drive, Kohler, WI 53044, USA. Please be sure to
provide all pertinent information regarding your claim, including a complete description
of the problem, the product, model number, color, finish, the date the product was
purchased and from whom the product was purchased. Also include your original
invoice. For other information, or to obtain the name and address of the service and
repair facility nearest you, call 1-800-4-KOHLER (1-800-456-4537) from within the USA
and Canada, and 001-800-456-4537 from within Mexico, or visit www.kohler.com within
the USA, www.ca.kohler.com from within Canada, or www.mx.kohler.com in Mexico.
KOHLER CO. AND/OR SELLER ARE PROVIDING THESE WARRANTIES IN LIEU
OF ALL OTHER WARRANTIES, EXPRESSED OR IMPLIED, INCLUDING BUT NOT
LIMITED TO THE IMPLIED WARRANTIES OF MERCHANTABILITY AND
FITNESS FOR A PARTICULAR PURPOSE. KOHLER CO. AND/OR SELLER
DISCLAIM ALL LIABILITY FOR SPECIAL, INCIDENTAL OR CONSEQUENTIAL
DAMAGES. Some states/provinces do not allow limitations of how long an implied
warranty lasts or the exclusion or limitation of such damages, so these limitations and
exclusions may not apply to you. This warranty gives the consumer specific legal
rights. You may also have other rights that vary from state/province to state/province.
This is Kohler Co.’s exclusive written warranty.
*Trend
®
faucets, MasterShowerTM tower, BodySpaTM systems and components;
WaterHavenTM tower, systems and components; TripointTM faucets, Polished Gold,
non-Vibrant and painted or powder coated finishes, fittings; all items within the ″Fixture
Related″ section of the Kohler Faucets Price Book, drains, Duostrainer
®
sink strainers,
Kohler Co. 25 1169172-2-A
Page is loading ...
Page is loading ...

Garantía (cont.)
COMERCIALIZACIÓN E IDONEIDAD PARA UN PROPÓSITO EN PARTICULAR.
KOHLER CO. Y/O EL VENDEDOR NO SE HACEN RESPONSABLES POR
CONCEPTO DE DAÑOS PARTICULARES, INCIDENTALES O INDIRECTOS.
Algunos estados/provincias no permiten limitaciones en cuanto a la duración de una
garantía implícitaoalaexclusión o limitación de tales daños, por lo que estas
limitaciones y exclusiones pueden no aplicar a su caso. Esta garantía otorga al
consumidor ciertos derechos legales específicos. Además, usted puede tener otros
derechos que varían de estado a estado y provincia a provincia.
Ésta es la garantía exclusiva por escrito de Kohler Co.
*La grifería Trend
®
; la torre MasterShowerTM; los sistemas y componentes BodySpaTM;la
torre, sistemas y componentes WaterHavenTM; las griferías TripointTM, el acabado en oro
pulido, que no sea Vibrant y los acabados con revestimiento de pintura o en polvo;
conexiones; todos los artículos contenidos en la sección ″Fixture Related″ del KOHLER
Faucets Price Book, los desagües, las coladeras de fregadero Duostrainer
®
,los
dispensadores de jabón y loción; y la grifería de uso comercial e instalada fuera del
territorio de Norteamérica, están cubiertos por la garantía limitada de un año de Kohler
Co.
**Nunca utilice limpiadores que contengan limpiadores abrasivos, amoníaco,
blanqueador, ácidos, ceras, alcohol, disolventes u otros productos no recomendados para
el cromo. Esto anulará la garantía.
Warranty
For Mexico
KOHLER CO.
It is recommended that at the time of purchase, you verify that all accessories and
components are complete in this package.
This Kohler product is warranted to be free of defects in material and workmanship for
one (1) year from the date of purchase as shown on the invoice or receipt.
1. Kohler Co. will only service its commercialized products through its authorized
distributors.
2. To obtain warranty service, please present the invoice and corresponding warranty.
3. Through its authorized distributors, Kohler Co. promises to repair the defective
product or provide a new replacement or an equivalent model (in those cases that the
model has been discontinued) when the product is beyond repair, without any charge to
the consumer.
4. The time of repair will not exceed six (6) weeks commencing on the date the product
is received.
5. It is recommended that the consumer save the invoice or receipt as additional
protection, as it may substitute the warranty in the case that there is a discrepancy in the
validity of the warranty.
EXCEPTIONS AND RESTRICTIONS
The Warranty will not be valid in the following cases:
1. When the product is not operated in accordance with the instructions concerning use
and operation set forth in the owner’s manual or installation instructions, and when the
recommendations and warnings included are not observed.
1169172-2-A 28 Kohler Co.

Warranty (cont.)
2. When the product has been modified or dismantled partially or totally; or has been
used in a negligent fashion and as a consequence has suffered damages attributable to
the consumer, individual, or hardware not authorized by Kohler Co.
3. This warranty does not cover the damages as a result of disaster such as fire or acts of
God, including flooding, earthquake, or electric storms, etc. To obtain a list of
distributors in your area where you can exercise your rights under this warranty, please
call 001-800-456-4537.
KOHLER CO., KOHLER, WI 53044 U.S.A.
IMPORTER:
INTERNACIONAL DE CERÁMICA, S.A.B. DE C.V.
AV. CARLOS PACHECO NO. 7200
CHIHUAHUA, CHIH., MEXICO C.P. 31060
TEL: 52 (14) 29-11-11
Garantía
Para México
KOHLER CO.
Se recomienda que al momento de la compra, verifique que todos los accesorios y
componentes estén completos en esta caja.
Se garantiza que este producto Kohler está libre de defectos en material y mano de obra
por un (1) año, a partir de la fecha de compra que aparezca en la factura o recibo.
1. Kohler Co. prestará servicio únicamente a los productos comercializados a través de
sus distribuidores autorizados.
2. A fin de obtener el servicio de garantía, favor de presentar la factura de compra y la
garantía correspondiente.
3. Kohler Co., a través de sus distribuidores autorizados, se compromete a reparar el
producto defectuoso o, cuando la reparación no sea posible, reemplazarlo por uno nuevo
o un modelo equivalente (en caso de que el producto haya sido descontinuado) sin
ningún cargo al consumidor.
4. El tiempo de reparación no excederá de seis (6) semanas a partir de la fecha de
recepción del producto.
5. Se recomienda al consumidor que conserve el recibo o factura de compra como
protección adicional, pues el mismo puede sustituir a la garantía en caso de que exista
discrepancia en cuanto a la validez de la misma.
EXCEPCIONES Y RESTRICCIONES
La garantía no tendrá validez en los siguientes casos:
1. Cuando el producto no se haya utilizado conforme a las instrucciones de uso y
funcionamiento incluidas en el manual del usuario o en las instrucciones de instalación y
cuando no se hayan observado las recomendaciones y advertencias provistas.
Kohler Co. 29 1169172-2-A
Page is loading ...

Service Parts/Pièces de rechange/Piezas de repuesto
Gasket/Joint/Empaque
Escutcheon
Applique
Chapetón
Diverter Button
Bouton inverseur
Botón del desviador
Handle
Poignée
Manija
Nut/Écrou/Tuerca
Plug/Bouchon/Tapón
Coupling
Couplage
Acoplamiento
Support Plate
Plaque de support
Placa de soporte
Elbow
Coude
Codo
3010822**
(Hot/Chaud/Caliente)
3012424**
(Cold/Froid/Fría)
Screw/Vis/Tornillo
834404
Screw/Vis/Tornillo
1055050
Connector (Includes 831752)
Raccord (Inclut 831752)
Conector (Incluye 831752)
1059117
3010690**
1054244
1156534**
1009881
1053714
1040043
1169956**
1054293
Nut
Écrou
Tuerca
1054293
Washer
Rondelle
Arandela
1057470
Washer
Rondelle
Arandela
1057470
Screw
Vis
Tornillo
91751
Diverter
Inverseur
Desviador
3012713**
Check valve
Valve clapet
Válvula de retención
831752
Valve/Valve/Válvula
1170273
Screw/Vis/Tornillo
834404
Tube/Tuyau/Tubo
1052059
Nut/Écrou/Tuerca
3010213
Bonnet
Chapeau
Bonete
834791**
Plug/Bouchon/Tapón
834705
Screw/Vis/Tornillo
3011113
Insert/Insert/Inserto
3010756
3013332
3013331
3010692
3013330
3013329
Insert/Insert/Inserto
(Green/Vert/Verde)
(Black/Noir/Negro)
(White/Blanc/Blanco)
(Green/Vert/Verde)
(Black/Noir/Negro)
(White/Blanc/Blanco)
Handshower
Douchette
Ducha de mano
O-Ring
Joint torique
Arosello
Gasket
Joint
Empaque
79003
K-10257-A**
34353
Screen Washer
Rondelle à grille
Arandela de rejilla
77420
Hose
Tuyau
Manguera
58461**
A
A
A
B
B
C
C
**Finish/color code must be specified when ordering.
**Vous devez spécifier les codes de la finition et/ou de la couleur
quand vous passez votre commande.
**Se debe especificar el código del acabado/color con el pedido.
Kohler Co. 31 1169172-2-A
Page is loading ...
-
 1
1
-
 2
2
-
 3
3
-
 4
4
-
 5
5
-
 6
6
-
 7
7
-
 8
8
-
 9
9
-
 10
10
-
 11
11
-
 12
12
-
 13
13
-
 14
14
-
 15
15
-
 16
16
-
 17
17
-
 18
18
-
 19
19
-
 20
20
-
 21
21
-
 22
22
-
 23
23
-
 24
24
-
 25
25
-
 26
26
-
 27
27
-
 28
28
-
 29
29
-
 30
30
-
 31
31
-
 32
32


Kohler K-8973-7-BN Installation guide
- Category
- Sanitary ware
- Type
- Installation guide
Ask a question and I''ll find the answer in the document
Finding information in a document is now easier with AI
in other languages
- français: Kohler K-8973-7-BN Guide d'installation
- español: Kohler K-8973-7-BN Guía de instalación
Related papers
-
Kohler K-7304-K-CP Installation guide
-
Kohler T97331-4-BN Installation guide
-
-
-
-
-
-
-
-
Kohler K-T97328-4-CP Installation guide
Other documents
-
Signature Hardware 329625 Installation guide
-
-
Duravit GK5900008 Specification Manual
-
BLANCO 401991 Installation guide
-
EZ-FLO 11120 Installation guide
-
 Sign of the Crab P0342 Installation guide
-
Signature Hardware 402672 Installation guide
-
Rubi RON69DO Installation guide
-
-
Everbilt C9793D Operating instructions
