Page is loading ...

2 1-888-632-4453
Thank you for choosing PetSafe
®
. The relationship you have with your pet is the focus of
everything we do. If you have questions about, or are dissatisfi ed with, any of our products, please
contact the Customer Care Center at 1-888-632-4453 or visit our website at www.petsafe.net.
To get the most protection out of your limited warranty, please register your product within 90
days at www.petsafe.net. By registering, you will enjoy the product’s full warranty and should
you ever need to call the Customer Care Center, we will be able to help you faster. Additionally,
you will not have to save your product receipt as registering serves as proof of purchase. Most
importantly, PetSafe will never give or sell your valuable information to anyone
.
_________________________________________________________________________________________________________
Table of Contents
Components .............................................................................................................................................. 3
Tools Needed ............................................................................................................................................ 3
Connect the Bottom Frame ....................................................................................................................... 4
Add Uprights ............................................................................................................................................4
Add an Upright Post for the Gate .............................................................................................................. 5
Add Top Rails ............................................................................................................................................ 5
Assemble the Gate ..................................................................................................................................... 6
Install the Gate ..........................................................................................................................................6
Add Fence Fabric ...................................................................................................................................... 7
Stretch the Fabric ......................................................................................................................................8
Cut the Fabric ........................................................................................................................................... 8
Secure the Fabric ....................................................................................................................................... 9
Caution ..................................................................................................................................................... 9
Terms of Use and Limitation of Liability ...................................................................................................9
Français ................................................................................................................................................. 10
Español .................................................................................................................................................. 18

www.petsafe.net 3
Components
65" Tension Rod
2 pcs.
Double Corner Rail
Swedged on One End
2 pcs.
1 Piece Chain
Link Fabric
(for Gate Assembly)
Bent Tubing (Corner Rail)
Swedged on One End
8 pcs.
Gate Latch
Clip
18 pcs.
End Rail Clamp
28 pcs.
Tie Wire
(103 pcs.)
Male Hinge
2 pcs.
Female Hinge
2 pcs.
62 ½" Tubing (Frame Rail)
Swedged on One End
4 pcs.
68" Tubing Plain (Upright)
7 pcs.
69" Tension Rod
2 pcs.
3
/
8
x 2" Carriage Bolt
with Nut
4 pcs.
5
/
16
x 2" Carriage Bolt
with Nut
14 pcs.
1 Roll Chain Link Fabric
Assembly Instructions
PetSafe
®
Do
-
I
t-
Y
ou
rs
el
f
D
og Ke
n
nel
A
s
s
e
m
b
l
y
I
n
s
t
ru
c
t
i
o
n
s
I
n
s
t
r
u
cti
o
n
s
d
’a
sse
m
bla
g
e
In
s
t
r
u
cci
on
e
s
de
m
on
t
a
j
e
P
l
e
a
s
e
r
e
a
d
t
h
i
s en
t
ire
g
u
i
d
e
b
ef
o
r
e
a
s
s
e
m
b
ly
.
V
e
u
il
l
e
z
l
i
r
e
e
n
t
ière
m
e
nt
l
e
m
a
n
u
e
l
a
v
a
n
t
l’a
s
s
em
b
l
a
g
e
.
P
o
r
f
a
v
o
r
, l
e
a
co
m
p
l
e
t
am
e
n
t
e
e
s
t
a
g
u
í
a
a
n
te
s
d
e
e
n
s
a
m
b
l
a
r
.
Tools Needed
• Hammer
• Adjustable Wrench
• Pliers
• Tape Measure

4 1-888-632-4453
Connect the Bottom Frame
Important: Assemble on a level surface.
1. Gather 4 corner rails and 2 frame rails.
2. Point all swedged ends clockwise.
3. Slip swedged ends of tubing into the next piece of tubing.
__________________________________________________________________________________________________
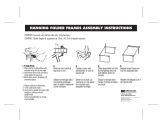
Add Uprights
1. Gather 6 uprights, 12 clamps, 6 -
5
/
16
" x 2" carriage bolts with nuts.
2. With the nut on top, loosely clamp all posts to the bottom frame at each corner and half way along each
side.
3. Stand corner posts up and tighten clamps. Let the center posts lie on the ground.
Step
1
Step
2

www.petsafe.net 5
Add an Upright Post for the Gate
1. Gather 1 upright, 2 clamps , and 1 -
5
/
16
" x 2" carriage bolt with nut.
2. Install the gate post 22 ¼" to either side of the corner upright.
Important: Do NOT have the gate span a joint in the frame. The frame can come apart at the
swedged joint.
22
1
/
4
"
Note: Gate Opening is 22
1
/
4
" between posts. All swedged joints will be loose until fence fabric is installed.
__________________________________________________________________________________________________
Add Top Rails
1. Gather 4 corner rails, 2 frame rails, 14 clamps and 7 -
5
/
16
" x 2" carriage bolts with nuts.
2. Point all top rail swedges clockwise the same as the bottom frame.
3. Connect rails to all posts (4A). Tighten all clamps as you go.
4A
Important: Check that all posts are straight up and down. Confi rm that all nuts are tight.
Step
3
Step
4

6 1-888-632-4453
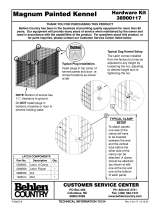
Assemble the Gate
1. Gather 2 double corner rails, 2-65" tension rods, 1 piece chain link fabric and 8 clips.
2. Insert swedged end into plain tube for both double corner rails (5A).
3. Slip both tension rods down through the fi rst diamonds of the fabric on each side (5B).
4. On one side using 4 clips, connect the fabric to the gate frame by clipping the tension rod to the frame
(5C).
5. On opposite side using 4 clips, connect fabric to frame by placing clip on tension rod fi rst and then clip
onto frame by applying downward pressure (5E). Watch fi ngers as they can get pinched in this step.
Work gloves are recommended for this step.
6. Attach 2 tie wires to the bottom of the gate spaced evenly apart (5F). Attach 1 tie wire centered at the
top (5D).
5A
5B
5F
5D
5E
5C
__________________________________________________________________________________________________
Install the Gate
1. Gather male and female hinges, 4 -
3
/
8
" x 2" carriage bolts with nuts, and the gate. Note: Gate can open
from either side.
2. Install the upper female hinge below the upper most gate clip (6B).
3. Install the lower female hinge directly above the bottom gate clip (6C).
4. Position the gate centered in the gate opening.
5. Attach bottom male hinge and slide up to meet bottom female hinge. Tighten securely (6C).
6. Attach top male hinge and slide down to meet top female hinge. Tighten securely (6B).
7. With an adjustable wrench, install the gate latch 36" from the ground (6A). Note: The gate latch can be
locked. Lock not provided.
Step
6
Step
5

www.petsafe.net 7
6A
6B
6C
__________________________________________________________________________________________________
Add Fence Fabric
1. Gather 5 Clips, 1 Tension Rod, package of Tie Wires, and the roll of Chain Link Fabric. Note: Putting on
the fabric is easy, except chain link fabric is strong and stiff and the roll is heavy, so a helper is recommended.
2. Start at a post next to the gate. Slip the tension rod down through the fi rst diamonds of the fabric (7B).
3. Connect the fabric to the gatepost by clipping the tension rod to the post (7C). Secure all 5 clips.
4. Unroll the fabric around the kennel. Loosely add a tie wire to the top frame about every 5 feet to keep
the fabric from falling down (7A).
7A
7B
7C
Step
7

8 1-888-632-4453
Stretch the Fabric
1. Starting from the fi rst post away from the gate, use a hammer to stretch
the fabric as shown.
2. Stretch fabric as tightly as possible. Add tie wires to posts to hold the
stretched fabric.
Important: Be sure all tie wires are on the same picket (wire) or
the fabric will be crooked.
3. Stretch and tie to the next post, until you go all the way around. Don’t tie
the last post (at the gate).
________________________________________________________________________________________________
Cut the Fabric
1. Gather 5 clips and 1 tension rod.
2. Stretch the fabric as tightly as possible to the last post and select a fabric
wire to cut, allowing 4 ½" for the tension rod and clips (9A).
3. Cut the fabric by holding the fabric loosely while you spin one of the pickets out.
a. Undo the knuckle at the top and the knuckle at the bottom of the
same picket (9B).
b. Unweave that picket by spinning it out (9C). Be careful! Wire ends
are sharp.
c. Install the tension rod (9D) and 5 clips (9E).
4
1
/
2
"
Remove this picket
9A
9B
9C 9D
9E
Step
8
Step
9

www.petsafe.net 9
Step
10
Secure the Fabric
Beginning at the gate opening, attach a tie wire to every 3rd diamond around the top
(10A) and every 5th diamond around the bottom (10B) of the kennel. Use any extra tie
wires around the bottom for extra security.
Note: Attaching tie wires around the bottom is easier if you temporarily raise the bottom of the kennel
onto bricks, blocks of wood, or the box that the kennel came in.
Important: Please, for your pets safety, train your pet to become accustomed to his
new home. Consult a professional for help.
10A
10B
________________________________________________________________________________________________
Caution
While this product is a solid barrier, Radio Systems
®
Corporation CANNOT guarantee that the system will,
in all cases, keep a pet within the established boundary. Not all pets can be trained for containment. There-
fore, if you have reason to believe that your pet may pose a danger to others or harm himself if he is not kept
from exiting the product, you should NOT rely solely upon the PetSafe
®
Kennel to contain your pet. Radio
Systems Corporation shall NOT be liable for any property damage, economic loss or any consequential
damages sustained as a result of any animal exiting the system. If you are unsure whether this is appropriate for
your pet, please consult your veterinarian or certifi ed trainer. This product is designed for use with pets only.
________________________________________________________________________________________________
Terms of Use and Limitation of Liability
1. Terms of Use
This Product is offered to you conditioned upon your acceptance without modifi cation of the terms,
conditions and notices contained herein. Usage of this Product implies acceptance of all such terms,
conditions, and notices.
2. Proper Use
This Product is designed for use with pets where training is desired. The specifi c temperament of your pet
may not work with this Product. If you are unsure whether this is appropriate for your pet, please consult
your veterinarian or certifi ed trainer.
3. No Unlawful or Prohibited Use
This Product is designed for use with pets only. This pet training device is not intended to harm, injure or
provoke. Using this Product in a way that is not intended could result in violation of Federal, State or local
laws.
4. Limitation of Liability
In no event shall Radio Systems Corporation be liable for any direct, indirect, punitive, incidental, special
or consequential damages, or any damages whatsoever arising out of or connected with the use or misuse of
this Product. Buyer assumes all risks and liability from the use of this Product.
5. Modifi cation of Terms and Conditions
Radio Systems Corporation reserves the right to change the terms, conditions and notices under which this
Product is offered.

www.petsafe.net 27

Radio Systems Corporation
10427 Electric Avenue
Knoxville, TN 37932
1-888-632-4453
www.petsafe.net
400-853-11
©Copyright 2007, Radio Systems Corpoation
/