Eusso USS4500-RS4 Owner's manual
- Category
- NAS & storage servers
- Type
- Owner's manual

User’s Guide
4-Bay Desktop Gigabit SATA NAS

FCC Certifications
This Equipment has been tested and found to comply with the limits for a Class A digital device,
pursuant to part 15 of the FCC Rules. These limits are designed to provide reasonable protection
against harmful interference when the equipment is operated in a commercial environment. This
equipment generates, uses, and can radiate radio frequency energy and, if not installed and used in
accordance with the instruction manual, may cause harmful interference to radio communications.
Operation of this equipment in a residential area is likely to cause harmful interference in which
case the user will be required to correct the interference at his own expense.
This device complies with Part 15 of the FCC Rules. Operation is subject to the following two
conditions: (1) this device may not cause harmful interference, and (2) this device must accept any
interference received; including interference that may cause undesired operation.
CE Mark Warning
This equipment complies with the requirements relating to electromagnetic compatibility, EN 55022
Class A for ITE, the essential protection requirement of Council Directive 89/336/EEC on the
approximation of the laws of the Member States relating to electromagnetic compatibility.
Company has an on-going policy of upgrading its products and it may be possible that information
in this document is not up-to-date. Please check with your local distributors for the latest
information. No part of this document can be copied or reproduced in any form without written
consent from the company.
Trademarks:
All trade names and trademarks are the properties of their respective companies.
Copyright © 2007, All Rights Reserved.
1

Table of Contents
OVERVIEW............................ 4
Unpacking information................................................................4
Introduction to the 4-Bay Desktop Gigabit SATA NAS ......................4
Key Features ......................................................................4
Front Panel ........................................................................5
Rear Panel.........................................................................6
INSTALLATION GUIDE........... 8
Hardware Installation ..................................................................8
Making Connection with the Device ............................................12
To access the folders in the device .......................................... 14
Software Installation .................................................................15
Installing the EZIP Backup .................................................... 15
EZ VIEW UTILITY.................17
Introduction.............................................................................17
Getting Started .................................................................. 17
Connecting the device with EZ View......................................... 30
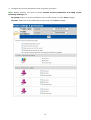
MANAGEMENT GUIDE..........32
Starting the Graphic User Interface (GUI) .....................................32
Using the Graphic User Interface (GUI)........................................33
Understanding the GUI......................................................... 33
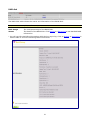
Management items list ......................................................... 34
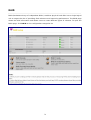
Status .....................................................................................35
System....................................................................................36
Login.............................................................................. 36
Config............................................................................. 37
Reboot............................................................................ 38
Shutdown ........................................................................ 38
Firmware upgrade .............................................................. 38
HD Sleep......................................................................... 39
Time............................................................................... 40
Network ..................................................................................41
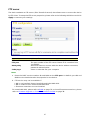
Hostname setup................................................................. 41
2

IP address setup................................................................ 41
To enable DHCP client .....................................................................41
To configure the IP address for the device ..............................................42
Jumbo mode..................................................................................42
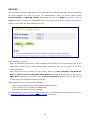
Alert............................................................................... 43
DDNS............................................................................. 45
Services..................................................................................46
FTP server ....................................................................... 47
UPnP AV ......................................................................... 48
iTunes ............................................................................ 49
P2P ............................................................................... 52
Printer............................................................................. 55
MySQL............................................................................ 58
Photo gallery..................................................................... 59
Account ..................................................................................67
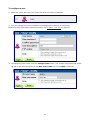
User configuration .............................................................. 67
To add a new user...........................................................................67
To delete a user..............................................................................68
To configure a user..........................................................................69
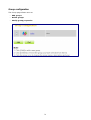
Group configuration............................................................. 70
To add a new group.........................................................................71
To delete a group............................................................................72
To configure a group........................................................................72
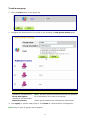
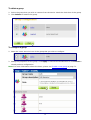
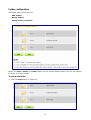
Folder configuration ............................................................ 73
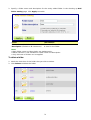
To add a new folder .........................................................................73
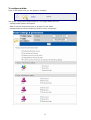
To delete a folder............................................................................74
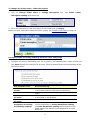
To configure a folder ........................................................................75
RAID.......................................................................................79
USB/eSATA..............................................................................84
APPENDIX ...........................85
Using EZIP Backup to back up your files .....................................85
Trouble Shooting......................................................................87
PRODUCT SPECIFICATION ...89
3

Overview
Thank you for purchasing the product. Read this chapter to know about your
4-Bay Desktop Gigabit SATA NAS.
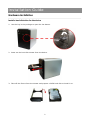
Unpacking information
Before getting started, please verify that your package includes the following items:
1. One 4-Bay Desktop Gigabit SATA NAS
(Hard Disk not Included)
2. One Power adapter and one AC power cable
3. One Quick Installation Guide
4. One Utility/ Manual CD
5. HD fastening screw x 16
6. One HD fastening key
Introduction to the 4-Bay Desktop Gigabit SATA NAS
Easily back-up your data and share them. This NAS allows 4 connected hard disks,
which boosts the capacity for your data sharing and backup needs. It uses the high-speed SATA
interface, providing users excellent data storage and sharing capability. The device also supports
RAID 0, RAID 1, RAID 5 and Linear modes for various HDD backup configurations.
The NAS embeds FTP server, Web Server and printer server. The FTP server allows
users to backup and share files with FTP client software. The Web server provides an easy way to
share files by web site. The NAS supports DDNS, which allows you to designate a easy-memorized
domain name to this device. The embedded printer server also brings you terrific convenience on
sharing your printer.
User-friendly and high compatibility, The NAS equips 2 USB 2.0 ports for your USB
storage devices and USB printer. You may also back-up files from your USB storage devices
conveniently by pressing the “Backup” button.
Hot swappable SATA tray module design, The NAS provides 2 HDD drawers, which give
you an extra hot-swappable function for immediate drive replacement and simplify maintenance.
Key Features
‧ Supports CIFS/SMB for Windows, MAC, Linux,
which allows remote users to retrieve files
easily using “My Neighborhood”
‧ Supports 50 sets of user name and password
‧ WEB-based User Interface (UI) for easy
configuration
‧ Up to 100 folders can be created via the web
configuration
‧ Supports 4 removable 3.5” SATA HDD up to
2TB
‧ Provides EZ View Utility for user-friendly
setup.
‧ Embeds FTP server for FTP clients to transfer
files conveniently
‧ Supports fixed IP & DHCP client network
environment setting
‧ Supports USB memory stick (pen drive), USB
Hard Disk
‧ Embeds BT (Bit Torrent) compatible P2P
software
4

‧ Embeds Web server for Web site construction
‧ Supports UPnP AV, iTunes server
‧ Supports firmware update over the Graphic
User Interface (GUI)
‧ Compatible with Windows 95 /98 /98SE /ME
/XP /2000 /NT4.0/Linux/ MAC OS /Vista
‧ Supports DDNS function
‧ Supports access management for 50 groups
‧ Supports 32 concurrently connected users
‧ Provides Password security for management &
HD Access
‧
‧ Built-in Samba server ‧ Supports hot-plug hard disk (RAID 1, 5)
‧ Built-in auto power recovery capability ‧ Complies with FCC, CE Class A certification
‧
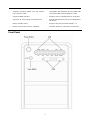
Front Panel
5

Power Button
To activate the device, press this Power button for two seconds after connecting the device to an
appropriate power outlet with the provided power cord.
To power off, press and hold the button for five seconds.
Backup Button
Press this button to copy files from USB port to the internal HD. A new folder will be created
automatically in the share directory. This new folder is named according to the time you press
this button.
Note: The Backup LED illuminates while data copying. Do not remove this device from USB port
before the Backup LED turns off.
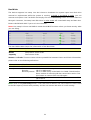
LEDs Definition
LED Status
Steady Blue Power on
Power
Off Power off
Amber Device works normally
Status
Red Device encounters an error
Steady Green Valid Connection at 1000 Mbps
Blinking Green Data transmitting at 1000 Mbps
Steady Amber Valid Connection at 10/100 Mbps
LAN
Blinking Amber Data transmitting at 10/100 Mbps
Steady Green Valid connection on USB I port
USB I
Off Invalid connection on USBI port
Steady Green Valid connection on USB II port
USB II
Off Invalid connection on USBII port
Steady Green Valid connection on HD
Blinking Green HD working busily
HD I – HD IV
Off Valid connection on HD
Steady Red HD has run out of space
HD FULL
Off Space available on HDD
Steady Green Data copying from USB to internal HD
Backup
Off Data copying finished
USB Port
Connect this port with your USB Storage or printer devices.
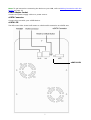
Rear Panel
Reset to Default Button
Press and hold the Reset Default Button for four seconds to reset all configurations to factory
default settings.
Note:
y All configurations that are done by users will be removed from the device.
y The device also supports restoring factory default settings by software. To get instruction
restoring factory default parameters, see
System > Config > Reset to Factory Default on page
37.
LAN Port
Connect the port with RJ-45 cable to your switch or IP sharing router.
6

Note: To get instruction connecting the device to your LAN, refer to Making Connection with the
Device on page 12.
Power Adapter Socket
Connect the power supply cable to a power source.
eSATA Connector
Connect this port with your eSATA device.
eSATA LED
The LED stays light (green)/off means a valid/invalid connection on eSATA port.
eSATA LED
7

Installation Guide
Hardware Installation
Install a hard disk drive for the device
1. Use the key in the package to open the slot button.
2. Draw out the hard disk drawer from the device.
3. Take off the fixture from the drawer and prepare a SATA hard disk to install it on.
8

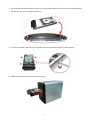
4. Place the SATA Hard Disk drive evenly on the hard disk drawer. The direction of the disk should
be like the one in the following pictures.
5. Screw your SATA hard disk on the drawer with the included screws in the package.
6. Slide the Hard Drive to connect to the device.
9

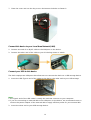
7. Close the cover and use the key to turn the button clockwise to fasten it.
Connect this device to your Local Area Network (LAN)
1. Connect one end of an RJ-45 cable to the LAN port on the device.
2. Connect the other end of the cable to your IP sharing router or switch.
Connect your USB to this device
The device equips two USB ports that allow users to connect the device to a USB storage device.
1. Insert the USB Type A end of the cable to the device, the other end to your USB storage.
Note:
y The Type A end of the USB cable is usually the end that connects to your computer.
y If you are connecting an external HD to the USB ports on the device, we recommend users to
connect the power adapter of the external HD to supply efficient power for your external HD.
2. Insert the other end to your USB storage device.
10

Connect this NAS with eSATA device
This NAS equips one eSATA port that allows users to connect your NAS with eSATA device. Please
find the cable that came with your eSATA device. Insert one end of the cable to this NAS, the
other end to the eSATA device.
Note: You have to power on your eSATA device before powering on this NAS, or this NAS cannot
detect your eSATA device.
Power on the device
1. Connect the included power cord with the power adapter.
2. Connect the connector end to the device and the plug to an outlet.
3. Push the power button to power on.
11

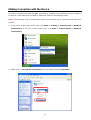
Making Connection with the Device
In order to communicate with this NAS, you have to configure the IP address of your computer
to make it connectable with the device. Please do perform the following steps.
Note: The following TCP/IP configuration guide uses windows XP as the presumed operation
system.
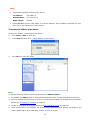
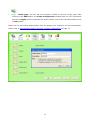
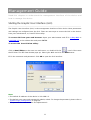
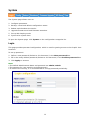
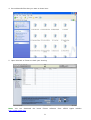
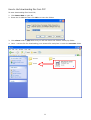
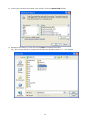
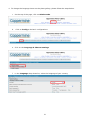
1. If you are in Classic Start menu view, click Start > Settings > Control Panel > Network
Connections. If you are in Start menu view, click Start > Control Panel > Network
Connections.
2. Right-click on Local Area Connection item and double-click on Properties.
12

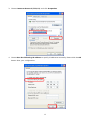
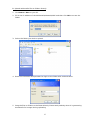
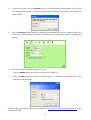
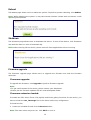
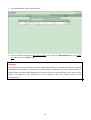
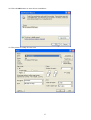
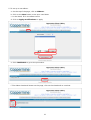
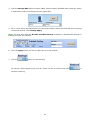
3. Choose Internet Protocol (TCP/IP) and click Properties.
4. Choose Use the following IP address to specify IP addresses manually. Please click the OK
button after your configuration.
13

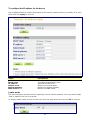
Note:
1. The default network setting of the device:
IP address: 192.168.1.2
Subnet Mask: 255.255.255.0
DHCP Client: disable
2. Please DO NOT choose “192.168.1.2” as the IP address. The IP address “192.168.1.2” has
been set as the default IP for this device.
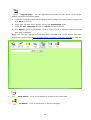
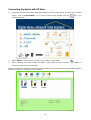
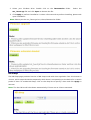
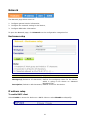
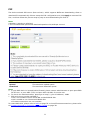
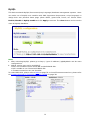
To access the folders in the device
To open the folders connecting to the device:
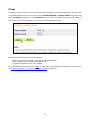
1. Click Start > Run on your PC.
2. In the Run window, fill in
\\4Bay-NAS or \\192.168.1.2
3. Click OK to access the folder.
Note:
1. We provide one default username/ password as admin/admin.
2. As default, the Share folder is created automatically and it can be read/write by all users.
3. You can change the permission of users for access to each folder. To change their permission,
please see
To Configure a Folder on page 75.
4. To add or configure an account, please see
To Configure a User on page 69.
5. Users would like to use another set of username/ password after getting accessed to any
folder, please log off your operating system and log on again.
14

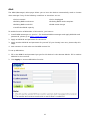
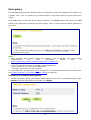
Software Installation
Installing the EZIP Backup
This EZIP Backup helps users to backup files on your computer to NAS. Please follow the
instructions below to install the software.
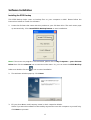
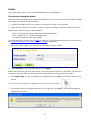
1. Insert the CD-Rom that came with this product to your CD-Rom drive. The main menu pops
up automatically. Click Install EZIP Backup button to start installation.
Note: If the auto-run program is not activated, please click on My Computer > your CD-Rom
Drive then click the autorun icon to start the main menu. Or, you can enter the EZIP Backup
folder and double click the
icon to start installation.
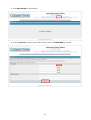
2. The welcome window pops up. Click Next.
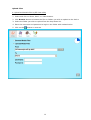
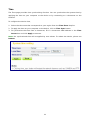
3. Fill your User Name and Company name in their respective blanks.
Select if you want this software to be used by anyone who uses this computer or yourself only.
Click Next to proceed.
15

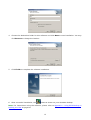
4. Choose the destination folder for this software and click Next to start installation. You may
click Browse to change the location.
5. Click Finish to complete the software installation.
6. After successful installation, the
shortcut shows on your windows desktop.
Note: For instructions using the software, please refer to
Appendix > Using EZIP Backup to
backup your files on page 84.
16

EZ View Utility
Read this chapter to understand the EZ View utility of the device and how to use
it.
Introduction
For users to launch the device more easily, we provided the convenient EZ View software. It is
user-friendly, easy to view and getting started. The following paragraphs are divided into two
parts: the first part introduces the EZ View utility, which gives you a general idea of EZ View
framework; the second part teaches you how to connect this device with EZ View to make a basic
configuration.
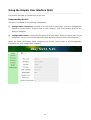
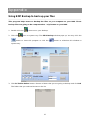
Getting Started
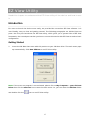
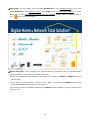
1. Insert the CD-Rom that came with this product to your CD-Rom drive. The main menu pops
up automatically. Click Run EZView to run EZ View utility.
Note: If the auto-run program is not activated, please click on My Computer > your CD-Rom
Drive then click the autorun icon to start the main menu. Or, you can enter the EZ View folder
and double click the
icon to run EZ View utility.
17

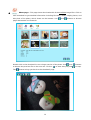
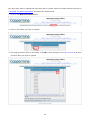
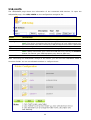
¡Main page - In main page, you can select Multimedia to scan
networks PVR on your LAN,
select Network to scan
router or switch, select NAS to scan network storage device, or select
All to scan all of the
network PVR, router or switch and NAS on your LAN. You can also click on
the icon to exit the program.
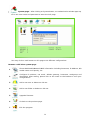
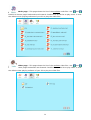
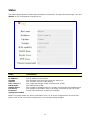
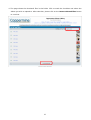
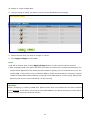
¡Device list page - After scanning, the page shows the connection status of the Multimedia
/Network/NAS on your LAN. You should notice that:
y Without a connected PVR / Router or AP / NAS, you cannot use Media and WEB buttons on
the EZ View.
y Even with a connected PVR / Router or AP / NAS, you cannot use Media button if the
Multimedia/Network/NAS has no hard disk in it.
You can also see the accessible information in System to know whether you can connect to the
device or not.
18

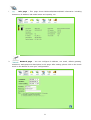
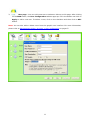
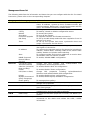
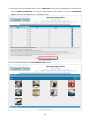
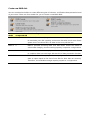
Buttons on EZ View device list page
Click this button to search for Multimedia/Network/NAS on your LAN again.
Click this button to see Multimedia/Network/NAS information, configure IP address,
user and folder, and upgrade firmware.
Browse/upload photos, music or video files to the folders in Multimedia/Network/NAS.
Open the WEB page of User Interface.
Go back to the previous page.
Exit the program.
19
Page is loading ...
Page is loading ...
Page is loading ...
Page is loading ...
Page is loading ...
Page is loading ...
Page is loading ...
Page is loading ...
Page is loading ...
Page is loading ...
Page is loading ...
Page is loading ...
Page is loading ...
Page is loading ...
Page is loading ...
Page is loading ...
Page is loading ...
Page is loading ...
Page is loading ...
Page is loading ...
Page is loading ...
Page is loading ...
Page is loading ...
Page is loading ...
Page is loading ...
Page is loading ...
Page is loading ...
Page is loading ...
Page is loading ...
Page is loading ...
Page is loading ...
Page is loading ...
Page is loading ...
Page is loading ...
Page is loading ...
Page is loading ...
Page is loading ...
Page is loading ...
Page is loading ...
Page is loading ...
Page is loading ...
Page is loading ...
Page is loading ...
Page is loading ...
Page is loading ...
Page is loading ...
Page is loading ...
Page is loading ...
Page is loading ...
Page is loading ...
Page is loading ...
Page is loading ...
Page is loading ...
Page is loading ...
Page is loading ...
Page is loading ...
Page is loading ...
Page is loading ...
Page is loading ...
Page is loading ...
Page is loading ...
Page is loading ...
Page is loading ...
Page is loading ...
Page is loading ...
Page is loading ...
Page is loading ...
Page is loading ...
Page is loading ...
Page is loading ...
-
 1
1
-
 2
2
-
 3
3
-
 4
4
-
 5
5
-
 6
6
-
 7
7
-
 8
8
-
 9
9
-
 10
10
-
 11
11
-
 12
12
-
 13
13
-
 14
14
-
 15
15
-
 16
16
-
 17
17
-
 18
18
-
 19
19
-
 20
20
-
 21
21
-
 22
22
-
 23
23
-
 24
24
-
 25
25
-
 26
26
-
 27
27
-
 28
28
-
 29
29
-
 30
30
-
 31
31
-
 32
32
-
 33
33
-
 34
34
-
 35
35
-
 36
36
-
 37
37
-
 38
38
-
 39
39
-
 40
40
-
 41
41
-
 42
42
-
 43
43
-
 44
44
-
 45
45
-
 46
46
-
 47
47
-
 48
48
-
 49
49
-
 50
50
-
 51
51
-
 52
52
-
 53
53
-
 54
54
-
 55
55
-
 56
56
-
 57
57
-
 58
58
-
 59
59
-
 60
60
-
 61
61
-
 62
62
-
 63
63
-
 64
64
-
 65
65
-
 66
66
-
 67
67
-
 68
68
-
 69
69
-
 70
70
-
 71
71
-
 72
72
-
 73
73
-
 74
74
-
 75
75
-
 76
76
-
 77
77
-
 78
78
-
 79
79
-
 80
80
-
 81
81
-
 82
82
-
 83
83
-
 84
84
-
 85
85
-
 86
86
-
 87
87
-
 88
88
-
 89
89
-
 90
90


Eusso USS4500-RS4 Owner's manual
- Category
- NAS & storage servers
- Type
- Owner's manual
Ask a question and I''ll find the answer in the document
Finding information in a document is now easier with AI
Related papers

Other documents
-
Sandberg 507-54 Datasheet
-
-
Seagate SSD User guide
-
Intellinet Network Attached Storage Appliance User manual
-
Encore ENNHD-NT User manual
-
Allnet ALL6200 Owner's manual
-
-
Encore electronic ENNHD-1GS User manual
-
Fantec GL-35DSR User manual
-