Page is loading ...

Operating Instructions
40 MHz 6/8/1 No. F4044
FC- 16 Boat `n Truck

Order Number
40 MHz No. F4044
FC-16 Boat `n Truck
2
CONTENT
SAFETY ADVICE, PLEASE TAKE NOTE. ...............................................................................................................3
Insurance ..........................................................................................................................................................3
1 . Contents ..........................................................................................................................................................4
1.1. Recommended accessories ...................................................................................................................4
2. Control layout .................................................................................................................................................4
2.1 FC-16 Boat ‘n Truck Transmitter ..............................................................................................................4
2.2 General description FC-16 Boat ‘n Truck transmitter ..............................................................................5
2.3 Technical data FC-16 Boat ‘n Truck transmitter .......................................................................................5
3. R118F Receiver ...............................................................................................................................................5
3.1 R118F Receiver technical data ...............................................................................................................5
4. Servo S 3003 ...................................................................................................................................................5
4.1 Technical data S3003 servo ....................................................................................................................5
5. Battery operation ............................................................................................................................................6
5.1 Battery installation and replacement .......................................................................................................6
5.2 Battery charging ......................................................................................................................................6
5.3 Transmitter battery voltage indicator .......................................................................................................7
5.4 Operation time .........................................................................................................................................7
6. Crystal change ................................................................................................................................................7
7. Transmitter adjustments................................................................................................................................7
7.1 Adjustment of stick lengths ......................................................................................................................7
7.2 Removal of rear cover .............................................................................................................................7
7.3 Changing of throttle ratchet .....................................................................................................................7
7.4 Servo connection .....................................................................................................................................8
8. Display and keypad ........................................................................................................................................9
9. Trainer operation(Buddy box) .......................................................................................................................9
9.1 DIRECT SERVO CONTROL (DSC) OPERATION ...................................................................................9
10 Menu structure .............................................................................................................................................10
11 Model function (MODL) ................................................................................................................................11
12. Trim memory (TRIM).....................................................................................................................................11
13 Model memory copy (COPY) .......................................................................................................................11
14. System adjustments (PARA) .......................................................................................................................12
14.1 Submenu modulation type (PULS) ........................................................................................................12
14.2 Submenu model memory reset (REST).................................................................................................12
14.3 Submenu stick mode (STCK) ................................................................................................................12
15. MULTI-SWITCH (NAUT) ................................................................................................................................12
16. Failsafe adjustment (F/S) (only in PCM) .....................................................................................................13
17. Cross mixer (XMX 1-2) .................................................................................................................................13
18. V mixer (VMX 1-2) .........................................................................................................................................14
19. Exponential function (EXPO).......................................................................................................................14
20. Sub Trim (SUB-TRIM/STRM) ........................................................................................................................15
21. Servo Reverse (REVR) .................................................................................................................................15
22. Servo end point adjustement (EPA) ...........................................................................................................15
23. CAMPAC model memory initialise ..............................................................................................................15
24. Layout of Tx PCB sockets ...........................................................................................................................16
25. Option module connection ..........................................................................................................................16
26. Receiver aerial ..............................................................................................................................................18
26.1 Switch harness ......................................................................................................................................18
26.2 Servo cables ..........................................................................................................................................18
26.3 Servo suppression filters .......................................................................................................................18
26.4 Servo mounting and installation ............................................................................................................19
26.5 Servo throw/ Servo horns ......................................................................................................................19
26.6 Installation of servo linkages .................................................................................................................19
26.7 Capacity/ Operating time of RX battery .................................................................................................19
27. Operating advice ..........................................................................................................................................20
27.1 Tx/Rx Switch on/off sequence ...............................................................................................................20
27.2 Electrical noise ......................................................................................................................................20
27.3 Electric motor suppression ....................................................................................................................20
27.4 Battery electronic ignition ......................................................................................................................20
28. Guarantee/Warranty .....................................................................................................................................20
29. Liability exclusion: .......................................................................................................................................20
30 Post office regulations .................................................................................................................................21
31. Conformity declaration (CE MARK) ............................................................................................................21
32. Accessories ..................................................................................................................................................21
34. Disposal ........................................................................................................................................................24
35. Service centre addresses ............................................................................................................................24

Order Number
40 MHz No. F4044
FC-16 Boat `n Truck
3
SAFETY ADVICE, PLEASE TAKE NOTE.
Before operating the equipment, please read these instruc-
tions paying special attention to the safety advice given here.
If you are operating a radio-controlled model for the first
time, we strongly recommend that you engage the help of an
experienced modeller.
This radio control system has only been designed and ap-
proved for the operation of radio-controlled models. robbe
Modellsport accepts no responsibility if used for other pur-
poses.
SAFETY ADVICE
Radio controlled models are not toys in the normal sense and
should not be operated by anyone under the age of 14 years old
without the consent and supervision of a responsible adult.
Their construction and operation requires technical understan-
ding, careful assembly and safety awareness in operation. Mi-
stakes or carelessness in the build or operation can lead to
serious damage to persons or property.
As the manufacturer and re-seller has no influence over the safe
construction and operation of the model, this risk is advised to
you and we absolve all responsibility for damage to persons or
property, howsoever caused.
Mechanical or electrical technical defects, can lead to an unex-
pected starting of drive motors. This can in turn lead to parts being
thrown from the drive train at high speed. Operation of the recei-
ving system without the transmitter being switched on can lead to
unexpected operation of motors and servos.
Therefore the possibility of serious wounding is always there. All
such driven rotating parts, offer a permanent threat to subject
damage to persons or property.
Avoid all personal contact with such parts of the model.
Never put your hands or body near the danger areas of electric
motors whilst they are connected to their power batteries. Ensure
that no other objects or clothing come into contact with rotating
parts!
Protect your equipment from dust, dirt and dampness. Keep it
away from excessive heat, cold and vibration. The equipment is
designed to operate in an ambient temperature range from –15
to +55 Celsius.
Use only the recommended chargers and charge your batteries
for the prescribed times. Take note of the advice given by the
battery manufacturer. Incorrect and over charging can lead to
explosion of the batteries. Ensure correct polarity is maintained.
Avoid shock or constant pressure loading on the electronic parts
of the system. Check for damage to casings and cables after a
crash. If a part becomes damaged or wet (even after drying out)
do not re use! Either send to robbe service to check or replace
the affected part yourself.
Hidden damage can occur through ingress of water or after a
collision, this can lead to function failure after a short operation
time. Only genuine robbe replacement parts or accessories may
be used with this equipment.
Always use genuine robbe-Futaba connectors and crystals. No
modifications may be made to the equipment.
Routine checks before use
If there is more than one modeller operating at your model site,
please check that no one else is using your frequency before
turning on your transmitter.
• Observeanyfrequencycontrolproceduresinoperationatthe
site.
• Thetransmitteraerialmustbefullyextendedandsecureinits
mounting
• Beforeswitchingonthereceiver,ensurethethrottlestickisat
its lowest setting.
• AlwaysturnthetransmitterONfirst,thenswitchthereceiveron
• AlwaysturnthereceiverOFFfirst,thenthetransmitteroff
• Makearangecheckwithcollapsedtransmitteraerial
• Gothroughacontrolcheck,takingspecialnotethatservodi-
rection and throw is correct for your model.
• Aremixersandswitchesintheircorrectpositions?
• Isthebatteryconditionsufficientforoperation?
• Anydoubts,don’toperatethemodel!!
Model operation
• Don’tputpeopleoranimalsatrisk
• Don’t operate your model near locks, weirs or other water
users
• Don’toperateyourmodelonpublicroads,motorways,foot-
paths or other public areas etc.
Don’t operate your equipment in rain or stormy conditions.
For full control of your model, you must have the transmitter aerial
fullyextended.Don’tpointyouraerialdirectlyatthemodelasthe
signal strength will be at its lowest. It is always best to have your
transmitter aerial acting parallel to the model axis.
When several transmitters are in operation and on neighbouring
channels, it is recommended that you stand in a group to avoid
unwanted interference from or to the other models.
Insurance
Ground-based models are usually insured by your own private
liability insurance, check that your insurance includes models and
has sufficient third party liability cover.
Liability exclusion:
robbe Modellsport are not in a position to influence the way you
install, operate and maintain the radio control system compon-
ents.
For this reason we are obliged to deny all liability for loss, damage
or costs which are incurred due to the incompetent or incorrect
use and operation of our products, or which are connected with
such operation in any way.
Unless otherwise prescribed by law, the obligation of the com-
pany to pay compensation is limited to the invoice value of the
robbe products, which were immediately and directly involved in
the event, which caused the damage.
This does not apply if robbe is found to be subject to unlimited
liability according to binding legal regulation on account of delibe-
rate or gross negligence.

Order Number
40 MHz No. F4044
FC-16 Boat `n Truck
4
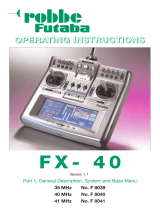
Aerial socket
Neckstrap ring
Left hand stick unit
Right hand
stick unit
(throttle)
Throttle trim
Charge
socket
LC- Display
Data “+”/”-“ keys
Mode keys
On-/Off switch
Channel 1 trim
Channel 4 trim
Channel 3 trim
Cursor keys
Linear propor-
tional control
well
Option well for
Multi-Prop or Multi-
Switch modules
Option well for
Multi-Prop or Multi-
Switch modules
CAMPac memory
module
1 . CONTENTS
1 FC-16 Boat ‘n Truck transmitter
1 R118F FM receiver
1 S3003 servo with accessory bag
2 Linear proportional potentiometer controls
1 Switch harness with charge cable
1 pair of crystals
1.1. RECOMMENDED ACCESSORIES
• 9,6V1500mAhtransmitterbattery No.4566
• 9,6V3500mAhtransmitterbattery No.4569
• 4,8V2000mAhreceiverbattery No.4551
• Fseriestransmitterchargelead No.8262
• Transmitterchargelead No.F1415
• Receiverchargelead No.F1416
• Neckstrap No.F1550
• AluminiumTxcase No.F1556
2. CONTROL LAYOUT
FC-16 Boat ‘n Truck
transmitter as supplied.
2.1 FC-16 BOAT ‘N TRUCK TRANSMITTER

Order Number
40 MHz No. F4044
FC-16 Boat `n Truck
5
2.2 GENERAL DESCRIPTION FC-16 BOAT ‘N TRUCK
TRANSMITTER
The FC-16 Boat ‘n Truck is a fully expanded 6 channel computer
transmitter in an ergonomic hand held layout and has been spe-
cially designed for marine and truck modellers.
Expandable to 8 proportional channels, or by using the Multi-
Switch/Multi-Prop modules, upto 6+32 switch functions or 6+16
proportional functions.
The transmitter includes all the important features that the advan-
ced modeller might need.
Some key features of the system are:
• Thetransmittercanbeusedin1of2modulationsystems
1. Standard PPM (FM) modulation
2. 1024 bit Pulse Code Modulation (PCM-1024) modulation for
fast and secure transmission
• Clear100segmentLiquidCrystalDisplay(LCD)
• 10internalmodelmemories,expandableusingCAMPacmo-
dules
• 4charactermemoryname
• Servoreverse(REVR)andexponential(EXP)availableonall
stick controls
• Servoendpointadjustment(EPA),foreachdirectionoftravel
• Lowvoltagealarm
• Trimmemory
• Easyinstallationofoptionmodules
• Easyinstallationoflinearproportionalcontrols
It is recommended to use only rechargeable batteries in a finished
pack form. The transmitter is supplied with a suitable charge sok-
ket to enable simple and safe charging of the battery pack.
2.3 TECHNICAL DATA FC-16 BOAT ‘N TRUCK
TRANSMITTER
Frequency 40 MHz
Channel spacing 10 kHz
Modulation PPM (FM)/PCM 1024
Current consumption 30/200 mA
Voltage 9,6V NiMH
Dimensions 230 x 200 x 50 mm
Weight 1000g (with battery)
3. R118F RECEIVER
The receiver covers a wide spectrum of uses with 8 channels in
FM operation. Compact in size by use of SMD technology. The
high quality FET front end and the Anti-Blocking double superhet
guarantee a secure signal reception. Highly integrated IC receiver
with ceramic filters specially designed for 10 kHz separation is
the new standard. Even on low operating voltages, the receiver
maintains a reliable signal reception.
3.1 R118F RECEIVER TECHNICAL DATA
Functions/channels 8 servos
Operating frequency 40 MHz
Modulation FM (PPM)
Channel separation 10 kHz
Operating voltage 4.8-6 V
Current drain 10 mA
Weight 35 g
Aerial length 100 cm
Dimensions 60 x 36,5 x 20,5
4. SERVO S 3003
Compact and robust universal
servo with high torque of 32
Ncm. Assembled using the la-
test wire-less technology, where
high resistance to vibration and
long life expectancy can be
expected to be achieved. The
feedback potentiometer is fitted
with 6 wipers and is backlash
free. High technology at an at-
tractive price.
4.1 TECHNICAL DATA S3003 SERVO
Operating voltage 4.8-6V
Torque (Ncm) 32 Ncm @ (4,8 V)
41 Ncm @ (6 V)
Speed (sec/45 degree) 0,18 @ 4,8 V
0,14 @ 6 V
Battery cells (NiCad/NiMH 4-5
Weight 37,2 g
Dimensions (mm) 40,4 x 19,8 x 36
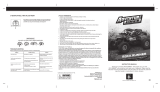
Aerial
Battery socket
Crystal
Servo sockets

Order Number
40 MHz No. F4044
FC-16 Boat `n Truck
6
5. BATTERY OPERATION
5.1 BATTERY INSTALLATION AND REPLACEMENT
The FC-16 Boat ‘n Truck is supplied without a battery pack. The
battery compartment will be found in the rear of the case. To
install or replace the battery, release the latches shown at the
point marked X below, slide and lift to open, more information in
section 7.2.
Battery recommendation:
9.6 Volt (8cell) 1500 NiMH welded transmitter pack, no. 4566, will
give an operating time of 8 to 9 hours.
We recommend using only welded, factory made packs for the
transmitter and the receiver in the model. Using single cells can
result in loss of reliability due to breaks in the receiver power
supply due to vibration/ loss of contact between individual cells.
Installation of a factory made transmitter battery
• Connect the battery plugtothe transmittersocketensuring
correct polarity
• Laythebatteryintoitscompartmentandclosethelid.
When changing batteries, please check the charge state of the
new pack. Switch the transmitter on and check the voltage on
the voltmeter in the display (section 5.3). If the battery is not fully
charged, then please recharge before further use. If the trans-
mitter is not to be used for a while, we recommend removal of
the battery pack and that it is stored indoors away from cold and
damp over winter.
5.2 BATTERY CHARGING
On initial use, or after a long lay up, please trickle charge all the
batteries at 1/10 the battery capacity. This will replace the lost
charge and form all the cells to the same charge level. (E.g. 1500
mAh battery, charge at 150 mA)
Self-discharge rate of NiMH cells is approx 5-10% of rated capa-
city per month. That means after 10 months of inactivity, a fully
charged battery will be flat, even if there is no load on it.
The transmitter battery can be charged without removal from the
transmitter case by using the integrated charging socket located
on the right hand side of the case.
For convenient charging, we recommend the robbe Unicharger
no.8500.
To avoid a short circuit whilst charging, always connect the
banana plug first to the charger. TAKE CARE NOT TO RE-
VERSE POLARITY.
After the winter lay off, all batteries should be cycled at least once
before use. Once this has been done, the full battery capacity and
life can be expected.
To charge the transmitter or receiver batteries at a higher rate
than 1/10 C, you must use a charger, which has a Delta-Peak
Cut-off feature, (these batteries are sensitive to overcharging).
In principle, you should be able to use almost any charger, which
has “automatic cut-off”, but do check the charger instructions.
The transmitter and receiver must be switched off whilst charging.
The transmitter battery should not be charged at a rate hig-
her than 1 A. Otherwise, the charge socket and internal wi-
ring will be overloaded and can be damaged.
Tip:
The transmitter is fitted with a diode for accidental reverse polarity
protection.
If wishing to use a charger using the “Reflex Charge Method”,
please contact robbe service department for advice.
Reflex charging with the protection diode gives an incorrect Cut-
Off and will overcharge the battery.
NiMH batteries are suitable for re-cycling; you have paid the
fee in the purchase price. Please do not dispose in your normal
household refuse! To protect the environment, please take your
used battery to a local disposal point for recycling. All battery sel-
lers will accept defective or used batteries at no charge. The cells
will then be recycled thereby minimising environmental damage.

Order Number
40 MHz No. F4044
FC-16 Boat `n Truck
7
Transmitter cry-
stals are marked
with TX + chan-
nel number
Receiver cry-
stals are marked
with RX + chan-
nel number
Crystals for dual
conversion super-
hets are marked
with RX-DS +
channel number
5.3 TRANSMITTER BATTERY VOLTAGE INDICATOR
The battery voltage status is shown
in the display. The voltage varies and
dependent on charge condition bet-
ween 10,8 V (full) and 9 V (nearly flat).
If the indicated voltage reaches 9.4 V,
then the battery needs recharging. If
the condition is such that 8.9V is dis-
played, you must stop operation and
recharge before continuing.
As soon as the voltage reaches 8.5
V, an acoustic and optical alarm will
go off to draw your attention that the
battery is flat and you must immedi-
ately turn off the transmitter and re-
charge.
5.4 OPERATION TIME
Using a 1500 mAh NiMH battery pack, the transmitter will have an
operating time of between 8 and 9 hours.
The receiver operation time, on the other hand, is dependent
upon the number of servos and friction in the control linkages as
well as the frequency that they are moving. One servo typically
draws between 150 and 600 mA in normal operation. Idle current
is 5-8 mA.
Once the servo reaches its commanded point (neutral, end or in
between position), the motor returns to an idle current, provided
that the linkages have no friction, and that the servo is not rea-
ching a mechanical limit. (A buzzing servo is drawing a heavy
current and can drain a battery very quickly!)
6. CRYSTAL CHANGE
Your transmitter and receiver may be operated on varying fre-
quency channels within the 40 MHz band. Matching transmitter
and receiver crystals must be fitted to their respective sockets in
the transmitter and receiver cases. The channel number of both
transmitter and receiver crystal must be the same for the system
to work.
To change the transmitter crystal, you must open the transmitter
case back; see section 7.2.
It is not possible use 35 MHz crystals in a 40 MHz receiver;
the receiver will not work.
7. TRANSMITTER ADJUSTMENTS
7.1 ADJUSTMENT OF STICK LENGTHS
The stick length may be adjusted in length to suit the best feeling
for the driver.
• LoosenPartA
and B
• Adjuststicklength
to suit by screwing
in or out
• LockpartBagainst
part A
7.2 REMOVAL OF REAR COVER
The rear cover is held in place by two latches.
To Open
• Slidethetwolatchesoncaseundersideoutwardsandliftcover
• Remove/replacetransmittercrystal
To close
• Carefullyreplacecoverbackintothecase
• Closetwolatchestosecure
7.3 CHANGING OF THROTTLE RATCHET
As delivered, the throttle stick is on the left hand side (Mode 2), if
required, the throttle control may be moved to the right hand stick
unit by the following means:
Remove rear cover as described previously: (Looking from
rear of case)
1 Loosen return spring on right hand stick unit
2 Install spring on left hand stick
3 Locate the spring on the left hand neutralising gimbal using
long nose pliers
4 Remove neutralising arm from left hand stick, This stick has
now a ratchet friction on the vertical axis
5 Fit the neutralising arm to right hand stick unit. Locate spring
with pliers on the hook. The right hand stick unit has now a
self-centring vertical axis.
Part A Part B

Order Number
40 MHz No. F4044
FC-16 Boat `n Truck
8
Position 3
Locate spring in left hand ver-
tical neutralising gimbal and
remove gimbal.
Position 5
Fit neutralising gimbal in right
hand stick. Hang spring on
the gimbal.
Position 1
loosen right hand throttle
spring
Position 2
Install spring on left stick
Receiver (Rx)
Switch
To battery
Take care to
ensure correct
polarity.
Charge
socket
(Channel 1)
Steering
(Channel 2)
(Channel 4)
Linear propor-
tional (chan. 5)
Linear propor-
tional chan. 6
Throttle
(Channel 3)
B
7.4 SERVO CONNECTION
The stick control functions for throttle, steering etc. are to be
found in channels 1-4. Channels 5 and 6 are linear proportional
channels with slider potentiometers.
Channels 7 and 8 may be used either with switches or opera-
ted with Multi-Modules.
The diagram illustrates the channel allocation on the Rx. Socket
“B” is used as an Rx battery connection or the battery may be
plugged into any of the other free channel outputs on the Rx.

Order Number
40 MHz No. F4044
FC-16 Boat `n Truck
9
Mode Key
Model name
and number
Data +/- keys
LCD
Cursor Key
Operating Voltage
Modulation type
8. DISPLAY AND KEYPAD 9. TRAINER OPERATION(BUDDY BOX)
When learning how to control models, it is safer to have an ex-
perienced driver at hand. The experienced teacher can control
the model during critical operation phases and give control to the
pupil when it is safe to do so.
This means that if a critical situation arises for the pupil, the tea-
cher can “take-over” control of the model from the pupil. Using this
system, it becomes simple for the pupil to learn the control inputs
required without fear of damage, loss of the model or personal
injury.
As standard, Tx is not fitted with a Trainer socket. The Trainer
Module 4 No. F1374 can be connected to Tx PCB. See page 16
for the exact position of the socket.
NOTE:
To ensure correct hand-over of control from Teacher to Pupil
Tx, the orange and red wires must be changed over on the
Trainer Module, otherwise incorrect operation will ensue.
9.1 DIRECT SERVO CONTROL (DSC) OPERATION
A DSC cable can be connected to the Trainer socket; this allows
operation of the receiver and servos without RF transmission from
the Tx.
The robbe/Futaba DSC cable No. F1422 and the Trainer Module
No. F1574 are needed for this.
The Trainer module 4 is connected to the Tx PCB (see page 16).
DSC operation can only be made with receivers fitted with a DSC
socket (C), e.g. Rx R-118F.
Note: To avoid the transmitter radiating RF, the Tx crystal must
be removed during DSC operation.
To program the transmitter and make adjustments to setting,
there are a number of keys for data entry.
“MODE” Key:
The MODE key is used to choose the program mode and choice
of menu. To enter programming mode, both the MODE keys
should be pressed simultaneously and held for approximately 2
seconds. To enter the individual menus, “leaf” through them by
pressing the UP or DOWN arrow keys individually. To exit, press
and hold both MODE keys for a further 2 seconds.
“DATA +/-“ Key:
The “DATA” keys are used to adjust the settings of a parameter
(e.g. alter % values). The keys are split into “+” and “-“, logically
pressing the “+” key will increase the values and “-“ will decrease
them. By holding the respective key down, you will be able to alter
values at a much higher rate (AUTOREPEAT) than with individual
keystrokes.
“CURSOR” Key:
The “CURSOR” key is used to choose functions in the sub-me-
nus.

Order Number
40 MHz No. F4044
FC-16 Boat `n Truck
10
MODE Tasten
MODE Taste
Nur im PCM Modus
Cursor Tasten
Model 1-10
[Kan. 1-8]
(Drücken Sie die beiden Mode Tasten für ca. 2 Sekunden)
*1. Taste + oder - für min. 0,5sek. drücken
*1
Data Tasten
*1
*1
*1
[Kan. 2-8]
[Kan. 2-8]
[Kan. 2-8]
10 MENU STRUCTURE
Press both mode keys for 2 seconds
Mode key
Cursor key
Data key
Chan. 1-8
only in PCM M´mode
Chan. 2-8
Chan. 2-8
Chan. 2-8

Order Number
40 MHz No. F4044
FC-16 Boat `n Truck
11
11 MODEL FUNCTION (MODL)
Submenu model memory select
As standard, the Tx has 10 internal model memories; all model
program changes and adjustments are stored here. Individual
adjustments can be conveniently stored and if needed accessed
quickly. The individual model memories are numbered for a clear
overview.
After simultaneous pressing of the
“Mode”-keys for 1 second, program-
ming mode will appear and the LCD
will show as in the neighbouring illu-
stration.
The number will flash of the active memory. To select a different
model memory, press the “+ or –“ keys until the chosen number
appears. The next higher memory will be selected with the “+ “
key, accordingly, the “–“ key selects the next lower memory.
Once the chosen model number has been selected, simultaneous
pressing of the “Mode” key will return to the start display.
NOTE:
The changes only become active after turning Tx off and turning
on again.
Submenu model name (MDL)
This function allows you to define an
abbreviated model name for each me-
mory number, thereby making subse-
quent model selection easier.
Using the “Cursor” key to select this
submenu, the current model name will
appear in the display. Unused model
memories will have the name “MOO1” as default; this name re-
presents the default model memory 1.
To change a model name, press the “Cursor” to move the cursor
to the far right hand side until it flashes below the number “1”.
Other model memory numbers can be selected by pressing “+
or –“ keys.
The model name can be abbreviated to a total of 4 characters,
again using the “+ or –“ keys, you can select alphanumeric, sym-
bols, space and number characters.
NOTE:
The changes only become active after turning Tx off and turning
on again.
12. TRIM MEMORY (TRIM)
With the help of the “TRIM” function,
the individual servo neutrals can be
set after testing the model and the
mechanical trims set to neutral.
Select “TRIM SET” function from the
main menu to adjust the servo neu-
trals. The above display will be shown.
Now set the required Tx control trim to its chosen position. Si-
multaneously press the “+ or –“ keys until a warn signal (beep)
is heard to show the position has been stored. The new position
is now stored in the memory and the set Tx trim should now be
returned to its centre/neutral position. To make further changes
to the neutral values, the original setting must be cleared/deleted.
Use the “CURSOR” to select “TRIM CLR” function.
Press “+ or –“ keys until you hear a beep. The previous stored
values are now deleted.
13 MODEL MEMORY COPY (COPY)
This function allows you to copy one
model settings to another memory
position. This can be used to make
a “back-up” copy of model settings
before you make further adjustments
or to store a model memory in the
CAMPac external memory. You are
not able to copy an active memory to
itself.
To Copy:
Choose the model memory that you wish to copy from using
“MODL” (model select) function. Select “COPY”. The model me-
mory number will now flash.
Use the “+ or –“ keys to select the memory number that you wish
to copy to. Press “CURSOR” “right” key until the display flashes
“SET”.
Simultaneous pressing of the “DATA” keys will start the copy pro-
cess and when complete the Tx will beep.
NOTE: apart from the model name, all other settings will be de-
leted.

Order Number
40 MHz No. F4044
FC-16 Boat `n Truck
12
14. SYSTEM ADJUSTMENTS (PARA)
14.1 SUBMENU MODULATION TYPE (PULS)
This function is used to select the chosen modulation, PCM-1024
or PPM. When using an FM Rx, then PPM must be selected, a
PCM Rx will use PCM mode (PCM will need the appropriate PCM
1024 Rx).
Selecting the “PARA” menu by pres-
sing the right cursor key twice to select
“PULS” menu. Press “+ or –“ keys for
at least 1 second to change the modu-
lation type.
It is important to understand that the
new modulation will not become active
until the Tx is turned off and on again.
You must check that the modulation
required is shown correctly in the dis-
play and that is now active.
14.2 SUBMENU MODEL MEMORY RESET (REST)
All model details in a memory may be deleted and reset to the
factory default condition. It is good practice, therefore before a
new model is programmed to delete the previous settings using
this function to reset to factory default condition.
The display will show.
Pressing both the “+ and –“ keys for 2 seconds, the reset process
will be initiated. The “CLR” will flash and then a beep will be heard
to show the reset process has been successfully completed.
Pressing “MODE” key will return to main menu.
NOTE: Resetting a model memory will delete all adjustments
back to factory default, There is no recovery of this data, so ple-
ase be careful how and when you use the REST function.
14.3 SUBMENU STICK MODE (STCK)
This menu allows you to choose the
stick control layout to suit you. The
stick controls 1-4 must always remain
in their factory position in the Tx con-
trols sockets for this software to func-
tion correctly.
• Select“STCK”functionin“PARA”menu.
• Select“MODE”1to4.
• ThechangesbecomeactiveafterturningTxoffandturningon
again.
MODE 1:
Steering right 1
Control 3
Throttle left 2
Control 4
MODE 2:
Steering right 1
Control 2
Throttle left 3
Control 4
MODE 3
Steering left 1
Control 3
Throttle left 2
Control 4
MODE 4
Steering left 1
Control 3
Throttle right 2
Control 4
15. MULTI-SWITCH (NAUT)
For marine and truck models which re-
quire many switched and proportional
controls. Using just two “normal” pro-
portional channels (7-8), it is possible
to cascade 2 x 16 switch, 2 x 12+2
multi or 2 x 8 proportional channels.
Using these modules, the FC16 then
can have 8 or 16 switch/proportional
channels. This can control up to 32 separate functions. To do this,
the Tx will need a Multi-Switch or Proportional module for every
8 channels required.
This module divides each proportional channel into 8 switch or
proportional channels. For 16 switched or proportional channels,
a second module is required.
• Usingthe“MODE”key,selectNAUTfunction
• Using“CURSOR”key,selectchosenchannel(7or8)
• Press“+or–“keystoactivatetheselectedchannel
NOTE: The connection to the Tx PCB is described in chapter 26
“connection of option modules”
3
1
1
1
2
3
2
4
4
4
2
1
4
3
3
2

Order Number
40 MHz No. F4044
FC-16 Boat `n Truck
13
16. FAILSAFE ADJUSTMENT (F/S) (ONLY IN PCM)
In the case of a loss of signal in the Tx to Rx radio link, there are
two alternative settings for the failsafe.
1 “NOR” (Normal) or hold mode
The Rx will hold the control setting from the last good trans-
mission signal. All the servos will remain held in their last good
position until reception of the Tx signal is re-established.
2 ( F/S) Failsafe position
In this setting, the throttle servo will move to a pre-programmed
position, which has been previously stored by the Rx. The fac-
tory pre-set position of 20% is active unless programmed dif-
ferently.
To navigate within the F/S menu.
The throttle channel will flash in the left hand side of the display.
Using the “+ or –“ keys you can select between Hold and Failsafe
modes.
NOR- (Hold) mode = press up (+)
F/S- mode = press down (-)
An arrow highlights the chosen option.
If you would like to set a failsafe posi-
tion for throttle channel (3), move the
throttle stick to the desired position
and press the (-) key for 2 seconds. A
beep will signify that the new position
has been stored and the percentage
stored will now be shown in the dis-
play.
To test the setting, switch Tx off, the throttle servo (channel 3) will
adopt the programmed failsafe position.
If using ani.c. motor;don’tset the F/Sthrottle value too low,
otherwise the motor may stop.
NOTE:
For certain slow moving models, using the Normal- (Hold) mode
will be sufficient.
In addition, the “Battery Failsafe” function is available when the
F/S mode is selected.
As soon as the Rx battery voltage falls below a value of 3,8V, the
throttle servo will move to its pre-set position, indicating to the
driver that the battery is nearly fully discharged.
Operation of the model must cease immediately this warning is
given. If you need throttle to return the model to you, closing the
throttle stick and re-opening will give throttle control to move it to
a safe position for recharging. You now have 30 seconds to do
this before the battery failsafe re-occurs if the voltage situation
has not improved.
The function works also for speed controllers connected to chan-
nel 3.
17. CROSS MIXER (XMX 1-2)
This mixer, known as a cross mixer
(XMX1-2) couples two separate Rx
output channels which need to be con-
trolled by two individual Tx controls.
(E.g. combined steering and throttle).
The Tx software contains two freely programmable cross mixers
(XMX1-2) for the user. Therefore, Tx inputs 1-8 can be used as
controls of these mixers.
Sustained pressing of the “+” key swit-
ches the mixer (ON). (The % symbol
will flash in the display, indicating that
channel 1 can be adjusted).
Page through with the cursor key until
“XMX1” appears. The mix value (%)
for control 1 can now be adjusted.
Further pressing of the cursor will take
you to control 2, where similarly, the
mix % can be adjusted.
Continue pressing cursor until “MAS1”
appears. The mix value for control
“1” (%) can be set here for any of the
channels (1-8). The same procedure
is followed for “MAS2” values, which
can be similarly adjusted in the menu.
In order to ensure that the servos move “together” or in “opposi-
tion” to achieve the desired control sense (and dependent on the
installed position of the servos), it may be necessary to reverse
their directions or change the mixer direction. Begin with rever-
sing servo on the throttle function to get both servos working in
the same sense.
This cross mixer is ideal for mixing throttle and steering functions
required in tracked vehicles and twin engine marine craft. In these
cases, it is usual to have throttle (3) and steering (1 or 4) mixed
at 100 % for each channel.

Order Number
40 MHz No. F4044
FC-16 Boat `n Truck
14
Finally, the mix switch number to con-
trol mix-on or mix-off must be selected.
19. EXPONENTIAL FUNCTION (EXPO)
The “EXPO” function can
be used to determine the
amount of servo throw at
a particular stick position.
The linear action can be
modified into a gradual
exponential curve. This
allows a softer control
reaction around the stick
and servo neutral posi-
tion.
This option is available on all stick controls (1-4).
The exponential curve can be set both sides of control neutral:
• Positivecurve->exaggeratedandsensitivecontrolresponse
around neutral position (curve 1).
• Negativecurve->reducedandsoftercontrolresponsearound
neutral position (curve 2).
• Inbothcasestheservoendpointthrowremainsunchanged.
• Thestraightlineshowsthenormal,linearcharacteristicofthe
stick to servo throw (Expo set at 0%).
This function must be selected with
the “MODE” key after activating the
programming mode. Press the “CUR-
SOR” key until “EXPO” menu appears
in the display. Subsequently, the
menu for adjusting Dual Rate appears
as shown in the neighbouring display
illustration.
The adjustment is made using an example for one of the stick
controls:
By use of the “CURSOR” key, select a channel (1-4) that you
would like to set the exponential throw. The particular channel
number selected will now flash in the display.
Using the “+” or “-“ keys, the “EXPO” adjustment can be set be a
positive or negative % value. The selected % age will appear in
the display.
The adjustment range of EXPO function lies between –100 and
+100 %. The factory default is set to 0% for all controls.
NOTE: Exponential also reduces the trim value by the correspon-
ding amount; therefore a maximum of 50% EXPO should be used!
18. V MIXER (VMX 1-2)
Moving a transmitter control will nor-
mally move only that servo connected
to that channel number. If you want
one Tx control to move another chan-
nel simultaneously, you must use a V
mixer.
Some or all of the Tx controls may
be mixed with another channel. The
throw and direction of the mix can be adjusted individually.
The FC-16 software contains two V mixers with dummy functions.
You are able to mix two free controls with each other. The mixer
function can be switched on or off at any time by using an external
mixer switch. The use of an external mixer switch can also vary
the mix percentage varied with a mix controller. Furthermore, you
are able to define the amount of trim used. The use and adjust-
ment is the same for both V Mixers (VMX1-2). The mix switch and
controller are simply plugged into a different position on the PCB
sockets. (See chapter 25).
The mixing takes place with one control (Master) acting on ano-
ther control (Slave).
Navigate to the V-Mix 1 adjustment
menu by continuous pressing of the
“+” key (ON).
Cursor through the menu until “VMX1”
appears. Now the mix value (%) can
be set for control 1.
Repeat pressing the cursor to select
master channel “MAS”. Channels 1-8
may be selected as master.
Further pressing the cursor will select
slave “SLV”. Channels 1-8 may be
selected as slave.
servo throw
stick throw
curve 1
curve 2

Order Number
40 MHz No. F4044
FC-16 Boat `n Truck
15
20. SUB TRIM (SUB-TRIM/STRM)
When installing the servos in your
model, it always best to adjust linka-
ges so that the servo arms and its con-
trol are in their neutral (centre) position
when the Tx controls are neutral.
If you find that this is not possible or
your servos have another neutral posi-
tion, the Sub Trim function can be very
useful. This allows all 8 servos to be
adjusted to a new neutral position. This function is not designed
to act as a replacement for trimming the model in the traditional
sense.
• Selectwith“MODE”key
• Select whichchannel from 1-8you wish to STRM with the
CURSOR key
• Adjusttheservotoitsnewneutralusing“+”or“-“key.
21. SERVO REVERSE (REVR)
This function will reverse the servo direction electronically. This
means you can install the servos in your model to give the most
direct linkage to the control without concern for servo sense of di-
rection. The servo direction can be reversed afterwards if needed.
Before further programming of the model takes place, we recom-
mend that you first correctly set the servo direction to suit your
model.
Select using “MODE” key after acti-
vating the programming mode.
The neighbouring display will be seen
to allow servo reverse to be made.
Select the channel for reversing with
the “CURSOR” key. Adjustments are
made using the “+” or “-“ key. If the (-)
key is depressed for more than half a
second, then the servo channel will be
set to “REVERSE” (REV). Pressing the (+) key will change the
setting to “NORMAL” (NOR) rotation. The arrow in the display
indicates the current rotation direction.
22. SERVO END POINT ADJUSTEMENT (EPA)
This function allows the end point to be set in each direction for all
channels. This can be adjusted from 40-140% of the total servo
travel including trim. This is to avoid stalling that servo against
a mechanical limit before it has reached its electronic limit. This
works on all servo channels and reduces all mixed functions. Ple-
ase note the trim amount is also proportional to the total servo
throw set.
The adjustment is made as a % age
value. Channels 1-8 have a 100 %
setting with approximately 40 de-
grees of servo rotation. With a servo
EPA of 120%, 55 degrees of servo
rotation will be available.
Select using “MODE” key to activate
EPA. The neighbouring display will
be seen. In the left half of the display,
you will see the channel number of the
servo to be adjusted. The right hand
side of the display has a flashing indi-
cation of the EPA value shown in %.
The relevant stick must be moved to select the direction for ad-
justment. Using the “+” or “-“ keys, the EPA value can be set. (-)
Reduces and (+) increases the value. Please note the servo throw
must be adjusted for both sides of neutral.
The “CURSOR” key chooses the channel for adjusting the servo
travel.
23. CAMPAC MODEL MEMORY INITIALISE
The Tx has 10 internal model memories. A further 10 memories
can be stored using a 16k CAMPac module. Remove the dust
cover and plug the CAMPac into the socket on the Tx front face.
NOTE: Before plugging in or removing
the module, the Tx must be turned off.
When a new CAMPac module is fitted
for the first time, it must be initialised
before use. After switching on the Tx,
“CAM “do” and CAM “-“ no will alter-
nate in the display. Press (+) key to
start the automatic memory initialise.
This process takes 2 minutes and will appear in the display. Pres-
sing the “-“ key will revert to the “normal” display and no further
keystrokes are necessary.
adjustement range 40 à
140%
servo throw
of 100%
servo throw
of 100%

Order Number
40 MHz No. F4044
FC-16 Boat `n Truck
16
A) Battery Connection
B) Aerial
C) Sockets for controls 1-8 (CH)
D) Sockets for Multi-Switch/ Prop modules (Multi In)
E) Socket for Multi-Switch/ Prop power supply (To Multi OP)
F) Mix switch sockets 1-2 (Mix SW)
G) Crystal socket
H) CAMPac connector socket
I) DSC connector socket for Trainer Module No. F1574
25. OPTION MODULE CONNECTION
Linear proportional slider:
To install the linear slide controls, the aluminium cover must be
removed from the slider well on the centre front of the Tx case.
Use a sharp knife to lift and remove the cover plates. Fit the slider
from the rear and fix using the supplied screws. Install the new
surround, remove protective film and attach the control knob.
Connection:
The linear proportional slider expands the Tx by one fully propor-
tional control channel. The connection is made in any of the bank
of sockets 1-8 (CH); the servo direction is defined in “REVR” or
by rotating the plug by 180 degrees in the socket.
3-position switch channel:
Remove the blind cover to install a switch in any of the two option
wells on the Tx front upper face. Simply prise the blind cover
out with a suitable object. Remove retainer nut from switch, feed
switch into your preferred position from the rear. Fit the retaining
nut. Break out the corresponding blank switch position from the
cover using pointed pliers or tweezers. Switch labels can be fitted
to the recess in the rear of the cover, the cover is then snapped
back into position in Tx case.
Connection:
This switch unit expands one channel to be a 3-position switch
channel with low, middle and high positions. The connection is
made to your choice of channel in the control sockets 1-8, the
servo direction will be adjusted by “REVR” function or simply ro-
tating the plug 180 degrees in the socket.
1 2 3 4 5 6 7 8
Multi-IN
1 2
Mix-SW
Spannungsversorgung
Antenne
CAMPac
Anschluss
To Multi OP
CH
TX
DSC
24. LAYOUT OF TX PCB SOCKETS
A
F
D
E
H
C
B
G
I
External Mix Switch:
Mix switches switch mixers on and off. Installation is made in op-
tion wells 1 or 2 in the same manner as switch channel switches.
Connection is made to Tx PCB in the MIX-SW (1-2) sockets.
Multi-Switch, Multi-Prop-Module
These modules split one proportional channel into 8 proportional
and/or switched functions. The Multi-Prop-8, Multi-Switch-16 or
a Multi-Switch-Prop-12+2 module can be installed. The resulting
transmitter is ideal for controlling models fitted with many com-
plex auxiliary working systems and features.
Connection:
The module is installed in the Tx with the 3-pin socket on the
solder side of the module facing the inside of the Tx (not the
outside edge). The black plug on the single-core lead from the
Multi-Module is connected to the socket marked “Multi In 1.2) on
the main PCB. The white plug (twin core cable) from the Multi-
Module is connected to the socket marked “To MULTI OP”. The
Multi-system will not work until you have programmed channels
7 or 8 (CH 7/8) as a MULTI channel within the MULTI program
menu.
Caution: if you install and connect a Multi-Module you MUST
NOT connect any other Tx control to channels 7 or 8 (sockets
CH7 + 8).
Battery Connection
CAMPac connector
socket

Order Number
40 MHz No. F4044
FC-16 Boat `n Truck
17
Multi-Prop Module No. F1512
This module is designed for controlling auxiliary functions, and
expands one proportional channel on the transmitter to provide 8
proportional functions. It provides accurate, simultaneous control
of 8 channels.
Multi-Switch-16 Module No. 8084
This module is designed for controlling auxiliary functions, and
expands one proportional channel on the transmitter to provide
16-switched functions.
Multi-Switch-Prop 12+2 Module No 8101
Optional module for controlling auxiliary functions; ex-
pands one proportional channel on the transmitter to pro-
vide 12-switched functions and 2 proportional servo channels.
This is a combination module, which covers most requirements.
Multi-Switch Prop Module Light Set No 8413
Optional transmitter module for controlling auxiliary functions; ex-
pands one proportional channel on the transmitter to provide 14
switched functions and 1 servo channel. Designed specifically
for use with the Truck super lighting set, but can also be used in
conjunction with any other Multi decoder.
Multi-Prop 8 Decoder No 8042
Multi-Decoder for proportional channel expansion. Occupies only
1 servo channel but can control 8 servos or speed controllers
independently of each other.
Multi-Switch 16 Decoder Memory No 8369
For each Multi-Switch module in the transmitter you need one de-
coder at the receiver end. This takes up only one servo channel,
and can switch 16 channels directly. Operating voltage 4.8 - 24
Volts, up to 1.8 A per output.
Multi-Switch-Prop 12+2 Decoder Memory No 8370
For each Multi-Switch module in the transmitter you need one de-
coder at the receiver end. This takes up only one servo channel,
and can switch 12 channels directly as well as providing 2-servo
channels. Operating voltage 4.8 - 24 Volts, up to 2.7 A per output.
Light Set for Trucks No 8411
Microprocessor controlled decoder module, providing full
control of scale lighting systems in model vehicles such as
trucks etc., plus proportional control of auxiliary functions.
This module can control the entire usual standard and flashing
lightfunctions;theunitmonitorstheRCsystem’sthrottlechannel
constantly, and uses that data to control the brake lights and re-
versing lights automatically.
In addition, there are 2 proportional servo channels controlled by
switches.
The system includes zero-contact control signal transfer to the
Trailer lighting set by means of a pulse-modulated infrared signal.

Order Number
40 MHz No. F4044
FC-16 Boat `n Truck
18
Super Light Set Trailer No 8412
Used to extend the Truck Light Set when operating a Trailer with
lights.
Sound Module Truck No 8268
Similar to Navy Sound Module, in addition to the Diesel motor
sound it has:
• Compressedairrelease
• MartinsHorn
• NormalHorn
• AirHorns
Operating voltage: 6-12 Volt, Power output: approx. 6 W into 8
Ohms at 12 V.
Sound Module Navy No.8270
A sound module for model boats, containing six digitally
stored original sounds. At any time a signal can be super-
imposed on the engine noise simultaneously, such as the
Martins horn, foghorn, ship’s bell, typhoon or destroyer
siren, without interrupting the sound of the diesel engine.
The diesel engine sound varies according to the speed of the
drive motor, and features start-up and run-down sound phases.
The sound module features an integral 8-channel multi-switch de-
coder, which is used to switch the individual sounds on and off.
26. RECEIVER AERIAL
The receiver aerial is connected
directly to the Rx PCB. The ae-
rial length MUST NOT be shor-
tened or lengthened.
If it is not possible to accommo-
date your aerial in your model,
place it in an S-shape near to
the receiver. Best solution is to
coil it around cardboard, ply or
plastic plate as in the schematic
diagram. This will not reduce the range.
Protect the aerial from tension, shock or bending. Where it exits
the model feed it through a length of silicon fuel tube to protect
the aerial. The aerial must be kept well clear of any rotating parts
of the drivetrain.
26.1 SWITCH HARNESS
The Rx switch harness must be operable in both directions with
no mechanical limits. The opening in the model must be large
enough to allow full action of the slide switch. With IC powered
models the switch should be placed on the opposite side of the
model to the exhaust, so that no oil and dirt can contaminate the
switch contacts. If using many, powerful digital servos, we recom-
mend the use of a double battery system.
26.2 SERVO CABLES
Take care when installing the servo cabling that they are not sub-
ject to tension or shock loads and are not bent in a tight radius
or broken. Make sure that they do not rub against sharp edges,
which might damage the insulation. When unplugging, do not pull
on the cables directly, instead pull on the plug housing.
Do not lay cables in an untidy manner, it is better to group and
retain them with tape or tie-wrap to the hull sidewall or vehicle
chassis. No modifications should be made, avoid short circuits
and check polarity. The associated servos and other electronic
devices are not protected against such abuse.
26.3 SERVO SUPPRESSION FILTERS
When using long servo cables or extension leads, the cables can
act as an aerial and introduce unwanted interference into the re-
ceiver. Therefore if there is a straight run of more than 50 cm, we
recommend you use twisted servo leads (F1452)
Even better is the use of additional servo suppression filters
(No. F1413).

Order Number
40 MHz No. F4044
FC-16 Boat `n Truck
19
26.4 SERVO MOUNTING AND INSTALLATION
Use the supplied rubber grommets and brass eyelet to mount the
servos in your model. Take care that the screws are only tighte-
ned enough to contact the grommet and not squash the brass
ferrules, otherwise the vibration damping of the grommets will be
compromised.
The following illustration shows the correct servo installation.
In example “A” is fixing to a wood plate, example “B” is fixing to a
plastic, glass fibre or aluminium plate.
In RC car/truck models, the servo is usually mounted into pre-
prepared servo mounts in the vehicle. For marine models we re-
commend the use of the robbe servo trays. Pay attention to the
servo installation, as servos are sensitive to excessive vibration.
26.5 SERVO THROW/ SERVO HORNS
Every servo must be able to work throughout its whole range
without stalling against a mechanical limit caused by the linkage.
This is particularly relevant on the throttle linkage. The servo must
be able to move between idle and full-throttle without being limited
by the throttle stops on the carburettor. Otherwise the servo will
be permanently stalled and under load; the servo life will be shor-
tened and it will have a high current drain on the receiver battery.
Robbe servos have a wide variety of servo horns and discs avai-
lable to suit most applications. (See illustration on other side of
the page). The splined servo output and horns provide an easy
means of adjusting the neutral position. The illustration below
shows a typical pushrod mounted to a servo.
26.6 INSTALLATION OF SERVO LINKAGES
The linkage must be very low friction and non-binding. Otherwise
the current drain on the receiver battery pack will be high; this will
significantly reduce the operating time. Friction in the linkage also
leads to poor centring of the servo, which has a negative effect on
the control accuracy and “feel”.
26.7 CAPACITY/ OPERATING TIME OF RX BATTERY
Applicable for all rechargeable batteries: Low ambient tempera-
tures will significantly reduce the capacity of the battery, please
note that in cold temperatures, the safe operating time will be
dramatically reduced.
The safe operating time is strongly influenced by the number and
type of servos, free linkages as well as the frequency of control
movements. A standard servo when operating draws between
150 and 600 mA, idle current is approximately 8 mA. Super ser-
vos and digital servos can draw up to 1300 mA peak current at
maximum torque.
Choose your battery with sufficient capacity to supply the current
drain for the number and type of servos used in your model. A
permanent mechanical limit (stalled servo) on the servo throw
draws the highest current, will reduce the servo life and cause
permanent damage.
Pay attention that the linkages are free and that the linkage to the
device does not stall the servo.
In the receiver system, you will notice a discharged battery when
the servo speed becomes noticeably slower than normal. It is time
to stop running the model and recharge the batteries.
We recommend the use of a robbe battery controller/ monitor,
which will indicate the voltage condition/ charge condition of the
batteries in operation.
4
5
6
1 Nut
2 washer
3 grommet
4 brass eyelet
5 aluminium plate
6 M2,5 or 2,6 bolt
1 woodscrew
2 washer
3 grommet
4 brass eyelet
5 wood
1
2
3
1
2
3
4
5
Servo Horn fixing screw
Linkage

Order Number
40 MHz No. F4044
FC-16 Boat `n Truck
20
27. OPERATING ADVICE
All robbe-Futaba receivers will continue to operate with the same
range even when the power supply drops to 3 Volts. This is an
advantage when even one cell in the pack ceases to function
(short circuit), you will retain full control of your model. Although
the servos, which require 3.6 V, will operate at a lower speed and
torque. This is very important in low winter temperatures to avoid
a break in control, which might occur and caused by reduced
voltage due to the cold temperature.
However, this can be a disadvantage inasmuch that you might not
notice that a cell has ceased functioning. Therefore, the receiver
battery should be checked periodically.
It is recommended that you use the robbe battery monitor
No.8409, which can show you the current receiver battery voltage
by means of a LED display.
27.1 TX/RX SWITCH ON/OFF SEQUENCE
Always turn the Tx on first, followed by the receiver. To switch off,
always turn the Rx off first.
If there is a Tx signal, the Rx commands the servos to go safely
and under full control to their neutral position. Before driving the
model, you should check all functions by moving all the controls
on the Tx. Also check that the servos are moving in the correct
direction or “sense” in relation to the Tx control. If this does not
occurs, then reverse the direction of throw using the REVR func-
tion described in chapter 22.
27.2 ELECTRICAL NOISE
For reliable, interference-free operation of your model, “metal-
to-metal” electrical interference must be avoided. This can occur
when individual metal parts of the model are allowed to contact
against each other under vibration. The throttle linkage of an i.c.
motor is a common source of this. Therefore, you should always
use a plastic quicklink for the throttle arm connection to the motor.
If a metal-to-metal linkage is inevitable, both parts should be elec-
trically earthed together by soldering a flexible wire to both metal
components.
27.3 ELECTRIC MOTOR SUPPRESSION
All on-board brushed elec-
tric motors MUST be sup-
pressed; otherwise the
arcing or “brushfire” that
exists between the brushes
and commutator will cause
constant interference and
loss of control.
We recommend using the
robbe suppresion filter kit
No.8306 or the capacitor
kit No.4008. Every brushed
motor must be individually suppressed as in the illustration.
27.4 BATTERY ELECTRONIC IGNITION
The increase in popularity of spark ignition motors has meant that
the ignition system can be a source of interference on your radio.
Always power the ignition from a separate battery. Use resistor
suppressed spark plugs and shielded plug leads. Locate the re-
ceiver system in your model as far away from the ignition and its
battery/switch as possible.
28. GUARANTEE/WARRANTY
Our products are, of course, offered with a 24-month statutory
guarantee period. If you feel you have a valid guarantee claim,
please contact your dealer or re-seller in the first instance, as they
are responsible for this.
During the guarantee period, if possible functional, material or
workmanship issues arise; robbe will rectify these free of charge.
Consequential loss or damage claims are excluded from this.
The items must be returned to us in their original packing at your
cost,theywillbereturnedtoyouatrobbe’cost.Wewillnotaccept
unpaid post shipments.
For loss or damage to your shipment, robbe absolves all respon-
sibility. In this instance, we recommend that you insure the ship-
ment with your carrier.
Return you item to the service address in your own country.
To make a guarantee claim, the following conditions apply:
• Pleaseincludeyourpurchasereceiptforthegoods
• Thegoodshavebeenoperatedinaccordancewiththerobbe
instructions.
• Onlyrecommendedpowersourcesandgenuinerobbeacces-
sories have been used in and during operation.
• Thesystemhasnotbeensubjectedtowaterordampdamage,
modification by third parties, reverse polarity, overload or other
mechanical damage.
• Pleaseincludeadetailedandobjectivesummaryofthepro-
blem or defect that you have experienced.
29. LIABILITY EXCLUSION:
robbe Modellsport are not in a position to influence the way you
install, operate and maintain the radio control system compon-
ents.
For this reason we are obliged to deny all liability for loss, damage
or costs which are incurred due to the incompetent or incorrect
use and operation of our products, or which are connected with
such operation in any way.
47 nF
100 nF
electric
motor
connec-
tions
100 nF
/