Page is loading ...

DVD 5 5-Disc DVD Changer
OWNER’S MANUAL
/
RESUME
TITLE
RANDOM
CHAPTER
REPEAT
TRACK
1ALL
HOUR
DISC A – B
MIN
PROG.
INTRO
SEC
DVD
CD
—±‚
12
3
4
5
DISC
Power for the digital revolution.™
®

2TABLE OF CONTENTS
3Introduction
4Safety Information
5DVD Compatibility & Terminology
6Front Panel Controls
7Front Panel Information Display
8Rear Panel Connections
9Remote Control Functions
11 Installation and Connections
15 Setup Menu
15 Remote Control Operation
16 Audio Language Selection
16 Subtitle Language Selection
17 Menu Language Selection
17 Ratings Selection and Password Control
19 Aspect Ratio
20 Dynamic Range Setting
20 Digital Audio Out
21 Playback Basics
21 Loading Discs
23 DVD Playback
23 Using a DVD’s Menu
24 Using the On-Screen Menu Bar for
DVD Playback
24 Selecting Titles and Chapters
25 Changing Languages
25 Changing Camera Angles
26 CD Playback
27 Programmed Play
29 Bookmarks
30 DVD Language Codes
31 Troubleshooting Guide
32 Technical Specifications
DVD 5 5-Disc DVD Changer
Typographical Conventions
In order to help you use this manual with the remote control, front-panel controls and rear-panel
connections, certain conventions have been used.
EXAMPLE – (bold type) indicates a specific remote control or front-panel button, or rear-panel
connection jack
EXAMPLE – (OCR type) indicates a message that is visible on the front-panel information display
1– (number in a square) indicates a specific front-panel control
a– (number in an oval) indicates a button or indicator on the remote
¡– (number in a circle) indicates a rear-panel connection
A– (letter in a square) indicates an indicator in the front-panel display
– (letter in a triangle) indicates a step in the installation process
A

3INTRODUCTION
Introduction
Thank you for choosing the Harman
Kardon DVD 5. The DVD 5 is a multipurpose
five-disc player, capable of playing both DVD
discs and conventional CD audio discs with the
highest fidelity. To enable you to get the maxi-
mum quality from DVDs, the DVD 5 is equipped
with the latest in design techniques, including
advanced 10-bit video digital-to-analog connec-
tors (DAC) and component video outputs, to
ensure that you get all the quality inherent in
today’s DVD medium. In addition, Harman
Kardon’s audio heritage continues into the digi-
tal video era with audiophile-grade AKM output
DACs to ensure that the audio quality matches
the superb video. Of course, both coaxial and
optical digital audio outputs are available for
direct connection to A/V receivers or processors
so that you may take advantage of Dolby
Digital* and DTS®soundtracks. When playing
audio CDs, the playback quality is state-of-the-
art, matching that of the finest players available
while delivering the convenience of a five-disc
changer.
A wide range of programming features makes it
easy to program an evening’s worth of enter-
tainment, selecting from tracks on multiple
discs. When playing DVDs, easy-to-understand
on-screen menus and icons make it simple to
change languages, soundtracks, subtitles or
aspect ratio, while a parental-lock function
enables you to control which discs may be
viewed by younger members of the household.
DVD players are among the fastest growing
consumer electronics products ever brought to
market, but this may, nevertheless, be the first
DVD player you’ve owned. Although many of
the features of the DVD 5 resemble those of
standard CD changers or players, there are a
number of functions that you may be unfamiliar
with. To ensure that you are able to take advan-
tage of all the power and flexibility the DVD 5
has to offer, we encourage you to review this
manual. That small investment in your time will
pay major dividends in the enjoyment you will
get from proper use of the DVD 5.
If you have additional questions about this
product, or its installation or operation, that are
not answered in this manual, please contact
your dealer, as he is your best source of
local information. You may also contact
Harman Kardon via e-mail through our Web site
at www.harmankardon.com.
Special Features
■Plays DVD-movie discs, standard CD
audio discs, and CD-RW rewritable
audio discs
■High-quality video playback 10-bit
DACs and component video outputs
■Dolby Digital and DTS data signal out-
put through both optical and coaxial
digital audio connections
■Audiophile-grade AKM output DACs for
the finest audio reproduction
■Easy-to-use on-screen navigation
system
■Extensive programming capability for
audio and video discs
■Parental lock controls prevent
unauthorized viewing of restricted
movies
■Multiple options for language,
soundtrack and subtitle selection
■Multiple-angle capabilities with
specially encoded DVD discs
■Bookmark function for easy return to
favorite scenes
■Backlit, ergonomically designed
remote control
■Five-disc-capacity changer with
play-exchange feature
NOTE: This player is designed and
manufactured for compatibility with Region
Management Information that is encoded on
most DVD discs. This player is designed only for
playback of discs with Region Code 1, or for
discs that do not contain Region Code informa-
tion. If there is any other Region Code on a
disc, that disc will not play on the DVD 5.
1
CAUTION
RISK OF ELECTRIC SHOCK
DO NOT OPEN
CAUTION: To prevent electric shock,
do not use this (polarized)
plug with an extension cord,
receptacle or other outlet
unless the blades can
be fully inserted to
prevent blade exposure.
The lightning flash with arrowhead symbol,
within an equilateral triangle, is intended to
alert the user to the presence of uninsulated
“dangerous voltage” within the product’s
enclosure that may be of sufficient magnitude to constitute a
risk of electric shock to persons.
The exclamation point within an equilateral
triangle is intended to alert the user to the
presence of important operating and
maintenance (servicing) instructions in the
literature accompanying the appliance.

4SAFETY INFORMATION
Safety Information
Verify Line Voltage Before Use
Your DVD 5 has been designed for use with
120-volt AC current. Connection to a line volt-
age other than that for which it is intended can
create a safety and fire hazard and may dam-
age the unit.
If you have any questions about the voltage
requirements for your specific model, or about
the line voltage in your area, contact your sell-
ing dealer before plugging the unit into a wall
outlet.
Do Not Use Extension Cords
We do not recommend that extension cords be
used with this product. As with all electrical
devices, do not run power cords under rugs or
carpets or place heavy objects on them.
Damaged power cords should be replaced
immediately by an authorized service depot
with cords meeting factory specifications.
Handle the AC Power Cord Gently
When disconnecting the power cord from an
AC outlet, always pull the plug, never pull the
cord. If you do not intend to use the unit for
any considerable length of time, disconnect the
plug from the AC outlet.
Do Not Open the Cabinet
There are no user-serviceable components
inside this product. Opening the cabinet may
present a shock hazard, and any modification
to the product will void your guarantee. If water
or any metal object such as a paper clip, wire
or a staple accidentally falls inside the unit, dis-
connect it from the AC power source immedi-
ately, and consult an authorized service station.
Installation Location
■To assure proper operation, and to avoid the
potential for safety hazards, place the unit
on a firm and level surface. When placing
the unit on a shelf, be certain that the shelf
and any mounting hardware can support the
weight of the product.
■Make certain that proper space is provided
both above and below the unit for ventila-
tion. If this product will be installed in a cab-
inet or other enclosed area, make certain
that there is sufficient air movement within
the cabinet.
■Do not place the unit directly on a carpeted
surface.
■Avoid moist or humid locations.
■Avoid installation in extremely hot or cold
locations, or an area that is exposed to
direct sunlight or heating equipment.
■Do not obstruct the ventilation slots on the
top of the unit, or place objects directly over
them.
Cleaning
When the unit gets dirty, wipe it with a clean,
soft, dry cloth. If necessary, wipe it with a soft
cloth dampened with mild soapy water, then a
fresh cloth with clean water. Wipe immediately
with a dry cloth. NEVER use benzene, aerosol
cleaners, thinner, alcohol or any volatile clean-
ing agent. Do not use abrasive cleaners, as they
may damage the finish of metal parts. Avoid
spraying insecticide near the unit.
Unpacking
The carton and shipping materials used to pro-
tect your new receiver during shipment were
specially designed to cushion it from shock and
vibration. We suggest that you save the carton
and packing materials for use in shipping if you
move, or should the unit ever need repair.
To minimize the size of the carton in storage,
you may wish to flatten it. This is done by care-
fully slitting the tape seams on the bottom, and
collapsing the carton down to a more two-
dimensional appearance. Other cardboard
inserts may be stored in the same manner.
Packing materials that cannot be collapsed
should be saved along with the carton in a
plastic bag.
If you do not wish to save the packaging mate-
rials, please note that the carton and other sec-
tions of the shipping protection are recyclable.
Please respect the environment and discard
those materials at a local recycling center.
Moving the Unit
Before moving the unit, be certain to discon-
nect any interconnection cords with other com-
ponents, and make certain that you disconnect
the unit from the AC outlet.
IMPORTANT NOTE: To avoid damage to the
DVD 5, which may not be covered by the war-
ranty, be certain that all discs are removed from
the unit before it is moved. Once the DVD 5 is
installed, discs may be left in the unit when it is
turned off, but the unit should NEVER be
moved with discs left in any of the positions of
the disc tray.
Important Information for the User
This equipment has been tested and found to
comply with the limits for a Class B digital
device, pursuant to Part 15 of the FCC Rules.
The limits are designed to provide reasonable
protection against harmful interference in a
residential installation. This equipment gener-
ates, uses and can radiate radio-frequency ener-
gy and, if not installed and used in accordance
with the instructions, may cause harmful inter-
ference to radio communication. However, there
is no guarantee that harmful interference will
not occur in a particular installation. If this
equipment does cause harmful interference to
radio or television reception, which can be
determined by turning the equipment off and
on, the user is encouraged to try to correct the
interference by one or more of the following
measures:
■Reorient or relocate the receiving antenna.
■Increase the separation between the equip-
ment and receiver.
■Connect the equipment into an outlet on a
circuit different from that to which the
receiver is connected.
■Consult the dealer or an experienced
radio/TV technician for help.
This device complies with Part 15 of the FCC
Rules. Operation is subject to the following two
conditions: (1) this device may not cause harm-
ful interference, and (2) this device must accept
interference received, including interference that
may cause undesired operation.
NOTE: Changes or modifications may cause
this unit to fail to comply with Part 15 of the
FCC Rules and may void the user’s authority to
operate the equipment.
CAUTION: The DVD 5 uses a laser system. To
prevent direct exposure to the laser beam, do
not open the cabinet enclosure or defeat any of
the safety mechanisms provided for your pro-
tection. DO NOT STARE INTO THE LASER BEAM.
To ensure proper use of this product, please
read this Owner’s Manual carefully and retain it
for future use. Should the unit require mainte-
nance or repair, please contact your local
Harman Kardon Service Station. Refer servicing
to qualified personnel only.

5DVD COMPATIBILITY & TERMINOLOGY
DVD Compatibility & Terminology
The DVD 5 is more than a DVD player; it will
play the following disc formats:
■ Both 5-inch (12cm) and 3-inch (8cm) discs
■ CD audio discs
■ DTS audio discs
■ CD-RW audio discs
■ DVD movie discs
However, it will NOT play the following:
■ DVD discs with a Region Code other than
the one the player is set for.
■ DVD discs with PAL format video
■ DVD-ROM data discs
■ DVD-RAM discs
■ VCD discs
■ CD-R discs
■ CD-I discs
■ CD-G discs
■ SVCD discs
■ Photo CD discs
■ MP3 Audio Discs
NOTE: Due to differences in the format of
certain discs, it is possible that some discs may
include a mix of features that are not compati-
ble with the DVD 5. Similarly, although the
DVD 5 is capable of a wide range of features,
not all discs include every capability of the DVD
system. For example, although the DVD 5 is
compatible with multi-angle discs, that feature
is only possible when the disc is specially
encoded for multiple-angle play. In addition, the
DVD 5 is capable of playing back both Dolby
Digital and DTS soundtracks, but the number
and types of tracks available will vary from disc
to disc. To make certain that a specific feature
or soundtrack option is available, please check
the options noted on the disc jacket.
■ Playback of DTS audio discs requires connec-
tion to a processor or receiver with a DTS
decoder.
■ Playback capability for CD-RW discs may
vary due to variations in the quality of the
CD-RW disc and the recorder used to create
the disc.
Since they share some of the characteristics and
technology of CD players, many of the terms
and operational concepts used in a DVD player
are similar to what you may be familiar with
from CD players and changers, or older video
disc formats such as Laser Disc. However, if this
is your first DVD product, some of the terms
used to describe the features of a DVD player
may be unfamiliar. The following explanations
should solve some of the mysteries of DVD, and
help you to enjoy all the power and flexibility of
the DVD format and the DVD 5.
Aspect Ratio: This is a description of the
width of a video image in relation to its height.
A conventional video screen is four units wide
for every three units of height, making it almost
square. Newer wide aspect ratio video displays
are 16 units wide for every nine units of height,
making them more like the screen in a movie
theater. The program material on a DVD may be
recorded in either format and, in addition, you
may configure the DVD 5 to play back in either
format, depending on the features recorded on
a disc.
Chapter: DVD programs are divided into chap-
ters and titles. Chapters are the sub-sections
programmed into a single title on a disc.
Chapters may be compared to the individual
tracks on an audio CD. Press the Menu button
to see a listing of the chapters on a disc.
Component Video: This is a new form of
video signal that eliminates many of the arti-
facts of traditional composite video signals by
splitting the signal into a separate luminance
channel and two color difference signals. With a
component video connection you will see
greater picture resolution and eliminate many
picture imperfections such as the moiré pat-
terns often seen on checked patterned cloths.
However, in order to benefit from component
video you must have a video display with
Y/Pr/Pb component video inputs. Do not
connect the component video outputs of the
DVD 5 to the standard composite or S-Video
inputs of a TV or recorder.
Title: For a DVD, a title is defined as an entire
movie or program. There may have as many
chapters within a title as the producers decide
to include. Most discs include only one title, but
some may have more than one, to give you a
“Double Feature”presentation. Press the Title
button to see a listing of the titles on a disc.
When a disc has only one title, pressing the title
button may show a list of the chapters.
Multiple Angle: DVDs have the capability to
show up to four different views of the same
scene in a program. When a disc is encoded
with multiple-angle information, pressing the
Angle button will enable you to switch between
these different views. Note that at present, few
discs take advantage of this capability and,
when they do, the multiple-angle technology
may only be present for short periods of time
within the disc. Producers will usually insert
some sort of icon or graphic in the picture to
alert you to the availability of multiple-angle
scenes.
Reading: This is a message that you will see
when you first press the Play button. It refers to
the fact that the player must first examine the
contents of the disc to see if it is a CD or DVD,
and then extract the information about the type
of material on the disc, such as languages,
aspect ratios, subtitles, number of titles and
more. The slight delay while the contents of the
disc are read is normal.
Resume: The operation of the Stop Button on
the DVD 5 works differently from what you are
used to on CD or CD players. On a traditional
CD player, when you press the Stop button, the
unit does just that: it stops playback. On a CD
player, when you press the start button again,
the disc starts from the beginning. With the
DVD 5, however, you have two options when
playing DVD discs. Pressing Stop once will stop
the playback, but it actually puts the unit in the
Resume mode. This means that you can turn
the machine off and, when you press play the
next time, the disc will resume or continue from
the point on the disc where the Stop button
was pressed. This is helpful if you are watching
a movie and must interrupt your viewing ses-
sion but wish to pick up where you left off.
Pressing the Stop button twice will stop the
machine in a traditional manner and, when
the disc is played again, it will start from the
beginning.

6FRONT PANEL CONTROLS
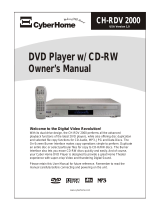
1Master Power Switch: Press this switch
to apply power to the DVD 5. When the unit is
first turned on, the Status Indicator 3will
turn green. Once the unit has been turned on
with this switch, it may be operated from either
the front panel or remote control. Press the
switch again to turn the unit completely off.
2Standby Switch: Press the button once to
turn the DVD 5 on, press it again to put the
unit in the Standby mode. Note that in order for
this switch to operate, the Main Power Switch
1must be pressed in so that it is in the
ON position.
3Status Indicator: When the DVD 5 is in
the On mode, this indicator will glow green.
When the unit has been placed in the Standby
mode by pressing the Power-Off button
on the remote, the indicator will glow amber,
indicating that the unit is still connected to the
AC main supply and is ready to be turned on
from the remote control.
4Headphone Jack: Connect standard head-
phones to this jack for private listening.
5Headphone Level Control: Turn this
control to adjust the volume level to the head-
phones. Note that the use of this control will
not change the analog output levels at the rear
panel audio outputs.
6Disc Tray: This tray holds as many as five
DVD or CD discs that can be played one at a
time in the DVD 5.
7Disc Skip: Press this button to change the
disc being played. Each press of the button will
move the tray forward to the next occupied
position in the tray. Note that the unit will skip
over the empty disc positions.
8Search Forward/Reverse: Press this but-
ton to move forward or backward through a CD
or DVD at one of four speeds. Each press and
release will increase the search speed, as indi-
cated in the on-screen display. Once you have
selected the desired speed, release the button
and the disc will continue to search at fast
speed. To resume normal playback speed, press
the play button.
9Open/Close Button: Press this button to
open or close the Disc Tray 6.
)Skip Forward/Reverse: Press this button
to move forward or backward through the
music tracks on a CD disc or the chapters on a
DVD disc.
!Stop: Press this button once to place the
disc in the Resume mode, which means that
playback will stop, but as long as the tray is not
opened or the disc changed, DVD playback will
continue from the same point on the disc when
the Play Button is pressed again. Resume will
also work if the unit was turned off. To stop a
disc and have play start from the beginning,
press the button twice.
@Play/Pause: Press this button to momen-
tarily pause playback. To resume playback,
press the button again. If a DVD is playing,
action will freeze and a still picture will be
displayed when the button is pressed.
#Direct Access Buttons: Press one of
these buttons to play any of up to five discs
loaded in the Disc Tray.
$Information Display: This display con-
tains a variety of indicators that provide infor-
mation about the status of the DVD 5 and the
disc currently playing.
%Display Dim: Press this button to adjust
the brightness of the Information Display by
50% or to turn the display off completely in the
following order: FULL BRIGHTNESS ➔HALF
BRIGHTNESS ➔OFF ➔FULL BRIGHTNESS.
^Remote Sensor: The sensor that receives
the infrared commands from the remote control
is behind this area. Do not cover or obscure this
part of the front panel in order to avoid a mal-
function with the remote.
29
Front Panel Controls
1Master Power Switch
2Standby Switch
3Status Indicator
4Headphone Jack
5Headphone Level Control
6Disc Tray
7Disc Skip
8Search Forward/Reverse
9Open/Close Button
)Skip Forward/Reverse
!Stop
@Play/Pause
#Direct Access Buttons
$Information Display
%Display Dim
^Remote Sensor
/
RESUME
TITLE
RANDOM
CHAPTER
REPEAT
TRACK
1ALL
HOUR
DISC A – B
MIN
PROG.
INTRO
SEC
DVD
CD
—±‚
12
3
4
5
DISC
123456789)
!
@
#
$
%
^

7FRONT PANEL INFORMATION DISPLAY
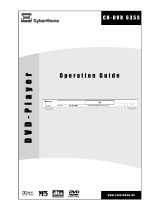
Front Panel Information Display
RESUME
TITLE
RANDOM
CHAPTER
REPEAT
TRACK
1ALL
HOUR
DISC A – B
MIN
PROG.
INTRO SEC
DVD
CD
—±‚
12
3
4
5
DISC
A
BCDE
F
LKJIH G
ADisc Type Indicators
BDisc-Number Indicators
CTitle Indicators
DChapter/Track Number Indicators
EProgram Time Indicators
FIntro Indicator
GProgram Indicator
HRepeat Indicators
IRandom Indicator
JResume Indicator
KPlayback-Mode Indicators
LParental Lock Indicator
ADisc Type Indicators: The DVD or CD
indicator will illuminate to show the type of
disc currently being played.
BDisc-Number Indicators: When the
DVD 5 has sensed that a disc is loaded in one
or more of the tray positions, the number inside
the corresponding disc icon will illuminate. The
disc position that is currently playing will flash.
Note that if a disc is added to, or removed
from, the tray while a disc is playing, the
indicator will not show the change until all
discs are cycled.
CTitle Indicators: These two positions in
the display will show the current title number
when a DVD disc is playing.
DChapter/Track Number Indicators:
When a DVD disc is playing, these two posi-
tions in the display will show the current chap-
ter. When a CD disc is playing they will show
the current track number.
EProgram Time Indicators: These posi-
tions in the indicator will show the running
time of a DVD in play. When a CD is playing,
these indicators will show the current track
time, time remaining in the current track, or the
total remaining time on the disc.
NOTE: The Program Time Indicators will also
display text messages about the DVD 5’s status,
including Reading when a disc is loading,
Bye when the unit is turned off, and Disc
Error when a disc not compatible with the
DVD 5 is put into the play position.
FIntro Indicator: This indicator lights when
the Intro Scan function is active.
GProgram Indicator: This indicator lights
when the programming functions are in use.
HRepeat Indicators: These indicators light
when any of the Repeat functions are in use.
IRandom Indicator: This indicator lights
when the unit is in the Random Play mode.
JResume Indicator: This indicator lights
when the Stop button has been pressed once
to put the unit in the Resume mode.
KPlayback-Mode Indicators: These indica-
tors light to show the current playback mode:
›Lights when a disc is playing in the normal
mode
›› Lights when the disc is in the Fast Search
Forward mode. For DVDs, When both triangles
glow steadily, the disc plays at 2x normal
speed. When the right triangle is flashing, the
disc plays at 4x normal speed. When the left
triangle is flashing, the disc plays at 8x normal
speed. When both triangles are flashing, the
disc plays at 16x normal speed. For CDs, only
the first three Fast Search modes are available.
›± Lights when the disc is paused
‹‹ Lights when the disc is in the Fast Search
Reverse mode. For DVDs, When both triangles
glow steadily, the disc plays at 2x normal
speed. When the left triangle is flashing, the
disc plays at 4x normal speed. When the right
triangle is playing, the disc plays at 8x normal
speed. When both triangles are flashing, the
disc plays at 16x normal speed. For CDs, only
the first three Fast Search modes are available.
LParental Lock Indicator: This indicator
lights when the parental-lock system is
engaged in order to prevent anyone from
changing the rating level without a code.

Rear Panel Connections
¡™£¢∞§¶•ª
¡Optical Digital Output
™Coaxial Digital Output
£Analog Audio Outputs
¢Composite Video Output
∞S-Video Output
§Component Video Outputs
¶Remote Control Output
•Remote Control Input
ªAC Power Cord
8REAR PANEL CONNECTIONS
¡Optical Digital Output: Connect this jack
to the optical digital input of an A/V receiver or
surround processor for Dolby Digital, DTS or
PCM audio playback.
™Coaxial Digital Output: Connect this jack
to the coaxial digital input of an A/V receiver or
surround processor for Dolby Digital, DTS or
PCM audio playback.
NOTE: The coaxial digital output should only be
connected to a digital input. Even though it is
the same RCA-type connector as standard ana-
log audio connections, DO NOT connect it to a
conventional analog input jack.
£Analog Audio Outputs: Connect these
jacks to an audio input on an A/V receiver or
surround processor for analog audio playback.
¢Composite Video Output: Connect this
jack to the video input on a television or video
projector, or to a video input on an A/V receiver
or processor if you are using that type of device
for video input switching.
∞S-Video Output: Connect this jack to the
S-Video input on a television or video projector,
or to an S-Video input on an A/V receiver or
processor if you are using that type of device
for S-Video input switching.
§Component Video Outputs: If your TV or
video projector has component video inputs,
you may connect these output jacks to the set
for the highest video quality available. Note
that the component video inputs may be
labeled as Y/Pr/Pb or Y/Cr/Cb but, for connec-
tion purposes, they are the same. The outputs
of these jacks should NOT be connected to a
standard composite video input.
¶Remote Control Output: Connect this
jack to the infrared (IR) input jack of another
compatible Harman Kardon remote controlled
product to have the built-in Remote Sensor ^
on the DVD 5 provide IR signals to other
compatible products.
•Remote Control Input: Connect the out-
put of a remote infrared sensor, or the remote
control output of another compatible Harman
Kardon product, to this jack. This will enable
the remote control to operate even when the
front panel Remote Sensor ^is blocked. This
jack may also be used with compatible IR
remote control-based automation systems.
ªAC Power Cord: Connect this plug to an
AC outlet. If the outlet is controlled by a switch,
make certain that it is in the ON position.

9 REMOTE CONTROL FUNCTIONS
●
●
●
●
Remote Control Functions
aAudio Button
bPower-On Button
cMode Button
dEnter Button
eNavigation Buttons
fReturn Button
gPlay Button
hReverse Search Button
iOpen/Close Button
jStop Button
kNext Button
lPrevious Button
mRandom Button
nDisc-Skip Button
oNumeric Keys
pRepeat Button
qRepeat A-B Button
rLight Button
sClear Button
tCheck Button
uProgram Button
vStep Buttons
wSlow-Play Buttons
xPause Button
yForward Search Button
zSubtitle On/Off Button
`Menu Button
28
Title Button
29
Power-Off Button
30
Angle Button
31
Subtitle Button
32
3
ON OFF
SEARCH
OPEN/CLOSE
SEARCH
STOP PAUSE
POWER POWER
RETURN
TITLE
MENU
ENTER
MODE
SUBTITLE
ON/OFF
DVD 5 RC
RANDOM DISC SKIP STEP
PROG.
CHECK
CLEAR
LIGHT
A - B
REPEAT
PREV. SLOW
b
d
f
j
n
30
AUDIO
c
a
e
g
PLAY
h
i
k
NEXT
l
m
o
123
7
56
89
0
4
p
q
r
s
t
u
v
w
x
y
z
`
28
29
31
SUBTITLE ANGLE
aAudio Button: When a DVD is playing,
press this button to select from the available
audio tracks or languages on the disc.
bPower-On Button: Press this button to turn
the DVD 5 on. Note that in order for this control
to function, the Front Panel Main Power Switch
1must first be pressed in, so that the unit is in
the Standby mode.
cMode Button: When a disc is playing,
pressing the button will display the Status Banner
which contains information about the disc and
enables you to change the functions.
dEnter Button: Press this button to select
the item that is highlighted in the DVD 5’s Status
Banner or in the on-screen menu displayed by a
DVD disc.

10 REMOTE CONTROL FUNCTIONS
Remote Control Functions
eNavigation Buttons: Press these buttons
to change or select an item from the DVD 5’s
Status Banner or in the on-screen menu
displayed by a DVD disc.
fReturn Button: When viewing the menu
display from a DVD disc, press this button to
return to the previous menu screen.
gPlay Button: Press this button to begin
playback. If the disc tray drawer is open, it will
automatically close when the button is pushed.
Pressing the Play button when the unit is in the
Standby mode will turn the unit on and begin
playback of the last disc in use.
hReverse Search: Press this button to
move backward through a CD or DVD at one
of four speeds. Each press and release will
increase the search speed, in the following
order: R. Search x 2 ➔ R. Search x 4 ➔
R. Search x 8 ➔ R. Search x 16. Once you have
selected the desired speed, release the button,
and the disc will continue to search at fast
speed. To resume normal playback, press the
Play Button g.
iOpen/Close Button: Press this button to
open or close the disc tray drawer. If the drawer
is opened while a disc is still playing, playback
will continue and discs not in use may be
changed. If the drawer is opened while the
unit is stopped, the disc that was playing will
be presented at the front-center position of
the tray.
jStop Button: Press this button once to
place the disc in the Resume mode, which
means that playback will stop; as long as the
tray is not opened or the disc changed, DVD
playback will continue from the same point on
the disc when the Play Button gis pressed
again. Resume will also work if the unit is
turned off. To totally stop a disc, press the
button twice.
kNext Button: Press this button to move
forward through the music tracks on a CD disc
or the chapters on a DVD disc.
lPrevious Button: Press this button to
move backward through the music tracks on a
CD disc or the chapters on a DVD disc.
mRandom Button: Press this button to
begin the playback of all tracks on a disc in
random order.
nDisc-Skip Button: Press this button to
move to the next available disc in the tray.
oNumeric Keys: Press these keys to enter
data for sequential programming, to enter or
change the access password for parental con-
trol, to enter a language code, or to respond to
menu options presented by a disc.
pRepeat Button: Press this button to
select a Repeat-Play mode. Each press of the
button shows the choice selected in either the
on-screen Status Banner display or in the
Repeat Indicators H.
qRepeat A-B Button: Press this button
once to begin the selection of a portion of a
disc to be repeated. Press it again to choose the
end point of the repeat-play selection.
rLight Button: Press this button to acti-
vate the remote’s backlighting so that the keys
are visible in low-light conditions.
sClear Button: Press this button to remove
the Status Banner or other displays from your
video screen. This button is also used to
clear items from Programmed Play lists.
(See page 29.)
tCheck Button: When a CD is playing,
press this button to check the status of the
current disc via the on-screen display. This
button is also used to verify the contents of a
programmed play list via the front panel
Information Display. (See page 28 for more
information about programming the DVD 5.)
uProgram Button: When the unit is
stopped, press this button to display the
program menu and enter a programmed play
sequence. When a disc is playing, press this
button to switch between normal play and
programmed playback.
vStep Buttons: When a DVD disc is play-
ing, press these buttons to move forward or
backward one frame at a time. Press the Play
Button g/@to resume normal play. These
buttons do not function when a CD is playing.
wSlow-Play Buttons: When a DVD disc is
playing, press these buttons to move forward or
backward through the disc in slow speed. Each
press of these buttons changes the slow-play
speed in the following order: 1/16 Normal
Speed ➔1/8 Normal Speed ➔1/4 Normal
Speed ➔1/2 Normal Speed.
To resume normal play, press the Play Button
g/@. These buttons do not function when a
CD is playing.
xPause Button: Press this button to stop
the disc in use. To resume playback, either press
the Pause Button again or press the Play
Button g/@.
yForward Search: Press this button to
move forward through a CD or DVD at one of
four speeds. Each press and release will
increase the search speed, in the following
order: F. Search x 2 ➔ F. Search x 4 ➔
F. Search x 8 ➔ F. Search x 16. Once you have
selected the desired speed, release the button
and the disc will continue to search at fast
speed. To resume normal playback speed, press
the play button.
zSubtitle On/Off Button: When a DVD is
playing, press this button to turn the subtitle
display on or off.
`Menu Button: This button has two func-
tions. When a DVD disc is playing, press this
button to stop the disc playback and display the
DVD’s main menu screen for the current title.
When the unit is stopped, press this button to
display the Setup Menu.
Title Button: When a DVD disc is play-
ing, press this button to display the disc’s Title
Select Menu. If the disc does not offer this func-
tion, a symbol () will appear on the screen to
indicate that there is only one title on the disc
or that the disc does not allow this feature.
Power-Off Button: Press this button to
place the unit in the Standby mode.
Angle Button: When a DVD encoded
with multiple-angle information is playing, press
this button to change the angle in use. Note
that this function is only available on discs that
are specially prepared to take advantage of the
multiple-angle function, and only for those
parts of the disc that are recorded with
multiple-angle content. The DVD 5 will display a
camera icon on the screen to indicate when this
feature is available.
Subtitle Button: When a DVD disc is
playing, press this button to change the subtitle
choice. To actually turn the subtitles on or off,
press the Subtitle On/Off Button z.
31
30
29
28

11 INSTALLATION AND CONNECTIONS
Installation
Connections will vary, depending on the type of
audio and video components used with your
DVD 5. However, regardless of the complexity
of your system, the installation guidelines on
pages 11–14 should always be followed to
ensure a safe installation and reliable operation
of the product.
Important Note: To prevent possible damage
to your speakers or other components in your
home entertainment system, we strongly rec-
ommend that ALL system components, includ-
ing the DVD 5, be turned off and unplugged
from their AC power source when any connec-
tions are made or a new component is
installed.
Placement of the DVD 5
Since the laser transport mechanism and
carousel tray in the DVD 5 are precision instru-
ments that are designed and manufactured to
precise tolerances, they are subject to interfer-
ence from vibration. To minimize the possibility
of skipping during playback, it is recommended
that the unit be placed on a level, solid,
vibration-free surface.
When installing the DVD 5 in a cabinet or tight
space, always make certain that there is enough
room in front of the unit for the disc tray to
open fully, and that there is enough space
above the unit so that discs may easily be
inserted into the spaces in the tray.
As the disc drawer extends out about six inches
from the front of the unit when it is open, you
should also make certain that there is sufficient
clearance in front of the unit to accommodate
the disc drawer without it bumping into other
objects or getting in the way of anyone walking
in front of the unit.
In addition to the safety considerations outlined
on page 4, it is also recommended that the
DVD 5 not be placed in a location that is sub-
ject to direct sunlight or extreme heat or cold,
as these conditions may damage the discs used
in the player, or the player itself. Note that
audio amplifiers or high-power receivers, as
well as certain other electronic products, can
generate significant heat. For that reason, do
not place the DVD 5 directly on top of an
amplifier, receiver, or other heat source.
Always allow at least one inch of free space on
all sides of the DVD 5 as well as around other
electronic products to allow for proper
ventilation.
Installation Options
The diagrams on pages 12–14 describe the
three basic ways to connect the DVD 5 to your
system components.
■ Option #1: Use this setup if all audio and
video connections from the DVD 5 will go
directly to a television set or video projector
without the use of an A/V receiver or
surround processor.
■ Option #2: Use this setup if the video con-
nections will go directly to a television set or
video projector, but the audio connections
will be made to an A/V Receiver or surround
processor.
■ Option #3: Use this setup if all audio and
video connections will be made through an
A/V receiver or a surround processor.
Installation and Connections

12 INSTALLATION AND CONNECTIONS
Installation and Connections
OPTION 1:
Direct Connections to a Television or
Video Projector
This is the simplest installation, as it does not
require anything other than a television set.
However, note that in this type of system you
will not be able to enjoy the benefits of Dolby
Digital or DTS discrete playback, as that
requires the digital audio processing found in
A/V receivers or surround processors. Follow as
many of these steps as needed, based on the
capabilities of your television:
Connect the left and right Analog Audio
Outputs £on the DVD 5 to the audio
inputs on your television. Connect the
Composite Video Output ¢on the DVD 5
to a video input on your television. Note that
composite video connections typically have a
yellow center ring for easy identification.
If your television or projector is equipped
with component video inputs, connect the three
Component Video Outputs §on the DVD
5 to the matching component video inputs on
your video display.
Connect the S-Video Output ∞on the
DVD 5 to an S-Video input on your television.
Connect the AC power cord to an AC
outlet.
Installation Notes and Hints
■ If your television has both standard compos-
ite video and S-Video inputs, you only need
to use one of the two connections. Where
possible, we recommend using the S-Video
connection due to the higher picture quality.
■ Do not connect any of the video outputs of
the DVD 5 through a VCR. Due to the use of
Macrovision encoding on most DVD discs,
connections through the circuitry of a VCR
will distort the picture so that it will become
unwatchable.
■ Note that the volume level for DVD playback
may different from the level for TV broad-
casts. This is normal and does not indicate a
problem with the DVD 5 or your TV set.
Simply use the volume control on the TV set
to set the desired level.
■ Depending on the product and brand, a
number of different descriptions are used to
label component video connections. You may
see them as Y/Pr/Pb, Y/Cr/Cb or Y/R-Y/B-Y.
For the purpose of connecting a DVD player,
all of these labels are normally identical. The
best guide is to connect the component
video connections using the green/red/blue
color coding of the inner rings of the con-
nection jacks.
■ When making connections to a high defini-
tion (HDTV) or “digital ready”set, do not
connect the component video outputs of the
DVD 5 to inputs labeled “HD Component
Inputs”unless you have checked with the
set’s owner’s manual to ensure that the HD
input is also compatible with standard scan
(NTSC) video.
E
D
C
B
A
TV
DVD 5
L R
A B C D E

13 INSTALLATION AND CONNECTIONS
OPTION 2:
Direct Connections to a Television or
Video Projector with Audio Connections
to an A/V Receiver or Surround Processor
To hear the benefits of discrete, multichannel
digital audio, you will need to use an external
Dolby Digital/DTS-capable A/V receiver or
surround processor. In this installation, you
maintain a direct video connection to your
television, but use the audio processing from
another device.
Note that step is not used, as it is for
analog audio connections only. This installation
starts with step
Connect the Composite Video Output
¢on the DVD 5 to a video input on your tele-
vision. Note that composite video connections
typically have a yellow center ring for easy
identification.
If your television or projector is equipped
with component video inputs, connect the three
Component Video Outputs §on the DVD
5 to the matching component video inputs on
your video display.
Connect the S-Video Output ∞on the
DVD 5 to an S-Video input on your television.
Connect the AC power cord to an AC
outlet.
Connect either the Optical Digital
Output ¡or the Coaxial Digital Output
™on the DVD 5 to the matching digital input
jacks on your A/V receiver or surround proces-
sor. Note that only one of these connections is
required, not both.
Connect the left/right Analog Audio
Outputs £of the DVD 5 to the matching
left/right analog inputs on your A/V receiver or
surround processor.
Installation Notes and Hints
■ Only one type of audio connection is
required, either digital or analog. If possible,
a digital connection is preferred, as that will
enable you to listen to DVD soundtracks
with the clarity, definition and channel sepa-
ration made possible by Dolby Digital and
DTS. Follow Step for digital audio con-
nections. However, if you do not yet have a
receiver capable of digital audio processing,
you will still benefit from an analog connec-
tion so that the receiver may create a multi-
channel soundfield using Dolby Pro Logic or
other matrix decoding. Follow Step for
instructions on analog audio connections.
■ If your television has both standard compos-
ite video and S-Video inputs, you only need
to use one of the two connections. Where
possible, we recommend an S-Video connec-
tion due to the higher picture quality.
■ Do not connect any of the video outputs of
the DVD 5 through a VCR. The use of
Macrovision encoding on most DVD discs
means that most discs will have a distorted
picture when connections are made through
a VCR.
■ Note that the volume level for DVD playback
may different from the level for other input
sources to your receiver. This is normal and
does not indicate a problem with the DVD 5
or your receiver. Simply use the volume con-
trol on the receiver to set the desired level.
■ Depending on the product and brand, a
number of different descriptions are used to
label component video connections. You may
see them as Y/Pr/Pb, Y/Cr/Cb or Y/R-Y/B-Y.
For the purposes of connecting a DVD play-
er, all of these labels are normally identical.
The best guide is to connect the component
video connections using the green/red/blue
color coding of the inner rings of the con-
nection jacks.
■ When making connections to a high defini-
tion (HDTV) or “digital ready”set, do not
connect the component video outputs of the
DVD 5 to inputs labeled “HD Component
Inputs”unless you have checked with the
set’s owner’s manual to ensure that the HD
input is also compatible with standard scan
(NTSC) video.
G
F
G
F
E
D
C
B
B
A
Installation and Connections
TV
Receiver
Audio In
Digital In
DVD 5
B C DE
F F G G

14 INSTALLATION AND CONNECTIONS
OPTION 3:
Audio and Video Connections through an
A/V Receiver or Surround Processor only
If your home entertainment system has other
audio/video input sources in addition to the
DVD 5, such as a VCR, cable set-top box or
satellite receiver, LD player, personal video
recorder or HDTV tuner, the most efficient way
to manage the various components is to make
all audio/video connections through an A/V
receiver or surround processor. This simplifies
the selection of an input source, and allows
many different components to be connected to
the same video display and speakers.
Note that steps / / and are not
used. This installation starts with step
Connect the AC power cord to an AC
outlet.
Connect either the Optical Digital
Output ¡or the Coaxial Digital Output
™on the DVD 5 to the matching digital input
jacks on your A/V receiver or surround proces-
sor. Note that only one of these connections is
required, not both.
Connect the left/right Analog Audio
Outputs £of the DVD 5 to the matching
left/right analog inputs on your A/V receiver or
surround processor.
Connect the Composite Video Output
¢on the DVD 5 to a video input on your
receiver or processor. Note that composite video
connections typically have a yellow center ring
for easy identification.
Connect the S-Video output ∞on the
DVD 5 to an S-Video input on your receiver or
processor.
If your television or projector is equipped
with component video inputs, connect the three
Component Video Outputs §on the
DVD 5 to the matching component video inputs
on your video display. However, if your receiver
or processor has multiple component input
switching capability, connect the Component
Video Output Jacks ∞on the DVD 5 to the
matching component video inputs on your
receiver, surround processor or video processor.
Installation Notes and Hints
■ For this installation, make the connections
from the receiver or processor to your video
display and speakers as described in the
owner’s manuals for those products.
■ Only one type of audio connection is
required, either digital or analog. If possible,
a digital connection is preferred as that will
enable you to listen to DVD soundtracks
with the clarity, definition and channel sepa-
ration made possible by Dolby Digital and
DTS. Follow Step for digital audio con-
nections. However, if you do not yet have a
receiver capable of digital audio processing,
you will still benefit from an analog connec-
tion so that the receiver may create a multi-
channel soundfield using Dolby ProLogic or
other matrix decoding. Follow Step for
instructions on analog audio connections.
■ If your television has both standard compos-
ite video and S-Video inputs, you only need
to use one of the two connections. Where
possible, we recommend an S-Video connec-
tion due to the higher picture quality.
■ Do not connect any of the video outputs of
the DVD 5 through a VCR. The use of
Macrovision encoding on most DVD discs
means that most discs will have a distorted
picture when connections are made through
a VCR.
■ Note that the volume level for DVD playback
may different from the level for other input
sources to your receiver. This is normal and
does not indicate a problem with the DVD 5
or your receiver. Simply use the volume con-
trol on the receiver to set the desired level.
■ Depending on the product and brand, a
number of different descriptions are used to
label component video connections. You may
see them as Y/Pr/Pb, Y/Cr/Cb or Y/R-Y/B-Y.
For the purposes of connecting a DVD play-
er, all of these labels are normally identical.
The best guide is to connect the component
video connections using the green/red/blue
color coding of the inner rings of the con-
nection jacks.
■ When making connections to a high defini-
tion (HDTV) or “digital ready”set, do not
connect the component video outputs of the
DVD 5 to inputs labeled “HD Component
Inputs”unless you have checked with the
set’s owner’s manual to ensure that the HD
input is also compatible with standard scan
(NTSC) video.
G
F
J
I
H
G
F
E
E
D
C
B
A
Installation and Connections
A/V Receiver or Surround Processor
BCD
E
J
J
J
Audio In
Video In S-Video In
Digital In
DVD 5
F F G G H I

15 SETUP MENU
Remote Control Operation
The DVD 5’s remote control contains all of the
codes needed to operate the product. In addi-
tion, it offers a built-in backlight that may be
used to identify the remote buttons when the
remote is used in low-level lighting conditions.
A guide to the operation of the remote’s func-
tions is found in this manual on page 9.
Batteries
Before using the remote, install the AA batteries
provided with the product by turning the
remote over and moving the small latch on the
bottom in the direction of the arrow. After the
latch is loosened, flip the cover up and then
remove it. Install the two batteries as shown
here, being careful to observe the “+”and “–”
polarity indications for proper placement of the
batteries in their compartment. Replace the
battery cover by first sliding the two teeth on
the cover into their matching slots towards the
top of the remote. Then, gently press down on
the cover until the latch firmly snaps into place.
The remote is now ready for operation.
NOTE: When replacing batteries, it always a
good idea to replace both at the same time.
When the remote will not be used for an
extended period of time, it is also a good idea
to remove the batteries to avoid the possibility
of damage due to corrosion. Batteries contain
chemical substances and we recommend that
you dispose of them properly and in compliance
with any local regulations.
Notes on Remote Control
Operational Range
■ The DVD 5’s remote will operate up to a
range of about 23 feet (7 m) from the
Remote Sensor ^in a range of about 30
degrees to each side of the unit., as shown
in the diagram below.
■The operating distance may vary according to
the brightness of the room.
■ Do not point any bright lights in the direc-
tion of the unit’s Remote Sensor ^,as
this will decrease operating range.
Notes on Batteries for the DVD 5 Remote
■ The batteries normally last for about one
year although this depends on how often,
and for what operations, the remote control
is used.
■ If the backlight does not illuminate, or if the
remote control unit fails to work even when
it is operated near the player, replace the
batteries. When replacing the batteries, do
not mix old and new batteries; always
change both cells at the same time.
■ Always dispose of used batteries in an envi-
ronmentally safe manner and in compliance
with any local regulations.
■ Do not use rechargeable (Ni-Cd) batteries
and do not attempt to recharge, short-circuit
or disassemble the batteries.
■ If the remote control unit is not going to be
used for an extended period of time, remove
the batteries. Otherwise, electrolyte may leak
which may lead to malfunctions as well as
damage to the remote, which is not covered
by the warranty.
■ Should any electrolyte leak from the batter-
ies inside the remote control unit, wipe it
away but avoid any contact. If any elec-
trolyte should come into contact with your
skin, wash it off thoroughly with water.
System Defaults
The final step of the installation is to establish
the system’s defaults. The factory settings for
the unit will accommodate most requirements,
so it is not essential that they be changed. If
you wish to immediately play a disc, proceed to
page 21. However, it is helpful to take a few
minutes to familiarize yourself with these set-
tings, as they may require change from time
to time.
Before using the DVD 5 for the first time, make
certain that the unit is properly connected to
any audio/video components it will be used
with, as described on the previous pages. When
the installation is done, make certain that the
batteries are properly installed in the remote
and that the unit is plugged into an AC power
source.
The first step in checking or changing the sys-
tem defaults is to access the Setup Menu. First,
make certain that the DVD 5 is properly con-
nected to a video display, and that power is
connected. For this process, however, you do
not need to load any discs into the unit.
To turn the DVD 5 on, press the Main Power
Switch 1in until it latches almost flush with
the unit’s front panel. Note that the Status
Indicator 3will turn amber. Next, press the
Standby Switch 2/b. The Status
Indicator 3will turn green and the
Information Display $will light up.
To access the Setup Menu, press the Menu
Button `on the remote. The Setup Menu
will appear on the video display screen as
shown in Figure 1. The left side of the screen
will show the various options, and the box
on the right side of the screen will show the
current defaults.
ONOFF
SEARCH
OPEN/CLOSE
PLAYSEARCH
STOPPAUSE
POWER POWER
RETURN
SUBTITLEANGLETITLE
MENU
ENTER
AUDIO
MODE
SUBTITLE
ON/OFF
DVD 5 RC
123
4
7
56
89
0
RANDOMDISC SKIPSTEP
PROG.
CHECK
CLEAR
LIGHT
A - B
REPEAT
PREV.NEXTSLOW
30°30°
/
RESUME
TITLE
RANDOM
CHAPTER
REPEAT
TRACK
1ALL
HOUR
DISC A – B
MIN
PROG.
INTRO
SEC
DVD
CD
—±‚
12
3
4
5
DISC
Setup Menu

16 SETUP MENU
Figure 1
To navigate through the settings on the screen,
use the
⁄
/
¤
Navigation Buttons eto
scroll up or down through the list of settings or
the list of options. Press the ‹/›Navigation
Buttons to move back and forth between the
list of settings and the list of options for those
settings. To choose a specific option, use the
⁄
/
¤
Navigation Buttons euntil it is
highlighted. Press the Enter Button dto
select the choice. When a selection is made,
you may confirm the choice by checking to see
that a black dot fills the “radio button”circle
next to the choice. This filled circle, not the
highlighted option, is the active choice.
Audio Language Selection
The Audio Language option sets the default
choice for the language that will be played
from a DVD disc.
To select the language default, you must be
viewing the Setup Menu (Figure 1), which is
available by pressing the Menu Button `
while the unit is in the Stop mode. Audio
Language Selection is the first option, so it will
automatically be highlighted in dark blue when
the Setup Menu is displayed.
To change the default Language, press the ›
Navigation Button eand note that the list
of system defaults will be replaced with a list of
the available options, as shown in Figure 2. The
current language choice will be indicated by a
filled-in circle on the list on the right side of
the screen.
Figure 2
To change the default setting, press the
⁄
/
¤
Navigation Buttons euntil the desired
choice is highlighted, and then press the Enter
Button d. Note that the circle for your
choice will fill in, and the menu will return to
the default listings.
If you wish to change the default to a language
other than English, Spanish or French, press the
⁄
/
¤
Navigation Buttons euntil the
“Other”line on the bottom is highlighted.
Consult the Language Codes lists on page 30
for the desired language. Press the Enter
Button d, and then enter the four-digit code
from the list using the Numeric Keys o.
Although your selection will be entered, the
word “Other”will appear on the default list.
Note that when a default language is selected,
it will be used whenever that language is pres-
ent on the DVD disc being played. However,
when that language is not present, the lan-
guage used will be the one preprogrammed
into the disc itself. (Typically, that default will
be English for discs sold in Region 1, but the
selection will vary at the discretion of the disc’s
producer.)
Although the default will set the language that
will be used when a disc is first put into play,
the language may easily be changed at any
time by using the Audio Button a. See
page 25 for more information.
If you have no other changes to make after set-
ting this default, press the Menu Button `
to remove the Setup Menu from the screen, or
press the Play Button g/@to begin or
resume playback.
Subtitle Language Selection
The Subtitle Language option sets the default
choice for the language that will be displayed
when subtitles are turned on during DVD
playback.
To select the Subtitle Language default, you
must be viewing the Setup Menu (Figure 1),
which is available by pressing the Menu
Button `while the unit is in the Stop Mode.
At the Setup menu, press the
¤
Navigation
Button euntil the Subtitle Language option
is highlighted.
To change the default Subtitle Language, press
the ›Navigation Button eand note that
the list of system defaults will be replaced with
a list of the available options, as shown in
Figure 3. The current subtitle language choice
will be indicated by a filled-in circle on the list
on the right side of the screen.
Figure 3
To change the default setting, press the
⁄
/
¤
Navigation Buttons euntil the desired
choice is highlighted, and then press the Enter
Button d. Note that the circle for your
choice will fill in, and the menu will return to
the default listings.
If you wish to change the subtitle default to a
language other than English, Spanish or French,
press the
⁄
/
¤
Navigation Button euntil
the “Other”line on the bottom is highlighted.
Consult the Language Codes list on page 30 for
the desired language. Press the Enter Button
d, and then enter the four-digit code from
the list using the Numeric Keys o.
Although your selection will be entered, the
word “Other”will appear on the default list.
Note that when a default subtitle language is
selected, it will be used whenever that lan-
guage is present on the DVD disc being played.
However, when that language is not present,
the language used will be the one prepro-
grammed into the disc itself. (Typically, that
default will be English for discs sold in
Region 1, but the selection will vary at the
discretion of each disc’s producer.)
Although the default will set the language that
will be used when the disc is first put into play,
the language may easily be changed at any
time by using the Subtitle Button . See
page 25 for more information.
If you have no other changes to make after set-
ting this default, press the Menu Button `
to remove the Setup Menu from the screen, or
press the Play Button g/@to begin or
resume playback.
31
Setup Menu

17 SETUP MENU
Menu Language Selection
The Menu Language option sets the default
choice for the language that will be used for
the DVD 5’s own on-screen menu displays. This
default setting DOES NOT impact the playback
of DVD discs.
To select the Menu Language default, you must
be viewing the Setup menu (Figure 1), which is
available by pressing the Menu Button `
while the unit is in the Stop mode. At the Setup
Menu, press the
¤
Navigation Button e
until the Menu’s option is highlighted.
To change the default Menu Language, press
the ›Navigation Button eand note that
the list of system defaults will be replaced with
a list of the available options, as shown in
Figure 4. The current language choice will be
indicated by a filled-in circle on the list on the
right side of the screen.
Figure 4
To change the default setting, press the
⁄
/
¤
Navigation Buttons euntil the desired
choice is highlighted, and then press the Enter
Button d. Note that the circle for your
choice will fill in, and the menu will return to
the default listings.
If you have no other changes to make after set-
ting this default, press the Menu Button `
to remove the Setup Menu from the screen, or
press the Play Button g/@to begin or
resume playback.
Ratings Selection and Password Control
The DVD 5 enables you to control the discs that
are viewed by setting a ratings level. When a
disc that’s ready to play has a rating level
greater than the default, it will not play. To fur-
ther protect against unauthorized viewing of
restricted discs, the ratings-level option may be
locked so that only authorized persons (such as
a parent) may change the rating level after a
password is entered.
The ratings system is dependent on information
encoded into the DVD disc being played so,
although most movies will carry an MPAA or
other rating symbol, the disc may or may not
contain that rating in its software. In addition
to the five MPAA ratings of G, PG, PG-13, R
and NC-17, the DVD 5 will accommodate a
total of eight ratings steps, as set by the cre-
ators of the DVD format. These additional steps
allow for more critical control of program play-
back for all audiences.
To select the permitted ratings values, you must
be viewing the Setup Menu (Figure 1), which is
available by pressing the Menu Button `
while the unit is in the Stop mode. At the Setup
Menu, press the
¤
Navigation Button e
until the Ratings option is highlighted.
To change the default Ratings setting, press the
›Navigation Button eand note that the
list of system defaults will be replaced with
a list of the program ratings as shown in
Figure 5. Some ratings will be highlighted in
orange, while others will be highlighted in blue.
Discs with a rating in the orange color band
will play without any further action by the
viewer. Discs with ratings in the blue band will
only play after a password is entered.
Figure 5
To change the range of ratings that may be
viewed without a password, press the
⁄
/
¤
Navigation Buttons euntil the desired
range is set, and then press the Enter Button
d. Note that the circle for your choice will fill
in, and the menu will return to the default list-
ings. The listing in the default settings will show
the highest rated program that may be viewed
without entering a password.
If you have no other changes to make after set-
ting this default, press the Menu Button `
to remove the Setup Menu from the screen, or
press the Play Button g/@to begin or
resume playback.
Password Selection and Control Lock
The DVD 5’s Password System is used to control
viewing of restricted programs and one’s capa-
bility to change the password itself. The DVD 5
is shipped without a password and with the
settings for the password system unlocked. The
following instructions will show how to add a
password and to lock the settings.
To set a password or lock the password system,
you must be viewing the Setup Menu
(Figure 1), which is available by pressing the
Menu Button `while the unit is in the
Stop mode. At the Setup Menu, press the
¤
Navigation Button euntil the Password
option is highlighted.
To enter a password, press the ›Navigation
Button eand note that the list of system
defaults will be replaced with a list of the three
password options (Figure 6). To enter a pass-
word, check to make certain that the words Set
Password are highlighted in light blue and then
press the Enter Button d. The Enter
Password screen will then appear on your video
display (Figure 7).
Figure 6
Figure 7
Setup Menu

18 SETUP MENU
Setup Menu
To enter a password you may either enter the
four-digit number directly, using the Numeric
Keys o, or you may use the
⁄
/
¤
Navigation Buttons eto select the
number for a position, and then press the ›
Navigation Button eto move to the next
position. Note that as each number is entered,
it will turn to a solid circle when you move to
the next position to protect the password’s
privacy. When all four numbers of the
password have been entered, press the Enter
Button d.
After the password has been entered once, a
second set of data entry boxes will appear, ask-
ing you to confirm the entry. Using the same
method described earlier, enter the password
again. When all four numbers have been
repeated, press the Enter Button dto set
the password in the DVD 5’s memory. If the
two passwords do not agree, an “Incorrect
Password”message will appear to ask you to
try entering the number again.
Once this password is entered, you will need to
use this four-digit number to view a disc when
the rating of the disc exceeds the settings
entered in the Ratings Menu. If a password
has been entered, it is also required that you
change the settings range in the Ratings Menu.
Finally, the password is required if you wish to
unlock the system again to permit access to the
Ratings Menu.
If you have no other changes to make after set-
ting this default, press the Menu Button `
to remove the Setup Menu from the screen, or
press the Play Button g/@to begin or
resume playback.
Clearing Passwords
Once a password has been entered, the system
remains locked until the password is cleared. To
clear a password so that the ratings may be
changed or to permit any movie to be viewed
regardless of ratings, you must be viewing the
Setup Menu (Figure 1), which is available by
pressing the Menu Button `while the unit
is in the Stop mode. At the Setup Menu, press
the
¤
Navigation Button euntil the
Password option is highlighted. As the system is
locked, you will first be asked to enter the pass-
word previously set. Enter that password using
the Numeric Keys eand then press the
Enter Button d.
Figure 8
To clear the password lock once you have
entered the correct password, press the
¤
Navigation Button eso that the words
Clear Password are highlighted in light blue
(Figure 8). Next, press the Enter Button d
to complete the process. Note that the wording
for Clear Password will change to white as a
confirmation that the system is now unlocked.
If you have no other changes to make after set-
ting this default, press the Menu Button `
to remove the Setup Menu from the screen, or
press the Play Button g/@to begin or
resume playback.
Changing The Password
If you feel that the password has become
known to an unauthorized person, you may
change the password without unlocking the
system. To change a password, you must be
viewing the Setup Menu (Figure 1), which is
available by pressing the Menu Button `
while the unit is in the Stop mode. At the Setup
Menu, press the
¤
Navigation Button e
until the Password option is highlighted. As the
system is locked, you will first be asked to enter
the password previously set (Figure 9). Enter
that password using the Numeric Keys e
and then press the Enter Button d.
Figure 9
Figure 10
To change the password, press the
¤
Navigation Button eso that the words
Change Password are highlighted in light blue
(Figure 10). Next, press the Enter Button d.
On the next screen that appears (Figure 11),
enter the new four-digit password directly by
using the Numeric Keys o, or you may use
the
⁄
/
¤
Navigation Buttons eto select
the number for a position, and then press the ›
Navigation Button eto move to the next
position. Note that as each number is entered,
it will turn to a solid circle when you move to
the next position to protect the password’s
privacy. When all four numbers of the
password have been entered, press the Enter
Button d.
Figure 11

19 SETUP MENU
Setup Menu
After the password has been entered once, a
second set of data entry boxes will appear, ask-
ing you to confirm the entry (Figure 12). Using
the same method described above, enter the
password again. When all four numbers have
been repeated, press the Enter Button dto
set the password in the DVD 5’s memory. If the
two passwords do not agree, an “Incorrect
Password”message will appear to ask you to
try entering the number again.
Figure 12
Once the new password has been entered, the
system remains locked with the new password
in effect. If you have no other changes to make
after setting this default, press the Menu
Button `to remove the Setup Menu from
the screen, or press the Play Button g/@
to begin or resume playback.
Aspect Ratio
The aspect ratio of a television picture is the
relationship between its width and height, and
it defines the shape of the picture. Television
sets have traditionally had an aspect ratio of
4 x 3, which is to say that they are almost
square, with slightly more width than height.
Almost all television programming is presented
in the 4 x 3 aspect ratio so that the pictures fit
within the confines of the TV screen.
Movies, on the other hand, have a variety of
what are known as “wide aspect ratio”formats
that are significantly wider in relation to their
height than traditional television pictures.
Indeed, the development of wide-screen movies
was something that was popularized in the
1950’s in response to the success of television;
movie producers wanted to provide a wider
vista than afforded by TVs.
However, since many movies are produced for a
wider screen than the TV set they are played
on, there is a problem that is like fitting a
square peg in a round hole. In many instances
this is taken care of by the disc’s producers,
who reformat the image to fit within a standard
4 x 3 TV screen. Discs such as this require no
special setting. The only downside to this is that
when wide-screen movies are converted to
4 x 3, some of the information at the sides of a
scene may be cut off due to the difference in
picture shape. This is also called a “pan and
scan”presentation, as a 4 x 3 viewing area is
moved across the wider cinema image.
Other discs are produced in what is called a
“letterbox wide-screen”format. In this case the
entire wide image is fit inside the 4 x 3 screen
shape from side to side. This means that you
see the entire picture as the movie’s director
intended, but the height of the picture is
reduced to accommodate the added width. The
blank areas that appear at the top and bottom
of the screen make the image in the center
appear as if you are looking into a mail slot,
giving this sort of presentation the nickname of
“letterbox.”
The DVD format accommodates both of these
formats, though it is up to the producer of the
disc to select which way to convert the movie
to video. Sometimes you will have a choice of
only one of the two formats, while some discs
offer a full screen, with the pan and scan ver-
sion on one side of a disc and the widescreen,
but letterbox version, on the other side.
The DVD 5 will play either type of disc, and you
may select a default that tells which way to
present the image when there is a choice.
To select an aspect ratio default, you must be
viewing the Setup Menu (Figure 1), which is
available by pressing the Menu Button `
while the unit is in the Stop mode. At the Setup
Menu, press the
¤
Navigation Button e
until the Aspect Ratio option is highlighted.
Next, press the Enter Button d. Select
one of the three choices in the options box
(Figure 13) using the
⁄
/
¤
Navigation
Buttons e.
Figure 13
Depending on the type of television set you
have, choose one of these three options:
■ 4 x 3 Letterbox: Choose this setting if you
have a standard 4 x 3 television set and pre-
fer to see movies in their original aspect
ratio. You will see the entire movie but,
when it is presented in a letterbox fashion,
there will be black bars at the top and
bottom of the screen. Movies or other pro-
grams recorded in a 4 x 3 format will appear
normal.
■ 4 x 3 Pan Scan: Choose this setting if you
have a standard 4 x 3 television set and
always want the image to fill the entire
screen. When a wide screen movie is shown,
you may not see parts of the picture at one
side of the screen or the other. Note, how-
ever, that even when you select this option,
playing a wide-screen-only movie will result
in black letterbox bars at the top and bot-
tom of the screen. This is due to the way
the disc was produced, and it cannot be
changed.
■ 16 x 9 Wide-screen: Choose this setting only
if you have a wide-screen television set
(16 x 9 aspect ratio). With this setting, the
DVD 5 will adjust the output for wide-screen
movies so that they fill the entire screen in
the proper aspect ratio. Note, however, that
in this setting a disc recorded in the 4 x 3
aspect ratio will appear in the wide-screen
as a boxed image in the center, with black
columns on the left and right side of the
screen.
NOTE: If the wide-screen option is chosen
and a wide-screen movie is played on a con-
ventional 4 x 3 aspect ratio set, the image will
be distorted due to vertical compression.
When you have made your selection using the
⁄
/
¤
Navigation Buttons eto highlight
the desired option, press the Enter Button
dand note that the circle next to your choice
will fill in. The menu system will then automati-
cally return to the status listing.
If you have no other changes to make after set-
ting this default, press the Menu Button `
to remove the Setup Menu from the screen, or
press the Play Button g/@to begin or
resume playback.

20 SETUP MENU
Dynamic Range Setting
With the DVD format you have the opportunity
to hear a program’s soundtrack in the most
accurate and realistic presentation possible,
thanks to the use of digital audio technology.
However, in certain instances you may wish to
slightly compress the dynamic range of the
audio output (the difference between the loud-
est sounds and the quietest ones) so that you
may listen to a movie at a lower volume with-
out losing dialog intelligibility.
In most cases it is desirable to leave the
Dynamic Range setting at “OFF”so that no
compression is applied to the audio, but if you
wish to change to a compressed setting, follow
these steps.
First, you must be viewing the Setup Menu
(Figure 1), which is available by pressing the
Menu Button `while the unit is in the
Stop mode. At the Setup Menu, press the
¤
Navigation Button euntil the Dynamic
Range option is highlighted. Next, press the
Enter Button dand select one of the two
choices in the options box using the
⁄
/
¤
Navigation Buttons e(Figure 14). The
choices are as follows:
■ Off: Select this option to turn off the
Dynamic Range compression and have the
soundtrack presented exactly as it was
authored.
■ On: Select this option to turn on the
Dynamic Range compression circuitry so
that the dialog will remain clear even at low
volume levels.
Figure 14
When you have made your selection using the
⁄
/
¤
Navigation Buttons eto highlight
the desired option, press the Enter Button
dand note that the circle next to your choice
will fill in. The menu system will then automati-
cally return to the status listing.
If you have no other changes to make after set-
ting this default, press the Menu Button `
to remove the Setup Menu from the screen, or
press the Play Button g/@to begin or
resume playback.
Note that the performance of the Dynamic
Range function is dependent on the audio
format of the disc being played, and whether
or not the disc’s soundtrack is capable of this
feature.
Digital Audio Out
DVD players accommodate a variety of audio
formats, including Dolby Digital, DTS and the
PCM audio format used by conventional CD
discs and some DVD playback. Depending on
the type of equipment your DVD 5 is connected
to, you need to set a default for the type of
audio outputs accommodated. Although the
DVD 5 will play all of these disc types, this set-
ting creates a default that tells which way to
present the soundtracks when there is a choice.
To select a Digital Audio Output default, you
must be viewing the Setup Menu (Figure 1),
which is available by pressing the Menu
Button `while the unit is in the Stop mode.
At the Setup Menu, press the
¤
Navigation
Button euntil the Digital Audio Out option
is highlighted. Next, press the Enter Button
d. Select one of the three choices in the
options box (Figure 15) using the
⁄
/
¤
Navigation Buttons e. The choices are
as follows:
■ PCM: Choose this setting if you are using
only the left/right Analog Audio Outputs
£, or if the Digital Audio Outputs
¡/™are connected to a processor that is
capable of playing conventional PCM audio
for CDs.
■ Dolby Digital: Choose this setting if the
DVD 5 is connected to an A/V receiver or
surround processor that is capable of decod-
ing Dolby Digital.
■ DTS: Choose this setting if the DVD 5 is
connected to an A/V receiver or surround
processor that is capable of both DTS and
Dolby Digital decoding.
Figure 15
NOTE: If you select the DTS option, your
receiver or processor MUST be capable of
decoding DTS audio. If the DTS option is chosen
and the unit is connected to a product that
cannot support DTS, no audio will be heard
when a DTS disc is played.
Remember, regardless of the option chosen, you
may still have to adjust the settings on your
audio equipment to match the output of the
DVD 5. In addition, the choice of which audio
formats are available is limited by the type of
material recorded on the disc when it was
authored.
When you have made your selection using the
⁄
/
¤
Navigation Buttons eto highlight
the desired option, press the Enter Button
dand note that the circle next to your choice
will fill in. The menu system will then automati-
cally return to the status listing.
If you have no other changes to make after set-
ting this default, press the Menu Button `
to remove the Setup Menu from the screen, or
press the Play Button g/@to begin or
resume playback.
Setup Menu
/