Page is loading ...

CH-DVD 635S
www.cyberhome.de
ON /STANDBY
ON / STANDBY
/
/
CH-DVD 635S
CH-DVD 635S
D V D -PP l a y e r
Operation Guide

CONTENT
Introduction ................................................................................................................................5
Accessories ........................................................................................................................................................................5
Region code information ....................................................................................................................................................5
Compatibility ........................................................................................................................................................................6
Usable disc types ........................................................................................................................................................................................6
Compatibility of PC created discs................................................................................................................................................................6
DVD-Audio compatibility ..............................................................................................................................................................................7
SACD compatibility ......................................................................................................................................................................................7
HDCD compatibility......................................................................................................................................................................................7
Data transfer rates ......................................................................................................................................................................................7
Taking care of player and discs ..........................................................................................................................................8
Handling of discs ........................................................................................................................................................................................8
Cleaning of discs ........................................................................................................................................................................................8
Storage of discs ..........................................................................................................................................................................................8
Discs to avoid ..............................................................................................................................................................................................8
Disc accessories..........................................................................................................................................................................................8
Cleaning of the DVD player ........................................................................................................................................................................8
Operation ....................................................................................................................................9
Operation of control panel ..................................................................................................................................................9
Operation of rear panel ....................................................................................................................................................10
Operation of VFD display ..................................................................................................................................................12
Messages on the display ..........................................................................................................................................................................13
Operation of remote control ..............................................................................................................................................13
Installing the batteries................................................................................................................................................................................13
Using the remote control............................................................................................................................................................................14
Cautions regarding use of remote control ................................................................................................................................................14
Important notes about the batteries ..........................................................................................................................................................14
Remote control functions ..........................................................................................................................................................................15
Audio and video connections..................................................................................................17
Television connections ......................................................................................................................................................17
1. Audio/Video connection to a TV with composite video and stereo audio input ....................................................................................17
2. Audio/Video connection to a TV with SCART socket ............................................................................................................................18
3. Audio/Video connection to a TV with S-Video and Stereo Audio input ................................................................................................19
4. Video connection to a TV/Beamer with component video inputs (YCbCr/YPbPr) ................................................................................20
Audio output connections ..................................................................................................................................................21
1. Audio connection to a TV/receiver using the analogue stereo outputs ................................................................................................21
2. Audio connection to a receiver using the coaxial digital audio output ..................................................................................................22
3. Audio connection to a receiver using the optical digital audio output....................................................................................................23
4. Audio connection to a receiver using the Dolby Digital/dts 5.1 channel analogue outputs ..................................................................23
Getting started ..........................................................................................................................24
Powering on the unit..........................................................................................................................................................24
Inserting a disc ..................................................................................................................................................................24
Start playing ......................................................................................................................................................................25
Pausing a disc ..................................................................................................................................................................25
Stop playing ......................................................................................................................................................................25
Removing a disc................................................................................................................................................................25
Switching off the power ....................................................................................................................................................25
General playback hints......................................................................................................................................................26
Playing a DVD ..................................................................................................................................................................26
Playback ....................................................................................................................................26
Playing a DVD+R/RW, DVD-R/RW or DVD+R DL disc ....................................................................................................27
Playing a (Super) Video CD ..............................................................................................................................................27
Playing an MPEG-4/DivX
®
disc ........................................................................................................................................27
Notes about DivX VOD content ................................................................................................................................................................28
Playing an Audio CD or HDCD..........................................................................................................................................29
Playing an MP3 disc..........................................................................................................................................................29
Playing a Super Audio CD ................................................................................................................................................30
Playing a WMA CD............................................................................................................................................................30
Playing a Picture CD ........................................................................................................................................................31
Playing a mixed format disc ..............................................................................................................................................31

CONTENT
Playing functions ......................................................................................................................32
Selecting a section of the disc to play ..............................................................................................................................32
1. Selecting a chapter using the DVD menu ............................................................................................................................................32
2. Playing from a specific time ..................................................................................................................................................................32
3. Playing a specific track, picture, title, chapter or group ........................................................................................................................33
4. Playing a specific track, picture, title, chapter or group using the number buttons ..............................................................................33
5. Skipping through tracks, pictures, titles or chapters..............................................................................................................................34
Using the repeat features..................................................................................................................................................34
1. Repeating an entire disc or playlist ......................................................................................................................................................34
2. Repeating a track, title, chapter or group ..............................................................................................................................................34
3. Repeating a section of a disc ..............................................................................................................................................................35
Shuffle play........................................................................................................................................................................35
Playing a disc at different speeds (fast forward/fast backward)........................................................................................35
Slow play ..........................................................................................................................................................................36
Still the picture frame / Pause a disc ................................................................................................................................36
Playing a disc frame by frame ..........................................................................................................................................36
Zooming in and out of an image ......................................................................................................................................37
Using position markers (Bookmark) ..................................................................................................................................37
Using the Intro feature ......................................................................................................................................................38
Using the reverb effects ....................................................................................................................................................39
Suspending audio with the “MUTE” button ......................................................................................................................39
Changing the audio settings..............................................................................................................................................39
Displaying disc information................................................................................................................................................40
Display menu for DVD-Video discs............................................................................................................................................................40
Display menu for Video CDs......................................................................................................................................................................41
Time displays for Audio CDs and HDCDs ................................................................................................................................................41
Time displays for DVD-Audio discs ..........................................................................................................................................................41
Disc information for SACDs, MP3, JPEG, MPEG, WMA and MPEG-4/DivX
®
files ..................................................................................41
Special features for DVD’s ......................................................................................................42
Using the DVD menu ........................................................................................................................................................42
Displaying subtitles............................................................................................................................................................42
Changing the camera angle ..............................................................................................................................................43
Special features for Video CD’s ..............................................................................................43
Using playback control (PBC) ..........................................................................................................................................43
Special features for SACD’s, MP3, JPEG, MPEG, WMA and MPEG-4/DivX
®
files ..............44
1. Navigating to a file or folder ..........................................................................................................................................44
2. Playing a file..................................................................................................................................................................44
3. Selecting the play mode................................................................................................................................................44
Additional features for JPEG files ..........................................................................................45
1. Rotation of a picture ......................................................................................................................................................45
2. Viewing thumbnails of your JPEG pictures ..................................................................................................................45
3. Making a slide show......................................................................................................................................................45
4. Zooming in and out ......................................................................................................................................................46
Creating a playlist ....................................................................................................................47
Creating a playlist of DVDs ..............................................................................................................................................47
Creating a playlist of Video CDs, Audio CDs or HDCDs ..................................................................................................48
Creating a playlist of SACDs, MP3, JPEG, MPEG, WMA and MPEG-4/DivX
®
files ........................................................48
User preferences ......................................................................................................................49
Important notes for moving in the setup menu..................................................................................................................49
Changing the language settings........................................................................................................................................49
Changing the video settings..............................................................................................................................................51
Changing the audio settings..............................................................................................................................................54
Changing the security settings ..........................................................................................................................................60
Changing the general settings ..........................................................................................................................................62
Troubleshooting ........................................................................................................................64
Specifications ............................................................................................................................66
Glossary ....................................................................................................................................67

5
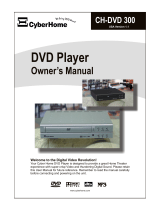
Accessories
Please make sure that the following accessories are in the box when you open
it. Note: Pictures may deviate.
Region code information
This DVD player has been constructed and produced in the way that it adheres
to Local Management information, which are recorded on a Digital Versatile
Disc (DVD). If the number of the destination area on a DVD-Video disc does not
correspond with the number of the destination area of this DVD player, this
device won’t be able to play the corresponding disc. The device is set to region
code “2”.
You can find the region code on the back side of the DVD cover. DVD-Video
discs must be labelled with “ALL” for all regions or with “2” for region 2, for that
they can be played in this device. Should another region be printed on the DVD-
Video disc, it cannot be played in this DVD player. The list on the left side shows
the various DVD regions of the world.
INTRODUCTION
ALL
User manual
CH-DVD 635S
www.cyberhome.de
ON/STANDBY
ON/STANDBY
/
/
CH-DVD635S
CH-DVD635S
D V D -PP l a y e r
Operation Guide
2 batteries (size AAA, R03, 1.5V)
Remote control
Audio/Video cable (optional*)
(Composite Video, Stereo Audio)
Power cord
SCART cable for Europe (optional*)
123
456
789
+10 0 C
TMTM
9
Region 1 USA, Canada
Region 2 Europe, Middle East, South Africa,
Japan
Region 3 Southeast Asia, Taiwan
Region 4 Central and South America, Mexi-
co, Australia, New Zealand
Region 5 Russian federation, Africa (part),
India, Pakistan
Region 6 China
*Note:
Optional means that some devices
include the cable in the box, however
not all devices. This depends on
whether the respective dealer wishes
this.

6
INTRODUCTION
DIGITAL VIDEO
R
RW
RW
SUPER VIDEO
Recordable
ReWritable
Compatibility
Usable disc types
The following discs can be used in your DVD player for playback:
DVD-Video (Digital Versatile Disc)
DVD-Audio
DVD+RW (Digital Versatile Disc + rewritable)
DVD+R (Digital Versatile Disc + recordable)
DVD-R (DVD-Recordable)
DVD-RW (DVD-Rewritable)
DVD+R DL (Dual layer DVD+R)
Audio CD (Compact Disc Digital Audio)
SACD
HDCD
Video CD (format 1.x/2.0)
Super Video CD
CD-R (CD-Recordable) with audio/MP3/JPEG/MPEG/WMA contents
CD-RW (CD-Rewritable) with audio/MP3/JPEG/MPEG/WMA contents
MPEG-4 discs, DivX
®
3, DivX
®
4, DivX
®
5, DivX
®
VOD-Videos, XviD
Kodak Picture-CD
Compatibility of PC created discs
When recording a disc with a PC, even if it is recorded in a compatible format
as listed above, there may be cases in which the disc cannot be played in this
device due to the application software setting used to create the disc. In this
case, please check with the software publisher for more detailed information.
Note:
Don’t load any exceptional discs in the player, as this will cause null playback
or other problems (e.g. also with copy-protected Audio CDs).
SUPER AUDIO CD
RDL
R

7
DVD-Audio compatibility
DVD-Audio enables a very high audio quality, surround sound as well as addi-
tional features, which are not available on CD. The discs are outwardly identi-
cally to DVD-Video discs, however they have been developed to save audio
signals in high quality. Beside High-Resolution-Audio, DVD-Audio discs can
also contain video clips, still frames, text and menus for navigation. There is no
regional coding of DVD-Audio discs.
SACD compatibility
Super Audio CD (SACD) is a new, revolutionary audio format that offers high-
resolution audio in either two-channel stereo or multi-channel audio.
SACD is based on a new digital audio technology, so-called DSD (Direct Stre-
am Digital). DSD operates with 1-bit Delta-Sigma modulation, an 1-bit repro-
duction of the wave form with 2.8224 MHz sampling, in order to reproduce the
analogue original wave form and to produce a natural sound comprising all
nuances and the feeling of the original material.
The frequency response for SACDs is 100 kHz, the dynamic range is above
120 dB. Standard CDs do not include frequencies that are not audible by
humans even though the recordings contain such frequencies. Whereas the
SACD format has a sampling rate that is 64 times higher than the sampling rate
of CDs (2.8224 MHz compared with 44.1 kHz). This results in a faithfull repro-
duction of the original source material. Furthermore, the "Super Bit Mapping
Direct" process and the hybrid disc technology enable that most of the DSD
sound quality of SACDs is audible on customary CD players.
HDCD compatibility
HDCD (High Definition Compatible Digital) is a technology for coding respecti-
vely decoding audio data.
This technique shall improve the sound quality (more detailed reproduction)
and the dynamics of digital audio recordings, especially on CD or DVD, and
thus reduce existing disadvantages of conventionally coded CDs. According to
the developers the effect of a more detailed reproduction is among others rea-
ched by coding the audio data with a resolution of 20 bits instead of customary
16 bits.
Data transfer rates
The maximum speed for playing CDs is 4x. The corresponding data transfer
rate is 600 KB/sec. The maximum speed for playing DVDs is 2x with a data
transfer rate of 2700 KB/sec.
INTRODUCTION
Important note:
In this operation manual the expression “DVD” means DVD-Video and DVD-
Audio. If a function is only valid for a special kind of DVD disc, this will be indi-
cated.
SUPER AUDIO CD
Note:
The SACD signal can only be output
via the analogue output. Digital play-
back is not possible.
Note:
The DVD-Audio signal can only be
output via the analogue output. Digi-
tal playback is not possible.

8
Taking care of player and discs
Handling of discs
- Please hold the disc by gripping the rim or by placing the index finger in the
central hole. Never touch the signal surface, which is shiny. This applies to
both sides of double sided discs.
- Never add labels or adhesive tapes on the discs and do not scratch or dam-
age the discs.
Cleaning of discs
- Finger prints or stains on the surface of the disc can cause signal missing.
Depending on the degree of stain, the reflected luminosity from the signal sur-
face may be weakened, resulting in a poorer picture quality. Therefore, please
use a soft cloth and wipe in a radiating manner from the centre to the outer
rims when cleaning the disc.
- If the surface of your disc is very dirty, please wipe the disc with a moist cloth,
finally use a dry soft cloth to remove all the water stains.
- Never use electrostatic prevention products as well as solutions which contain
benzene, thinner or any other vaporizing substances, as they may damage
the disc surface.
Storage of discs
- To prevent discs from getting bent or deformed, they should be vertically kept
in the disc storage case.
- To prevent damages, avoid placing them in a car, which may contact direct
sunlight. Also avoid leaving discs in excessively cold or humid environments.
- For more information refer to the instructions that come with discs.
Discs to avoid
Please only use conventional, fully circular discs in this DVD player. It is not rec-
ommended to use warped, cracked, chipped or otherwise damaged discs in
this device.
Disc accessories
Do not use any disc accessory to improve the audio quality, disc protective
solutions or lens cleaner. These products may cause problems.
Cleaning of the DVD player
The control panel and the case of the player will only require occasional wiping
with a soft cloth. Areas with stubborn stains can be cleaned with a soft cloth
dipped in a neutral detergent. To prevent damaging the player, never use vapor-
izing solutions.
INTRODUCTION
Labeling side
Labels
Tapes
Surface

9
OPERATION
Operation of control panel
1. ON / STANDBY: Switches the device on or off. When pressing this button
you can only go into Standby mode. In order to switch the
device completely off, please press the power switch on
the rear panel. If the device is in Standby mode, the blue
LED of the Standby button will light. If the player is in oper-
ation, the blue LED light will be off. Please note that the
unit consumes a slight amount of power in standby mode.
2. VFD DISPLAY: The front Vacuum Fluorescent Display shows information
about the unit’s operational status.
3. DISC TRAY: For inserting discs.
4. K : Opens or closes the disc tray.
5. A : Press this button to start the playback of a disc.
6. I : Press this button to pause a disc.
7. J : Press once to stop playback of a disc and save the loca-
tion of a stop point. The disc can be played back from the
stop point by pressing “A”. Press this button two times to
enter stop mode.
8. H / G : Press this button shortly to skip to the previous track,
chapter, title or picture. Hold this button 3 seconds for fast
backward search while playing (2x, 4x, 8x, 16x, 32x).
9.
E / F : Hold this button 3 seconds for fast forward search while
playing (2x, 4x, 8x, 16x, 32x). Press this button shortly to
skip to the next track, chapter, title or picture.
123456789
ON/STANDBYON /STANDBY
/
/
CH-DVD 635SCH-DVD 635S

10
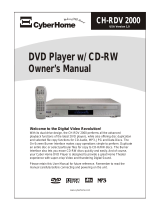
Operation of rear panel
1. REGION CODE: Indicates that the device is set to region code “2”.
2. 5.1 CHANNEL: 5.1 channel analogue audio outputs for connection to AV
receivers, amplifiers or active speaker systems.
3. AUDIO L/R: 2 channel analogue audio outputs (white/red socket) for
connection to a television, AV receiver, beamer or stereo
system.
4. DIGITAL: Digital coaxial/optical audio output for connection to a
digital audio device (amplifier/receiver). Please note that
the amplifier/receiver has to be compatible to dts, Dolby
Digital, MPEG and/or PCM (for more information please
refer to the manual of your amplifier/receiver).
5. VIDEO: Composite video output (yellow socket) for connecting to
a television or AV receiver with a video input (CVBS,
composite video) by an audio/video cable.
6. S-VIDEO: S-Video output for connecting to a TV or AV receiver with
S-Video input by an S-Video cable. The S-Video output
can be used instead of the video output. By this, a high-
er video quality can be reached than with composite
video.
7. YCbCR/YPbPr: High quality video output for connection to the compo-
nent video inputs of a television, AV receiver, beamer or
monitor by means of a YCbCr connecting cable. Please
note that the Progressive-Scan signal is only available
over the component video output.
8. RGB/SCART: For connection to a television or monitor that is compat-
ible with this kind of connection by means of a 21-pin
SCART cable. This connection enables the output of
audio and video signals.
OPERATION
RGB OUTPUTRGB OUTPUT
AV CONNECTOR SCARTAV CONNECTOR SCART
~100-230V
AC IN
~100-230V
AC
IN
Pb / CbPb / Cb
Y
S-VIDEO
VIDEO
5.1 CH ANALOG OUTPUT5.1 CH ANALOG OUTPUT ANALOG OUTPUTANALOG OUTPUT
OPTICALCOAXIAL
R
L
P - SCAN / COMPONENTP-
SCAN / COMPONENT
FR
SR
SUB
WOOFER
SUB
WOOFER
FL
SL
CENTER
VIDEO OUTPUTVIDEO OUTPUT
ON
OFF
AC SWITCHAC SWITCH
Pr / CrPr / Cr
DIGITAL OUTPUT
2
AUDIO
CAUTION:TO REDUCETHE RISKOFELECTRIC SHOCK.DO NOT
REMOVE
COVER.NO USER-SERVICEABLEPAR TS INSIDE.
REFER
SERVICINGTO QUALIFIEDSERVICE PERSONNEL.
CAUTION:TO REDUCETHE RISKOFELECTRIC SHOCK.DO NOT
REMOVECOVER. NOUSER-SERVICEABLE PARTSINSIDE.
REFERSERVICING TOQUALIFIED SERVICE PERSONNEL.
I
O
1
1098765432
Note:
The 5.1 audio track of DVD-Audio discs and SACDs can
only be played over the analogue 5.1 output, not over
the digital outputs.
“DTS” and “DTS Digital Surround” are trademarks
of DTS, Inc.

11
9. AC IN: For connection of the supplied AC power cord. Plug the
matching end of the power cord into the unit before con-
necting the other end to the wall socket.
10. AC SWITCH: Power switch for activating the power of the device. The
main power switch must be set to “ON” for the unit to
function. Make sure all cable connections are complete
before switching the main power switch to “ON”. When
the main power switch is turned on, the unit will enter
standby mode, where it may be turned on with the
remote control or the front power button.
OPERATION

12
Operation of VFD display
1. DISC TYPE INDICATORS: Displays the type of optical disc inserted - DVD-
Video, SVCD, VCD, CD-DA (Music CD) or MP3. If a DVD+R/RW or DVD-
R/RW is inserted, DVD-Video is displayed.
2. REPEAT FUNCTION INDICATORS: Indicates the status of the repeat play-
back functions:
• : Repeat function is active (e.g. repeat chapter, title, track, etc.).
• A-B : Repeat A-B function is active.
3. PBC FUNCTION INDICATOR: Indicates that the PBC (Playback Control)
function is enabled.
4. • ANGLE : Indicates that the multi-angle mode is active.
• RAND : Indicates that the tracks, titles or pictures are being played in
random order.
• ZOOM : Indicates that the Zoom function is being used.
5. PLAYLIST INDICATOR: Indicates that the playlist function is activated, i. e.
the disc is played according to the playlist.
6. SOUND TRACK INDICATORS: Indicates the type of soundtrack currently
active, either Dolby Digital, dts, PCM or L/R.
7. DVD-AUDIO INDICATOR: Indicates that a DVD-Audio is inserted.
8. MULTI-FUNCTION DISPLAY / TEXT LINE:
• Displays the playing time
• Displays the number of the currently played title, chapter, track or picture
• Displays the total number of available tracks on the inserted Audio CD or
HDCD
• Display of information
9. PLAYBACK STATUS INDICATORS: Shows the playback status of a DVD,
CD or other optical disc.
•
A:Currently playing
• I : Paused
• J : Stopped
10. PLAYBACK INDICATOR: Indicates that the disc is playing.
OPERATION
1
1098
6
5432
7

13
Messages on the display
The following messages may appear on the display of your DVD player:
The disc tray is opening.
The disc tray is closing.
The disc is read.
No disc has been inserted. If a disc is inserted, it perhaps cannot be read.
The player is in standby mode.
The DVD player is in hold mode. The disc can be played back from the stop
point later on by pressing the Play button “A”.
The DVD player is in stop mode.
The DVD menu is displayed.
A JPEG picture file is played.
The player is updating software from CD.
Operation of remote control
Installing the batteries
This unit comes complete with batteries for the remote control. When installing
batteries, be sure to take note of the polarity markings on the inside of the bat-
tery compartment and match them up with those on the batteries. If the remote
control only operates when you get closer to the device, it means that the bat-
teries have been used up. Please replace the two batteries simultaneously with
two new batteries (Size AAA, R03, 1.5V).
1. Slide off the battery cover.
2. Install the batteries in the correct orientation as shown beside and marked
on the battery compartment.
OPERATION
OPEN
CLOSE
LOADING
NO DISC
OFF
CD UPDT
ROOT
JPEG
HOLD
STOP
TITLE
}

14
30 30
1 2 3
4 5 6
7 8 9
+10 0 C
ON/ STANDBY
ON/ STANDBY
/
/
CH-DVD 635S
OPERATION
Using the remote control
You can use the enclosed wireless remote control to control this device. When
using the remote control, please aim at the device's remote control sensor,
located on the front of the device. A 30 degree angle is recommended for best
operation.
Cautions regarding use of remote control
• Please do not expose the remote control to shock and liquids and do not place
it in areas with high humidity. Do not install or place the remote control under
direct sunlight, as the heat may cause deformation of the unit.
• When the remote sensor window is exposed to direct sunlight, it may not work
properly. If so, please operate the remote control closer to the remote sensor
window or change the angle of the lighting or device.
Important notes about the batteries
• If the unit is not used for a longer period of time, we recommend you to
remove the batteries.
• When changing batteries, please do not use old and new batteries or batter-
ies of different brands simultaneously.
• Please do not use batteries other than specified. Improper use of batteries
can result in a leakage of chemicals and/or explosion.
• In case of any leakage of batteries, dispose of the batteries right away and
avoid touching the chemical discharge. Make sure to clean the remote con-
trol’s battery compartment before installing new batteries.
Note:
• Objects between the remote control and the sensor window may prevent
proper operation.
• Similar remote controls could interfere with the function of the player.
• Make sure not to store the remote control upside down or with any objects
pressing on the buttons - this could drain the batteries.

15
123
456
789
+10 0 C
TM
123
456
789
+10 0 C
TM
ENTER
PAUSE
SLOW
STOP
PLAY
OPERATION
Remote control functions
STANDBY / I Switch on/off: Switch the device on/off (only Standby
mode).
OPEN/CLOSE
K Opens or closes the disc tray.
TITLE For DVDs, this displays the DVD menu.
MENU “PBC” To enter the menu of DVD discs or to select PBC func-
tion for VCD discs.
SETUP OSD menu: Enters the device’s setup menu screen to
set up according to preference.
DISPLAY Screen display for indicating the disc and time informa-
tion.
AUDIO Interchanges the audio settings depending on the disc
content (only possible with DVD-Video discs, VCDs,
Audio CDs and HDCDs).
ANGLE Changes the camera angle depending on the disc con-
tent (only supported on DVD-Video discs).
MUTE To turn off the sound. Press again to turn sound on
again.
GOTO Used for the direct selection of a track, title, chapter,
picture or time for intended play. Follow with the corre-
sponding number button.
SUBTITLE For DVD-Video discs, this can be used to display sub-
titles and select the language to use.
C, D, B, A Direction buttons: Up, down, left, right.
ENTER Select: To select options in menus.
G Fast backward: Fast backward search while playing
(2/4/8/16/32x). Not possible with JPEG files.
E Fast forward: Fast forward search while playing
(2/4/8/16/32x). Not possible with JPEG files.
PLAY Press this button to start the playback of a disc.
H Select previous title: Skips to the previous track,
chapter, title or picture.
F Select next title: Skips to the next track, chapter, title
or picture.
PAUSE I Pause/Stepwise: This is used to pause a disc. Press
again to resume playback (on Audio CDs, MP3s,
WMAs, SACDs and HDCDs) or to advance frame by
frame on a still image (DVD-Video, VCD).
Slow I
A Slow play: Slow movie playback (1/2x, 1/4x, 1/8x,
1/16x). Also possible in reverse with DVD-Video discs.

16
STOP J Stops the disc playing but holds the resume location.
Enters Stop mode after pressing the button two times.
0-9, +10 Number buttons: 0-9, +10. Use the “+10” button to
enter numeric values greater than 10. Press once for
each value above 10, then enter the corresponding
number by using “0-9”. Press twice for values above
20, etc.
C Delete: For deleting the last entry.
PROGRAM Playlist: This can be used to set up a playlist.
REPEAT “1/ALL” Repeats an entire disc, playlist, track, chapter, title or
picture.
REPEAT “A-B” Repeats the sequence stipulated by two selected play-
back points.
INTRO Playing the first seconds:
• To play the first seconds of each title, chapter, title
interval, chapter interval and bookmark (for DVD-
Video discs).
• To play the first seconds of each group, track, group
interval, track interval and bookmark (for DVD-Audio
discs).
• To play the first seconds of each track, disc interval,
track interval and bookmark (for Video CDs).
• To play the first seconds of each track (for CDs,
HDCDs).
ZOOM Zooms in and out the picture.
EFFECT To setup the surround effects.
BOOKMARK To store specific portions of the disc in memory and
play them immediately whenever you want without the
need to search.
RETURN For returning to the previous menu and/or last playing
position (for DVDs and VCDs).
OPERATION
123
456
789
+10 0 C
TM
123
456
789
+10 0 C
TM
ENTER
PAUSE
SLOW
STOP
PLAY

17
Television connections
In order to use your DVD player, you will need to make a video connection to
your TV. The capabilities of your TV and the cables you have on hand will deter-
mine the connections you can use. There are four possible connection types:
Composite video - The most widely used connection. An audio/video
cable for composite video is required (optionally included in your accesso-
ry).
RGB (over SCART) - Audio and video connection which enables an opti-
mal picture quality. This connection possibility requires a SCART cable
(optionally included in your accessory).
S-Video - A higher quality connection that requires a special S-Video cable
and a S-Video capable TV.
Component video & Progressive-Scan - The highest quality video con-
nection. Supported on high-end TVs or beamers and requires a special
cable.
In detail:
Audio/Video connection to a TV with composite video and stereo
audio input
If your TV has only a single Video input jack, typically a yellow-coloured plug,
you will use the Composite Video output of your DVD player for the Video con-
nection. For the audio connection you can use the red and white stereo audio
in connectors of your TV.
Have the following cables ready:
1. Audio/Video cable - red, white and yellow plug (optionally supplied)
2. Power cord (supplied)
1. Use the audio/video cable optionally included in your accessory to connect
the video output of your DVD player to the Video input of your TV. This is
normally a yellow-coloured connector that matches the video output on the
back of this unit.
2. If you wish to hear sound through the TV, connect the stereo audio outputs
of your DVD player to the matching inputs of your TV using the red and white
connectors on the supplied audio/video cable.
AUDIO AND VIDEO CONNECTIONS
RGB OUTPUTRGB OUTPUT
AV CONNECTOR SCARTAV CONNECTOR SCART
Pb/CbPb / Cb
Y
S-VIDEOS-VIDEO
VIDEO
5.1 CH ANALOG OUTPUT5.1 CH ANALOG OUTPUT ANALOG OUTPUTANALOG OUTPUT
OPTICALCOAXIAL
R
L
P - SCAN / COMPONENTP-
SCAN / COMPONENT
FR
SR
SUB
WOOFER
SUB
WOOFER
FL
SL
CENTER
VIDEO OUTPUTVIDEO OUTPUT
ON
OFF
AC SWITCHAC SWITCH
Pr/CrPr / Cr
DIGITAL OUTPUT
2
AUDIO
CAUTION:TO REDUCETHE RISKOFELECTRIC SHOCK.DO NOT
REMOVE
COVER.NO USER-SERVICEABLEPAR TS INSIDE.
REFER
SERVICINGTO QUALIFIEDSERVICE PERSONNEL.
CAUTION:TO REDUCETHE RISKOFELECTRIC SHOCK.DO NOT
REMOVECOVER. NOUSER-SERVICEABLE PARTSINSIDE.
REFERSERVICING TOQUALIFIED SERVICE PERSONNEL.
I
O
V
RL
VIDEO OUTPUT
RED
YELLOW
WHITE
TV
VIDEO INPUT
STEREO AUDIO INPUT
Composite video
input jack
12

18
3. Connect the supplied AC power cord to the “AC IN” inlet on the rear side of
this unit, then plug into a power outlet.
4. Turn on the TV and the DVD player.
5. Select the video input on your TV. For this please refer to the user manual
of your TV. You should now see the DVD player’s splash screen on your TV.
Audio/Video connection to a TV with SCART socket
If your TV has a SCART socket, you can optionally connect your device with the
TV over the SCART socket. The advantage is here an optimal picture quality.
Have the following cables ready:
1. SCART cable (optionally supplied)
2. Power cord (supplied)
1. Use a completely connected SCART cable, which is included in your acces-
sory (optional), to connect the SCART output of your DVD player to the
SCART socket of your TV.
2. Connect the supplied AC power cord to the “AC IN” inlet on the rear side of
this unit, then plug into a power outlet.
3. Turn on the TV and the DVD player.
4. If the TV offers the possibility to choose manually between RGB and CVBS,
you should set your TV to RGB in order to achieve a better picture quality. If
the DVD player is connected with the TV over the SCART cable, the TV
automatically switches to the DVD mode when you turn on the player (if the
TV supports this function).
AUDIO AND VIDEO CONNECTIONS
RGB OUTPUT
RGB OUTPUT
AV CONNECTOR SCART
AV CONNECTOR SCART
~100-230V
AC IN
~100-230V
AC
IN
Pb / Cb
Pb / Cb
Y
S-VIDEO
VIDEO
5.1 CH ANALOG OUTPUT
5.1 CH ANALOG OUTPUT
ANALOG OUTPUT
ANALOG OUTPUT
OPTICAL
OPTICALCOAXIAL
R
L
P - SCAN / COMPONENT
P-SCAN / COMPONENT
FR
SR
SUB
WOOFER
SUB
WOOFER
FL
SL
CENTER
VIDEO OUTPUT
VIDEO OUTPUT
ON
OFF
AC SWITCH
AC SWITCH
Pr/Cr
Pr / Cr
DIGITAL OUTPUT
2
AUDIO
CAUTION:TO REDUCETHE RISKOFELECTRIC SHOCK.DO NOT
REMOVE
COVER.NO USER-SERVICEABLEPAR TS INSIDE.
REFER
SERVICINGTO QUALIFIEDSERVICE PERSONNEL.
CAUTION:TO REDUCETHE RISKOFELECTRIC SHOCK.DO NOT
REMOVECOVER. NOUSER-SERVICEABLE PARTSINSIDE.
REFERSERVICING TOQUALIFIED SERVICEPERSONNEL.
I
O
RGB AV SCART OUTPUT/
SCART CABLE
SCART INPUT
TV
12

19
Audio/Video connection to a TV with S-Video and Stereo Audio
input
If your TV has a S-Video input, it is recommended that you use this Video con-
nection. The S-Video connector is distinguishable by its 4 pins, as shown on the
left side. S-Video separates brightness and colour signals, resulting in a higher
video quality than standard Composite Video. For the audio connection you can
use the red and white stereo audio in connectors of your TV.
Have the following cables ready:
1. S-Video cable (not supplied)
2. Audio/Video cable - red and white plug (optionally supplied)
3. Power cord (supplied)
1. Use a special S-Video cable (not included in your accessory) to connect the
S-Video output of your DVD player to the S-Video input of your TV.
2. If you wish to hear sound through the TV, connect the stereo audio outputs
of your DVD player to the matching inputs of your TV using the red and white
connectors on a audio/video cable.
3. Connect the supplied AC power cord to the “AC IN” inlet on the rear side of
this unit, then plug into a power outlet.
4. Turn on the TV and the DVD player.
5. Select the S-Video input on your TV. For this please refer to the user manu-
al of your TV. You should now see the DVD player’s splash screen on your
TV.
AUDIO AND VIDEO CONNECTIONS
RGB OUTPUT
RGB OUTPUT
AV CONNECTOR SCART
AV CONNECTOR SCART
~100-230V
AC IN
~100-230V
AC
IN
Pb/Cb
Pb / Cb
Y
S-VIDEO
S-VIDEO
VIDEO
5.1 CH ANALOG OUTPUT
5.1 CH ANALOG OUTPUT
ANALOG OUTPUT
ANALOG OUTPUT
OPTICALCOAXIAL
R
L
P - SCAN / COMPONENT
P-SCAN / COMPONENT
FR
SR
SUB
WOOFER
SUB
WOOFER
FL
SL
CENTER
VIDEO OUTPUT
VIDEO OUTPUT
ON
OFF
AC SWITCH
AC SWITCH
Pr/Cr
Pr / Cr
DIGITAL OUTPUT
2
AUDIO
CAUTION:TO REDUCETHE RISKOFELECTRIC SHOCK.DO NOT
REMOVE
COVER.NO USER-SERVICEABLEPAR TS INSIDE.
REFER
SERVICINGTO QUALIFIEDSERVICE PERSONNEL.
CAUTION:TO REDUCETHE RISKOFELECTRIC SHOCK.DO NOT
REMOVECOVER. NOUSER-SERVICEABLE PARTSINSIDE.
REFERSERVICING TOQUALIFIED SERVICE PERSONNEL.
I
O
S
R
L
S-VIDEO INPUT
TV
WHITE
RED
STEREO AUDIO
INPUT
AUDIO AND VIDEO CONNECTIONS
S-Video socket
123

20
AC
B
A C
B
Video setup page
TV shape PS
TV type PAL
Video output S-Vi S-Video
Video mode YUV
P-Scan mode Auto RGB
Video quality
YUV output
Component video
input jacks
Component video
cable
AUDIO AND VIDEO CONNECTIONS
AC
B
A C
B
Video setup page
TV shape PS
TV type PAL
Video output YUV
Video mode P-Scan
P-Scan mode Auto Interlace
Video quality
Progressive-Scan mode
Video connection to a TV/Beamer with component video inputs
(YCbCr / YPbPr)
Component video separates the video signal into three separate “components”,
resulting in a higher picture quality than S-Video or standard composite video.
In order to use component video, you have to use a TV/Beamer equipped with
component video inputs.
You will also need a component/P-Scan video cable (not included) with sepa-
rate connectors for Y, Cb/Pb and Cr/Pr signals. This type of cable also supports
the Progressive-Scan mode when used with high-end P-Scan TVs. Using the
component video output or P-Scan mode requires the following steps:
1. Preparation:
- First, use an audio/video cable or S-Video cable to connect the DVD play-
er to the composite video or S-Video input on your TV/Beamer.
- Connect the supplied AC power cord to the “AC IN” inlet on the rear side
of this unit, then plug into a power outlet.
- Turn on the TV/Beamer and the DVD player and select the corresponding
video input on your TV/Beamer.
2. Entering the setup menu to change the video setting:
Enter the player’s setup menu by pressing the “SETUP” button on the
remote control. Use the direction button “
A” to navigate to the “Video
setup page”, then navigate down to the “Video output” menu and press
“ENTER” to enter the menu. Use the direction button “D” to proceed down
to the “YUV” setting and press “ENTER” to confirm your selection. On the
screen will now be displayed a warning hint. Follow the instructions on the
screen.
3. Connecting the player using the component video cable:
Unplug the composite video or S-Video cable and connect the component
video cable to the appropriate jacks on your TV/Beamer. Normally, cables
and jacks are colour-coded to make the connection easier. Then adjust the
TV’s video input setting to correspond to the component video input.
4. Using a Progressive-Scan TV:
Now that you are using the component video output, you can change the
video mode setting to enable the Progressive-Scan mode. Do not change
this setting if you are not sure that your TV supports Progressive-Scan.
Using the direction buttons and the “ENTER” key, you can change the set-
ting to “P-Scan”. On the screen will now be displayed a warning hint. Fol-
low the instructions on the screen.
Progressive-Scan is a method of making a computer picture by drawing all
the scan lines sequentially from top to bottom resulting in a slightly brighter,
more stable and flicker free picture.
RGB OUTPUT
RGB OUTPUT
AV CONNECTOR SCART
AV CONNECTOR SCART
~100-230V
AC IN
~100-230V
AC
IN
Pb/Cb
Pb / Cb
Y
S-VIDEO
VIDEO
5.1 CH ANALOG OUTPUT
5.1 CH ANALOG OUTPUT
ANALOG OUTPUT
ANALOG OUTPUT
OPTICALCOAXIAL
R
L
P - SCAN / COMPONENT
P-SCAN / COMPONENT
FR
SR
SUB
WOOFER
SUB
WOOFER
FL
SL
CENTER
VIDEO OUTPUT
VIDEO OUTPUT
ON
OFF
AC SWITCH
AC SWITCH
Pr/Cr
Pr / Cr
DIGITAL OUTPUT
2
AUDIO
CAUTION:TO REDUCETHE RISKOFELECTRIC SHOCK.DO NOT
REMOVE
COVER.NO USER-SERVICEABLEPAR TS INSIDE.
REFER
SERVICINGTO QUALIFIEDSERVICE PERSONNEL.
CAUTION:TO REDUCETHE RISKOFELECTRIC SHOCK.DO NOT
REMOVECOVER. NOUSER-SERVICEABLE PARTSINSIDE.
REFERSERVICING TOQUALIFIED SERVICE PERSONNEL.
I
O
COMPONENT
VIDEO INPUT
TV or
BEAMER
COMPONENT VIDEO CABLE

21
Audio output connections
This unit features a variety of audio line outputs for connection to a receiver
or TV. There are four possible connection types:
Analogue stereo outputs
Coaxial digital output
Optical digital output
Dolby Digital/dts 5.1 channel analogue outputs
In detail:
Audio connection to a TV / receiver using the analogue stereo
outputs
Have the following cable ready:
1. Audio/Video cable -red and white plug (optionally supplied)
Connect the stereo audio outputs of your DVD player to the matching inputs of
your TV or receiver using the red and white connectors on a audio/video cable.
AUDIO AND VIDEO CONNECTIONS
RGB OUTPUT
AV CONNECTOR SCART
~100-230V
AC IN
Pb / Cb
Y
S-VIDEO
VIDEO
5.1 CH ANALOG OUTPUT ANALOG OUTPUT
OPTICALCOAXIAL
R
L
P - SCAN / COMPONENT
FR
SR
SUB
WOOFER
FL
SL
CENTER
VIDEO OUTPUT
ON
OFF
AC SWITCH
Pr / Cr
DIGITAL OUTPUT
2
AUDIO
TUV
Rheinland
..
ProductSafety
CAUTION:TO REDUCETHE RISKOFELECTRIC SHOCK.DO NOT
REMOVE
COVER.NO USER-SERVICEABLEPAR TS INSIDE.
REFER
SERVICINGTO QUALIFIEDSERVICE PERSONNEL.
CAUTION:TO REDUCETHE RISKOFELECTRIC SHOCK.DO NOT
REMOVECOVER. NOUSER-SERVICEABLE PARTSINSIDE.
REFERSERVICING TOQUALIFIED SERVICE PERSONNEL.
I
O
RL
DIGITAL OUT
RED
WHITE
TV
STEREO AUDIO INPUT
1
/