
CFD-ZW150/.ZW160/ZW200.E_3-859-373-1X.U2/CA2/AU6
3-859-373-12(1)
1996 by Sony Corporation
Operating Instructions
CD Radio
Cassette-Corder
CFD-ZW150
CFD-ZW160
CFD-ZW200

CFD-ZW150/.ZW160/ZW200.E_3-859-373-1X.U2/CA2/AU6
Introduction2
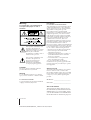
Warning
To prevent fire or shock hazard, do
not expose the player to rain or
moisture.
This symbol is intended to alert
the user to the presence of
uninsulated “dangerous voltage”
within the product's enclosure
that may be of sufficient
magnitude to constitute a risk of
electric shock to persons.
This symbol is intended to alert
the user to the presence of
important operating and
maintenance (servicing)
instructions in the literature
accompanying the appliance.
CAUTION
The use of optical instruments with this
product will increase eye hazard.
Warning
Do not install the appliance in a confined
space, such as a bookcase or built-in cabinet.
For customers in Canada
To prevent electric shock, match wide blade
of plug to wide slot, fully insert.
Information
For customers in the United States
This equipment has been tested and found to
comply with the limits for a Class B digital
device, pursuant to Part 15 of the FCC Rules.
These limits are designed to provide
reasonable protection against harmful
interference in a residential installation. This
equipment generates, uses and can radiate
radio frequency energy and, if not installed
and used in accordance with the instructions,
may cause harmful interference to radio
communications. However, there is no
guarantee that interference will not occur in a
particular installation. If this equipment does
cause harmful interference to radio or
television reception, which can be determined
by turning the equipment off and on, the user
is encouraged to try to correct the interference
by one or more of the following measures:
—Reorient or relocate the receiving antenna.
—Increase the separation between the
equipment and receiver.
—Connect the equipment into an outlet on a
circuit different from that to which the
receiver is connected.
—Consult the dealer or an experienced
radio/TV technician for help.
You are cautioned that any changes or
modifications not expressly approved in this
manual could void your authority to operate
this equipment.
Owner's Record
The model and serial numbers are located at
the rear of the CD radio cassette-corder.
Record these numbers in the spaces provided
below. Refer to these numbers whenever you
call upon your Sony dealer regarding this
product.
Model No. _______________________
Serial No. ________________________
About This Manual
The instructions in this manual are for
the CFD-ZW150, CFD-ZW160 and CFD-
ZW200. Before you start reading, check
your model number. The CFD-ZW160 is
the model used for illustration purposes.

Basic Operations
3Introduction
CFD-ZW150/.ZW160/ZW200.E_3-859-373-1X.U2/CA2/AU6
Table of contents
Basic Operations
4 Playing a CD
6 Listening to the radio
8 Playing a tape
10 Recording on a tape
The CD Player
12 Using the display
13 Locating a specific track
14 Playing tracks repeatedly
(Repeat Play)
15 Creating your own program
(Program Play)
The Timer
16 Setting the clock
17 Waking up to music
19 Falling asleep to music
Setting Up
20 Hooking up the system
23 Adjusting the audio emphasis
(MEGA BASS/4 BAND
GRAPHIC EQUALIZER/
SURROUND)
Additional Information
25 Precautions
27 Troubleshooting
29 Maintenance
30 Specifications
31 Index

Basic Operations
CFD-ZW150/.ZW160/ZW200.E_3-859-373-1X.U2/CA2/AU6
4
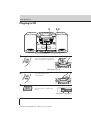
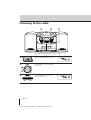
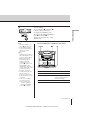
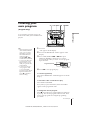
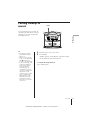
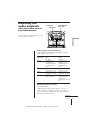
Playing a CD
Basic Operations
Track number Playing time
3
With the label side up
Display
For hookup instructions, see pages 20 – 22.
1 Push PUSH OPEN down to open
the CD compartment and place
the CD on the CD compartment.
2 Close the lid of the CD
compartment.
3 Press ^ (direct power-on).
The player plays all the tracks
once.
1,2

Basic Operations
Basic Operations
CFD-ZW150/.ZW160/ZW200.E_3-859-373-1X.U2/CA2/AU6
5
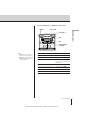
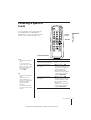
Use these buttons for additional operations
Tip
Next time you want to
listen to a CD, just press
^. The player turns on
automatically and starts
playing the CD.
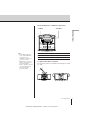
To Press
Adjust the volume VOLUME +/–
Stop playback p
Pause playback ^
Press again to resume play
after pause.
Go to the next track AMS/SEARCH+
Go back to the previous track AMS/SEARCH=
Remove the CD PUSH OPEN
Turn on/off the player POWER
POWER PUSH OPEN
VOLUME +/–
^
p
AMS/SEARCH
=/+

Basic Operations
CFD-ZW150/.ZW160/ZW200.E_3-859-373-1X.U2/CA2/AU6
6
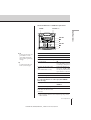
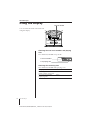
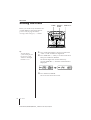
Listening to the radio
For hookup instructions, see pages 20 – 22.
1 Press RADIO (direct power-on).
2 Turn BAND to select the band
you want.
3 Turn TUNING to tune in the
station you want.
Display
23
1

Basic Operations
Basic Operations
CFD-ZW150/.ZW160/ZW200.E_3-859-373-1X.U2/CA2/AU6
7
Use these buttons for additional operations
Tips
• If the FM broadcast is
noisy, set FM MODE/
ISS at the rear to
“MONO”. Radio will
play in monaural.
• Next time you want to
listen to the radio, just
press the RADIO
button. The player turns
on automatically and
starts playing the
previous station.
To Press
Adjust the volume VOLUME +/–
Turn on/off the radio POWER
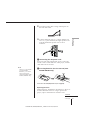
To improve broadcast reception
Reorient the antenna for FM. Reorient the player itself
for AM.
for FM for AM
VOLUME +/–POWER

Basic Operations
CFD-ZW150/.ZW160/ZW200.E_3-859-373-1X.U2/CA2/AU6
8
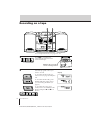
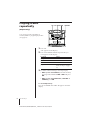
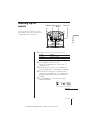
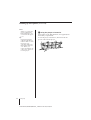
Playing a tape
For hookup instructions, see pages 20 – 22.
1 Press TAPE (direct power-on).
2 Press p6 to open tape
compartment and insert a
recorded tape. Close the
compartment.
3 Press (.
The player starts playing.
With the side you want
to play facing forward
12 323

Basic Operations
Basic Operations
CFD-ZW150/.ZW160/ZW200.E_3-859-373-1X.U2/CA2/AU6
9
Use these buttons for additional operations
To Press or slide
Adjust the volume VOLUME +/–
Stop playback p6
Fast-forward or rewind the tape ) or 0
Pause playback P
Press the button again to
resume play after pause.
Play the opposite side of the DIR in the direction of
tape the arrow. The ” or “ in
(CFD-ZW200 deck A only) the display indicates the
tape direction of deck A.
Eject the cassette p6
Turn on/off the player POWER
To select the direction of the tape (CFD-ZW200
deck A only)
To play Switch DIRECTION
MODE to
Both sides of the tape repeatedly ß
Both sides of the tape Í
from the front side to reverse
side only*
* If play begins from the reverse side, the tape stops at the
end of that side.
Note
During playback, do not
press buttons on the
other deck. Otherwise
the playback speed may
change.
Tip
For the best results, use
TYPE I (normal) tape.
POWER VOLUME +/–
0/)
0/)
p6
P
p6
P

Basic Operations
CFD-ZW150/.ZW160/ZW200.E_3-859-373-1X.U2/CA2/AU6
10
Recording on a tape
For hookup instructions, see pages 20 – 22.
1 Press p6 to open the tape
compartment on deck B and
insert a blank tape.
2 Select the program source you
want to record.
To record from the CD player,
insert a CD (see page 4) and press
CD.
To record from the radio, press
RADIO and tune in the station
you want using TUNING (see
page 6.)
To record from a tape, press
TAPE, insert a recorded tape into
deck A and press P and ( on
deck A.
Display
With the side you want to
record on facing forward
31

Basic Operations
Basic Operations
CFD-ZW150/.ZW160/ZW200.E_3-859-373-1X.U2/CA2/AU6
11
3 Start recording.
To record, press r on deck B ((
is depressed automatically).
For high speed dubbing, after
depressing HI-SPEED DUBBING,
press r on deck B (( is
depressed automatically). (CFD-
ZW200 only).
Deck B
To Press
Stop recording p6 on deck B
Pause recording P on deck B
Press the button again to
resume recording.
Turn on/off the player POWER
Use these buttons for additional operations
Note
When recording a CD,
press r after the total
track number and the
total playing number of
the CD have been
displayed.
Tips
• Adjusting the volume or
the audio emphasis (see
page 23) will not affect
the recording level.
• If the AM program
makes a whistling
sound after you've
pressed r in step 3, set
the FM MODE/ISS
(Interference Suppress
Switch) at the rear to the
position that most
decreases the noise.
• For the best results, use
the AC power as a
power source and use
TYPE I(normal) tape for
recording.
• To erase a recording,
proceed as follows:
1 Press TAPE until
“TAPE” appears in
the display window.
2 Press r on deck B.
POWER p6 P

The CD Player
CFD-ZW150/.ZW160/ZW200.E_3-859-373-1X.U2/CA2/AU6
12
Using the display
You can check information about the CD
using the display.
The CD Player
DISPLAY/ ENTER
Checking the total track numbers and playing
time
Press DISPLAY/ENTER in stop mode.
Total playing time
Checking the remaining time
Press DISPLAY/ENTER while playing a CD.
To display
Press DISPLAY/ENTER
Remaining time on the CD Once
and the number of tracks left
The current track number Twice
and playing time
Total track number

The CD Player
CFD-ZW150/.ZW160/ZW200.E_3-859-373-1X.U2/CA2/AU6
13
The CD Player
Locating a specific
track
You can quickly locate any track using
the number buttons (CFD-ZW160/
ZW200 only). You can also find a specific
point in a track while playing a CD.
To locate Press
a specific track directly number button of the
(CFD-ZW160/ZW200 only) track.
a point while listening to ) (forward) or 0
the sound (backward) while playing
and hold down until you
find the point (CFD-
ZW160/ZW200 only).
When you use the buttons
on the player, use AMS/
SEARCH =/+.
a point while observing ) (forward) or 0
the display (backward) in pause and
hold down until you find
the point (CFD-ZW160/
ZW200 only).
When you use the buttons
on the player, use AMS/
SEARCH =/+.
Note
(CFD-ZW160/ZW200
only)
You cannot locate a
specific track if “SHUF
REP” or “PGM” is lit in
the display. Turn off
the indication by
pressing p.
Tip
(CFD-ZW160/ZW200
only)
When you locate a
track numbered over
10, press >10 first, then
the corresponding
number buttons.
Example:
To play track number
23, press >10 first, then
2 and 3.
(CFD-ZW160/ZW200)
0 / )
Number
buttons

The CD Player
CFD-ZW150/.ZW160/ZW200.E_3-859-373-1X.U2/CA2/AU6
14
Playing tracks
repeatedly
(Repeat Play)
You can play tracks repeatedly in
normal, shuffle or program play modes
(see page 15).
1 Press CD.
“Cd” appears in the display.
2 Press PLAY MODE until the repeat mode you
want appears in the display.
To repeat Select
a single track REP 1
all the tracks REP ALL
tracks in random order SHUF REP
programed tracks PGM REP and then progam
tracks (see step 3 on page
15).
3 Do either of the following to start repeat play:
• When you’ve selected REP1, select the track by
pressing AMS/SEARCH = or + and press
^.
• When you’ve selected REP ALL, SHUF REP or
PGM REP, press ^ .
To cancel Repeat Play
Press PLAY MODE until “REP” disappears from the
display.
PLAY MODECD ^=/+

The CD Player
CFD-ZW150/.ZW160/ZW200.E_3-859-373-1X.U2/CA2/AU6
15
The CD Player
Creating your
own program
(Program Play)
You can make a program of up to 20
tracks in the order you want them to be
played.
1 Press CD.
“Cd” appears in the display.
2 Press PLAY MODE until “PGM” appears in the
display.
3 Press AMS/SEARCH =or + then press
DISPLAY/ENTER for the tracks you want to
program in the order you want. You can program
up to 20 tracks.
4 Press ^ to start program play.
To cancel Program Play
Press PLAY MODE until “PGM” disappears from the
display.
To check the order of tracks before play
Press DISPLAY/ENTER.
Every time you press the button, the track number
appears in the programed order.
To change the current program
Press p once if the CD is stopped and twice if the CD
is playing. The current program will be erased. Then
create a new program following the programing
procedure.
Tips
• When using the remote
(CFD-ZW160/ZW200
only), you can select
the track by pressing
the number buttons
instead of AMS/
SEARCH =/+
and DISPLAY/ENTER.
• You can play the same
program again, since
the program is saved
until you open the disc
compartment.
• You can record your
own program. After
you’ve created the
program, insert a blank
tape into deck B and
press r on deck B to
start recording.
Programed track
Playing order
=/+PLAY MODE ^CD

The Timer
CFD-ZW150/.ZW160/ZW200.E_3-859-373-1X.U2/CA2/AU6
16
Setting the clock
Before you set the clock, insert three size
AA (R6) batteries and connect the AC
power cord (see page 20 and 21.)
As long as the clock goes, “:” flashes.
The Timer
1 Press and hold CLOCK for about 2 seconds until
“AM” or “PM” and the hour digit flash.
2 Press TIME SET +/– until you set the current hour.
Then press DISPLAY/ENTER.
The minute digits flash. Set the minutes by
pressing TIME SET +/– until the current minute is
displayed.
3 Press DISPLAY/ENTER.
The clock starts from 00 seconds.
TIME SET +/–
Tip
The time display
system of this player is
the 12-hour system:
AM12:00 = midnight
PM12:00 = noon
CLOCK DISPLAY/
ENTER

The Timer
CFD-ZW150/.ZW160/ZW200.E_3-859-373-1X.U2/CA2/AU6
17
The Timer
Waking up to
music
You can wake up to music at a preset
time. Make sure you have set the clock
(“Setting the clock” on page 16).
1 Prepare the music source you want to play.
To play Do this
the radio Tune in a station
a CD Insert a CD.
2 Press TIMER for about 2 seconds.
The t (clock) and the music source (“Cd” or
“RAdIO”) flash.
3 Select the music source (“Cd” or “RAdIO”) by
pressing TIME SET +/–, then DISPLAY/ENTER.
4 Set the timer to the hour you want the music to
start by pressing TIME SET +/– then DISPLAY/
ENTER. Set the minutes, then press DISPLAY/
ENTER.
5 Press TIME SET +/– to set the volume, then
DISPLAY/ENTER.
continued
STANDBY TIMER TIME SET+/–DISPLAY/
ENTER

The Timer
CFD-ZW150/.ZW160/ZW200.E_3-859-373-1X.U2/CA2/AU6
18
Waking up to music (continued)
Tips
• The display window
dims while the waking
up timer is on.
• You can have the
player go on the next
day at the same time.
Just press STANDBY
until the t indication
appears in the display.
The preset settings
remain until you reset
them.
Note
During the timer
mode, you cannot
change the tape player
to the tape function.
To operate the tape
player, press
STANDBY until the t
indication disappears
from the display first,
then operate the tape
player.
6 Press STANDBY.
The t indication appears in the display and the
power goes off.
At the preset time, the power will go on and music
will play for 2 hours.
To check/change when the playback will start
Press TIMER for about 2 seconds, then DISPLAY/
ENTER. Each time you press DISPLAY/ENTER, a
stored setting lights up. Change the setting if you need
to when the setting lights up. When you finish
checking the setting of volume, press TIMER again.
To use the player before a timer playback starts
Just turn on the player, and then you can use it.
If you turn off the player before the preset time, timer
playback will start at the preset time.
In case of the radio, however, if you listen to the
station which is different from the one you tuned in
in step 1 on page 17, you will hear that station at the
preset time. Make sure to tune in the station you want
to listen to before you turn off the player.
To stop play
Press POWER.

The Timer
CFD-ZW150/.ZW160/ZW200.E_3-859-373-1X.U2/CA2/AU6
19
The Timer
Falling asleep to
music
You can set the player to turn off
automatically after about 2 hours,
allowing you to fall asleep while
listening to music.
1 Play the music source you want.
2 Press SLEEP.
“SLEEP” appears in the display. The player shuts
off automatically after about 2 hours.
To cancel the sleep function
Press SLEEP again.
Tip
• The display window
dims while the sleep
timer is on.
• When you are playing
radio or CD, make sure
that ( of the tape
player is not depressed.
• You can fall asleep and
wake up to different
music. First, set the
wake up timer by
following steps in
“Waking up to music”
on page 17 . Then, turn
the power on and
follow the steps on this
page to set the sleep
timer. When you are
listening to the radio,
make sure to tune in
the station you want to
wake up to.
SLEEP

Setting Up
CFD-ZW150/.ZW160/ZW200.E_3-859-373-1X.U2/CA2/AU6
20
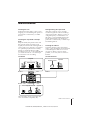
Setting Up
Hooking up the
system
Make sure you turn off the
power before making any
connections.
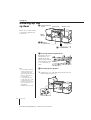
Tips
• To detach the speakers,
unlock speaker (see B
on the diagram) and
slide the speaker box all
the way up and away
from the player.
• Connect the speakers
for this unit only to the
speaker terminals of
this unit. If you connect
any other speakers or
equipment,
malfunction may occur.
2
Speaker terminals
5
1 Battery
compartment
Right
speaker
Left speaker
Speaker cords
To a wall outlet
3
1 Inserting the back-up batteries
Insert three size AA
(R6) batteries (not
supplied) into the
battery compartment.
These batteries work
to save the memory
data.
2 Hooking up the speakers
1 Align the grooves and slide the speaker box down
until it snaps into place A.
Page is loading ...
Page is loading ...
Page is loading ...
Page is loading ...
Page is loading ...
Page is loading ...
Page is loading ...
Page is loading ...
Page is loading ...
Page is loading ...
Page is loading ...
Page is loading ...
-
 1
1
-
 2
2
-
 3
3
-
 4
4
-
 5
5
-
 6
6
-
 7
7
-
 8
8
-
 9
9
-
 10
10
-
 11
11
-
 12
12
-
 13
13
-
 14
14
-
 15
15
-
 16
16
-
 17
17
-
 18
18
-
 19
19
-
 20
20
-
 21
21
-
 22
22
-
 23
23
-
 24
24
-
 25
25
-
 26
26
-
 27
27
-
 28
28
-
 29
29
-
 30
30
-
 31
31
-
 32
32


Sony CFD-ZW200 User manual
- Category
- Drive recorders
- Type
- User manual
Ask a question and I''ll find the answer in the document
Finding information in a document is now easier with AI
Related papers
Other documents
-
Aiwa CSDA300 Datasheet
-
HP RP9 G1 Retail System Model 9018 Base Model Installation guide
-
-
 B&B 3804 Operators Safety Manual
-
ARC AISLink CA2 Installation guide
-
Equinox Systems Apollo CFD Installation guide
-
