Ohlins LOV1D00 Mounting Instruction
- Category
- Car kits
- Type
- Mounting Instruction
Öhlins Racing AB, Box 722, S-194 27 Upplands Väsby, Sweden.
Phone +46 8 590 025 00. Fax +46 8 590 025 80.
www.ohlins.com
LOV 1D00-4D00, LOV1f11-4F14, LOV1F12-4F13, Issued 2005 11 11
Mounting Instructions
Öhlins shock absorber kit for Lotus Elise
© Öhlins Racing AB. All rights reserved. Any reprinting or unauthorized use without the
written permission of Öhlins Racing AB is prohibited. Printed in Sweden.
Before Installing
Öhlins Racing AB cannot be held responsible
for any damage to shock absorber or vehicle,
or injury to persons, if the instructions for fi tting
and main tenance are not followed exactly.
Similarly, the warranty will become null and
void if the instructions are not adhered to.
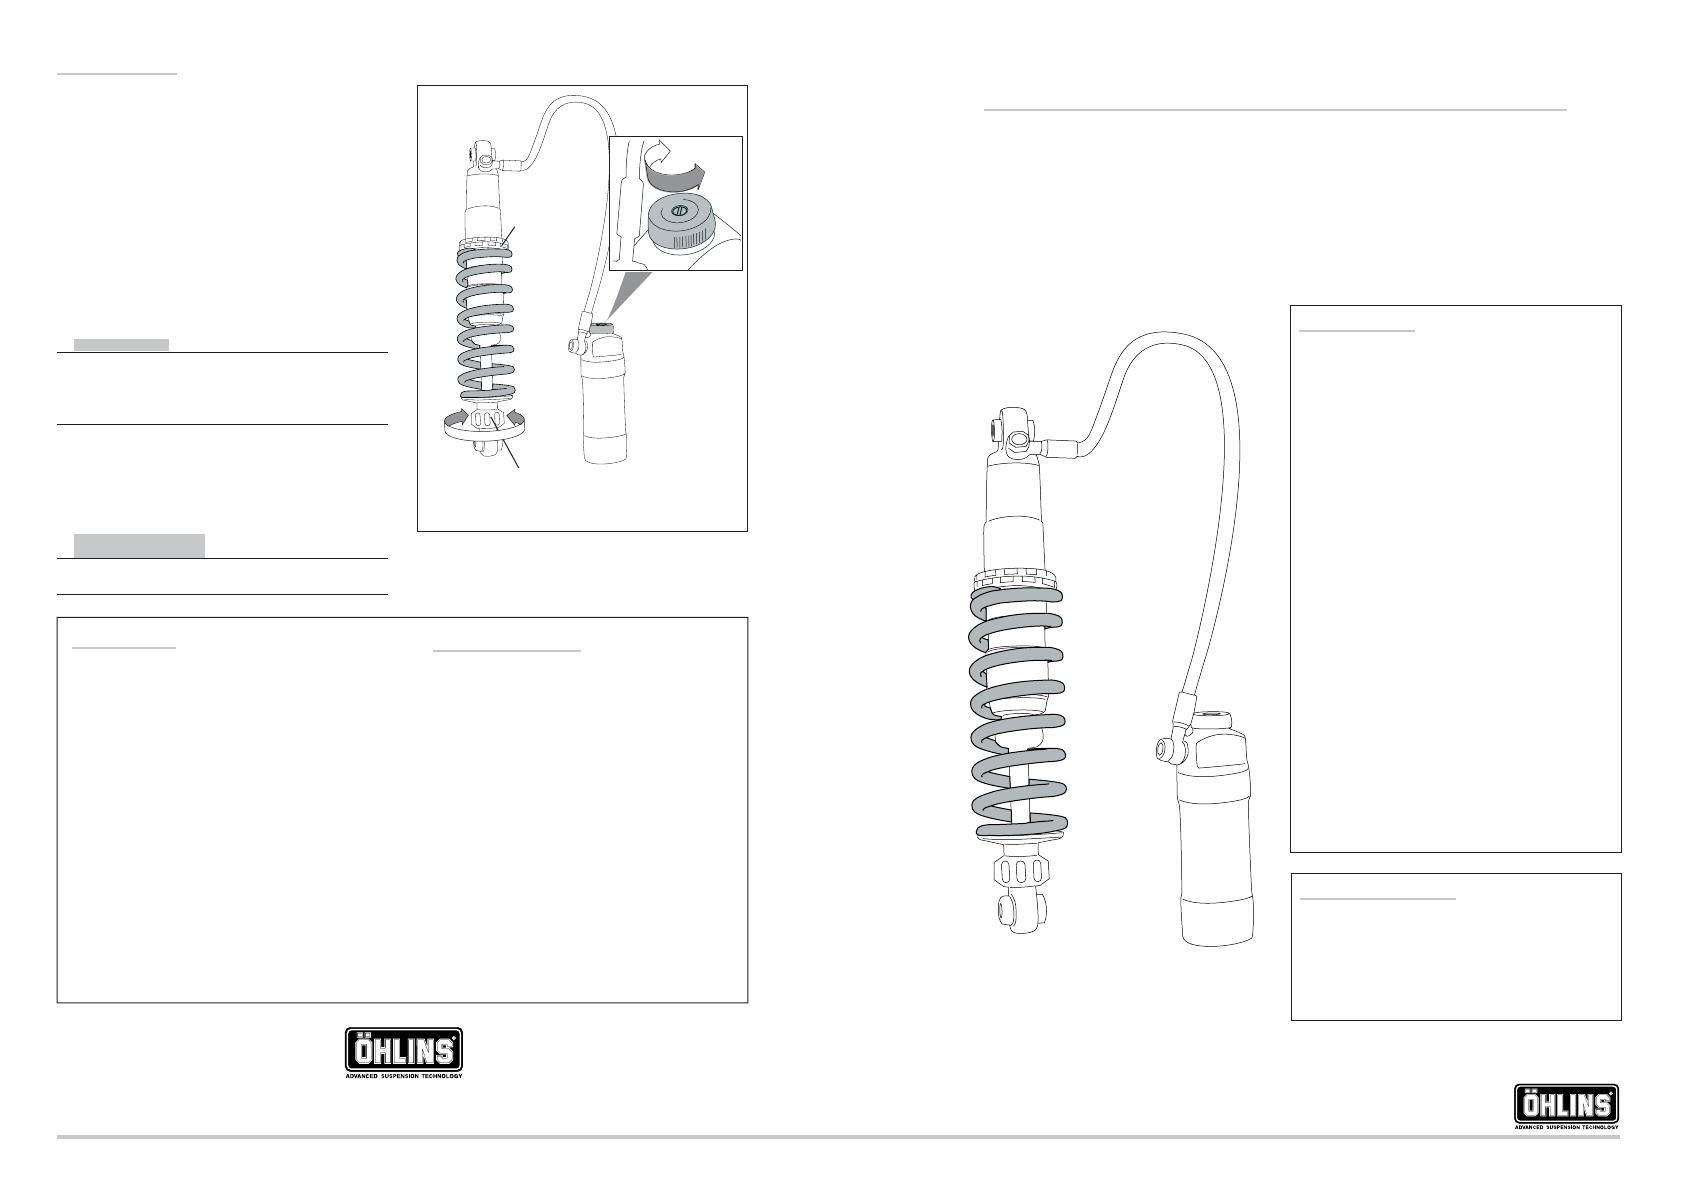
Spring pre-load
Adjust the spring pre-load by turning the rings
on the cylinder house. Use a C-spanner.
Compression damping:
Adjustments are made on top of the reservoir.
Rebound damping
Adjuster wheel on the piston shaft above the
end bracket.
NOTE!
When delivered the Öhlins shock absorber is
dialed to recommended settings for the specifi c
brand. If you have changed the setting, reset
according to the following:
The adjusters have a normal right hand thread.
Turn clockwise to fully closed. Turn counter
clockwise to open and count the clicks until you
reach the recommended number.
CAUTION!
Do not use too much force, delicate sealing sur-
faces can be damaged. Do use fi ngers only.
Rebound
adjustment
Adjustments
Read more about settings and adjustments in
your Öhlins Owner’s manual.
Front: LOV1D00–2D00, LOV1F11–2F11,
LOV1F12–2F12, LOV1F13-2F13
Rear: LOV3D00–4D00, LOV3F11–4F11,
LOV3F12–4F12, LOV3F13-4F13
Kit contents
Before installing the shock absorber, please
check the contents of the kit. If anything is
missing, please contact your Öhlins dealer.
Front shock absorbers* LOV1D00/2D00 (2)
Rear shock absorbers* LOV 3D00/4D00 (2)
Alternative front shocks* LOV 1F11/2F11 (2)
LOV 1F12/2F12 (2)
LOV 1F13/2F13 (2)
Alternative rear shocks* LOV 3F11/4F11 (2)
LOV 3F12/4F12 (2)
LOV 3F13/4F13 (2)
Reservoir mounts 00230-01 (8)
Hose clamps 00643-02 (8)
Tie waps 00231-01 (8)
C-spanner 00710-01 (2)
Sticker 00192-01 (4)
Owner’s manual
*
Left - Front:
LOV1D00/ LOV1F11/ LOV1F12/LOV1F13
Right - Front:
LOV2D00/ LOV2F11/ LOV2F12/ LOV2F13
Left - Rear:
LOV3D00/ LOV3F11/ LOV3F12 / LOV3F13
Right - Rear:
LOV4D00/ LOV4F11/ LOV4F12 / LOV4F13
Compression
adjustment
Spring
pre-load
adjustment
Setup data
Street use (LOV 1D00-4D00,
LOV 1F11-4F11, LOV 1F12-4F12)
Rebound damping 18 clicks
Compression damping 12 clicks
Street use (LOV 1F13-4F13)
Front
Rebound damping 14 clicks
Compression damping 10 clicks
Rear
Rebound damping 15 clicks
Compression damping 10 clicks
Race track (LOV1D00–4D00,
LOV1F11–4F11)
Rebound damping 12 clicks
Compression damping 1 clicks
Spring pre-load
LOV1D00–4D00, LOV1F11–4F11
Front 10 mm
Rear 3 mm
LOV1F12–4F12
Front 6 mm
Rear 2 mm
LOV 1F13-4F13
Front 6 mm
Rear 0 mm
WARNING!
1. Installing a shock absorber, that is not
approved by the vehicle manufacturer, may
affect the stability of your vehicle. Öhlins
Racing AB cannot be held responsible for
any personal injury or damage that may oc-
cur after fi tting the shock absorber. Contact
an Öhlins dealer or other qualifi ed person
for advice.
2. Please study and make certain that you fully
understand all the mounting instructions and
the owner’s manual before handling this shock
absorber kit. If you have any questions regard-
ing proper installation procedures, contact an
Öhlins dealer or other qualifi ed person.
3. The vehicle service manual must be
referred to when installing the Öhlins shock
absorber
!
NOTE!
During storage and transportation, especially
at high ambient temperature, the oil and
grease used for assembling may run out in-
side the packing and damage the expanded
polystyrene packing material. This is not
unusual and is in no way detrimental to the
shock absorber.
Safety Signals
Important information concerning safety is
distinguished in this manual by the following
notations:
The Safety alert symbol means:
Attention! Your safety is involved.
WARNING!
Failure to follow these warning instruc-
tions could result in severe or fatal
injury to anyone working with, inspect-
ing or using the shock absorber, or to
bystanders.
CAUTION!
Caution indicates that special pre-
cautions must be taken to avoid damage
to the shock absorber.
NOTE!
Indicates information that is of importance
regarding mounting procedures.
!
!
WARNING!
1. It is advisable to have an Öhlins dealer
or other qualifi ed person install the shock
absorber.
2. Follow the instructions in the vehicle service
manual when changing the shock absorber.
3. When working on a raised vehicle, make
sure that it is securely supported to prevent
it from falling.
!
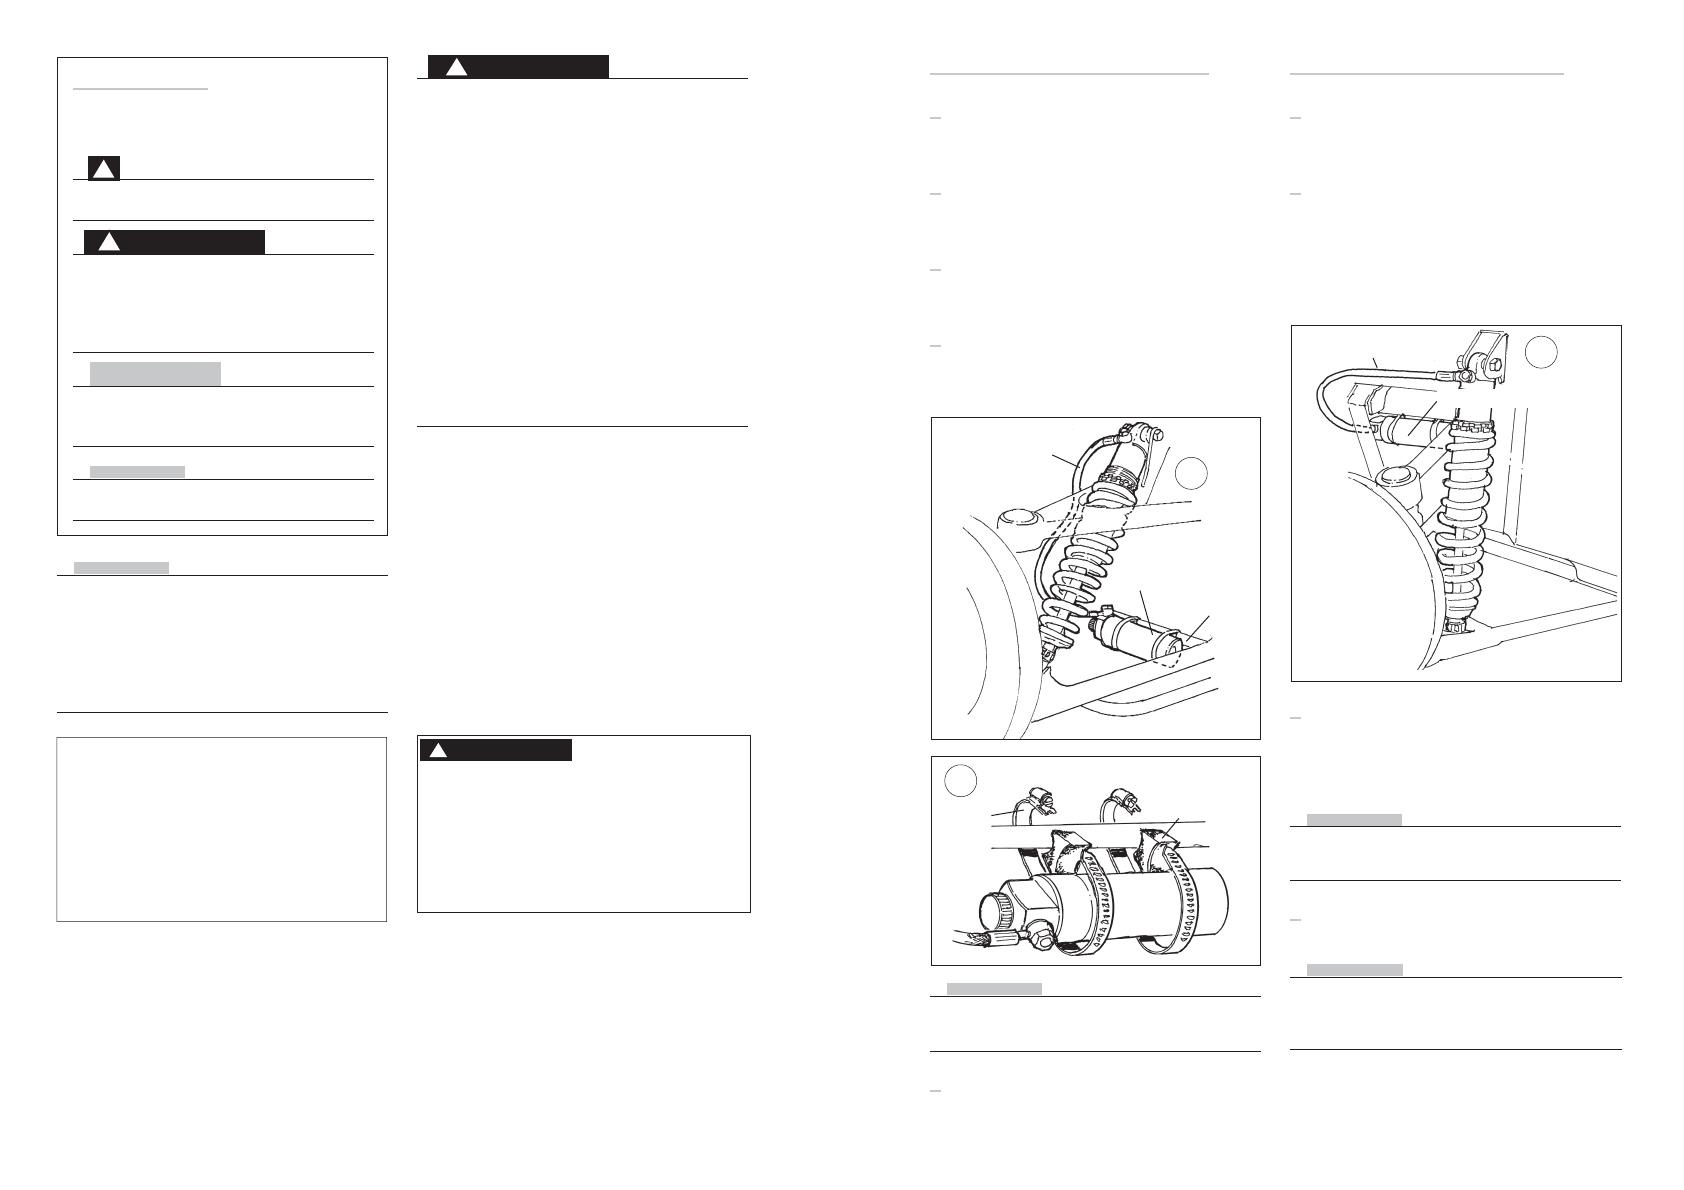
Mounting Instructions - Front
1
Remove the wheel. Consult your vehicle
service manual.
2
Remove the original shock absorber by remov-
ing the upper and lower attachments.
3
Install the Öhlins shock absorber in the same way
as the original unit. See fi gure below.
4
Attach the reservoir with the provided rubber
mounts to the inner tube of the lower trailing
arm. Use the provided hose clamps.
NOTE!
Make sure that all bolts are tightened to the
correct torque and that nothing fouls or restricts
movement of the suspension when it is being
fully compressed or extended.
Mounting Instructions - Rear
1
Remove the wheel. Consult your vehicle
service manual.
2
Remove the original shock absorber by remov-
ing the upper and lower attachments.
3
Install the Öhlins shock absorber in the same way
as the original unit.
NOTE!
Lead the hose in a soft bend and make sure that
nothing restricts or interferes with the shock
absorber when the wheels are moving.
5
Reinstall the wheel.
4
Attach the reservoir with the provided rubber
mounts to the inner tube of the upper trailing
arm. Use the provided hose clamps. See fi gure
to the left.
NOTE!
Lead the hose in a soft bend and make sure that
nothing restricts or interferes with the shock
absorber when the wheels are moving.
5
Reinstall the wheel.
Reservoir
Hose
Hose
Installing the reservoir
Hose
clamp
Rubber
mount
Öhlins products are subject to continuous
improvement and development. Conse-
quently, although these instructions include
the most up-to-date information available
at the time of printing, there may be minor
differences between your shock absorber
and this manual. Please consult your Öhlins
dealer if you have any questions regarding
the contents of this manual.
3
Reservoir
inner tube
4
front
rear
3
rear
front
-
 1
1
-
 2
2


Ohlins LOV1D00 Mounting Instruction
- Category
- Car kits
- Type
- Mounting Instruction
Ask a question and I''ll find the answer in the document
Finding information in a document is now easier with AI
Related papers
-
Ohlins OPV3D00 Mounting Instruction
-
-
-
-
-
-
-
-
-