Page is loading ...

Operator’s Manual
English (EN, GB)
Form No. 3350–803
62 Guardian
Recycler
Mower
Groundsmaster
200 Series
Model No. 30569—Serial No. 240000001 and Up

2
2004 by The Toro Company
8111 Lyndale Avenue South
Bloomington, MN 55420-1196
Contact us at www.Toro.com
All Rights Reserved
Printed in the USA
Contents
Page
Introduction 2. . . . . . . . . . . . . . . . . . . . . . . . . . . . . . . . .
Safety 3. . . . . . . . . . . . . . . . . . . . . . . . . . . . . . . . . . . . . .
Safe Operating Practices 3. . . . . . . . . . . . . . . . . . . .
Toro Mower Safety 4. . . . . . . . . . . . . . . . . . . . . . . .
Safety and Instruction Decals 5. . . . . . . . . . . . . . . . .
Specifications 7. . . . . . . . . . . . . . . . . . . . . . . . . . . . . . . .
General Specifications 7. . . . . . . . . . . . . . . . . . . . .
Optional Equipment 7. . . . . . . . . . . . . . . . . . . . . . . .
Setup 8. . . . . . . . . . . . . . . . . . . . . . . . . . . . . . . . . . . . . .
Loose Parts 8. . . . . . . . . . . . . . . . . . . . . . . . . . . . . . .
Installing the Castor Wheel Assemblies 9. . . . . . . .
Installing the Lift Arms to the Traction Unit 9. . . . .
Connecting the Lift Arms to the Cutting Unit 10. . . .
Connecting the PTO Shaft to the
Cutting Unit Gear Box 11. . . . . . . . . . . . . . . . . . . .
Mounting the Counterbalance Manifold 11. . . . . . . .
Installing the Rear Weight 14. . . . . . . . . . . . . . . . . . .
Before Operating 15. . . . . . . . . . . . . . . . . . . . . . . . . . . . .
Checking the Lubricant in the Gear Box 15. . . . . . . .
Adjusting the Height-of-Cut 15. . . . . . . . . . . . . . . . .
Adjusting the Rollers 16. . . . . . . . . . . . . . . . . . . . . . .
Adjusting the Skids 16. . . . . . . . . . . . . . . . . . . . . . . .
Adjusting the Deck Baffles 17. . . . . . . . . . . . . . . . . .
Greasing the Cutting Unit 17. . . . . . . . . . . . . . . . . . .
Operation 17. . . . . . . . . . . . . . . . . . . . . . . . . . . . . . . . . . .
Operating Tips 17. . . . . . . . . . . . . . . . . . . . . . . . . . . .
Maintenance 19. . . . . . . . . . . . . . . . . . . . . . . . . . . . . . . . .
Recommended Maintenance Schedule 19. . . . . . . . .
Greasing the Bearings, Bushings, and Gear Box 19. .
Separating the Cutting Unit from
the Traction Unit 20. . . . . . . . . . . . . . . . . . . . . . . . .
Mounting the Cutting Unit to the Traction Unit 21. .
Replacing the Drive Belt 21. . . . . . . . . . . . . . . . . . . .
Servicing the Front Bushings in the Castor Arms 22.
Servicing the Castor Wheels and Bearings 23. . . . . .
Removing the Cutting Blade 23. . . . . . . . . . . . . . . . .
Inspecting and Sharpening the Blade 24. . . . . . . . . . .
Correcting Cutting Unit Mismatch 25. . . . . . . . . . . .
Hydraulic Schematic 26. . . . . . . . . . . . . . . . . . . . . . .
Troubleshooting 27. . . . . . . . . . . . . . . . . . . . . . . . . . . . . .
The Toro General Commercial Products Warranty 28. . .
Introduction
Read this manual carefully to learn how to operate and
maintain your product properly. The information in this
manual can help you and others avoid injury and product
damage. Although Toro designs and produces safe
products, you are responsible for operating the product
properly and safely.
You may contact Toro directly at www.Toro.com for
product and accessory information, help finding a dealer, or
to register your product.
Whenever you need service, genuine Toro parts, or
additional information, contact an Authorized Service
Dealer or Toro Customer Service and have the model and
serial numbers of your product ready. The numbers are
stamped into a plate located on the left rear hanger bracket
of the mower.
Write the product model and serial numbers in the space
below:
Model No.
Serial No.
This manual identifies potential hazards and has special
safety messages that help you and others avoid personal
injury and even death. Danger, Warning, and Caution are
signal words used to identify the level of hazard. However,
regardless of the hazard, be extremely careful.
Danger signals an extreme hazard that will cause serious
injury or death if you do not follow the recommended
precautions.
Warning signals a hazard that may cause serious injury or
death if you do not follow the recommended precautions.
Caution signals a hazard that may cause minor or moderate
injury if you do not follow the recommended precautions.
This manual uses two other words to highlight information.
Important calls attention to special mechanical
information and Note: emphasizes general information
worthy of special attention.

3
Safety
This machine meets or exceeds CEN standard EN
836:1997, ISO standard 5395:1990, and ANSI
B71.4-1999 specifications in effect at the time of
production.
Improper use or maintenance by the operator or owner
can result in injury. To reduce the potential for injury,
comply with these safety instructions and always pay
attention to the safety alert
symbol, which means
CAUTION, WARNING, or DANGER—“personal
safety instruction.” Failure to comply with the
instruction may result in personal injury or death.
Safe Operating Practices
The following instructions are from the CEN standard EN
836:1997, ISO standard 5395:1990, and ANSI B71.4-1999.
Training
• Read the Operator’s Manual and other training material.
If the operator(s) or mechanic(s) can not read English it
is the owner’s responsibility to explain this material to
them.
• Become familiar with the safe operation of the
equipment, operator controls, and safety signs.
• All operators and mechanics should be trained. The
owner is responsible for training the users.
• Never let children or untrained people operate or
service the equipment. Local regulations may restrict
the age of the operator.
• The owner/user can prevent and is responsible for
accidents or injuries occurring to himself or herself,
other people or property.
Preparation
• Evaluate the terrain to determine what accessories and
attachments are needed to properly and safely perform
the job. Only use accessories and attachments approved
by the manufacturer.
• Wear appropriate clothing including hard hat, safety
glasses and ear protection. Long hair, loose clothing or
jewelry may get tangled in moving parts.
• Inspect the area where the equipment is to be used and
remove all objects such as rocks, toys and wire which
can be thrown by the machine.
• Use extra care when handling gasoline and other fuels.
They are flammable and vapors are explosive.
– Use only an approved container.
– Never remove fuel cap or add fuel with engine
running. Allow engine to cool before refueling. Do
not smoke.
– Never refuel or drain the machine indoors.
• Check that operator’s presence controls, safety switches
and shields are attached and functioning properly. Do
not operate unless they are functioning properly.
Operation
• Never run an engine in an enclosed area.
• Only operate in good light, keeping away from holes
and hidden hazards.
• Be sure all drives are in neutral and parking brake is
engaged before starting engine. Only start engine from
the operator’s position. Use seat belts if provided.
• Slow down and use extra care on hillsides. Be sure to
travel in the recommended direction on hillsides. Turf
conditions can affect the machine’s stability. Use
caution while operating near drop-offs.
• Slow down and use caution when making turns and
when changing directions on slopes.
• Never raise deck with the blades running.
• Never operate with guards not securely in place. Be
sure all interlocks are attached, adjusted properly, and
functioning property.
• Do not change the engine governor setting or overspeed
the engine.
• Stop on level ground, lower the cutting units, disengage
drives, engage parking brake (if provided), shut off
engine before leaving the operator’s position for any
reason.
• Stop equipment and inspect the blades after striking
objects or if an abnormal vibration occurs. Make
necessary repairs before resuming operations.
• Keep hands and feet away from the cutting units.
• Look behind and down before backing up to be sure of
a clear path.
• Never carry passengers and keep pets and bystanders
away.
• Slow down and use caution when making turns and
crossing roads and sidewalks. Stop blades if not
mowing.
• Do not operate the mower under the influence of
alcohol or drugs.
• Use care when loading or unloading the machine into a
trailer or truck.
• Use care when approaching blind corners, shrubs, trees,
or other objects that may obscure vision.

4
• The operator shall turn on flashing warning lights, if
provided, whenever traveling on a public road, except
where such use is prohibited by law.
Maintenance and Storage
• Disengage drives, lower the cutting units, move traction
pedal to Neutral, set parking brake, stop engine and
remove key and disconnect spark plug wire. Wait for all
movement to stop before adjusting, cleaning or
repairing.
• Clean grass and debris from cutting units, drives,
mufflers, and engine to help prevent fires. Clean up oil
or fuel spillage.
• Let engine cool before storing and do not store near
flame.
• Shut off fuel while storing or transporting. Do not store
fuel near flames or drain indoors.
• Park machine on level ground. Never allow untrained
personnel to service machine.
• Use jack stands to support components when required.
• Carefully release pressure from components with stored
energy.
• Disconnect battery or remove spark plug wire before
making any repairs. Disconnect the negative terminal
first and the positive last. Reconnect positive first and
negative last.
• Use care when checking blades. Wrap the blades or
wear gloves, and use caution when servicing them.
Only replace blades. Never straighten or weld them.
• Keep hands and feet away from moving parts. If
possible, do not make adjustments with the engine
running.
• Charge batteries in an open well ventilated area, away
from spark and flames. Unplug charger before
connecting or disconnecting from battery. Wear
protective clothing and use insulated tools.
• Keep all parts in good working condition and all
hardware tightened. Replace all worn or damaged
decals.
Toro Mower Safety
The following list contains safety information specific to
Toro products or other safety information that you must
know that is not included in the ANSI standards.
This product is capable of amputating hands and feet and
throwing objects. Always follow all safety instructions to
avoid serious injury or death.
Use of this product for purposes other than its intended use
could prove dangerous to user and bystanders.
Operation
• Know how to stop the machine and engine quickly.
• Always wear substantial shoes. Do not operate the
machine while wearing sandals, tennis shoes, or
sneakers.
• Wearing safety shoes and long pants is advisable and
required by some local ordinances and insurance
regulations.
• Fill fuel tank until level is 1 in. (25 mm) below the
bottom of the filler neck. Do not overfill.
• Check the safety interlock switches daily for proper
operation. If a switch should fail, replace the switch
before operating the machine. After every two years,
replace all three interlock switches in the safety system,
regardless if they are working properly or not.
• Pay attention when using the machine. To prevent loss
of control:
– Do not drive close to sand traps, ditches, creeks, or
other hazards.
– Avoid sudden stops and starts.
– Watch for traffic when near or crossing roads.
Always yield the right-of-way.
– Lower the cutting unit when going down slopes.
• If the cutting unit discharge area ever plugs, shut the
engine off before removing the obstruction.
• Cut grass slopes carefully. Do not start, stop, or turn
suddenly.
• Do not touch the engine or muffler while the engine is
running or soon after it has stopped because these areas
could be hot enough to cause burns.
Maintenance and Storage
• Check the blade mounting bolts frequently to be sure
that they are tightened to specification.
• Make sure that all hydraulic line connectors are tight
and all hydraulic hoses and lines are in good condition
before applying pressure to the system.
• Keep your body and hands away from pin hole leaks or
nozzles that eject hydraulic fluid under high pressure.
Use paper or cardboard, not your hands, to search for
leaks. Hydraulic fluid escaping under pressure can have
sufficient force to penetrate the skin and cause serious
injury.
• Before disconnecting or performing any work on the
hydraulic system, all pressure in the system must be
relieved by stopping the engine and lowering the cutting
units to the ground.

5
• If the engine must be running to perform a maintenance
adjustment, keep hands, feet, clothing, and any parts of
the body away from the cutting units, attachments, and
any moving parts. Keep everyone away.
• Do not overspeed the engine by changing governor
settings. To ensure safety and accuracy, have an
Authorized Toro Distributor check the maximum engine
speed with a tachometer.
• The engine must be shut off before checking the oil or
adding oil to the crankcase.
• Make sure that the mower fuel tank is empty if the
machine is to be stored in excess of 30 days. Do not
store the mower near any open flame or where gasoline
fumes may be ignited by a spark.
• Perform only those maintenance instructions described
in this manual. If major repairs are ever needed or if
assistance is desired, contact an Authorized Toro
Distributor.
• To make sure of optimum performance and continued
safety certification of the machine, use only genuine
Toro replacement parts and accessories. Replacement
parts and accessories made by other manufacturers
could be dangerous, and such use could void the
product warranty.
Safety and Instruction Decals
Safety decals and instructions are easily visible to the operator and are located near any area
of potential danger. Replace any decal that is damaged or lost.
106-6753
1. Thrown object
hazard—keep bystanders
a safe distance from the
machine.
2. Cutting/dismemberment
hazard of hand or foot,
mower blade—stay away
from moving parts.
93-7818
1. Warning—read the
Operator’s Manual
for instructions on
torquing the blade bolt/nut to 115–149 N⋅m (85–110 ft.-lb.).
93-6697
1. Read the operator’s manual for further information on
lubrication.

6
107-2915
1. Entanglement hazard, shaft—keep bystanders a safe distance
from the machine.
100-6578
1. Entanglement hazard, belt—do not operate the machine with
the shields or guards removed; always keep the shields and
guards in place. Stay away from moving parts.
93-7826
1. Height of cut 2. Height settings
105-9552
1. Warning—read the
Operator’s Manual.
2. Tipping hazard—lower the cutting unit when driving down
slopes. For 2 wheel drive units, add a 32 kg (70 lb.) rear
weight to GM 228D units and a 48 kg (105 lb.) rear weight to
GM 225 units. For 4 wheel drive units, do not add weight.
92-4092

7
Specifications
General Specifications
Width of Cut 62 in. (157 cm)
Height of Cut Adjustable from 1-1/2 to 4-1/2 in. (38 to 114 mm) in 1/2 inch increments
Blade Tip Speed 15,480 ft./min. @ 3250 engine RPM
Cutter Housing
4 in. (102 mm) deep housing is made of 12 gauge steel and reinforced with 10
gauge channel and plates.
Cutting Unit Drive
Isolation mounted gear box on cutting unit is drive by PTO shaft. Power is
transmitted to the blades by one hex “AA” section belt. Spindle shafts are 1 in.
(25 mm) diameter and supported by 2 greaseable, tapered roller bearings.
Cutting Unit Blades
Three 21-3/4 in. (55.2 cm) long and 1/4 in. (6 mm) thick heat-treated, steel
recycling blades
Castor Wheels
Front and rear castor wheels have 8 in. (203 mm) x 3-1/2 in. (89 mm) hard rubber
tires and roller bearings.
Cutting Unit Lift Independent lift arms and hydraulic weight transfer provide deck flotation.
Weight 340 lb. (154 kg)
Note: Specifications and design subject to change without notice.
Optional Equipment
Spindle Assembly Part No. 95-3081
Blade and Belt Kit Part No. 95-3073
Castor Wheel Part No. 85-5760
Castor Wheel Set (set of 4 wheels) Part No. 95-3076

8
Setup
Loose Parts
Note: Use this chart as a checklist to ensure that all parts have been received. Without these parts, total setup cannot be
completed.
Description Qty. Use
Front castor wheel assembly 2 Installing the front castor wheel assemblies
Rear castor wheel assembly
Spacers
Thrust washers
2
12
4
Installing the rear castor wheel assemblies
Right-hand lift arm
Left-hand lift arm
Pivot pin assembly
Cotter pin, 5/32 x 1-3/4 in.
1
1
2
2
Mount to the traction unit pivot brackets
Capscrew, 7/16 x 3 in.
Flat washer, 7/16 in.
Flange nut, 7/16 in.
4
4
4
Connecting the lift arms to the cutting unit
Tee fitting
Straight fitting
Elbow fitting
Short hydraulic tube
Long hydraulic tube
Manifold block assembly
Manifold bracket
Flange head capscrew, 5/16 x 5/8 in.
Locknut, 5/16 in.
Spacer
Flat washer
Capscrew, 1/4 x 4 in.
45° fitting
Straight fitting
Hydraulic hose
Hose clamp
Hydraulic hose
Hose clamp
1
1
1
1
1
1
1
4
2
2
2
2
1
1
1
2
1
2
Installing the manifold block
Parts catalog
Certificate of Conformance
1
1
Operator’s Manual 1 Read before operating the machine.

9
Danger
If the engine is started and the PTO shaft is
allowed to rotate, serious injury could result.
Do not start the engine and engage the PTO lever
when the PTO shaft is not connected to the gear
box on the cutting unit.
Installing the Castor Wheel
Assemblies
The thrust washers, spacers, and tensioning caps have been
installed on the castor wheel spindles for shipping. The
thrust washers and spacers included in the loose parts are
for the rear castor wheel assemblies.
1. Remove the tensioning caps from the spindle shafts and
slide off the spacers and thrust washers (Fig. 1 and 2).
1
2
2
3
4
Figure 1
1. Tensioning cap
2. Thrust washers
3. Spacers
4. Front castor spindle
2. Slide the spacers onto the castor spindle to get the
desired height-of-cut; refer to the Height-of-Cut Chart
on page 15. Slide a thrust washer onto the spindle, push
the round castor spindle through the front castor arm,
and the hex castor spindle through the rear castor arm.
Install another thrust washer and the remaining spacers
onto the spindle and install the tensioning cap to secure
the assembly.
Important The thrust washers, not the spacers, must
contact the top and bottom of the castor arm.
Note: Determine the left and right sides of the machine
from the normal operating position.
3. Ensure that all four castor wheels are set at the same
height-of-cut and roll the cutting unit off of the pallet.
1
2
2
3
4
Figure 2
1. Tensioning cap
2. Thrust washers
3. Spacers
4. Rear castor spindle
Installing the Lift Arms to the
Traction Unit
1. On one side of the traction unit, loosen (do not remove)
the wheel nuts securing the wheel and tire assembly to
the front wheel studs.
2. Jack up the machine until the front wheel is off of the
floor. Use jack stands or block the machine to prevent it
from accidentally falling.
3. Remove the wheel nuts and slide the wheel and tire
assembly off of the studs.
4. Mount a lift arm to the pivot bracket with a pivot pin
and cotter pin (5/32 x 1-3/4 in.) (Fig. 3). Mount the lift
arm with the ball joint end positioned outward.

10
5. Mount the rear of the lift arm to the lift cylinder with a
pivot pin and 2 cotter pins (supplied with the traction
unit).
1
2
3
4
Figure 3
1. Pivot pin
2. Lift arm
3. Lift arm pivot bracket
4. Brake return spring
6. Hook the brake return spring to the hole in the lift arm
(Fig. 3).
7. Install the wheel and tire assembly. Torque the wheel
nuts to 45–55 ft.-lb. (61–75 N⋅m).
8. Repeat the procedure on the opposite side of the
machine.
Connecting the Lift Arms to the
Cutting Unit
1. Move the cutting unit into position in front of the
traction unit.
2. Measure the distance from the end of each lift arm to
the center of the ball joint (grease fitting). The distance
should be 2 in. (51 mm) (Fig. 4). If distance is not 2 in.
(51 mm), loosen the jam nut securing the ball joint to
the lift arm and rotate the ball joint in or out until the
distance is attained. Do not tighten the jam nuts at this
time.
2 in.
(51 mm)
1
2
3
Figure 4
1. Lift arm
2. Ball joint
3. Jam nut
3. Move the lift lever to the Float position. Push the lift
arms down until the holes in the ball joint mounts line
up with the holes in the castor arms.
4. Secure the ball joint mounts to each castor arm with 2
capscrews (7/16 x 3 in.), flat washers (7/16 in.), and
flange nuts (7/16 in.). Position the flat washers to the
outside of the castor arm (Fig. 5).
Note: The ball joint mount should be above the castor arm
when it is assembled.
1
2
3
4
5
6
Figure 5
1. Castor arm
2. Ball joint mount
3. Ball joint
4. Capscrew
5. Washer
6. Flange nut

11
5. Tighten the large jam nut securing the ball joint to the
lift arm (Fig. 5). When tightening the jam nut, hold the
ball joint straight to permit proper oscillation during
raising and lowering of the cutting unit.
Connecting the PTO Shaft to
the Cutting Unit Gear Box
1. Remove the 2 capscrews and lock washers securing the
PTO guard mounting brackets to the gearbox (Fig. 6).
Retain the fasteners for future installation.
2. Slide the PTO shaft guard onto the PTO shaft,
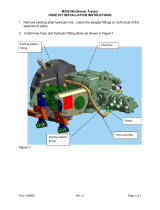
positioning the guard as shown in Figure 6.
1
2
Figure 6
1. PTO guard 2. Gear box
3. Slide the male PTO shaft into the female PTO shaft.
Align the mounting holes in the gear case input shaft
with the holes in the PTO shaft and slide them together.
1
2
2
3
4
Figure 7
1. PTO shaft
2. Bolts and locknuts
3. Gearcase input shaft
4. Roll pin
4. Secure them with a roll pin.
5. Tighten the capscrews and nuts.
6. Attach the PTO shaft guard to the gearbox with the 2
capscrews and lock washers previously removed.
Mounting the Counterbalance
Manifold
1. Place a drain pan under the lift valve on the right side of
the machine.
2. Move the lift lever to the Float position. Make sure that
the cutting unit is lowered all of the way to the floor.
3. Remove the hose clamps securing the hoses to the
three-way fitting at the rear of the lift valve. Remove
the hoses.
4. Loosen the 2 capscrews securing the lift valve to the
frame channel (Fig. 8).
1
2
4
3
5
Figure 8
1. Lift valve
2. Straight fitting
3. Elbow fitting
4. Short hydraulic tube
5. Long hydraulic tube
5. Remove the three-way fitting and o-ring from the rear
of the lift valve.
Important Before instaling any hydraulic fittings,
make sure that the o-rings are lubricated with hydraulic oil
and positioned correctly.
6. Install a new straight fitting and o-ring into the rear of
the lift valve (Fig. 8).
7. For the Groundsmaster 200 series only, disconnect the
return line from the bottom of the lift valve (the line
that goes to the radiator). Remove the elbow fitting
from the lift valve.
8. For the Groundsmaster 1000L only, disconnect the
return line from the bottom of the lift valve (the line
that goes to the oil cooler). Remove the barb fitting
from the lift valve.
9. Install a new elbow fitting and o-ring into the bottom of
the lift valve (Fig. 8).

12
10.Loosely install the short hydraulic tube to the straight
fitting on the rear of the lift valve (Fig. 8).
Note: The ends of hydraulic tubes with the tape on them
are to be installed to the lift valve fittings.
11. Loosely install the long hydraulic tube to the elbow
fitting on the bottom of the lift valve (Fig. 8).
12.Mount the manifold block assembly to the manifold
bracket with 2 flange head capscrews (5/16 x 5/8 in.)
(Fig. 9). Torque the screws to 145–190 in.-lb.
(16–21 N⋅m).
1
4
3
2
Figure 9
1. Manifold block
2. Short hydraulic tube
3. Long hydraulic tube
4. Manifold bracket
13.Loosely install the other end of the short hydraulic tube
to the elbow fitting on top of the manifold block
(Fig. 9).
14.Loosely install the other end of the long hydraulic tube
to the straight fitting on the front of the manifold block
(Fig. 9).
15.Using the lower set of holes in the right side frame
member, mount the manifold bracket with 2 flange head
capscrews (5/16 x 5/8 in.) and locknuts (Fig. 10).
Figure 10
16.Tighten the fittings securing both ends of the hydraulic
tubes to the lift valve and manifold block.
17.Tighten the capscrews securing the lift valve to the
frame channel.
18.Mount the hoses to the new tee fitting with the hose
clamps removed, as shown in Figure 11.
1
Figure 11
1. Tee fitting
19.For the Groundsmaster 200 series only, route the
hydraulic hose, previously removed from the elbow
fitting on the bottom of the lift valve, to the rear of the
right front engine mount and connect it to the OUT port
elbow fitting on the side of the manifold block
(Fig. 12).

13
Note: For the Groundsmaster 223. the OUT port elbow
fitting on the side of the manifold block must be rotated
180.
20.For the Groundsmaster 1000L series only, remove the
relief valve from the G1 port and the 90° fitting from
the OUT port on the side of the manifold block. Install
the relief valve in the G1 port and install the barb
fitting, removed from the bottom of the lift valve, in the
OUT port of the manifold block.
21.For the Groundsmaster 1000L series only, cut off
11-1/2 in. (29.2 cm) of the hose, previously removed
from the barb fitting on the bottom of the lift valve, and
attach it to the barb fitting in the OUT port of the
manifold block. Secure it with a hose clamp.
1
2
3
Figure 12
1. Hydraulic hose
2. Straight fitting
3. 90° fitting
22.Place a drain pan under the rear of the transmission.
Note: On traction units equipped with an oil filter adapter
on the rear of the transmission, use steps 23–27. Other
machines use steps 28–33.
23.Remove the large and small plug from the right side of
the transmission oil filter adapter.
24.Install a 45° fitting into the transmission oil filter
adapter. Position the fitting so that the opening points
toward the manifold block (Fig. 13).
1
2
3
Figure 13
1. Transmission oil filter
adapter
2. 45° fitting
3. Straight fitting
25.Install a straight fitting into the transmission oil filter
adapter (Fig. 13).
26.Install the hydraulic hose to the 90° fitting on the front
of the manifold block and the straight fitting on the oil
filter adapter with 2 hose clamps.
27.Cut the remaining hydraulic hose to a length of 8-3/4 in.
(22.2 cm). Install the hose to the 90° fitting on the
bottom of the manifold block and the 45° fitting on the
oil filter adapter with 2 hose clamps.
28.Disconnect the left and right lift cylinder hoses and
return hose from the cross fitting on the bottom of the
transmission (Fig. 14).
Note: Steps 29–31 are not required on machines with serial
numbers greater than 30001.
29.Remove the cross fitting from the transmission
(Fig. 14).
Note: A special new cross fitting, Part No. 92-5640, is not
included in the loose parts. It must be purchased from your
Authorized Toro Distributor.
30.Install the new special fitting (Part No. 92-5640) into
the bottom of the transmission (Fig. 15). Position the
fitting so that the side with the two openings points
toward the right side of the machine.
31.Install the lift cylinder hoses and return hose to the new
cross fitting. Position the hoses as shown in Figure 15.
32.Install the hydraulic hose to the 90° fitting on the front
of the manifold block and the remaining opening on the
side of the cross fitting with 2 hose clamps. Reposition
the 90° fitting, as required, for the hose connection.

14
33.Install the remaining hose to the 90° fitting on the
bottom of the manifold block and the remaining
opening on the cross fitting with 2 hose clamps.
Reposition the 90° fitting, as required, for the hose
connection.
34.Replenish the oil in the transmission, as required.
1
2
3
4
Figure 14
1. Cross fitting
2. Right lift cylinder hose
3. Left lift cylinder hose
4. Return hose
1
3
4
6
5
2
Figure 15
1. Cross fitting (92-5640)
2. Right lift cylinder hose
3. Left lift cylinder hose
4. Return hose
5. Hose to manifold block
6. Hose to manifold block
Note: The test port is used to check the hydraulic circuit
pressure. Check the pressure with the lift lever in the Float
position, the engine running at high idle, and the hydraulic
oil at its normal operating temperature (Fig. 16). Contact
your local Toro distributor for assistance.
Normal counterbalance setting is 100 psi (689 kPa).
1
2
Figure 16
1. Adjusting screw 2. Test port
Note: The counterbalance has been preset at the factory and
should not require adjusting. Rotating the manifold screw
to increase or decrease pressure will increase or decrease
the counterbalance (Fig. 16).
Installing the Rear Weight
Two Wheel Drive Groundsmaster 1000 and 200 Series
traction units comply with the ANSI B71.4-1999 Standard
when equipped with rear weight. Refer to the chart in the
traction unit Operator’s Manual to determine the
combinations of weight required. Order the parts from your
local Authorized Toro Distributor.
Four Wheel Drive Groundsmaster 200 Series traction units
do not need additional rear weight to comply with the
ANSI B71.4-1999 Standard.

15
Before Operating
Checking the Lubricant in the
Gear Box
The gear box in designed to operate on SAE 80–90 wt. gear
lube. Although the gear box is shipped with lubricant from
the factory, check the level before operating the cutting
unit.
1. Position the machine and cutting unit on a level surface.
2. Remove the dipstick/fill plug from the top of the gear
box (Fig. 17) and make sure that the lubricant is
between the marks on the dipstick. If the lubricant level
is low, add enough lubricant until the level is between
the marks.
1
Figure 17
1. Dipstick/fill plug
Adjusting the Height-of-Cut
The height-of-cut is adjustable from 1-1/2 to 4-1/2 inches
(38 to 114 mm) in 1/2 inch (13 mm) increments, by adding
or removing an equal number of spacers on the front and
rear castor forks. The following height-of-cut chart gives
the combinations of spacers to use for all height-of-cut
settings.
Height-of-Cut
Setting
Spacers Below Castor Arm
Setting
(inches)
Front Rear
1-1/2 (38 mm) 0 0
2 (51 mm) 1 1
2-1/2 (64 mm) 2 2
3 (76 mm) 3 3
3-1/2 (89 mm) 4 4
4 (102 mm) 5 5
4-1/2 (114 mm) 6 6
Start the engine and raise the cutting unit so that the
height-of-cut can be changed. Stop the engine after the
cutting unit is raised.
Note: 1 in. (25 mm) height-of-cut can be attained by
modifying the castor forks as follows:
1. Remove the front and rear castor forks from the cutting
deck and remove the wheels from the forks.
2. Drill out the 7/16 in. diameter holes (Fig. 18 and 19) in
each side of the castor forks to 1/2 in. or 33/64 in.
diameter.
3. Using the new holes, install the castor wheels on the
forks and install the forks to the deck.
Note: The height-of-cut decal will now be off by 1/2 in.
(13 mm) for spacer placement and the height-of-cut will be
1 to 4 in. (25 to 102 mm).
Front Castor Wheels
1. Remove the tensioning cap from the spindle shaft and
slide the spindle out of the front castor arm (Fig. 18).
Remove the washer from the spindle shaft. Slide the
spacers onto the spindle shaft to get the desired
height-of-cut, then slide the washer onto the shaft.

16
4
1
2
3
5
Figure 18
1. Front castor wheel
2. Tensioning cap
3. Spacers
4. Thrust washers
5. 7/16 in. diameter hole
2. Push the castor spindle through the front castor arm,
install the other thrust washer and remaining spacers
onto the spindle, and install the tensioning cap to secure
the assembly.
Rear Castor Wheels
1. Remove the tensioning cap from the spindle shaft
(Fig. 19).
3
1
5
2
4
Figure 19
1. Rear castor wheel
2. Tensioning cap
3. Spacers
4. Thrust washers
5. 7/16 in. diameter hole
Note: The rear castor fork assembly does not need to be
removed from the castor arm to change the height-of-cut.
2. Remove or add ”C” shaped spacers at the narrow
portion of the spindle shaft, below the castor arm, to get
the desired height-of-cut. Make sure that the thrust
washers, not the spacers, contact the top and bottom of
the castor arm.
3. Install the tensioning cap to secure the assembly.
4. Ensure that all four castor wheels are set at the same
height-of-cut.
Adjusting the Rollers
Note: If the cutting unit is to be used in the 1 or 1-1/2 in.
(25 or 38 mm) height-of-cut setting, the cutting unit rollers
must be repositioned in the top bracket holes.
1. Remove the cotter pins securing the roller shafts to the
underside of the deck.
2. Slide the shafts out of the lower bracket holes, align the
rollers with the top holes, and install the shafts.
3. Install the cotter pins to secure the assemblies.
Adjusting the Skids
Adjust the skids by removing the flange nuts, positioning
the skids at the desired position, and installing the flange
nuts (Fig. 20).
1
Figure 20
1. Skid

17
Adjusting the Deck Baffles
1. Loosen the fasteners securing the front and side baffles
to deck straps (Fig. 21).
1
Figure 21
1. Baffles
2. Adjust the baffles to the desired height and tighten the
mounting fasteners.
Note: Make sure that the baffles are level and not bent. A
bent baffle could affect the quality of cut.
Greasing the Cutting Unit
Before the cutting unit is operated, it must be greased to
ensure proper lubricating characteristics; refer to Greasing
the Bearings, Bushings, and Gear Box, page 19. Failure to
properly grease the cutting unit will result in premature
failure of critical parts.
Operation
The use of protective equipment, such as but not limited to,
for eyes, ears, feet, and head is recommended.
This machine produces sound levels in excess of
85 dBA at the operator’s ear and can cause
hearing loss through extended periods of exposure.
Wear hearing protection when operating this
machine.
Caution
1
2
Figure 22
1. Caution 2. Wear hearing protection
Operating Tips
Mow When Grass is Dry
Mow either in the late morning to avoid the dew, which
causes grass clumping, or in late afternoon to avoid the
damage that can be caused by direct sunlight on the
sensitive, freshly mowed grass.
Select the Proper Height-of-Cut Setting to
Suit Conditions
Remove approximately 1 inch (25 mm) or no more than 1/3
of the grass blade when cutting. In exceptionally lush and
dense grass you may have to raise your height-of-cut
setting another notch.
Mowing in Extreme Conditions
Air is required to cut and recut grass clippings in the
mower housing, so do not set the height-of-cut too low or
totally surround the housing by uncut grass. Always try to
have one side of the mower housing free from uncut grass,
allowing air to be drawn into the housing. When making an
initial cut through the center of an uncut area, operate the
machine slower and back up if the mower starts to clog.

18
Mow at Proper Intervals
Under most normal conditions you will need to mow
approximately every 4–5 days. But remember, grass grows
at different rates at different times. This means that in order
to maintain the same height-of-cut, which is a good
practice, you will need to cut more frequently in early
spring; as the grass growth rate slows in mid summer, cut
only every 8–10 days. If you are unable to mow for an
extended period due to weather conditions or other reasons,
mow first with the height-of-cut at a high level; then mow
again 2–3 days later with a lower height setting.
Always Mow with Sharp Blades
A sharp blade cuts cleanly and without tearing or shredding
the grass blades like a dull blade. Tearing and shredding
causes the grass to turn brown at the edges which impairs
growth and increases susceptibility to diseases.
Stopping
If the machine has to be stopped while cutting, a clump of
grass clippings may be deposited on the lawn. Follow this
procedure for stopping while cutting:
1. With the deck engaged, move onto a previously cut
area.
2. Shift to neutral, move the throttle control lever to the
Slow position, and rotate the ignition key to Off.
After Operating
To ensure optimum performance, clean the underside of the
mower housing, especially around the inserts (kickers),
after each use. If residue is allowed to build up in the
mower housing and on the inserts, cutting performance will
decrease.

19
Maintenance
Recommended Maintenance Schedule
Maintenance Service
Interval
Maintenance Procedure
After first 2 hours • Tighten the castor wheel nuts.
After first 10 hours
• Tighten the castor wheel nuts.
• Torque the blade bolts.
Daily
• Check the blades.
• Lubricate the castor arm bushings.
• Lubricate the castor wheel bearings.
Every 50 hours
• Tighten the castor wheel nuts.
• Torque the blade bolts.
• Lubricate the grease fittings.
• Clean under the cutting unit belt covers.
• Check the blade drive belt adjustment.
• Check the gear box oil level.
Every 400 hours • Change the gear box oil.
Note: Determine the left and right sides of the machine
from the normal operating position.
If you leave the key in the ignition switch, someone
could accidentally start the engine and seriously
injure you or other bystanders.
Remove the key from the ignition switch before
you do any maintenance.
Caution
Greasing the Bearings,
Bushings, and Gear Box
The cutting unit must be lubricated regularly. If the
machine is operated under normal conditions, lubricate the
castor bearings and bushings with No. 2 general purpose
lithium base grease or molybdenum base grease after every
8 hours of operation or daily, whichever comes first.
1. Lubricate the following areas:
• front castor spindle bushings (Fig. 23)
• rear castor spindle shaft (remove shaft from castor
arm and coat the hexagonal shaft with designated
grease every 50 hours) (Fig. 24)
• castor wheel bearings (Fig. 23 and 24)
• blade spindle bearings (Fig. 25)
• right and left push arm ball joints (Fig. 25)
Figure 23

20
Figure 24
Figure 25
2. Position the machine and cutting unit on a level surface
and lower the cutting unit. Remove the dipstick/fill plug
from the top of the gear box (Fig. 26) and make sure
that the lubricant is between the marks on the dipstick.
If the lubricant level is low, add SAE 80–90 wt. gear
lube until the level is between the marks.
1
Figure 26
1. Fill/check plug
Separating the Cutting Unit
from the Traction Unit
1. Position the machine on level surface, lower the cutting
unit to the floor, move the lift lever to the Float
position, shut the engine off, and engage the parking
brake.
2. Remove the capscrews, flat washers, and locknuts
securing the ball joint mounts to the castor arms on the
cutting unit (Fig. 27).
1
2
Figure 27
1. Castor arm 2. Ball joint mount
/