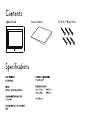
RAB Lighting HALVS10L930-FG2-CU/LC/E2 Operating instructions
- Type
- Operating instructions

INSTRUCTIONS
HALV Indoor Architectural-Grade LED Wall Sconce
RAB Lighting is committed to creating high-quality, aordable, well-designed and energy-ecient LED lighting and controls that make it easy for electricians to install
and end users to save energy. We’d love to hear your comments. Please call the Marketing Department at 888-RAB-1000 or email: mark[email protected]
IMPORTANT
READ CAREFULLY BEFORE INSTALLING FIXTURE. RETAIN THESE INSTRUCTIONS FOR FUTURE REFERENCE.
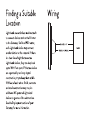
WARNINGS:
• Make certain power is OFF before installing or maintaining fixture. No user serviceable parts inside.
• To prevent wiring damage or abrasion, do not expose wiring to edges of sharp objects.
CAUTION:
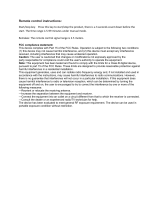
• This fixture supports the following protocols – Triac and ELV at 120V ONLY. For 0-10V dimming, connect purple wire to the
V+ DIM lead and the grey wire to the V-DIM lead. This fixture is damp listed and suitable for indoor applications on walls.
Driver is 120V – 277V and 50Hz or 60 Hz
.
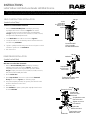
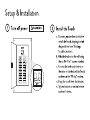
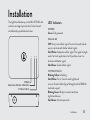
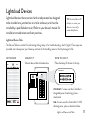
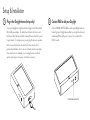
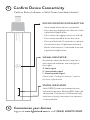
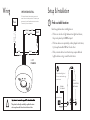
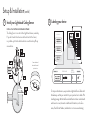
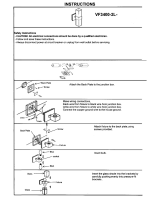
HALV
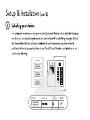
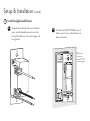
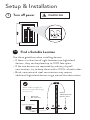
Mounting the fixture on a standard 4 x 4 J-BOX.
This fixture is damp listed and suitable for indoor applications
on walls
driver/LED mounting
driver/LED assembly
DO NOT
TOUCH THE LEDsFigure 1
Driver/LED
Wall Plate
‘S’ hook
Driver/LED Assembly‘S’ hook
Figure 1a
Driver/LED Assembly
(standard models)
‘S’ Hook Notch
Wall Plate
Driver/LED
Assembly
DO NOT TOUCH LEDs
Driver/LED
Screw Keyhole
Wire Hole
Driver/LED mounting screws
‘S’ Hook
‘S’ Hook
‘S’ Hook

INSTRUCTIONS
HALV Indoor Architectural-Grade LED Wall Sconce
RAB Lighting is committed to creating high-quality, aordable, well-designed and energy-ecient LED lighting and controls that make it easy for electricians to install
and end users to save energy. We’d love to hear your comments. Please call the Marketing Department at 888-RAB-1000 or email: mark[email protected]
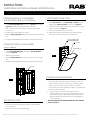
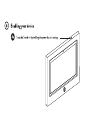
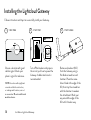
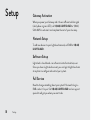
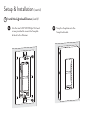
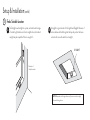
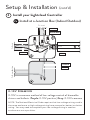
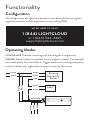
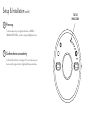
Wall box is installed before sheetrock.
Driver/LED/Wall plate
Figure 1
Hanger
Nailer BarsFigure 2
Nailer Bars
Nailer Bars
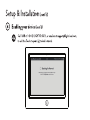
Wall box is installed after sheetrock.
Driver/LED/Wall plate
Figure 1
Hanger
Nailer Bars
Stop BracketsSheetrock
ClampsFigure 3
Wall Box
Wall Box
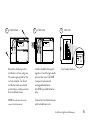
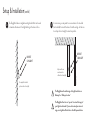
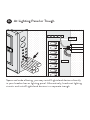
`
Hanger
Sheetrock Clamp
Stop Bracket
after relocation.
Move both
Stop Bracket screw
after relocation
Stop Bracket
before relocation
Stop Bracket screw
before relocation
Nailer Bar
Tighten to secure
in sheetrock
Hanger
Driver/LED/Wall
plate assembly
DO NOT TOUCH LEDs
Insert
screwdriver
though hole to
loosen screw
4 places
Hanger
Nailer bar
Stop Bracket
Discard for new
work install
Tighten this locating screw
to hold box in place
(models w/wall box)
(models w/wall box)

INSTRUCTIONS
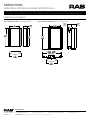
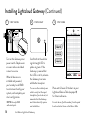
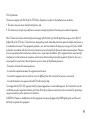
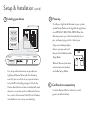
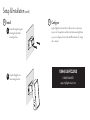
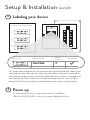
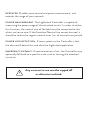
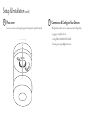
DO NOT OPEN THE FIXTURE TO CLEAN THE LEDs. DO NOT
TOUCH THE LEDs
Lens FrameDriver/LED assembly
mounting screwFigure 5
Figure 5
Driver / LED Assembly
DO NOT TOUCH LEDs
Mounting Screw
Lens Frame
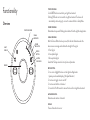
Note: These instructions do not cover all details or variations in equipment nor do they provide for every possible situation during installation, operation or maintenance.
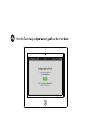
Driver/LED/Wall plateHanger Bracket
Figure 4
Hanger Bracket
Driver/LED/Wall plateHanger
Figure 4
Hanging Bracket
(with E2, E2/MVS, E2/BL, or LC/E2 Options)
(with LC option)
Hanger

INSTRUCTIONS
HALV Indoor Architectural-Grade LED Wall Sconce
RAB Lighting is committed to creating high-quality, aordable, well-designed and energy-ecient LED lighting and controls that make it easy for electricians to install
and end users to save energy. We’d love to hear your comments. Please call the Marketing Department at 888-RAB-1000 or email: mark[email protected]
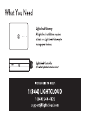
Easy Answers
rablighting.com
Visit our website for product info
Tech Help Line
Call our experts - 888 722-1000
e-mail
Answered promptly - [email protected]
Free Lighting Layouts
Answered online or by request
© 2019 RAB LIGHTING Inc.
Northvale, New Jersey 07647 USA
LENS FRAME ASSEMBLY MODELS WITH BACK BOXLENS FRAME ASSEMBLY STANDARD MODELS
-
HALVLED-IN 0119 RAB WARRANTY: RAB’s warranty is subject to all terms and conditions found at rablighting.com/warranty.


Page is loading ...
Page is loading ...
Page is loading ...
Page is loading ...
Page is loading ...
Page is loading ...
Page is loading ...
Page is loading ...
Page is loading ...
Page is loading ...
Page is loading ...
Page is loading ...
Page is loading ...
Page is loading ...
Page is loading ...
Page is loading ...
Page is loading ...
Page is loading ...
Page is loading ...
Page is loading ...
Page is loading ...
Page is loading ...
Page is loading ...
Page is loading ...
Page is loading ...
Page is loading ...
Page is loading ...
Page is loading ...
Page is loading ...
Page is loading ...
Page is loading ...
Page is loading ...
Page is loading ...
Page is loading ...
Page is loading ...
Page is loading ...
Page is loading ...
Page is loading ...
Page is loading ...
Page is loading ...
Page is loading ...
Page is loading ...
Page is loading ...
Page is loading ...
Page is loading ...
Page is loading ...
Page is loading ...
Page is loading ...
Page is loading ...
Page is loading ...
Page is loading ...
Page is loading ...
Page is loading ...
Page is loading ...
Page is loading ...
Page is loading ...
Page is loading ...
Page is loading ...
Page is loading ...
Page is loading ...
Page is loading ...
Page is loading ...
Page is loading ...
Page is loading ...
Page is loading ...
-
 1
1
-
 2
2
-
 3
3
-
 4
4
-
 5
5
-
 6
6
-
 7
7
-
 8
8
-
 9
9
-
 10
10
-
 11
11
-
 12
12
-
 13
13
-
 14
14
-
 15
15
-
 16
16
-
 17
17
-
 18
18
-
 19
19
-
 20
20
-
 21
21
-
 22
22
-
 23
23
-
 24
24
-
 25
25
-
 26
26
-
 27
27
-
 28
28
-
 29
29
-
 30
30
-
 31
31
-
 32
32
-
 33
33
-
 34
34
-
 35
35
-
 36
36
-
 37
37
-
 38
38
-
 39
39
-
 40
40
-
 41
41
-
 42
42
-
 43
43
-
 44
44
-
 45
45
-
 46
46
-
 47
47
-
 48
48
-
 49
49
-
 50
50
-
 51
51
-
 52
52
-
 53
53
-
 54
54
-
 55
55
-
 56
56
-
 57
57
-
 58
58
-
 59
59
-
 60
60
-
 61
61
-
 62
62
-
 63
63
-
 64
64
-
 65
65
-
 66
66
-
 67
67
-
 68
68
-
 69
69
-
 70
70
-
 71
71
-
 72
72
-
 73
73
-
 74
74
-
 75
75
-
 76
76
-
 77
77
-
 78
78
-
 79
79
-
 80
80
-
 81
81
-
 82
82
-
 83
83
-
 84
84
-
 85
85


RAB Lighting HALVS10L930-FG2-CU/LC/E2 Operating instructions
- Type
- Operating instructions
Ask a question and I''ll find the answer in the document
Finding information in a document is now easier with AI
Related papers
-
RAB Lighting LCDAYLIGHT Operating instructions
-
RAB Lighting VANLED20/LC Operating instructions
-
-
-
RAB Lighting HALV18L935-GL-CU/BL/E2 Operating instructions
-
-
-
RAB Lighting ALED4T150NW/D10/LC Operating instructions
-
-
RAB Lighting IVAT2-45LWM750GU/7PR/LC Operating instructions
Other documents
-
Guardian 303NTX-01 User manual
-
 Xiamen RQBK6 Operating instructions
-
RAB LCDIMMER User manual
-
Designers Choice Collection VF3400-1L-SN Operating instructions
-
 Designers Choice Collection VF3400-2L-CH Operating instructions
-
 Practical Magic Innovation G0916 User manual
-
Cree BA19-08050OMF-12CE26-1C100 User manual
-


