CB1220

dewert okin CB1220 Operating instructions

  • Hello! I am an AI chatbot trained to assist you with the dewert okin CB1220 Operating instructions. I’ve already reviewed the document and can help you find the information you need or explain it in simple terms. Just ask your questions, and providing more details will help me assist you more effectively!
Issuing Department :Bedding
Division
Creation
Time
2023-2-15
Functional test instruction
Creator
Gary
No
RF.60.10.01 Functional test instruction
Vision
1.0
Page 1 of 7
制作 Made by: 检查 Checked by: 确认 Confirmed by:
1 / 7
Design change record
Date
Release Note
Author
Approver
Signature
Post
2023-2-21
Draft
Gary
1.Test Production
Test ModelRF60 Test ModelCB1220
Product CodeRF. 61.10.01 Product CodeCB.12.20.02
Software VersionV1.0 Hardware VersionR6.210.00.530EC
Software VersionSWRF.12.20.02-
Fix Bluetooth Issues 20200120
Issuing Department :Bedding
Division
Creation
Time
2023-2-15
Functional test instruction
Creator
Gary
No
RF.60.10.01 Functional test instruction
Vision
1.0
Page 2 of 7
制作 Made by: 检查 Checked by: 确认 Confirmed by:
2 / 7
Test configuration list
Name
ORE Product Model
Reference
quantity
Head driver
B11359
2
Foot driver
B11360
2
DC Power cord
R5.216.01.055
2
AC Power cord
R5.522.01.250
2
Tap lights
R5.113.00.067
2
Sync cord
R5.408.00.002
1
Bluetooth
plug-in
1
power adapter
JLDP.10.023.000
2
2 Test Procedure
1.1. Power on the code pair
When the system is powered on, the control box The blue LED indicator is steady on,
the light strip blinks, and enters the code matching state. Run once Alignment
keyGreen LED indicator light is on, the light belt is off, and it enters the normal working
state. In the normal working state, long press the code key motor reset, let go of the
motor stop.
1.2. Code test procedure
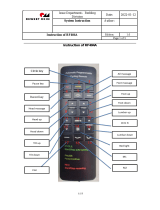
1For wired synchronization, double click on the control box KEYWhen the
blue LED light is on and the light belt is blinking, long press the head up and head down
buttons on the remote control, the backlight light of the remote control will blink. When
the blue LED of the control box is off, the green LED light is on, and the light belt is not
Issuing Department :Bedding
Division
Creation
Time
2023-2-15
Functional test instruction
Creator
Gary
No
RF.60.10.01 Functional test instruction
Vision
1.0
Page 3 of 7
制作 Made by: 检查 Checked by: 确认 Confirmed by:
3 / 7
blinking, the backlight light of the remote control is on, it indicates that the code is
successfully verified.
2For wireless synchronization, double click on the other control box KEYWhen
the blue LED light is on and the light belt is blinking, long press the foot up and foot down
buttons on the remote control, the backlight indicator of the remote control will blink.
When the blue LED of the control box is off, the green LED is on, but the light belt is not
blinking, and the backlight indicator of the remote control is on, it indicates that the code
matching is successful.
Note: Wireless synchronization needs to be completed in step 1 and 2, and wired
synchronization only needs to be completed in step 1. Wireless synchronization of the last
step of the operation, as long as you press any key on the remote control, the
corresponding action from the control box can be.
1.3. Head drive extension test
Click the head up button and hold it, the head driver is extended, and the action stops
when you release the button;
1.4. Head drive recovery test
Click the head down button and hold it, the head drive will be withdrawn, and the action
will stop when you release the button.
1.5. Foot driver extension test
Click the "foot up" button and hold it, the foot driver is extended, and the action stops
when you release the button;
1.6. Foot drive recovery test
Click the "foot down" button and hold it, the foot drive will be recovered, and the action
will stop when you release the button.
Issuing Department :Bedding
Division
Creation
Time
2023-2-15
Functional test instruction
Creator
Gary
No
RF.60.10.01 Functional test instruction
Vision
1.0
Page 4 of 7
制作 Made by: 检查 Checked by: 确认 Confirmed by:
4 / 7
1.7. FLAT test
Click the flat button, the head and foot drive synchronously run to the highest position,
press any key to stop the action;
1.8. ZERO G Position Test
Click the zero button, the head and foot drivers run synchronously to the preset ZERO G
position, and the action will stop when pressed by any key;
Head driver
Foot driver
Journey
6200ms
7300ms
1.9. M1 Position Test
Click M1 button, head and foot drive synchronously run to the preset M1 position, press
any key to stop the action;
Head driver
Foot driver
Journey
4000ms
10000ms
1.10. M2 Position Test
Click the M2 button, the head and foot drive synchronously run to the preset M2 position,
and the action will stop when pressed by any key;
Head driver
Foot driver
Journey
6000ms
14000ms
Issuing Department :Bedding
Division
Creation
Time
2023-2-15
Functional test instruction
Creator
Gary
No
RF.60.10.01 Functional test instruction
Vision
1.0
Page 5 of 7
制作 Made by: 检查 Checked by: 确认 Confirmed by:
5 / 7
1.11. Light belt test
Click Light belt button, light belt on, then click the light belt button, light belt off.
Light on delay 5 minutes to turn off (sample a test 5 minutes to turn off).
1.12. ZERO G location rememory test
Run the head and foot driver to the appropriate position, long press the zeroG button for
5s until the backlight led of the remote control flashes for about 1 second, and the control
box will set the current memory position to the zeroG position; Run the drive to another
location, and operating zeroG will return to the set location.
1.13. M1 location rememory test
Run the head and foot driver to the appropriate position, long press the M1 button for 5s
until the remote control backlight led flashes for about 1 second, and the control box will
set the current memory position to M1 position; Run the drive to another position, and
operation M1 will return to the set position.
1.14. M2 location rememory test
Run the head and foot driver to the appropriate position, long press the M2 button for 5s
until the backlight led of the remote control flashes for about 1 second, and the control
box will set the current memory position to the M2 position; Run the drive to another
position, and operation M2 will return to the set position.
1.15. Memory location is restored to factory Settings
Press and hold the ZERO and FLAT keys for 5s at the same time until the backlight led of
the remote control flashes, and the control box restores the zeroG memory position to the
factory setting position;
Issuing Department :Bedding
Division
Creation
Time
2023-2-15
Functional test instruction
Creator
Gary
No
RF.60.10.01 Functional test instruction
Vision
1.0
Page 6 of 7
制作 Made by: 检查 Checked by: 确认 Confirmed by:
6 / 7
1.16. Synchronous testing
Wire synchronization, after connecting the synchronization line, operate the motor and
lamp belt, and the motor can work normally in sync (from 2.3 to 2.15 step test); Wireless
synchronization, the distance between the two control boxes is not more than 5 meters,
the operation of the motor, the lamp belt can work normally.
Note: When the memory position is called from the FLAT position, the motor can run
normally to the theoretical Angle or theoretical stroke, and the error range is not more
than or 5mm; When pressing the button, the backlight indicator of the remote control is
steady on indicating the configuration of the driver for reference only
1.17. Standby power consumption
Less than 10uA
1.18. Flashlight test
Press and hold the flashlight button to open, open and close the flashlight
FCC warning
Any Changes or modifications not expressly approved by the party responsible for compliance
could void the users authority to operate the equipment.
This equipment has been tested and found to comply with the limits for a Class B digital device,
pursuant to part 15 of the FCC Rules. These limits are designed to provide reasonable protection
against harmful interference in a residential installation. This equipment generates, uses and can
radiate radio frequency energy and, if not installed and used in accordance with the instructions,
may cause harmful interference to radio communications. However, there is no guarantee that
interference will not occur in a particular installation. If this equipment does cause harmful
interference to radio or television reception, which can be determined by turning the equipment off
and on, the user is encouraged to try to correct the interference by one or more of the following
measures:
• Reorient or relocate the receiving antenna.
• Increase the separation between the equipment and receiver.
Connect the equipment into an outlet on a circuit different from that to which the receiver is
Issuing Department :Bedding
Division
Creation
Time
2023-2-15
Functional test instruction
Creator
Gary
No
RF.60.10.01 Functional test instruction
Vision
1.0
Page 7 of 7
制作 Made by: 检查 Checked by: 确认 Confirmed by:
7 / 7
connected.
• Consult the dealer or an experienced radio/TV technician for help.
This device complies with part 15 of the FCC Rules. Operation is subject to the following two
conditions: (1) This device may not cause harmful interference, and (2) this device must accept
any interference received, including interference that may cause undesired operation.
IC RSS warning
This device complies with Industry Canada licence-exempt RSS standard (s). Operation is subject
to the following two conditions: (1) this device may not cause interference, and (2) this device
must accept any interference,including interference that may cause undesired operation of the
device.
ISED RSS Warning:
This device complies with Innovation,Science and Economic Development Canada licenceexempt
RSS standard(s). Operation is subject to the following two conditions: (1) this device may not
cause interference, and (2) this device must accept any interference, including interference that
may cause undesired operation of the device.
Le présent appareil est conforme aux CNR d'ISED applicables aux appareils radioexempts de
licence.
L'exploitation est autorisée aux deux conditions suivantes:
(1) l'appareil ne doit pas produire de brouillage, et
(2) l'utilisateur de l'appareil doit accepter tout brouillage radioélectrique subi, me si le
brouillage est susceptible d'en compromettre le fonctionnement.
/