
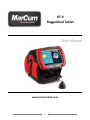
0
RT-9
Ruggedized Tablet
www.marcumtech.com

0
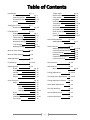
Introduction pg. 1-2
RT-9 Power System pg. 2
How to assemble pg. 2
Functions/Features pg. 2-3
Shuttle pg. 4
Turning the RT-9 on pg. 4
Home Screen pg. 4-5
RT-9 Operation pg. 5-6
Settings Menu pg. 6
General Settings pg. 6-7
Theme Settings pg. 7
Status Bar Settings pg. 7
Waypoints Settings pg. 8
Trails Settings pg. 8
Mapping Settings pg. 9-10
MarCum Sonar Settings pg. 10
MarCum Video Settings pg. 10
Adding Modules pg. 10
RT-9 Start up pg. 11-12
Adjusting Sonar pg. 12
Graph pg. 12
Graph Zoom pg. 12
Vertical pg. 13
Vertical Zoom pg. 13
Flasher pg. 13
Sonar Functions pg. 13
Range pg. 13
Auto pg. 13
Manual pg. 13
Dynamic pg. 13
Manual Dynamic pg. 13-14
Zoom pg. 14
Sensitivity pg. 14
Interference Rejection pg. 14-15
Cone Angle pg. 15
Target Adjust pg. 15
Bottom Enhance pg. 15
Color Palette pg. 15
Ping Rate pg. 15
Scroll Speed pg. 15
Transducer Offset pg. 15-16
Scale Color pg. 16
Scale Major Line pg. 16
Scale Minor Line pg. 16
Show Temperature pg. 16
Gain 1_2 pg. 16
Simulator pg. 16-17
Second Sonar Module pg. 16-17
Adding Modules pg. 17
Video Functions pg. 17
Adjusting Camera Settings pg. 17-18
Camera Panel Adjustments pg. 18
Camera Panning pg. 19
Recording pg. 19
Camera Display Options pg. 19
PanCam with RT-9 pg. 19
GPS Functions pg. 20
Map Features pg. 21
Misc. Map Information pg. 21
Fishing Applications pg. 22-23
Ice Fishing Sonar Applications pg. 23-24
Fishing Applications Camera pg. 24
Open Water Applications pg. 24
Two Year Warranty pg. 25
How to Obtain Service pg. 25
Contact Information pg. 26

1
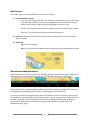
RT-9 Introduction
We’ve all heard the commercials telling us that since we spend 1/3 of our life in bed that you should have the
best mattress available.
What if I told you that for 1/3 of your life the lakes are frozen?
Ice anglers have it good today. There’s a few of us around here who can remember when ice fishing often meant
simply walking from shore a ways and drilling a hole. Are we out far enough? Is this where we caught them last
year? Only one way to find out--drill a hole, drop down a heavy weight, measure the depth by how many arm
lengths of line were out, then decide if this was the depth of water you were looking for. Not the right depth?
Well, let’s walk out another 50 yards and try again. Repeat as necessary, and then set up and fish, not even
knowing if there are even any fish down there. No shelter, no heater, no electronics of any kind. Seriously…how
did we do it?
Fast forward to today. You have spent many hours researching fishing locations on the internet. Perhaps
chatting online with other anglers, or maybe checking DNR websites, carefully choosing where you will spend
your time. All your equipment, from your pickup to your ice rods is the best available, as you have spent as much
time researching gear as fishing locations. The sun is just showing above the trees when you get to the lake, you
hook your sled to your ATV, flip on the GPS, and quickly head to an exact location, chosen weeks before. Maybe
you made a waypoint in that location last summer. Once you arrive at the icon, a quick check of the depth
confirms this is the right location, so you punch a few holes with your power auger, and within minutes your
shelter is set up, the heat is on, electronics are fired up, and the lines are in! Ice fishing in style!
The RT-9 will help you every step of the way, from before the lakes are frozen until after you return from a
successful venture onto the frozen waters. We are confident in saying that the RT-9 has the most impressive
array of technology ever to hit the ice. For starters, it’s an Android tablet, capable of browsing the internet via
Wi-Fi, so you can log in to your favorite message board using your locator! The RT-9 has built in GPS with
Navionics mapping capability, so it will help you navigate right to where you want to fish, as well as study other
lake maps. The Sonar in the RT-9 is the best there is, and with many different configurations, your biggest
decision will be deciding which one suits you best. Fortunately it is easy to switch things up. That’s a good thing,
because there is an underwater panning camera option as well. You can even download games, music, books or
video for when the fish aren’t biting. And it doesn’t stop there—let’s not forget that there is built-in recording
too, so you can capture the action digitally and share it with your online buddies later to complete the circle.
The RT-9 can be purchased as a tablet only, or as a Tablet and Sonar combo. The sonar system that will not only
help you navigate to the spot, but will show the depth and fish on sonar, and allow for you to watch all the
action in real time with the optional camera! Below are some of the advanced features on the RT-9.
o Built in GPS, Navionics® compatible
o It will get you to the spot
o Create and save waypoints
o Modular additions allow the use of multiple sonar and underwater cameras
o Marcum Digital Series Sonar
o Displays the depth, the fish, and your lure on sonar
o Allow you to observe the action in true® time on the optional camera
o Allow for screen recording of GPS, sonar, video, and screenshots to share your catch

2
o Compatible with Marcum PanCam systems
o Browse the internet through Wi-Fi
o Add music, movies, and games for when the fish aren’t biting
Once you have immersed yourself in the interface, it is very intuitive how to change your display and settings.
This user’s guide is meant to be a quick start guide and due to auto formatting functions, it is not possible to
explain every setting, configuration, or actions that may occur when certain combinations are activated. It is
strongly recommended that you become familiar with the basic functions before venturing out with the system.
Understanding the power system of your RT-9
The RT-9 can be purchased as a tablet only, or as a combo unit including a battery and sonar module. There are
different options available for charging your unit. With the tablet only, you will charge your unit by using our
wall charger adapter that is included. If you have the combo unit, you will have two ways to charge your internal
battery. The RT-9 combo is powered by an internal lithium battery that can be charged by an external 12 volt
battery. The internal battery, when fully charged, will power the tablet for about 90 minutes. To recharge the
battery, you must have the tablet in the docking cradle with the power cord hooked up to an external battery.
You can also charge the internal and external batteries by connecting the unit to the wall charger. Be sure to
recharge your external battery after each outing. Always make sure that the tablet is securely in the docking
cradle and that the pins on the cradle are in contact with the power/charging port on the tablet. A lightning bolt
in the battery icon at the top of the home screen indicates that the internal battery is charging. All functions and
settings are controlled via The RT-9’s unique touchscreen.
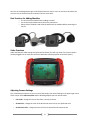
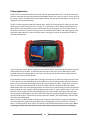
How to assemble
Your RT-9 comes virtually ready to fish, you only need to connect the modules you would like to use and hook
up to the battery. Please allow 24 hours for the first charge on your external 12 volt battery.
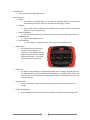
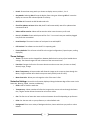
Functions/Features
o Power Button
Press the Power Button to turn the unit on.
Once ON, a long press of the Power Button will give you three options; Power OFF, Airplane
Mode ON/OFF, and Silent Mode ON/OFF
Once powered ON the RT-9 can be put into SLEEP MODE with a short press of the Power Button.
The unit can resume activity with another short press. The unit will automatically enter SLEEP
MODE after 15 minutes of inactivity, and power off.
o Touch screen LCD

3
o 3 panel display
Up to 3 panels can be displayed at once
o AV access panel
Sd slots
Insert Navionics mapping chips, or micro SD cards, (to download data), and save your
videos and/or pictures to. The micro SD card must be 32 gig or smaller.
USB port
This port will accept a USB mini-micro standard. You can export videos or photos from
the RT-9 to your computer here.
External HDMI port
You can send the signal from your RT-9 to an external monitor (like a big screen TV)
Headphone jack
Plug in your headphones here
Volume Buttons
Push the gray (–) button to lower volume and (+) to raise the volume
o Module Ports
The module ports are where you
connect your transducer [s] or
camera [s]. Three modules may be
used at once, but only two may be
of the same function. To connect
you will need a flat screwdriver.
o Power port
The tablet’s internal battery is charged by the power port. To charge, the gold pins from
the docking cradle must be in contact with the power port on the back of the tablet. You
will know you are connected when a lightning bolt displays in the battery icon at the top
of the home page.
o Docking Cradle
There are two tabs on the front of the docking cradle that the RT-9 will lock into to
charge.
o Cradle release button
Press the Red button on the back of the RT-9 tablet to release from the docking cradle.

4
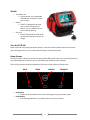
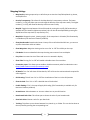
Shuttle
o Transducer arm
The transducer arm is adjustable
and holds the transducer in place
over ice hole.
o Battery
The RT-9 is designed to be used
with a 12 volt 9 amp external
battery. This is in addition to the
internal lithium battery.
o Soft pack
Your RT-9 should be secured inside
the soft pack whenever you are not
using it.
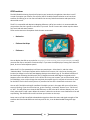
Turn the RT-9 ON
Power up the RT-9 by pressing the power button on the front of the machine and a lock screen will
open. Swiping the lock icon in any direction will lead you to the Home Screen.
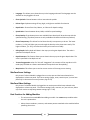
Home Screen
The Home screen is where you will launch apps, and the Marcum RT-9 app. You can place shortcuts to
any selected Apps to the home screen, as you would your desktop of your computer.
There are four buttons towards the bottom of the home screen to become familiar with:
o Back button
Arrow icon at the bottom of the screen allowing you to go to previous screen
o Home Button
This building shaped icon is pressed to return to the Home Screen
BACK
HOME
LAUNCH
MINIMIZE

5
o Launch Button [apps] button (button has 6 dots inside of a circle)
Pressing the Launch button reveals the desktop and app icons.
When first selecting the Marcum RT-9 app, it is recommended to drag the
shortcut to your home page by holding the icon down and releasing on home
page where you prefer it to be located.
A Safety Warning and End User License agreement will display when you
open the RT-9 app. Press “I Agree” to continue.
o Minimize
This button allows you to quickly select between multiple Apps that are open
The top of the home screen has the below icons:
o GPS Indicator
The GPS icon in the upper left hand corner of the screen will be blinking when searching
for a satellite; and a solid white circle when a satellite signal has been found. (GPS icon
will only show after MarCum RT-9 app has been opened)
o Wi-Fi signal indicator
The Wi-Fi indicator is blue when connected to a Wi-Fi network (Wi-Fi icon will only show
when Wi-Fi is turned on)
o Battery Charge Indicator
This shows if the internal battery is being charged by the external battery
o Clock
Will display the time according to preferences; settings for date and time can be changed
by swiping down on the icons to access the Settings menu
Most of the RT-9 tablet settings can be adjusted by pressing and holding, then swiping down on icons in
the upper right hand corner to gain access to the Settings menu.
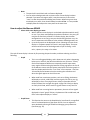
MARCUM RT-9 OPERATION
When you open up the RT-9 app for the first time you should see a black background with a few visible
icons. When the RT-9 is searching for satellites, there will be a red satellite icon in the upper right
corner. Once the RT-9 has acquired a GPS signal, the red satellite icon will disappear, and the indicator in
the upper left corner of the home screen will stop blinking, and become a solid white circle.

6
There will be a red circle “Record” icon in the upper right corner. By touching this button, you will be
able to start a recording. When a recording is in progress, a blue square will appear. Pressing the blue
square icon will stop recording.
You will also see a “Settings” button in the upper right corner. By pressing this you are able to access a
wide variety of settings to customize the RT-9 app to your exact specifications.
Along the bottom of the screen there is info displayed in what is called the Status Bar. The following
data is displayed here:
o Bearing: The direction the unit is moving, expressed in degrees as on a compass
o Speed: The ground speed the unit is moving
o Location: Expressed in Latitude / Longitude
o Battery: The percentage of battery you have left in the internal battery
(Note: the colors of the status bar text can be changed to your preference; see Status Bar settings, pg. 7)
Settings Menu:
To access all of the RT-9 general settings start by pressing the Settings button in the upper right corner.
This will open a menu with the following selections:
General Settings:
o Units: Standard or Metric units depending on your preferences
o Full screen: Turning this on will eliminate data at the top of the screen, and will increase the
display size

7
o Panels: Choose how many panels you choose to display at once, either 1, 2 or 3
o Stay Awake: Selecting ON will keep the display from timing out. Selecting OFF will cause the
display to time out after selected period of inactivity
o GPS Filter: Will smooth out GPS breadcrumb trails
o Check for Updates on Start: When ON, the RT-9 will automatically search for updates when
connected to Wi-Fi
o Videos will be saved to: Videos will be saved to either internal memory or SD card
o Port 1, 2, 3 Enable: Choose which ports will be “live”—be sure to have your modules plugged
into ports that are enabled
o Panel Overlays: The actual numbers of each panel is turned ON/OFF
o RT9 Version: The software version the RT-9 is operating with
o Factory defaults: This will return the RT-9 to the original configuration (2 panels open, nothing
displayed)
Theme Settings:
o Theme: The theme can be changed from between Default and a variety of pre-loaded theme
settings. The theme changes the color schemes of the menus and icons.
o Font Size: Changes the font size for menu selections and on screen icons; choices are Small,
Normal, Large, X-Large
o Menu Transparency: A lower number will allow the image on the screen to show through the
Menu, a higher number will make the map more easily visible (scale of 0-255)
o Menu Font Color: Allows you to change the color of the menu’s font
Status bar Settings: Controls the information displayed along the bottom edge of the screen in the
Status bar, (Bearing, Speed, Location, and Battery)
o Show: Hide or show the status bar
o Transparency: A lower number will allow the image on the screen to show through the Status
Bar; a higher number allows the status bar to be more visible
o Size: The font size of status bar items can be set between 10 and 32 depending on preference
o Color: Set the text color to your preference, or select Default color
o Background: There are a variety of background colors, choose which one you prefer or select
Default

8
Waypoints Settings
o There are two ways to create a Waypoint
1. In the GPS panel, press the ‘Waypoint’ icon in the lower right corner of the map. This
will create a Waypoint at your current location
2. Press and hold with your finger on the map where you would like to create a Waypoint.
o Cancel navigation: If you have selected “Go to Waypoint”, this will cancel the operation and
remove the bold navigation line.
o Waypoint 1, 2, etc.
Pressing a waypoint will open a new submenu
Name: Choose a name for your waypoint
Color: Change the color of the waypoint icon on the map
Go to Waypoint: This shows with a bold line where the waypoint is relative to
the cursor and the distance between them
Show Waypoint: Shows where on the map the waypoint selected is located
Latitude/Longitude: The precise location of the waypoint in degrees of
Latitude/Longitude
Time: This shows the date and time the waypoint was created
Delete Waypoint: Deletes an unwanted waypoint
Trails Settings
o Current Trail: Trail that is currently showing
o New Trail: Start a new trail by pressing this icon
o Trail Color: Choose the color you would like the trail to be on the display
o Trail 1, 2, etc.
Pressing the Trail [trail 1, 2, etc.] will open a submenu specific to that Trail’s information
and settings
Name
The name of the trail can be changed here
Date and Time
Displays the Date and Time the trail was created
Count
This shows how long your trail is by showing the number of
breadcrumbs are on the trail
Show
Allows the trail to be turned on/off and visible or hidden on the map

9
Mapping Settings
o Map Overlay: Having map overlay on will allow you to view the Free/Follow/North Up, Home,
and 2D/3D icons
o Overlay Transparency: This allows for the Map Overlay’s transparency to be set. The lower
numbers, (i.e. 50), will allow you to see through the Overlay to the map more easily. The higher
numbers, (i.e. 255), will allow the Overlay to be seen more vividly.
o Map 3D: Toggle the map between 3D and 2D mode by turning this on/off, (3D functionality is
available only for Navionics Platinum products); this can also be accomplished by pressing the
2D/3D box on the map itself (if map overlay is on)
o Map Pitch: Changes the pitch, (viewing angle), of the map when in 3D mode (This functionality
is available only for Navionics Platinum products)
o Show Breadcrumbs: Breadcrumbs leave a history of the trail behind the GPS icon, you can turn
on/off to have them visible or hidden
o Show Waypoints: Waypoint viewing can be set to ‘On’ or ‘Off’ for visibility on the map
o Fish Mode: View more detailed Lake maps showing more contour lines and depths
o Easy View: Increases the size of fonts and icons via a zoomed in display
o Show Tide: Turning ‘On’ or ‘Off’ will enable or disable views of current tides
o Community Layer: This allows you to enable or disable community edits from Navionics users
(http://www.navionics.com/en/community-edits).
o All Details: Turn ‘On’ will show all Chart details; ‘Off’ will show the minimum details required for
safe navigation
o GPS Drawing: This will turn ‘On’ or ‘Off’ the visualization of the icon in the GPS position
o Show Sea Bed: Turn ‘On’ or ‘Off’ a detailed view of the Sea Bed
o Enable Shading: If ‘On’, the map will apply 3D shading. (This functionality is available only for
Navionics Platinum products)
o Arrow Picture: Select between an Arrow or a Boat icon as your GPS marker
o Breadcrumb Path Color: This allows you to choose the color of your breadcrumbs
o Goto Path Color: Choose a color for your Goto Path
o Tracking: This allows you to choose between Free, North Up, or Follow. This can also be done on
the map itself by pressing the corresponding icon.

10
o Language: This allows you to draw the map in the language selected. The language must be
available on the plugged in SD card.
o Chart Symbols: Choose between USA or International symbols
o Palette Type: 3 palette settings of Day, Night, or Bright are available for selection
o Depth Units : Choose from Feet, Meters, or Fathoms for depth readings
o Speed Units: Choose between Knots, MPH, or KPH for speed readings
o Photo Overlay: If top-down pictures are available Photo Overlay will draw the map with the
specified setting. (Top-down pictures are only available with Navionics Platinum products)
o Photo Transparency: This allows for the Photo Overlay’s transparency to be set. The lower
numbers, (i.e. 50), will allow you to see through the Overlay to the photo more easily. The
higher numbers, (i.e. 255), will allow the Overlay to be seen more vividly.
o Safety Depth: Safety depth will draw in the map up to the given depth value. The value is
specified in the depth unit set.
o Depth Contours: This feature allows you to draw in the map up to the given depth value. The
value is specified in the depth unit set.
o Texture Exaggeration: when ‘On’ this will “exaggerate” the contours of the map when in 3D
mode (only available as a feature with Navionics maps that have 3D capability)
o Map Version: This allows you to see the current version of the map you are viewing
MarCum Sonar Settings
Only shows if a Sonar Module is plugged into an active port and has been selected to be
displayed on at least one panel. Your sonar settings [range, zoom, sensitivity etc.] are set here.
(More info in the section on sonar functions; Pgs.13-17)
MarCum Video Settings
Only shows if a Camera Module is plugged into an active port and has been selected to be
displayed on at least one panel. The camera settings [color, contrast, etc.] are set here. (More
info in the section on adjusting camera settings; Pgs. 17-20)
Best Practices for Adding Modules
o The unit must be turned OFF when adding a module. You cannot swap modules when
the unit is powered on.
o Always have transducers, cameras, and camera panners attached to the modules before
powering the unit on.

11
RT-9 Start up
On the initial start-up, there will be two panels enabled. There will be a “1” in the lower left corner,
pressing this will allow you to control the content of panel 1. There will also be a “2” in the bottom
center of the screen, pressing this will allow control the content of panel 2. If the same content for two
adjacent screens is selected, the selection will seamlessly fill both screens. In the SETTINGS menu panels
can be added or subtracted. To open a third panel, go into SETTINGS and under PANELS select “3”.
Press one of the panel numbers for that corresponding Panel menu to open.
o Change Panel Source
Exactly what will be shown will depend on which modules are installed on the
ports, and which ports they are in. There can be a module in each port, but only
two may be the same. (i.e. 2 Sonar modules or 2 camera modules) A sonar
module in port 1 will show in the Panel Source Menu as “Marcum Sonar: 1”; a
sonar module in port 2 will show in the Panel Source Menu as “Marcum Sonar:
2”. A camera module in Port 3 will show as “SD Camera: 3”
o Navionics map
Allows either the stock map or a downloaded Navionics map chip to show
o Picture
Allows a stock or saved image to show, this is a nice option for a background
when using sonar or for occupying an empty panel. To display sonar over a
picture select Sonar first, and then choose a background picture.
o Solid Color
Set the background to a solid color of your preference. This option is only
available for Sonar mode. Select Sonar first and then choose the background
color you would like. Solid Color will not work with a Map or Camera displayed
in the panel.
o SD Camera
Selecting this will allow video to be viewed in that panel.
This option is only available if a camera module is attached to one of the ports.
o Marcum Sonar
Selecting this will allow that panel to display the Sonar you have chosen.
This option is only available if a sonar module is attached to one of the ports.

12
o None
The panel will remain blank with no features displayed.
You can select a background color or picture after a sonar display has been
selected. If you want to change a panel, it may be necessary to first select
“none” to clear the panel before adding new content. When using more than
one display on a panel, Sonar should always be selected first. It is not possible
to display video and map on the same panel at the same time.
How to adjust the Marcum SONAR
o Select which sonar display you want
With 5 different sonar displays it can be hard to decide on which one[s]
to use. If you have used traditional mechanical flashers in the past, you
may like the familiarity of the RT-9’s flasher display, but the other
configurations are so easy to use you should really give them a try. Be
sure to experiment with different color palettes and backgrounds, too.
Up to three panels can be displayed at once. Selecting the same sonar
display on 2 adjacent panels will result in one large display. The sonar
can be overlaid on one of the backgrounds of your choosing—solid
color, a picture, the map, or live video.
The style of Sonar display is chosen by first pressing the panel number, and then selecting one of the
following:
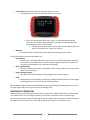
o Graph
This is a scrolling graph display, and it shows not only what is happening
below you in real time, but will also enable the user to have a “history”
of what has happened. While most commonly used for open water,
many anglers are discovering the benefits of using a graph on the ice. All
of the Marcum sonars with this feature stand apart from other graphs in
that they display with ultra-fast “True-Time” sonar response – less than
.02 seconds passes between the echo reaching the transducer and
when the signal appears on the LCD screen.
When used from a stationary position, such as ice fishing, the bottom
will display as a thick, solid band, but other signals, like fish or your jig,
will display as lines of varying thickness. Always remember that the
thicker the band, the stronger the signal. A large fish is likely to display
as a fairly thick band, while a small ice jig will show as a very fine line.
When used from a moving boat in open water, the user will see signals
displayed in classic “graph” fashion; the bottom will be a solid band, and
fish or other objects display as “arches”.
o Graph Zoom
This functions the same as the Graph display, but allows for a magnified
view of a selected portion of the water column. You can adjust the
zoom window by entering SETTINGS and changing your preferences.
(See Zoom; pg. 14)

13
o Vertical
Sometimes referred to as a “Showdown” display, this one is very easy to
interpret—top is the top, bottom is the bottom. Anything in between
the top and bottom is weeds, fish, or your lure.
o Vertical Zoom
Same as Vertical, but allows for a magnified view of a selected portion
of the water column. The ZOOM window can be adjusted by entering
SETTINGS to change your preferences. (See Zoom; pg. 14)
o Flasher
This Sonar window will read much like a traditional flasher-style display.
Signals are displayed as various colored lines on the dial, and the
different colors represent different signal strengths.
Sonar Functions
Once the style of sonar has been selected, the following adjustments can be made by first pressing
SETTINGS in the upper right corner of the screen, and once the menu bar appears on the left, selecting
Marcum Sonar [if using more than one sonar module, each module can be adjusted separately].
o RANGE – The Marcum RT-9 has nine different fixed ranges, as well as the ability to create
custom ranges using the Dynamic Depth features. Pressing the RANGE button in the SONAR
SETTINGS menu will open up a sub-menu with four different range options.
AUTO – Selecting AUTO will put the RT-9 into a “search mode” where it will detect the
bottom and automatically lock into one of the nine fixed ranges [10, 20, 40, 60, 80, 120,
180, 240, and 300]. This is a feature that allows you to simply turn on the unit and begin
fishing. To enter Auto Range, select RANGE, and then highlight “Auto” and the RT-9 will
automatically lock into the appropriate depth range. For instance, in 32 feet of water,
the RT-9 will lock into the 40 foot range. In 45 feet of water the RT-9 will automatically
lock into the 60 foot range.
MANUAL – Selecting MANUAL will allow the user to decide which fixed range is
displayed. Select RANGE, then MANUAL, and use the arrows to move to the desired
depth range.
DYNAMIC – This Marcum exclusive feature functions similarly to the “Auto Range”, but
fine tunes your range setting even farther. The Dynamic Depth will maximize the space
on your display by utilizing a variable range that will always be just slightly deeper than
the actual depth. For example, if you were fishing in 23 feet of water, the Dynamic
Depth feature will automatically create a custom range of 0 - 26 feet. Similarly, if you
were in 29 feet of water, the Dynamic Depth range will be 32 feet. The Dynamic Depth
range will not go shallower than 10 feet.
MANUAL DYNAMIC – This function allows the user to select the depth range. For
instance, say you start out in AUTO range and you quickly learn that the water is 21 feet
deep. The AUTO range will have selected the 0-40 foot range. To fine tune your display,

14
press the RANGE button, and highlight MANUAL DYNAMIC. Now start pressing the
UP/DOWN buttons to get to the desired DYNAMIC DEPTH range. If the water is 21 feet
deep, you would select 22 feet. Now the DYNAMIC DEPTH has created a 0–22 foot
range, utilizing virtually 100% of your display.
We offer the manual range functions because in some circumstances the AUTO range functions can
behave erratically, especially in situations where there is heavy weed growth, uneven bottom contours,
large schools of fish, or very shallow water. If erratic behavior is encountered in these circumstances,
the user should manually select a fixed range. We recommend Ice Fishing in a Manual range selection.
o Zoom
First, activate one of the Zoom displays [vertical zoom or graph] by pressing the panel
number, then Marcum sonar, then the Zoom display of your choosing. Now press the
settings button in the upper right corner, then press Marcum sonar. A menu window
will open, and pressing zoom will open the zoom sub-menu. Pressing auto will put the
unit into bottom lock zoom mode, where it will automatically lock onto the bottom and
display a selected portion of the water column above it.
Manual Zoom will allow the user to zoom in on any portion of the water column. Select
“Zoom Mode” and then choose “Manual”. Once “Manual” has been selected, choose
the size of zoom window that you prefer [5’, 10’, 20’, 40’].
Next, choose the zoom depth. This number will determine the uppermost portion of the
water column that will be displayed. For example, if a 10-foot zoom window is chosen
and the zoom depth is set for 21 feet, the portion of the water column starting at 21
feet and going down to 31 feet will be zoomed.
o Sensitivity
Controls the amount of sensitivity required by the unit to pick up objects like bottom,
weeds, fish, or lures and jigs. The lower the number, the less sensitivity; conversely
higher numbers mean more sensitivity. Can be used in conjunction with Target Adjust to
fine tune your display to your preferences.
o Interference Rejection
The Interference Rejection system is designed to suppress signals from other sonar units
being used within close proximity. When other sonar units are causing interference to
the display, activate the IR feature by pressing the right arrow to the desired level.
Interference is indicated by unusual signals or clutter flashing or scrolling across your
display.
The correct level of IR will be achieved when the display is clear of display clutter. In
some extreme cases, clutter will be greatly reduced but not totally eliminated.
Anytime two or more sonars are being operated in proximity to each other, there is the
potential for interference. Deep water and hard bottom will increase the likelihood that
one or more of the competing sonars will experience interference. Besides
experimenting with different levels of IR, the anglers experiencing interference can also

15
try having their transducers set at different levels, switching to narrow cone angles, and
reducing gain or sensitivity settings.
o Cone Angle
To switch between a 20 degree and 8 degree cone angle, simply select CONE ANGLE,
and then change to your preferred cone angle. A feature unique to all Marcum Digital
Sonars is the “Sonar Footprint” that displays the actual area being covered by your
transducer while you are fishing. This data is displayed near the top of the screen, and
represents the diameter of the base of the transducer cone. This will keep you
constantly updated how much area is being covered by your RT-9, and will help you
decide which transducer angle best suits the conditions. When first turned on, it will be
transmitting utilizing the 20-degree setting.
Conditions where the narrow beam (8 degree cone) will benefit you are:
1 — fishing in deep water (over 40’)
2 — fishing along very steep drop-offs for bottom-hugging walleyes
3 — fishing in big schools of fish, like suspended crappies
4 — fishing in and around heavy weeds or standing timber
5 — when fishing in a crowd, the narrow beam will reduce interference
o Target Adjust
This feature allows the angler to change the size of the signals being displayed without
increasing the sensitivity. The TARGET ENHANCE feature will give you the smallest signal
size at “0”, and the signals displayed will get thicker as you increase the TARGET
ENHANCE. This feature should be used in conjunction with the sensitivity to fine-tune
your display. Those who have a hard time seeing, as well as those who fish from a
standing position will really appreciate the “TARGET ENHANCE” feature
o Bottom Enhance
This feature allows you to enhance your bottom reading to distinguish between a
potential target and the bottom.
o Color Palette
The six color palette is the RT-9 default, but there are other options to experiment with.
If you experience excessive clutter, switching to a three-color palette may clear it up.
o Ping Rate
Allows for controlling the pulse rate of the transducer. Default is “4”, in shallow water
you may find lowering the ping rate improves performance.
o Scroll Speed
The larger the number, the faster your signals will move across the screen in Chart
Mode. Slowing the speed down allows you to see the “history” for longer.
o Transducer Offset
Use this to offset the distance your transducer is below the water line to get a true
depth reading. If the transducer is a half-foot below the water line, setting the

16
Transducer Offset to “.5” [1/2 foot] will compensate for the distance below the
waterline.
o Scale color
Choose the color of the text of the sonar data; this will change the color of the numbers
o Scale Major Line
The depth indexes along the edge of the sonar display are there to help you better
interpret your signals. The color of the major depth index lines are adjusted here, we
suggest a bold color for this setting. This also changes the color of the Zoom Window
Indicator on the Vertical Sonar Display.
o Scale Minor Line
The minor lines are the incremental lines in between the major lines. You can adjust the
color of these here; we suggest a color that will contrast with the major lines.
o Show Temperature
Temperature can be displayed here when the optional Open Water Universal
Transducer is being used. The Ice transducer DOES NOT have a temperature sensor, and
won’t give temperature readings.
o Gain 1_2
The RT-9 has two different Gain modes, Gain 1 and Gain 2. When this is set to OFF it will
be set to Gain 1; when set to ON it will be set to Gain 2. Each gain setting will have a
different power output and will change the readings on your sonar screen. Experiment
with each gain setting to find the one that works best for you in your current conditions.
o Simulator
The RT-9 has a simulator mode that will portray a variety of different depths and signal
returns. Activating this feature enables the user to experiment with the various settings
without actually being on the water. This simulator represents an open water
experience, so the depths and signals will change as it goes through the simulation.
The user may also experiment with settings by getting the RT-9 to get a bottom reading
off a bare tile or cement floor. Position the RT-9 with the transducer hanging motionless
about 2 feet above the tile or cement floor and then turn the sensitivity up to the
maximum [25] setting. If the transducer is 2 feet above the floor, there will be a bottom
reading at approximately 8.5 feet [the unit is calibrated to be accurate in water, not
air!]. If the transducer is raised and lowered, the bottom signal should move in a
corresponding manner. Many will find it is easier to learn the various functions while
experimenting in this way as a “manual simulator”.
Second Sonar Module
You may elect to get a second sonar module. This will allow you to have two transducers deployed at
once. The RT-9 can be displayed on different panels with Transducer #1, displayed in one panel, and
Transducer #2 displayed in another. Place the RT-9 in between you and your fishing partner and you can
both watch the same screen. Take it one step farther and have a camera down a third hole; you can

17
have this as the background to give a live feed of the entire area, or set it to monitor a third hole. You
can even use the Camera Panner to rotate across the entire area.
Best Practices for Adding Modules
o The unit must be turned off when adding a module
o You cannot swap modules when the unit is powered on
o Always have transducers and cameras attached to the modules before powering the
unit on
Video Functions
Under the Marcum Video settings the below will be found: (This will only show if you have a camera
module plugged into an active port and have selected it to be displayed on at least one panel.)
Adjusting Camera Settings
First, select Marcum Camera on one or more of the Panels, then select Settings in the upper right corner
of the screen. Select Marcum Video and the following adjustments can now be made:
o Font Color –change the color of text from a variety of choices
o Arrow Color—change the color of the directional arrow icon to your preferred color
o Arrow Circle Color—change the color of the circle around the directional arrow

18
o Fit Panel—video will better fit into the panel
o Maintain Aspect Ratio—video will be displayed as large as possible, yet still maintain aspect
ratio
o Center Video in Panel—video will be vertically centered in the panel. Experiment with all three
settings to find which suits your needs; it can change depending on how many panels you are
displaying the camera in.
o On Screen Display/OSD— Turn On/Off your On Screen Displays (Temperature, Depth, Direction)
o Show Panning Arrows—Panning arrows at the bottom of the screen can be set On/Off. Panning
arrows will move the camera in the corresponding direction in 1 degree increments.
o Overlay Transparency—changes the transparency of the on screen display data
o OSD Offset [degrees] change to camera direction offset if the calibration of the directional
arrow has become inaccurate by entering the degrees you need it changed. Entering 90 will
move the arrow one quarter of the dial in a clockwise direction. Use a negative number to move
it in a counter-clockwise direction.
o Brightness—adjust the brightness level of the video display
o Contrast—Contrast is the difference in brightness between lightest and darkest tones in a
picture. Adjust the contrast to the desired setting for the best picture quality.
o Color Saturation— increasing the color saturation will increase the vividness but can make the
picture look darker overall. Decreasing the color saturation will make the colors look washed out
and gray.
o Color Kill—eliminates color viewing; creates a black and white picture; can allow for a better
quality picture in low light environments
o Calibrate Manta Compass—if your calibration is off you may have to recalibrate. This menu
feature will have you manually turn the camera in one direction two complete revolutions to
calibrate.
Camera Panel Adjustments (these adjust the on screen camera settings)
o Sync—press Sync if your camera ever has a split screen or has choppy performance or any lag
o Light—turn the light ON/OFF by pressing the light bulb shaped icon
o Panning Arrows—these arrows will pan the camera in one degree increments in their
corresponding direction (Must be turned on via ‘Show Panning Arrows’; see above)
Page is loading ...
Page is loading ...
Page is loading ...
Page is loading ...
Page is loading ...
Page is loading ...
Page is loading ...
Page is loading ...
-
 1
1
-
 2
2
-
 3
3
-
 4
4
-
 5
5
-
 6
6
-
 7
7
-
 8
8
-
 9
9
-
 10
10
-
 11
11
-
 12
12
-
 13
13
-
 14
14
-
 15
15
-
 16
16
-
 17
17
-
 18
18
-
 19
19
-
 20
20
-
 21
21
-
 22
22
-
 23
23
-
 24
24
-
 25
25
-
 26
26
-
 27
27
-
 28
28


Marcum Technologies RT-9 2.0 User manual
- Type
- User manual
- This manual is also suitable for
Ask a question and I''ll find the answer in the document
Finding information in a document is now easier with AI
Related papers
-
 Marcum Technologies LX series User manual
-
 Marcum Technologies LX-7 User manual
-
 Marcum Technologies LX-9L User manual
-
 Marcum Technologies MX-7GPS User manual
-
 Marcum Technologies PanCam User manual
-
 Marcum Technologies LX-i User manual
-
Marcum Technologies M1 User manual
-
Marcum Technologies M3 User manual
-
Marcum Technologies M5 User manual
-
 Marcum Technologies Lithium Shuttle User manual


Other documents
-
MARCUM M5LR User manual
-
 Blue Wave Boats MS-57 User manual
-
 MARCUM M1X User manual
-
MARCUM PHDL User guide
-
Lowrance HDS LIVE User manual
-
Lowrance HDS Carbon Operating instructions
-
MARCUM M5X User manual
-
 Eyoyo Portable 7 inch LCD Monitor Fish Finder User manual
-
Lowrance electronic NMEA 2000 User manual
-
MARCUM Pursuit SD User manual


