Page is loading ...

LX-7L
Digital Sonar
www.MarCumTech.com
User Manual

www.MarCumTech.com
- 2 -
INTRODUCTION
Congratulations on purchasing the MarCum Digital Sonar—the most advanced ice sonar system
available. When MarCum was founded over a decade ago, we all knew that our original flashers
were just the beginning. Every step of the way, we have been designing improving, building
momentum. This momentum keeps us in nearly perpetual motion, on the vanguard of innova-
tion, with our competition forever in our rear-view mirror. We’re glad you’ve joined us in the front
seat. While our existing product lines have always beat the competition in every category, up
until now there has always been room for lively discussion as to the merits of various systems.
These discussions will now come to a stop as we usher in a new era in ice fishing electronics:
The MarCum Digital Sonar. These units are the most advanced ice fishing sonars ever
designed, and now that you own one, you’re about to see why.
With a customizable dashboard display, superior target separation, 12-level interference
rejection, dual-beam transducer, adjustable zoom, and much more, the MarCum Digital Sonar is
the perfect combination of macro features and micro precision.
FEATURES
LCD monitor
Dual-Beam Transducer—Quickly switch between 20-degrees and 8-degree
Rugged transport shuttle with extendable transducer arm
Padded nylon soft pack offers the ultimate in protection
Protective clear shield
Rechargeable 12-volt 10-amp Lithium LiFePO4 Battery
3-amp Hour Rapid-charge Battery Charger
2-year warranty
User-friendly fully adjustable zoom
Dashboard display keeps the angler updated with critical information
Five different sonar windows to choose from, display up to three at once
Silent operation
GETTING STARTED
Ice System Set-Up
Your Digital Sonar comes virtually ready to fish. Open the top cover of the soft pack, loosen the
knobs and the monitor can now be positioned how you want it. Once the monitor is positioned,
tighten the knobs again to hold the monitor in place.
Look behind the monitor and hook up the Digital Sonar’s power cord to the battery. While you are
at it, remove the entire unit from the soft pack so you can see exactly how everything
connects—this makes it easier down the road if you ever need to change a battery or transduc-
er. Your Digital Sonar is delivered with a Rechargeable 12-volt 10-amp Lithium LiFePO4 Battery
that is charged 70%, so you can take it fishing right away. Even though the battery comes with a
charge on it, due to storage time or other factors it may not be fully charged when you get it, so if
you are not going fishing immediately you should hook up the charger to make sure the battery
has a full charge. To charge the battery, see below. The MarCum Digital Sonar will operate for up
to 18 hours on a fully charged battery. If you are going to be in a situation where you will want to
use your system for more than 18 hours without recharging, having a second, fully charged
battery with you is cheap insurance that will allow you to get full use out of your system for the
duration of your trip.
Inside the MarCum Digital Sonar’s soft case is an electronics shuttle that has compartments for
the battery and the dual beam transducer, as well as a transducer arm. The adjustable transduc-
er arm allows for maximum flexibility in positioning the Digital Sonar around the ice hole and can

- 3 -
even be moved to the other side of the shuttle.
Using the MarCum Digital Sonar can be as simple as turning it on—the factory settings will come
on automatically and allow you to use the Digital Sonar in the most popular configuration.
Be sure to explore all the options available to customize your Dashboard Display. With five
different sonar portals, four color palettes, two cone angles, and a myriad of other settings, there
are many possibilities. Changing your settings is easily done on the fly but experimenting while
using the simulator at home will help you learn the “flow” of the menu and settings.
Battery Charging
Your MarCum system comes with a 3-stage battery charger. This style of charger has proven to
be the most effective and easiest to use of all charging systems available. Because this is a
3-stage charger, there is no danger of overcharging your battery. When properly cared for, a
LiFePO4 battery will last for 2000 charge cycles. Batteries are made to be used, and they need
to be used to make the most of them. The most important thing you can do is to promptly
recharge your battery after each use. Not charging your battery immediately after use is the
number one thing that leads to battery failure.
For safety reasons, it is recommended that you place your system on a flat, hard surface like
cement or tile when charging it, away from any flammable materials. Be sure to disconnect the
charger from the wall when not in use and avoid leaving your battery hooked up to the charger
for extended periods of time.
When you get home from a trip, put your battery on charge right away and leave it there
overnight, or for around 4-6 hours. Likewise, on the night before an ice fishing trip, put it on the
charger again to ensure a charge. Again, there is no danger of overcharging your battery. We
often talk to people who hesitate to charge their battery after each use for fear that the battery
will develop a “memory” and this will lead to a shortened run time—THIS IS FALSE!!! ALWAYS
CHARGE YOUR BATTERY AFTER EVERY USE!!! Be sure, to use the charger that came with
your system, or a similar one that is between .5 amp. and 3 amp. Using a larger charger, like you
would use on a car, truck, RV, or boat is likely to cause damage to the battery. There is really no
danger of overcharging your battery with a low amp charger, and most chargers automatically go
into “maintenance mode” once a full charge has been achieved.
TO CHARGE YOUR BATTERY:
Your battery has a wiring harness attached to it that has “piggyback” terminals on it, enabling
you to keep the power cord from the unit attached to the battery always, as well as having the
wiring harness with receptacle for your charger attached always. To charge, simply couple the
end of the charger with the end of the wiring harness. It is normal for a green light to appear on
the charger now if the charger is plugged into the battery only. It is also normal for the light on
the charger to be green if it is just plugged into the wall. When it is plugged into the wall and
battery, you will see a red LED light appear on the charger. If the light is red, the battery is being
charged. When your battery is fully charged, this red light should change to green. If it is time to
go fishing and the light has not turned green, go fish and try to allow a longer charging period
next time.
Batteries are an expendable item and must be replaced periodically. The batteries that we use
are the “LiFePO4” variety, they are 12 volts 10 amps and have a life span of approximately 2000
charge cycles. The more amps the battery has, the longer it will run on a full charge. Your unit
can be powered off any battery that is 12 volts, even a large automotive or deep cycle battery. If
you are having difficulty with the charging process, please see the Charger Troubleshooting
section at end of the manual. If you need to remove the battery, slide the power cord leads from
the battery. Remove the strap that is holding the battery in place and lift the battery out.
www.MarCumTech.com

- 4 -
To replace the battery, place a new battery of similar specifications into the battery compartment
and secure it with the Velcro strap and re-connect the positive and negative terminals.
SETTING THE TRANSDUCER FOR ICE FISHING
When used in conjunction with the retractable pivoting transducer arm and rubber stopper, the
Digital Sonar’s transducer will automatically level itself in your ice hole. To begin operation, take
the transducer out of the recessed holder, and rotate the adjustable ice arm out from inside the
shuttle. Extend the transducer arm, (the cable should already be threaded through it with stopper
in place) and deploy the transducer into the water. We recommend setting your stopper to have
the transducer down the least amount possible. The MarCum Digital Sonar puts out enough
power that in most cases it is not necessary to have your transducer down more than a few
inches below the water line to get a good reading. When the ice thickness is over two feet, it
may be necessary to have your transducer set somewhat farther down.
Remember--the less transducer cable you have out, the easier it is to pull it out of the water
when bringing in a fish, or to move to a new location. Under no circumstances should you ever
have the transducer below the ice—this can lead to the transducer becoming damaged.
It is also important that you keep the cable near the center of the ice hole. We frequently hear
from anglers who allowed their cable to freeze into the side of the ice hole. If this should happen
to you, make sure the unit is turned off before attempting to chisel it out. If you accidentally cut
the transducer cable, do not try to use that transducer again.
MOVING THE TRANSDUCER TO A NEW LOCATION
Being mobile is one of the keys to being successful on the ice. Whenever you move from one
spot to another, it is tempting to leave your transducer hanging on the transducer arm. This is
likely to lead to failure of the transducer arm, and can cause damage to the transducer itself.
Always stow the transducer inside the pack when you are moving. Keeping the amount of
transducer cord you have out at a minimum will make transporting your Digital Sonar easier.
Similarly, you may need to quickly remove your transducer from the hole when about to land a
fish. We have seen anglers in a panic grab the shuttle itself and toss the entire unit to the side.
This is no way to treat any piece of electronics; a much better approach is to simply lift the
transducer out of your way by the cord, and the shuttle itself can be gently pushed aside.
Whenever you are moving via sled or vehicle, always fold up your transducer arm, stow the
transducer inside, and close the protective soft pack.
READING THROUGH ICE
The MarCum Digital Sonar will provide accurate information reading through ice providing the
ice is reasonably clear. Wet the ice with at least a cup of water to improve the coupling of the
transducer to the ice. Place the face of the transducer firmly on the wet ice, and you will now be
able to see the depth displayed digitally, and a signal showing the bottom (and fish) on whichev-
er sonar windows you have open. Drilling into the ice 1-2” before taking a reading may be
necessary if the surface of the ice is very rough, or if the ice is filled with air bubbles.
OPERATION
The MarCum Digital Sonar has many functions and settings that are selected or changed by
buttons on the Control Panel. Learning what each of the buttons (POWER, SENS, RANGE,
ZOOM, IR, CONE ANGLE, TARGET ADJUST, MENU/ENTER, UP, DOWN) does will enable you
to get the most out of your Digital Sonar. Note that you can experiment with different settings
and dashboard arrangements in SIMULATOR mode. Many of the selections will activate just by
highlighting your desired setting.
www.MarCumTech.com

- 5 -
CONTROL PANEL
The following is an explanation of each button on the control panel and what it does. Some of
the button functions can also be accessed in the main menu. Pressing any of the Control Panel
buttons will cause a window to open, enabling the user to make the desired adjustments. All
button function windows will time out after about 6 seconds. Any changes made to the settings
will activate when the MENU button is pressed, or after a few seconds without activity.
POWER - Press and hold this button for 2 seconds to turn your unit on or off.
SENS - The SENS (sensitivity) button controls the amount of sensitivity required by the unit to
pick up objects like bottom, weeds, fish, or lures and jigs. The lower the number, the less
sensitivity, conversely higher numbers mean more sensitivity. To adjust your sensitivity, first
press the SENS button and a bar will appear at the bottom of your display. Pressing the UP/
DOWN will adjust your sensitivity, and the sensitivity setting will now be digitally displayed on the
SENS gauge. The best SENS setting is achieved by turning up your sensitivity until you receive
a clear and steady bottom reading(start between 15 and 20). To see your lure or bait, turn up the
SENS some more until you just begin to display your bait without it fading or flickering on the
screen. The sensitivity will go up to 25, but you are likely to have it set considerably lower.
RANGE - The MarCum Digital Sonar has nine different fixed ranges, as well as the ability to
create custom ranges using the Dynamic Depth feature. Pressing the RANGE button on your
Digital Sonar will open a sub-menu with four different range options.
AUTO RANGE – Suggested for “Open Water” use. Selecting AUTO will put the Digital Sonar
into a sort of “search mode” where it will detect the bottom and automatically lock into one of the
nine ranges [10, 20, 40, 60, 80, 120, 180, 240, and 300]. This is a feature that allows you to
simply turn on the unit and begin fishing. To enter Auto Range, press RANGE, and use the UP
button to highlight “Auto”, and the Digital Sonar will automatically lock into the appropriate depth
range. For instance, in 32 feet of water, the Digital Sonar will lock into the 40-foot range. In 45
feet of water the Digital Sonar will automatically lock into the 60-foot range.
MANUAL RANGE – Suggested for “Ice Fishing” use. Selecting MANUAL will allow the user to
decide which fixed range they would like to have displayed. Highlight MANUAL, and arrow up or
down to the desired depth range.
DYNAMIC – Suggested for “Open Water” use. This MarCum exclusive feature functions similarly
to the “Auto Range”, but fine tunes your range setting even farther. The Dynamic Depth will
maximize the space on your display by utilizing a variable range that will always be just slightly
deeper than the actual depth. For example, if you were fishing in 23 feet of water, the Dynamic
Depth feature will automatically create a custom range of 0 - 25 feet. Similarly, if you were in 29
feet of water, the Dynamic Depth range will be 32 feet. The Dynamic Depth range will not go
shallower than 10 feet.
MANUAL DYNAMIC – Suggested for “Ice Fishing” use. This functions similarly to the DYNAMIC
DEPTH, but allows the user to select the depth range. For instance, say you start out in AUTO
range and you quickly learn that the water is 21 feet deep. The AUTO range will have selected
the 0-40 foot range. To fine tune your display, press the RANGE button, and highlight MANUAL
DYNAMIC. Now start pressing the UP/DOWN buttons to get to the desired DYNAMIC DEPTH
range. If the water is 21 feet deep, you would select 22 feet. Now the DYNAMIC DEPTH has
created a 0 – 22 foot range, utilizing virtually 100% of your display.
We offer the manual range functions because in some circumstances the AUTO range functions
can behave erratically. In situations where there is heavy weed growth, uneven bottom contours,
www.MarCumTech.com

- 6 -
or very shallow water, it is suggested that the user manually selects a fixed depth range.
ZOOM – The ZOOM button allows you to select the upper range of the portion of the water
column you would like to zoom in on. The actual size of the Zoom window can be adjusted in the
Main Menu. The Zoom feature allows you to focus the display on a specific depth within the
water column and can be a great benefit in a variety of fishing situations. See the separate
ZOOM section below for more info on the ZOOM. Whenever you are utilizing the ZOOM menu,
keep in mind that it “times-out” after 6 seconds.
IR (INTERFERENCE REJECTION) – The Interference Rejection system is designed to
suppress competing return signals from other sonar units being used within proximity. When
other sonar units are causing interference to the display of the Digital Sonar, activate the IR
feature by depressing the IR button located on the control panel of the Digital Sonar. Interfer-
ence is indicated by unusual signals flashing or scrolling across your display.
There are 12 levels, or channels, of interference rejection. Press the IR button once to open the
IR window, now use the UP/DOWN buttons to select the desired level of IR. The correct level of
IR will be achieved when the display is clear of display clutter. In some extreme cases, clutter
will be greatly reduced but not eliminated.
Anytime two or more sonars are being operated in proximity to each other, there is the potential
for interference. Deep water and hard bottom will increase the likelihood that one or more of the
competing sonars will experience interference. Besides experimenting with different levels of IR,
the anglers experiencing interference can also try having their transducers set at different levels,
going to narrow cone angles, and reducing gain or sensitivity settings.
CONE ANGLE – All transducers send down a signal that is shaped somewhat like a cone. Your
Digital Sonar easily switches from a 20-degree cone angle (good for general use) to a narrow
8-degree cone angle (good for water over 40’, or any time you need a more precise view of what
is below you). See the special section on Cone Angles below for more info. A feature unique to
the Marcum Digital Sonar is the “Sonar Footprint” that displays the actual extent of coverage by
your transducer while you are fishing. This data is displayed below the cone angle icon and
represents the diameter of the base of the transducer cone. This will keep you constantly
updated how much area is being covered by your Digital Sonar and will help you decide which
transducer angle best suits the conditions.
When the MarCum Digital Sonar is first turned on, it will be transmitting utilizing the 20-degree
setting. To switch from 20 degree to 8 degree, simply press the CONE ANGLE button once and
use the UP/DOWN buttons to highlight the desired selection. The cone angle changes as soon
as you highlight a selection and the Sonar Footprint will change with it.
TARGET ADJUST – This feature allows the angler to change the size of the signals being
displayed without increasing the sensitivity. The TARGET ADJUST feature will give you the
smallest, signal size at “0”, and the signals displayed will get thicker as you increase the
TARGET ADJUST. This feature should be used in conjunction with the SENS to fine-tune your
display. Those who have a hard time seeing, as well as those who fish from a standing position
will really appreciate the “TARGET ADJUST” feature.
BATTERY METER — This gauge indicates the voltage currently being produced by your battery.
The Marcum Digital Sonar needs at least 11 volts and preferably over 12 volts to properly
operate. If the voltage drops below 11 volts, you may see a decrease in performance. Recharg-
ing your battery after each use will maximize the life of your battery, and will ensure that your
Digital Sonar will run strong all day.
www.MarCumTech.com

- 7 -
MENU/ENTER— This button enables you to access other functions of the Digital Sonar. Some
of these functions are also accessible using the other buttons on the Control Panel. When you
press the MENU button, three sub-menus will be revealed—SONAR SETTINGS, DISPLAY
OPTIONS, and SYSTEM SETTINGS.
Use the arrow buttons to highlight the desired sub-menu, and press MENU again to access to
the sub-menu
SENSITIVITY
This adjusts the sensitivity. This is described in the Control Panel
section above
SONAR SETTINGS is the first sub-menu, and it has the
following features that may be adjusted:
RANGE
Select range in the same manner as described above
ZOOM DEPTH
Here is where you set the upper range of the zoom window. This
can also be done by using the ZOOM button as described above.
The actual size of the zoom window is adjusted in the “Zoom
Window” field.
ZOOM WINDOW
Here is where you determine the size of the Zoom Window. Go to
the “Zoom” section of the manual for more specific information.
IR
Interference Rejection can be adjusted here, as well as by using
the Control Panel button. See above for more info.
TARGET ADJUST
Target Adjust can be adjusted here, as well as by using the
Control Panel button. See above for more info.
CONE ANGLE
Cone Angle [and Sonar Footprint] can be adjusted here, as well
as by using the Control Panel button. See above for more info.
SONAR MODE
Choose between “Gain 1” and “Gain 2” mode here. NOTE—when
ice fishing in shallow water [10' or less], you may have better
performance if you select “Gain 2”
MAX PING RATE
Adjusting this setting will increase the response time of signals
from your transducer to the screen. If fishing shallow water (less
than 20 feet) use the lower settings. Likewise, you will see better
performance with the higher settings in deeper water.
TRANSDUCER
OFFSET
This will allow you to have true a depth measurement, no matter
how far below the water line you have your transducer. If you
have your transducer 8 inches below the water line, but want a
true depth reading, select “Transducer Offset”, and use the
DOWN button to highlight 8 inches. You will notice your sonar
signals will shift to reflect this offset. This function is particularly
useful if using your Digital Sonar on a boat, where you will have
your transducer [Universal Open Water Transducer sold
separately] mounted well below the waterline somewhere on your
www.MarCumTech.com

- 8 -
FLASHER DISPLAY
The Flasher Display can be turned on or off here
DISPLAY OPTIONS is the second sub-menu, and it has the
following features that may be adjusted
VERTICAL DISPLAY
The Vertical Display can be turned on or off here
VERTICAL ZOOM
DISPLAY
The Vertical Zoom Display can be turned on or off here
CHART DISPLAY
The Chart, or Scrolling graph, can be turned on or off here
CHART ZOOM
This enables you to use the scrolling graph in zoom mode
GAUGE DISPLAY
Your 5 gauges, as well as your Sonar footprint may be turned on
or off here
TEMPERATURE
Your water temperature display may be turned on or off here. You
may also select between Fahrenheit and Celsius here. This
feature will only work if you are using your unit with the optional
“Universal Open Water Sonar”, designed for open water use.
BACKLIGHT
You can adjust the overall brightness level of the display here.
When using outside during bright conditions, you will want to
have it set fairly high, at 50 or more. In low light or when using
inside an ice shack, a setting of 50 or less is desirable.
COLOR PALETTE
There are four different color palettes; you choose which one you
prefer here. See the section below on Color Palettes below for
more info.
BACKGROUND
There are three different backgrounds; you choose which one
you prefer here. The “Night” option is great for low light periods or
when in a darkened shack.
LANGUAGE
Choose between English or French
SYSTEMS SETTINGS is the third sub-menu, and it has the
following features that may be adjusted
UNITS
Choose between feet or meters
SIMULATOR
The Digital Sonar has a simulator mode that will portray a variety
of different depths and signal returns. Activating this feature
enables the user to experiment with the various settings without
actually being on the water. This simulator represents an open
water experience, so the depths and signals will change as it
goes through the simulation.
RESTORE FACTORY
This is where you can restore factory settings. The factory
settings are the most popular configuration, and if at any time of
changing your selections you want to revert back to this screen,
you may easily do so here.
RESTORE SAVED
If you find a screen configuration that you like, you can easily
return to that saved screen by highlighting this selection
www.MarCumTech.com

- 9 -
COLOR PALETTES — The default setting is the 6-color palette. This setting has RED
representing the strongest signal, often signifying a hard bottom or a larger fish that is in the
center of the transmit signal (cone). As signal strengths diminish, the colors will fade accordingly.
Again, red represents the strongest signal, followed by orange, yellow, light green, green, and
blue. When using the other color palettes, the colors displayed, and the signal strengths
represented will change accordingly. It is impossible to always associate a signal from a target
with a particular color, as water depth, sensitivity setting, and the target’s proximity to your
location can all affect how the signals show on your display.
SIMULATOR — The MarCum Digital Sonar has a simulator mode that will portray a variety of
different depths and signal returns. Activating this feature enables the user to experiment with
the various settings without being on the water. This simulator represents an open water or ice
fishing experience, so the depths and signals will change as it goes through the simulation.
When using your Digital Sonar in open water [in a moving boat] it is typical to mark fish as a
“hook” or “arch” shape. When stationary, as in ice fishing, your signals of both your jig and the
fish will show as lines of varying thicknesses.
You may also experiment with settings by getting your Digital Sonar to get a bottom reading off
the floor in your house or garage. It must be a bare tile or cement floor. Position your Digital
Sonar with the transducer hanging motionless about 2 feet above the tile or cement floor and
then turn the sensitivity up to the maximum [25] setting. If the transducer is 2 feet above the
floor, you should get a bottom reading at about 8.5 feet [the unit is calibrated to be accurate in
water, not air!]. If you now raise and lower the transducer the bottom signal should move in a
corresponding manner. You may find it is easier to learn the zoom and other functions while
experimenting in this way with the “manual simulator”.
GAUGES — A feature unique to the MarCum Digital Sonar is the ability to be able to constantly
see where your most critical settings are at. At a glance, you will be able to see what your
sensitivity level is, what level of IR you are operating at, how high your Target Adjust is, your
range, and battery status displayed in volts. The gauges can be turned on or off by pressing
MENU, highlighting “Gauge Display”, and making your selection. Where the gauges display will
depend on which screen configuration you have selected.
ZOOM INFO
One of the best features to have in an ice fishing Sonar is a “Zoom”, and there is none better
than that of the Marcum Digital Sonar. A Zoom feature enables you to have a magnified view of a
selected portion of the water column. Note that when the ZOOM window is open, you can still
view the entire water column on one of the other windows. Imagine that you are fishing for
walleyes in 30 feet of water, and you are zoomed in on the bottom 5 feet. If a school of crappies
comes through at 20 feet, you will be able to easily see them on one of the other windows, and
quickly raise your bait to their level. The position of the ZOOM window is adjustable in one-foot
increments and can be moved to focus on the bottom (for detecting bottom-hugging fish), or at
any level above bottom for suspended fish.
The MarCum Digital Sonar also offers Auto Bottom Lock Zoom that automatically zooms and
locks onto the bottom, even when you change locations. This is especially useful for if you are
hole-hopping for bottom hugging fish like walleyes and perch. To access the Auto Bottom Lock
Zoom, press ZOOM, and then press the UP button until “A” (Auto) appears. It will appear after
you pass “0” on the Zoom Window. The ZOOM feature on the MarCum Digital Sonar can be
accessed in several ways depending on which sonar windows you have displayed on your
dashboard. Having your Digital Sonar set at the factory default setting for a screen configuration
will make it easiest to learn how to use the Zoom. It is highly recommended that you learn how
the Zoom works while in simulator mode.
www.MarCumTech.com

- 10 -
Operating the Zoom is quite simple, and only requires the pressing of a few buttons to select the
size and position of your Zoom window.
Begin from the factory default screen open (Flasher in center, Vertical Display on left, Vertical
Zoom on right). The area that is featured on the Zoom Display is indicated by the “Zoom
Indicator Bar”, a light blue bar on the right side of the Vertical Display. When you press the
ZOOM button, a “Zoom Depth” window will appear at the bottom of the screen. This is where
you set the uppermost limit of the Zoom Display by pressing the UP/DOWN buttons. When you
have the desired depth highlighted, pressing ZOOM again will establish that depth as the top of
your Zoom display. You will notice that the Zoom Indicator Bar will move up or down as you
make these adjustments. To set the size of what is shown in the Zoom Display, press MENU,
and then highlight “Zoom Window”. You can now select which size zoom window you want.
Going through this process several times before you go fishing is a great idea, as that will allow
you to easily and quickly adjust right away once on the water.
If you have only the Flasher Display, the Vertical Display, or the Scrolling Graph Display open,
and go into zoom mode, pressing the “ZOOM” will cause the vertical zoom window to appear,
and a “Zoom Depth” window will open at the bottom of the screen. You will still set the upper-
most limit of your zoom window here, but you won’t have the advantage of having the Zoom
Indicator Bar to show you exactly what area is being highlighted. With a little bit of experience,
you’ll find this to be quite easy to do. Just set the zoom depth for 5, 10, 20, or 40 feet above the
bottom, and then set the Zoom Window to the size that is appropriate.
For example, if you were fishing in 30 feet of water, and wanted to zoom in on the bottom 10
feet, press ZOOM, and then set the zoom depth for 20 feet (10 feet off bottom). Now press
MENU, highlight “Zoom Window”, and select 10 feet. The 20 to 30-foot portion of the water
column is now displayed on the Zoom display, and the entire water column is viewable on the
flasher window.
The MarCum Digital Sonar also features “Chart Zoom” which enables you to use a scrolling
graph in Zoom mode. Activate the Chart Zoom in the Display Options of the menu. You set the
zoom just as you would when using the other sonar options. When you press the ZOOM button
to make a change, the Vertical Zoom window will automatically open. After adjustments have
been made, you may turn the Vertical Zoom window off again in the Display Options of the
menu.
CONE ANGLE INFO
A feature unique to the Digital Sonar is the “Sonar Footprint” that displays the actual area being
covered by your transducer while you are fishing. This data is displayed below the cone angle
icon and represents the diameter of the base of the transducer cone. This will keep you
constantly updated how much area is being covered by your Digital Sonar and will help you
decide which transducer angle best suits the conditions. When the Digital Sonar is first turned
on, it will be transmitting utilizing the 20-degree setting. To switch from 20 degrees to 8 degrees,
simply press the CONE ANGLE button once, and the CONE ANGLE icon will change from 20
degree to 8 degree, and the Sonar Footprint will change with it.
Conditions where the narrow beam will benefit you are:
1 — Fishing in deep water (over 40’)
2 — Fishing along very steep drop-offs for bottom-hugging walleyes
3 — Fishing in big schools of fish, like suspended crappies
4 — Fishing in and around heavy weeds or standing timber
5 — When fishing in a crowd, the narrow beam will reduce interference.
www.MarCumTech.com

- 11 -
INTERPRETING SIGNALS
DIGITAL DEPTH — The digital depth display on the MarCum Digital Sonar provides a quick and
easy way to determine depth. Digital Depth is always displayed in the center of the circular
display, and on the bottom of the vertical displays. It will also show in the upper left corner of the
graph in some configurations. This display can be used as a quick reference when checking
depths through the ice.
READING BOTTOM — When interpreting your bottom signal, always read the leading edge
(shallowest side) of the signal return. If you have a strong signal return (wide band) and it starts
at 13 feet and ends at 16 feet, the correct depth is 13 feet or the shallowest leading edge of the
return signal. Anything beyond the shallowest leading edge indicates the strength of the return
signal.
The MarCum Digital Sonar can also be used to determine bottom composition. The thicker and
bolder your bottom shows, the harder the bottom is. In some cases, hard bottom can be
indicated by a “double” or second echo that will show on your display at approximately twice the
water depth. Soft bottom (silt, mud, muck) will only register one bottom reading.
Using your Sonar in conjunction with an underwater viewing system is a great way to learn how
to interpret your sonar signals.
READING FISH— Fish will generally appear as separate targets from the bottom. Depending on
the size of the fish and the location within the transmit beam they can show as any of the colors
in the palette you are using. RED indicates the strongest signal on all the color palettes, and this
generally indicates a fish directly below the transducer. Smaller fish or fish on the outside of the
cone may appear orange, yellow, or even green or blue. Fish moving through the transmit beam
may change color as the return signal strengthens or weakens reflecting their location.
Some fish, like walleyes, are notorious for cruising right on the bottom. The Marcum Digital
Sonar has target separation fine enough that it will generally show bottom hugging fish as a
separate signal. However, fish that are right on the bottom can appear as part of the bottom. The
best indication of a fish sitting right on the bottom is that the leading edge of the bottom return
signal is a thin band of a color other than red, possibly dithering or flickering. It is important that
the sensitivity be kept to a minimum when displaying a strong bottom return. Having your
sensitivity too high will flood out the ability to differentiate targets and clutter the display.
Utilizing the ZOOM feature can give you a magnified look at the bottom when this is happening,
and help you better learn what is going on below you.
Schooling fish, like panfish, will sometimes group in large numbers suspended off the bottom. A
big school of fish concentrated in one portion of the water column can show on your sonar as
one large “blob”, and it can be difficult to pick out individual targets. Zooming in on the zone with
the most fish will give you better definition and switching to the 8-degree cone will eliminate
signals from fish on the periphery of your area, improving your definition even more.
READING LURES AND JIGS— The MarCum Digital Sonar will pick up and display the smallest
of lures and jigs. When tuning the unit to display your lure, lower it to the desired depth and turn
up the SENS until you see the lure or bait on the display. It is important that the SENS be set so
it displays the lure or bait as you raise or lower it. Once you have the SENS set where you want
it, you can fine- tune your signals by using the TARGET ADJUST button.
NOTE: When tuning the unit to display lures or bait, make sure that the objects are in the center
of the hole and therefore in the center of the transmit beam. If there is current (some lakes and
all rivers have under water current or movement) and the lure doesn’t weigh much, it may move
to the outer edge of the signal or out of the transmit beam altogether.
www.MarCumTech.com

- 12 -
This will make it difficult or impossible to pick it up on the display. You may find it difficult to mark
your jig in shallow water, or when it is just below the ice. See the section on shallow water fishing
for more info.
The MarCum Digital Sonar has sensitivity that will enable it to display the smallest ice jigs, as
well as sinkers and swivels. The target separation of the Digital Sonar is down to 3/4". This
means that two objects that are more than 3/4" apart can show as two separate signals on your
display. If you have a strike and fail to hook the fish, you can even determine if you still have bait
on your jig, or if you have to reel up and re-bait based upon how the signal appears.
Dead Zone – All sonar units will have a dead zone in certain circumstances. This occurs on
sharp drop-offs where the transmit beam (cone) hits the shallower edge of the drop-off and
returns before the deeper edge returns. This in effect creates an undisplayed area between the
shallower and deeper water within the transmit beam. The 8-degree transducer option on the
Digital Sonar will greatly reduce this effect.
HOW TO DECIDE WHICH CONFIGURATION TO USE
With 5 different sonar windows, along with a plethora of other settings, it can be hard to decide
on which one to display. If you have used traditional mechanical flashers in the past, you may
like the familiarity of the Digital Sonar’s flasher display. The flasher displayed with one or more of
the vertical displays is likely to be how most anglers use the Digital Sonar, at least for starters.
We get endless feedback on how well the scrolling graph display works for ice fishing, so be
sure to give it a try. Be sure to experiment with different color palettes and backgrounds, too. You
can have up to three windows displayed at once.
CIRCULAR [FLASHER] DISPLAY— This Sonar window will read much like a traditional
Flasher-style display. You can set the range manually or allow the Auto Range or Dynamic Depth
interface to automatically lock into a RANGE that will optimize the use of the circular display.
Signals are displayed as various colored lines on the dial, and the different colors represent
different signal strengths.
VERTICAL DISPLAYS— These Sonar windows are very easy to interpret— top is the top;
bottom is the bottom. Anything in between the top and bottom is weeds, fish, or your lure. There
are two different Vertical displays—one shows the entire water column, one shows your ZOOM
window. On each one, signals are displayed as various colored lines on the column, and the
different colors represent different signal strengths.
SCROLLING GRAPH (CHART) DISPLAYS— These windows will show not only what is
happening below you in real time but will also enable the user to have a “history” of what has
happened. While most commonly used for open water, many anglers are discovering the
benefits of using a graph on the ice. The Marcum Digital Sonar stands apart from other graphs in
that it displays with ultra-fast “True-Time” sonar response – less than .02 seconds between the
echo reaching the transducer and when the signal appears on the LCD screen. Other graphs
experience a much longer response time. When used from a boat in open water, the user will
see signals displayed in classic “graph” fashion; the bottom will be a solid band, and fish or other
objects display as “arches”.
When used from a stationary position, such as ice fishing, the bottom will display as a solid
band, but other signals, like fish or your jig, will display as lines of varying thickness. Always
remember that the thicker the band, the stronger the signal. A large fish is likely to display as a
fairly thick band, while a small ice jig will show as a very fine line. The best way to learn how to
interpret signals on the graph is to have it displayed along with the circular or vertical display.
www.MarCumTech.com

- 13 -
After using the graph along with one of the more familiar displays, you may find that you like
fishing with the graph best of all. It is fascinating to watch the “trail” of your jigging motion, and
fine tuning your presentation to exactly what the fish want has never been easier.
The Marcum Digital Sonar has the option of displaying a full water column graph, as well as an
adjustable zoom graph. The interpretation of these signals improves with experience and use in
the field.
SOFTWARE UPDATES
Your MarCum Digital Sonar has the ability to have the software updated. We may come out with
new software versions to add features or to improve performance. To see which version you
have, press the MENU button, then select SYSTEM SETTINGS. The version will be displayed at
the top of the menu window as a number with a “v” in front of it. To see if there are new versions
available, check our website www.MarCumTech.com/support. Compare the software version on
your system with what we have available Online, and ensure your system has the highest
numbered version.
It is quite simple to do; you only need a PC, a USB 2.0 cable (sold separately), and about 10
minutes. For more information, be sure to go to our website, click on the support tab, then
firmware updates for step-by-step instructions and tutorial video.
OPEN WATER APPLICATION
The MarCum Digital Sonar is just at home on a boat as it is in your ice shack. The Universal
Transducer [sold separately] is designed to be mounted right to your boat’s transom, or to the
lower unit of a bow-mounted trolling motor. This design makes it easy for you to use your Digital
Sonar for high speed scouting work, or for breaking down structure one piece at a time. You will
be able to identify the presence of fish or weeds and be able to determine the bottom makeup.
The Universal Transducer can transmit an 8 or 20-degree cone, and it also has a temperature
sensor.
From an anchored or otherwise stationary position, you can use your Digital Sonar from a boat
much like you would on the ice—you can see the fish and how they react to your jig on the
screen. You may find that being double anchored is necessary to maintain a stationary position.
WARRANTY - SONAR
MarCum warranties this product to be free from defects in materials and workmanship for two
years from the date of purchase. This warranty applies to customers who properly complete the
Online product registration form found on the MarCum Technologies Website:
www.MarCumTech.com/support .
MarCum Technologies will repair or replace any components that fail in normal use. Failures due
to abuse, misuse, unauthorized alteration, modification, or repair are not covered. The warranty
is valid only for the original owner who purchases the unit from an authorized dealer. An original
sales receipt dated within the warranty period is required for all warranty claims.
WARRANTY - Battery
To best serve our customers, MarCum Technologies has set a standardized battery warranty
policy. Battery warranty coverage requires a proof of purchase. Please see our website,
www.MarCumTech.com/support for full details on warranty coverage.
www.MarCumTech.com

- 14 -
HOW TO OBTAIN SERVICE
If your system is malfunctioning, check the support section of our website. You may find that the
solution to your problem is something you can resolve yourself. If you need to send it in, there is
no need to contact our office. Getting repairs made is as simple as going to our website,
MarCumTech.com clicking the support tab and then filling out the MarCum Warranty Claim.
If your system is under warranty, be sure to attach a picture/scan of your proof of purchase with
date included. If your system is out of warranty, we have a flat rate fee that will cover the cost of
repairs, including parts and labor. You will find the non-warranty claim on our support site.
Once you have completed and submitted a claim form, package the unit as described on the
website and ship it to us.
Some people are more comfortable calling for shipping instructions. During peak ice season, we
sometimes receive a high volume of calls, making it impossible to get to all customers who
phone in. For this reason, strongly consider using the on-line forms at www.MarCumTech.com/-
support or using the "Live Chat" option.
OUR ADDRESS:
MARCUM TECHNOLOGIES
ATTN: SERVICE DEPT.
3943 QUEBEC AVE NORTH
MINNEAPOLIS, MN 55427
Please send your email inquiries to service@MarCumTech.com
If you are unable to use email or Internet, you may call us at 763-512-3987.
Our office hours are Monday – Friday, 8 – 4 Central Time.
International callers may use 888-778-1208.
The customer is responsible for shipping costs associated with returning the system to MarCum
Technologies. MarCum will pay for shipping the repaired system back to the customer while it is
still under warranty. All out of warranty services will be charged a fee for service and shipping
which must be paid in advance. The system should be securely packed and shipped “prepaid
freight” and insured to MarCum Technologies. It is the customer’s full responsibility to track their
products sent out in the mail or other forms of delivery service. MarCum Technologies will not be
liable for packages lost in route to us. Unless specified otherwise, do not include batteries or
other accessories when returning the product for repair. MarCum Technologies will not be
responsible for lost or damaged accessories. Turnaround time can vary, on average it is about 1
week.
www.MarCumTech.com

- 15 -
These are some other great systems from Marcum.
Pursuit HD
MarCum's Pursuit HD Camera sets the new standard in mobility, while adhering to technological
innovations our cameras have always led with. A FULL HD Image Sensor (1920X1080p) offers
industry-leading display precision, packing a punch in a pocket-sized 5” LCD display. Included
are all of the on-screen reconnaissance details like temp, depth, and absolute direction, along
with new DVR features like MP4 capability, multiple image output sizes, and cyclical recording.
The image itself is so precise, it can support digital zoom, allowing anglers to gather more
information on weeds or cover, fish behavior, and jigs on the far end of the wheelhouse. We’ve
packaged the technology complete with a built-in cable reel and a convenient ¼”-20 port at the
bottom of the unit for endless mounting options. Whether you’re mobile on ice or stationary in a
fish-house, the Pursuit’s rich feature set offers best-in-class tools with the functionality to benefit
all anglers.
M5L
The most advanced flasher-sonars ever built, the MarCum® “M” Series offers brushless,
dead-quiet operation with dazzling bright and crisp color definition of bottom, fish, baitfish and
your lure, all illuminated on the highest resolution display available in a commercial grade
flasher. Acute .75-inch target separation distinctly identifies each individual object on the screen,
so you can clearly discern the minuscule separation of a bluegill about to kiss your ice jig.
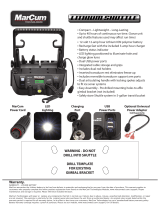
Lithium Shuttle
Add the long-life power of Lithium ION to your MarCum® sonar units. Compact, lightweight and
long-lasting, the Lithium Shuttle, powered by a 12-volt 12-amp hour Lithium ION polymer battery,
can extend your unit’s continuous run time up to 40 hours. Designed for the new MarCum
M-Series, LX-6s & LX-7, and the MX-7gps systems. Compatible with other ice electronics with
optional Lithium Shuttle power adapter (available at MarCumTech.com).
MX-7gps
Now introducing the leader in sonar and mapping technology, Marcum Technologies brings you
the MX-7gps. As a Lithium-powered sonar/GPS combination unit, we’ve taken GPS mapping
and fused it to MarCum's legendary sonar platform. For decades, we’ve built the best ice-specif-
ic sonar platform in the world. One that was built on power, Interference Rejection (IR) so
advanced it’s patented, zoom that was adjustable anywhere in the water column, and a veritable
laundry-list of industry “firsts.” We gave birth to the modern movement of ice fishing’s informa-
tion age, by taking a stationary circular display and breathing life into it. We invented on-screen
scenarios that involved dynamic movement which more closely matches what’s happening
below ice, all while staying true to the number one aspect that makes ice fishing sonar specific to
our sport – real-time. In a stationary, vertical game of cat and mouse, where latency and sonar
lag are unacceptable, Marcum’s response time is completely unrivaled. That lighting fast sonar
reaction has been a hallmark of the Marcum brand, and has made it the most sought after ice
sonar platform to this day. Not all sonar is created equal, and that’s especially true when talking
ice fishing. The best ice anglers in the world require electronics with a full-time dedication to the
sport. Take the MX-7gps out of the box and it’s automatically locked in ice mode; equipped with
a Lithium LiFePO4 battery, soft pack, and ready to fish. Long story short, we’ve added more
features, making them longer lasting, lighter, and technologically superior, all while staying true
to our real-time roots – a defining characteristic in any quality ice sonar.
www.MarCumTech.com

www.MarCumTech.com
www.MarCumTech.com
MarCum Technologies
3943 Quebec Ave N
Minneapolis, MN 55427
MarCum User Manuals are available for downloads from
www.MarCumTech.com
0407-2020
/