Page is loading ...

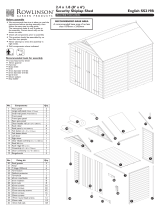
No. Fixing Kit Qty.
9 50mm screw 17
10 30mm nail 28
11 10mm felt nail 20
No. Components Qty.
1 Upright 2
2 Side panel 1
3Back panel 1
4 Roof panel 1
5 Felt batten (905mm) 2
6 Roof rafter (645mm) 2
7 Roof felt roll 1
8 Bargeboards 2
2
1
3
4
5
6
2014 © Rowlinson Garden Products Ltd
7
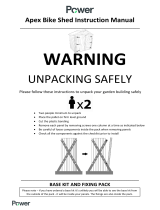
Before assembly
•We recommend that time is taken to read the instructions before
starting assembly, then follow the easy step by step guide.
The instruction sheet is only a guide to the assembly.
Certain items may not be shown to scale.
•Check all components prior to assembly
•Drill all components where indicated.
•This product should be assembled by no less than two people.
•Never attempt to erect the assembly in high winds.
Recommended tools for assembly
•Cross head screw driver
•Drill with 2mm diameter drill bit
•Step ladder
x 2 Drill
8
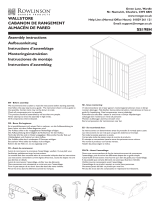
ROWLINSON GARDEN PRODUCTS LIMITED
Green Lane
Wardle, Nr. Nantwich
Cheshire
CW5 6BN
Help Line (Normal Office Hours) 01829 261 121
English SS349
Assembly Instructions
4x3 Shed Lean to/log store
We constantly improve the quality of our products, occasionally the
components may differ from the components shown and are only
correct at time of printing. We reserve the right to change the
specification of our products without prior notice.
IMPORTANT NOTE:
This instruction is for use in
conjuction with the 4x3 Shed
assembly instruction (SS276 ).
The lean to can be fitted to
either side of the shed.
Side panel Back panel
50mm
50mm
50mm
50mm
50mm
3. Attaching walls
Position the walls under the roof. Secure the back wall to the side of the shed
using 3 x 50mm screws. At the front and rear screw through the roof rafter
into the uprights as shown using 1 x 50mm screw for each upright.
10mm
10mm
10mm
10mm
10mm
4. Roof felt
Lay the lean to roof felt over the lower part of the long roof. Ensure the is
equal overhang front and rear. Fold over the felt so it covers the felt batten at
the bottom edge of the roof and secure to the batten using 10 x 10mm felt
nails. Tension the felt up the roof and secure the other edge with 3 x 10mm
to the roof. Lay the shed roof felt over the short side of the roof. Fold over
the felt so it covers the felt batten and secure to the batten using 10 x 10mm
felt nails. Tension the felt up over the roof apex and secure the other edge
using 10 x 10mm felt nails. Dress the felt down over the front and back and
secure using 11 x 10mm felt nails. If necessary trim off any excess felt .
5. Bargeboards and finials
To the front and rear of the shed, secure the bargeboards so that the top edge
is flush with the roof line and the two boards meet evenly at the apex secure
using 3 x 30mm nails per board. Attach a finial at the roof apex, over the joins
between the bargeboards using 2 x 30mm nails.
30mm
30mm 30mm
1. Back and side panels
Secure an upright to each edge of the side panel using 3 x 50mm screws per
leg, screw through the panel frame into the legs. Then secure the side panel
to the leg and back panel as shown using 3 x 50mm screws. It is recommended
to drill pilot holes for all screws with a 2mm drill bit before assembly.
2mm
Drill
2mm
Drill
2mm
Drill
50mm
30mm
30mm
2. Roof panel
Using 5 x 30mm nails fix the felt battens flush with the long each edges of the
roof panel. Then attach the roof rafters between the felt battens flush to the
short roof edges using 4 x 30mm nails. Screw the panel to the felt batten on
the shed using 3 x 50mm screws.
/