Page is loading ...

SUB
BAND
INSTRUCTION
MANUAL
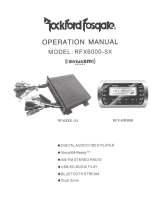
RFX9901DM
VOl
--
•roo!
OF
14
00.01
T.I.TLE
:M
.
OON
RIVER
ARTbST:
ALB
M:
11
:
12
• Capacitive Touch Control Panel
• 7-line
Dot Matrix
Display
•
SiriusXM-Ready
•
FM/AM Stereo Radio
• RDS
Ready
• HDMI Output
•
CD-DVD Changer Support
• USB
&
SO
AN
Play
• DIGI MUSIC
PLAY
•
Punch EQ
•
Bluetooth

CONTENTS
CONTENTS
...............................................................................................
1
CONTROL
PANEL (WIRE REMOTE) ILLUSTRATION
..........................................
2
WIRE
DIAGRAM
.........................................................................................
3
INSTALLATION
..........................................................................................
4
BASIC OPERATION
.....................................................................................
6
RADIO
OPERATION
....................................................................................
8
SIRIUSXM
OPERATION
............................................................................
···10
USB/SO OPERATION
....................................................................................
13
AUXIN
OPERATION
.....................................................................................
15
DIG
I MUSIC
OPERATION.
.................................................................................
1 6
CDC/DVDC OPERATION
...............................................................................
-17
BLUETOOTH OPERATION
..............................................................................
18
IR
REMOTE
CONTROL
...............................................................................
19
SPECIFICATIONS
....................................................................................
···20
TROUBLESHOOTING
.................................................................................
21
-1-

CONTROL
PANEL
ILLUSTRATION
1.
2.
3.
4.
5.
6.
7.
8.
9.
SCAN
MENU
POWER
SEEK-
BAND/SUB
DISP
SEEK+
MODE
VOLUME SEL/ENT
LCD Display
SCAN/MENU
10. AS/PS
11. Preset 1
I
PAUSE-PLAY
12. Preset 2/RPT
13. Preset 3//RDM
14. Preset 4
15. Preset 5
16. Preset 6
17.
IR
Receiver
8EL
lENT
uoo1W
-2-
00.01
TITLE:MOON
RIVRE
ARTLST:
ALBUM:
11112

WIRE DIAGRAM
~
i
(/)
c
0
(/)
:;c
:;c
CD
c
m
(/)
()
X
m
s:::
<
m
:;c
0
9
"'C
0
~
PowtR
ANTENNA
MEMORY
IB•I
FRONT
lffl
SPEAKER
R£AA
LEfT
SPEAKER
()
0
()
Qo
0
<
0
()
II
II
:E
~
ru·
ru·
·u·
ru·
1
~
~
'i
;JJ
m
~
'i
i
0
>
:;c
~
[
z
;JJ
[
~
m m
"'
-
"'
-
-i
~
"'
-
:;c
:;c
G)
0
m m
~
:!
s::: s:::
0 0
11
:;c
(/)
)>
-i
-I
:;c
m
c c
m m
0
)>
CD
X
1\,)
z
:;c
:E
z
-i
:;c
0
:;c
()
0
()
)>
11
)>
m
:;c
POWER CONNECTOR
SLUE
YELLOW
BAQ;UP
+WHITt
-WHITE
BlACX
+GREEr'~
-GREEN
BlAtK
-3-
I
BLACK
GROUNO
<G
NO
}
REO
IGNITlON
SWlTCH
lA
CCI
GREY+
II
GREY
BLACK-
VIOLfJ
+
II
VIOLET
BlACK-
FRO
NT
HT
AKER
RIG
SPf
A
REA
RIG
HT
MER
SPE
:5
0
m
0
0
c
-i
POWER
CONNECTOR

INSTALLATION
FUSE
REPLACEMENT:
If the fuse blows, check the power connection and replace the fuse.
If the fuse blows again
after the replacement, there may
be
an
internal malfunction.
In
this case, contact your nearest
repair center.
Warning:
Only replace fuse with the same type and rating. Use of a different type or rating may cause
serious damage/safety concerns.
PRECAUTIONS
Choose the mounting location
carefully
so that the unit
will
not impair the safe operation
of
the
vehicle, or interfere with the driver.
Avoid
installing
the unit where it would
be
subject to high temperature, such
as
from direct
sunlight or hot air from the heater, or where it would
be
subject to dust, dirt or excessive
vibration.
-4-

INSTALLATION
Use
only
the
supplied
mounting hardware for a safe and secure
installation.
To
support the unit
1.
UNIT
2.
DASH
BOARO
3.
HEX
NUT
MS
4.
LOCK
WASHER
5.
PLAIN
WASHER
6.
M~RINE
BODY
7.
REA~
"
SUPPORT
STRAP
8.
TAPPING
SCREW
9.
MSxlS
HEY
BOLT
-5-

BASIC
OPERATION
NOTE:
Short
press: Press less
than
2 seconds.
Long
press: Press and
hold
more than 2 seconds.
POWER
Button
(1)
e
Power
ON/OFF
Short
press the button to turn on/off the unit.
VOLUME PUSH SEL/ENT (7)
• Volume Control
Rotate the knob to
control the
volume
0-40.
•
Audio Settings
Short
press to select
BASS/TREBLE/FADER/BALANCE/Punch EQ/
EQUALIZER/Rear Zone
level.
then rotates the knob to adjust desired setting. Press the knob again to
select
desired
functions. Unit will return to
normal
previous
display
if
left without any key
be
pressed for 5
seconds.
• System
Settings
Long press to
select DIMMER(0-10)/Stereo(ON/OFF)/TUNER REGION/24
HOUR(ON/OFF),
then rotate the knob to adjust desired setting. Press the knob again to
select desired functions.
Unit
will
return to
normal
previous
display
if
left
untouched for 5 seconds.
• Punch
EQ
Punch
EQ
can increase both bass
and
treble
at the same time
in
the audio
playing
mode, short
press ENTER key repeatedly
until
Punch
EQ
is
selected, rotates the knob to
select
OFF/3/6/9/12.
• EQUALIZER
Short
press ENTER key
repeatedly
until EQUALIZER
is
selected,
rotates the knob to
select
OFF/FLAT/CLASSIC/POP/ROCK/JAZZ/VOCAL.
FLAT:
give
a
smooth
level
at
Bass
and
Treble.
POP:
give
a
-4dB
of
boost
at
Bass
and
-BdB
boost
at
Treble
JAZZ:
give
a
-2dB
of
boost
at
Bass
and
-2dB
boost
at
Treble
CLASSIC:
give
a
+2dB
of
boost
at
Bass
and
+6dB
boost
at
Treble
ROCK:
give
a
+4dB
of
boost
at
Bass
and
+BdB
boost
at
Treble
VOCAL:
give
a +BdB
of
boost
at
Bass
and
+BdB
boost
at
Treble
•
RearZone
Short
press
SEL
key
repeatedly
to
select
the
Rear
Zone
option, rotate the knob to
choose
Radio(FM/AM)/SXM
radio/USB/SD/AXU
IN/CDC(DVDC)/Biutooth/DIGI
PLAY source
for
zone
2
play
via the
REAR
RCA
OUT
cable. Please
note
if
the USB
Mode is
playing
at
the
zone
1,
SO
Mode
is
not
allowed
to be
selected
at
the
zone
2(rear
zone) option.
•
Rear
Zone
Level
Behind
Rear
Zone
option you can
choose
0
to
+1
OdB
for
the
zone
2(rear
zone)
line
out
volume
level.
-6-

BASIC
OPERATION
e
DIMMER
You can adjust the
Illumination
brightness
in
this mode, there are
10 levels
you
can
select,
when you find the desired brightness by rotating the knob, press the knob to save the setting.
e
TUNER
REGION
By pressing the knob again, the unit will
be
in
Radio region selection mode. Rotate the knob to
choose
USA/EUROPE/ASIA.
• 24
HOUR
To
change
the
time
display
format
to
24
hours
or
12
hours
AM/PM,
you
can
switch
to
ON
or
OFF
by
rotating
the
knob.
MODE
(6)
e
MODE Selection
Short
press
MODE
button to choose desired listening mode,
RADIO
(FM/AM)/SiriusXM/USB/SD/AUX/CDC (DVDC)/Biuetooth/DIGI MUSIC
DISP
(4)
• System
Time
Setting
Long press this button
until hour icon begins to flash, press
Seek+/- key to adjust hour
indication. And then short press
until
minute icon begins to flash, press
Seek+/- key to adjust
minute indication. The system
will
save current time and exit time setting
if
user press the key
again or there is no action within 5 seconds.
BAND/SUB (3)
• Subwoofer
ON/OFF
Long press this key to choose between Subwoofer
ON
and
OFF
in
the playing mode.
-7-

RADIO
OPERATION
MODE (6)
• MODE Selection
Short press MODE button to select radio mode.
BAND/SUB (3)
• Band Selection
In
radio mode, short press BAND button to locate the desired band. The reception band will
change
in
the following order:
FM1-FM2-FM3-AM1-AM2
SEEK+ (2)/SEEK- (5)
• Automatic Seek
Short press to automatically seek the higher/lower radio station.
• Manual tuning
Long press to enter manual tuning mode, then short press to seek the higher/lower frequency.
The manual tuning mode will exit automatically if there
is
no action within 5 seconds.
PRESET 1-6 (11/12/13/14/15/16)
• Store Preset Station
Long press a PRESET button, the current station will be stored, and the
Corresponding preset number will appear
in
the display. The PRESET buttons can
be
used to
store 6 stations
in
each band (FM1, FM2, and AM) for convenient access to your favorite
stations.
• Recall Preset Station
To
recall a station, select a band (if needed). Short press a Preset button and the unit will turn
to the corresponding stored station.
SCAN/MENU (9)
• All Station Scanning
Press SCAN button to scan all stations. The unit will keep
on
scanning every 5 seconds until
you press the SCAN button again to stop scan function.
• RDS Function
Note: To select the RDS function, Make sure to choose the EUR (Europe) AREA
in
tuner
region setting.
RDS
(Radio Data System) - automatically switches to the strongest signal for the station you
are listening so you don't have to retune your radio manually as you drive around. It includes
three
setting-
AF, TA, PTY.
AF (Alternative Frequency) - shows that RDS is tuning to the strongest signal for the station
you have selected.
It
retunes to a different frequency when you move into another area.
-8-

RADIO OPERATION
AF Operation -
press and
hold
MENU button and press Enter key to select AF settings.
Rotate Volume knob to turn on/off AF function.
The-
"AF"
characters
will
be flashed
on
LCD
if
AF
is
on. When there
is
RDS
signal currently playing and the signal
is
below
a certain level,
the radio
will
switch to the alternative stations which can receive good
signal.
TA
or
TP
(Traffic Announcement
or
Traffic Program) -
automatically
detects travel
announcements
on
the nearest local
radio station. This facility will
raise the volume
of
the radio
or interrupt a
CD
or
cassette to
alert
you to a travel announcement. You can turn the facility
on
or off, as required.
TA Operation -
press and
hold
MENU button and press Enter key to select AF settings.
Rotate Volume knob to turn on/off AF function. The
-"TA"
characters will
be displayed on
LCD
if
T A
is
on. Pressing
Seek+/-
button
will search stations with TP information. When the
station with TP info
is
found, the TP
will
be
displayed
on
LCD
and the radio
will
switch to Radio
mode when there
is
traffic alarm
and
will display
-TRAFFIC
II
on LCD.
PTY (Program Type) -
shows the type
of
program, e.g. sport, news,
classical
music.
PTY Operation-
press and hold
MENU button and press Enter key to select AF settings.
Rotate Volume knob to turn On(Group 1/Group 2)
or
Off PTY function.
If
PTY and TA
is
on,
PTY information
will
be
displayed
on
LCD and the radio
will also
search
all
the stations with the
same PTY. Use Preset buttons
(1-6)
for switching between different PTY's then press
Seek+/-
button
to search the stations with the same PTY info.
Group 1 Group 2
Preset 1 - "NEWS" Preset 1
- "LIGHT M"
Preset 2
- "INFO"
Preset 3
-
"EDUCATE"
Preset 4
- "CULTURE"
Preset
5-
"VARIES"
Preset 6
-
"ROCK M"
Preset
2-
"WEATHER"
Preset 3
- "SOCIAL"
Preset 4
-
"TRAVEL"
Preset 5
-
"COUNTRY"
Preset 6 -
"FOLK M"
If
there
is
no
corresponding PTY, it
will
display-
"PTY none" and exit PTY mode.
AS.PS (10)
• Automatically Store
Long press this button for more than 2 seconds, and the unit
will automatically
scan and store
the strongest stations
in
the FM/AM band. To stop this function before the automatic storing is
complete, shortly press this button again.
•
Preset
Station
Scanning
Short press this button to scan preset station. The unit will
keep
on
scanning every 5 seconds
until
you press the
SCAN button again to stop scan function.
-9-

SiriusXM
OPERATION
Everything
worth
listening
to
is
on SiriusXM,
getting
over 130 channels, including the most
commercial-free music, plus the best sports, news,
talk
and
entertainment. A SiriusXM Vehicle
Tuner (sold separately)
and
Subscription are required. For more information, visit
www.siriusxm.com.
To
listen
to
SiriusXM Satellite Radio, a subscription
is
required. Activate the SiriusXM Vehicle Tuner
using one
of
the
two
methods below:
• Online:
Go
to
www.siriusxm.com/activatenow
• Phone: Call1-866-635-2349
To
view the 8
digit
Radio ID
of
the SiriusXM Vehicle
Tuner,
tune
to
channel 000.
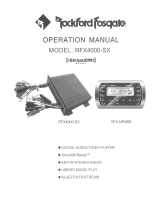
MODE (6)
• Mode Selection
SXMl
CH008
CAT
POll
CHANNEL
HAMES
CATEGORY
NAMES
ARTIST
NAME
i
SONG
TITLE
SiriusXM Display Diagram
Short press MODE button to select SiriusXM mode.
Note: If there
is
no SiriusXM TUNER connected this mode will be skipped. Please connect
your SiriusXM Tuner to the SiriusXM port located at the back
of
the unit. Then press MODE
button to change to SiriusXM mode.
SEEK+ (2)/SEEK- (5)
• Channel Browsing
If category setting
is
off, short press the buttons to start browsing all channels. Press the
SEEK+/SEEK- key to browsing next/previous channels, Press the enter key to select the
channel showed
on
LCD and play
it.
If there
is
no
key pressed
in
Ss,
the LCD will change back
to display current playing channel information again.
• Category Browsing
If
the category setting
is
on, short press the buttons to start browsing channels
in
current
category. Press the SEEK+/SEEK- key to browsing next/previous channels, Press the enter
key to select the channel showed
on
LCD and play
it.
If there
is
no key pressed
in
5s, the LCD
will change back to display current playing channel information again.
• Rapid Channel Browsing
-10-

SiriusXM
OPERATION
If
category set
is
off, press and
hold
the buttons goes into rapid channel
browsing mode, you
can browsing
all channels
in
higher speed, if you
release the touch key, the
LCD will show the
information
of
the
last
browsed channel. , Press the enter key to select
the
channel
showed
on
LCD
and
play
it.
If
there
is
no key pressed
in
Ss,
the
LCD will
change back to
display
current
playing channel information again.
•
Category
Selection
If the category setting
is
on, long
press and
hold
the buttons over
2S to
select
previous/next
category.
AS.PS (10)
•
Direct Channel
Tuning
Short
press this button,
"Select:---"
will
show
on
the
display.
Then, the first character
will
flash.
Rotate the
Volume knob to
select
number
0-9 and press it to enter then the second character
flash. Use the same operation to select
other character. After select
the last number, press
Volume
knob to enter and
play
the desired channel.
• Channel Category Setting
Long press this button to enter category setting while "CAT" will
show at the bottom
left
of
the
screen, when press again, the category setting will
be
off, and "CAT" will
disappear.
BAND/SUB
(3)
•
Bank
of
presets
Selection
In
SiriusXM mode, short press this button to change the bank
of
presets. The current bank
of
presets
will
change
in
the
following order:
SXM1
- SXM2 -
SXM3
•
Reset
In
SiriusXM mode, press and
hold
BAND and Enter button to reset the SiriusXM mode to the
factory default
setting. When finished the reset operation
finished, the
locked channel will
be
unlocked,
the presets storing
will
be
cleared,
the
parental control
passcode
will
be
restored
default
passcode, etc.
PRESET 1-6
(11
/12/13/14/15/16)
• Store
Preset
Channel
Long press a PRESET button, the current
channel will
be
stored, and the corresponding preset
number
will
appear
in
the display.
The PRESET buttons can
be
used to store 6
channels
in
each bank
of
presets (SXM1, SXM2,
and
SXM3)
for convenient access to your favorite
channels.
• Recall
Preset
Channel
To
recall a preset channel, select
a bank
of
channels
(if needed).Short
press a Preset button
and the unit
will
turn to the corresponding stored channel.
-11 -

SiriusXM OPERATION
SCAN/MENU
(9)
• Channel scanning
Short press the button to scan all the
channels.
The unit
will
keep
on
scanning every 5
seconds per
channel until
you press the
SCAN
button again to stop scan function.
PARENTAL
CONTROL
You can
lock
any SiriusXM
channels you do not
want others to have access without your
permission. The
default
code
is
"5220".
In
case you forget your code
please
disconnect the
unit
completely
from the power.
e
GUIDE ON
HOW
TO
ENTER THE
CODE USING THE VOLUME BUTTON
When the first character is flashing, rotate the Volume
knob to
select number 5 and press it to
enter then the second character flash. The same operation to
select
the rest character
"2","2","0".When
done, press
Volume
knob to confirm.
• TO LOCK
A CHANNEL
Select
a
channel
that you wish to lock
then
long
press
SCAN
button
-"Lock
Channel" will
show
on
the
display.
Enter the code then press
Volume
knob to confirm
-"Channel
Locked"
will
show
on
the
display
e
TO UNLOCK
A CHANNEL
Select
the
channel
that you wish to
unlock then
long press SCAN
button-"Unlock
Channel"
will
show
on
the
display. Enter the code then press
Volume
knob to confirm
-"Channel
Unlocked" will
show
on
the
display
e
TO
CHANGE THE CODE
Press and
hold
BAND Button
-"Old
Code" will show
on
the
display.
Enter the old
code then
press
Volume knob to confirm
-"New
Code" will
show
on
the
display.
Enter your new code
then press
Volume knob again to confirm
-"SetCode
ok" will
show
on
the
display.
e
LOCKED CHANNEL MANAGEMENT
When you want to browse all
the
locked channels,
press and
hold "Volume SEL" button and
"1"
button simultaneously
to enter the
locked channel
browsing mode. You can browse the
entire
locked channel
by rotating the Volume
knob after entering the correct passcode. Select
a
locked channel and press Volume knob if you want to clear
that
locked channel, and if you
want to
clear all
the locked channel,
you just rotate the
Volume
knob
until
the advisory
"CLEAR
ALL
LOCKED"
display,
then press the Enter button to execute.
If
you want to change the
status
of
the mature
channels,
you just rotate the
Volume
knob
until
the advisory
"lock/unlock
Mature"
display,
then press the Enter button to switch.
Sirius,
XM
and
all
related marks
and
logos are trademarks
of
Sirius
XM
Radio Inc.
All
rights
reserved.
-12-

USD/SD OPERATION
MODE (6)
• MODE Selection
Short press MODE button to select USB/SO mode.
Note: If there
is
no
USB or SD Card reader device connected, this mode will
be
skipped. If
there
is
a USB or SD Card reader device connected to
USB1
port, the USB mode will
be
displayed, and if there
is
a USB or
SO
Card reader device connected to USB2 port, the SD
mode will
be
displayed.
SEEK+ (2)/SEEK-
(5)
• Track Selection
Short press to automatically seek the previous/next track.
• Track FF/FR
Long
press
the buttons to fast forward/fast rewind.
Preset 1/PAUSE-PLAY
(11)
e Track PAUSE-PLAY
Short press to pause play. Press 1 button again to resume play.
e Track STOP
Long press to stop play.
Preset 2/RPT (12)
• Track Repeat
Short press 5 button and select "Repeat: ONE" to repeat same song. Press 5 button and
select "Repeat: ALL" to repeat all tracks or to stop repeat function.
Preset 3/RDM Button (13)
• Track Random
Short press 3 button and select "Random: Track" to play all tracks
in
random. Press this button
again and select "Random:
Off'
to cancel random function.
AS/PS (10)
• Direct Track Tuning
Short press this button, "Search
Track:----"
will show
on
the display. Then, the first character
will flash. Rotate the Volume knob to select number 0-9 and press it to enter then the second
character flash. Use the same operation to select other character. After select the last number,
press Volume knob to enter and play the desired track.
BAND (3)/SCAN (9)/ Preset 4 (14)/ Preset 5 (15)/ Preset 6 (16)
• Interface Navigation
When a USB or
SO
device with audio/video/picture files is plugged, a menu will
be
displayed
on
external LCD via VIDEO out/HDMI output.
-13-

USD/SD OPERATION
~~
I [
MYMUSI-1]
HELLO.MP3
eo1.\
L·
02.MYMUSI-1
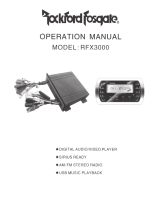
The menu include six blocks
f1
01-HAPPV
DAY
.11
02-HELLO
.1"1
0:3-0NL
Y YOU
n
04-MY
LOVE
rJ
05-MY
OH MY
~
I
,{
MYMUSi-1]HELLO~MP3
(1)
eo1.\
02.MYMUSf
...
1
•
..
:·
..
·
•..
•
..
···.··.··.~·>>.·••·······.:··
·
;:J
~·
.11
01-HAPPY
DAY
1"1
02-HELLO
n
03-0NL
Y YOU
.FJ
04-MY
LOVE
n
05-MYOHMY
Block
CD:
Current play. This area shows what
is
playing right now.
Block
®: Folders. All available folders will
be
displayed
in
this area.
Block
@:
Audio files. The audio files are displayed
in
this area.
Block
@:Audio
sources
Block
@:Picture
sources
Block
®: Video sources
While the block 4/5/6
is
selected, the corresponding media folders and files will displayed
in
block 1 and
2.
• Operation Tips
BAND key
is
for up, SCAN key
is
for down, Preset 4 key
is
for left, Preset 6 key
is
for right,
Preset 5 key
is
for selecting and entering. You can press these keys to select different sources
and files.
-14-

USD/SD
OPERATION
• File
Selection
The
selective
cursor
would
be
default
in the
first
file of
the
audio
files
block
when
there
is a USB/SO be read
successfully,
then
directly
press
BAND(up)
and
SCAN(down)
button to
choose
all
the
files
in the
current
folder.
•
Folder
Selection
Press
4(1etf) button to
move
the
selective
cursor
to the
folders
block,
then
directly
press
BAND( up) and
SCAN(down)
button
to
choose
all the
folder
in the
current
disk.
•
Sources
Switching
Press
6(right)
button to
move
the
selective
cursor
to the
Video
source,
or
twice
press
4(1etf)
button
to
move
the
selective
cursor
to the
Audio
source.
Then
directly
press
4(1eft)
and
6(right)
button
to
choose
the
Audio/Picture/Video
sources,
press
5(enter)
button to
access.
After
entering
the
desired
sources,
repeat
File
Selection
step
and
Folder
Selection
step
to
select
different
files
and
folders
in the
current
source. Long
press
1
button
to
exit
playing.
AUX
IN OPERATION
MODE
(6)
• MODE Selection
Short press
MODE button
to
select
AUX mode.
Note:
This unit
can
be
connected
to
any portable
music devices such
as
MP3
Player, TV
and
DVD
through the AUX
IN
located
at
the back of the unit. Press
MODE button
to
change the
mode
to
"AUX" mode.
In
this mode,
all
controls
and
functions
has
to
be
controlled
through your
music device.
-15-

DIGI MUSIC OPERATION
MODE
(6)
• MODE
Selection
Short press
MODE
button to select
DIGI
MUSIC
mode.
Note: If there
is
no
DIGI
MUSIC
connected, this
mode
will
be
skipped. If
there
is
a
connected
to
the
DIGI
MUSIC
port,this mode
will
be
displayed.
SEEK+
(2)/SEEK-
(5)
•
Track
Selection
Short
press
to
automatically
seek
the
previous/next
track.
e
Track
FF/FR
Press and hold
the
buttons
to
fast
forward/fast
rewind.
Preset
1
I PAUSE-PLAY (11)
e
Track
PAUSE-PLAY
Short
press
to
pause
player. Press 1 button again to
resume
play.
Preset
2/
RPT ( 12)
•
Track
Repeat
Short
press
5 button and
select
"Repeat:
ONE"
to
repeat
same
song. Press 5 button
and
select
"Repeat:
ALL"
to
repeat
all
tracks
or
to stop
repeat
function.
Preset
3/
ROM
(13)
•
Track
Random
Short
press
4 button and
select
"Random:
Track" to
play
all
tracks
in random. Press
this
button
again and
select
"Random:
Off"
to cancel random
function.
MENU
(9)/
VOLUME
PUSH
SEL/ENT(7)
•
Menu
Navigation
Short
press
MENU button
to
access
the
device
menu
interface,
rotate the
volume
knob to
choose
PLAYLIST/ARTIST/ALBUM/GENRE/SONGS,
press
the knob to
enter
the
desired
item.
Continue
to rotate
or
press the
volume
knob to
select
the
folder
and
play
the
songs.
Simply
press MENU button again to return to
the
regular
display.
•
Control
Lock
switch
Long
press
MENU and
VOLUME
knob
together
you can
unlock
the
DIGI
MUSIC
control
mode,
that
will
support
you to
control
the
DIGI
MUSIC
by itself,
but
this
way can not
support
the
DIGI
MUSIC
information
displayed
on the LCD.
-16-

CDC/DVDC OPERATION
MODE
(6)
• MODE Selection
Short press MODE
button to
select CDC/DVDC
mode.
Note:
If
there
is
no
CDC/DVDC
connected, this mode will
be
skipped. If
there
is
a
CDC/DVDC
connected to the
CDC/DVDC
port, this mode
will
be displayed.
The
unit
only
support
the
specified
CD/DVD Changer,
or
it
will
not
work.
Please
consult
your
local
dealer
SEEK+ (2)/SEEK- (5)
•
Track Selection
Short press to
automatically
seek the previous/next track.
Preset 1
I
PAUSE-PLAY
(11)
• Track PAUSE-PLAY
Short press to pause player.
Press 1 button again to resume
play.
Preset 2/ RPT (12)
• Track Repeat
Short press 2 button and
select "Repeat:
ONE" to repeat same song. Press 5 button and
select
"Repeat:
ALL"
to repeat
all
tracks or to stop repeat function.
Preset 3/
ROM
Button (13)
• Track Random
Short press 3 button and
select
"Random: Track" to play all
tracks
in
random. Press this button
again and
select
"Random:
Off'
to
cancel
random function.
BAND (3)/SCAN (9)
•
Disc selection
You
may short press BAND as
"pre-disc" button and
SCAN
as
"next-disc"
button.
-17-

BLUETOOTH
OPERATION
MODE
(6)
• MODE Selection
Short press MODE button to select BLUETOOTH mode, when there
is
a Bluetooth device
connecting with the unit, "BT PLAY" will be displayed.
Note: Choose "RFX9900DM" from your BT device and enter "0000" as the default passcode
for the Bluetooth link.
SEEK+ (2)/SEEK-
(5)
• Track Selection
Short press to automatically seek the previous/next track.
Preset 1/ PAUSE-PLAY
(11)
e Track PAUSE-PLAY
Short press to pause player. Press 1 button again to resume play.
AS/PS (10)
• BT Disconnecting
Long press AS/PS key to disconnect the current Bluetooth device from the unit,
but this will not erase the pairing from unit memory.
SCAN (9)
• BT Erasing
Long press SCAN key to erase all Bluetooth pairings stored
in
the unit memory, you should
re-enter the passcode next time to connect the Bluetooth.
-18-

IR
REMOTE CONTROL
1 2 3
4
5
6
8
1
9
10
12
5
13
14
16
17
18
1.
POWER
2.
MODE
3.
PAIR
(OPTION)
4.
SCAN
5.
AS/PS
6. BAND
7.
MUTE
8.
PLAY/PAUSE
9.
REPEAT
10. INTRO
11
. RANDOM
12. SELECT
13. MENU
14.
GOTO
15.
DISP
16.
VOL+ ,VOL-
17.
REMIND/FORWARD
18. ENT
19.
NEXT/PREVIOUS
20.
NUMO-
NUM9(3
is
for
up
, 0
is for
dowm
, 6 is for left,
8 is
for
right, 7 is for enter)
-19-
/