Page is loading ...

Customer Service Hotline 1-877-693-PURE
Page 8
Home Master
®
Water Filter Owners Manual
Perfect Water Technologies, Inc.
Copyright © 2013
Customer Service Hotline 1-877-693-PURE
Perfect Water Technologies
Home Master
®
Water Filter
Installation & Service Manual
HMF1C
HMF2SdgC
HMF2SdgCCKDF85
HMF3SdgFeC
HMF3SdgNCCKDF85
HMF-CYO
USE A LICENCED PLUMBER TO
INSTALL THIS PRODUCT

Customer Service Hotline 1-877-693-PURE
Page 2
Home Master
®
Water Filter Owners Manual
Contents:
Instruction book: detailed descriptions, photos and troubleshooting guide
Mounting bracket & screws assembled with housing cap(s)
Housing sump(s) with filter(s), o-ring, and silicone grease
Filter housing wrench
Maintenance Schedule
SEE APPENDIX A
General System Specifications (See Appendix A for additional Information)
Feed water: PSI 20 - 90 PSI ; for pressure greater than 90 PSI install a pressure
regulator set to 75 PSI
Feed water Temperature: 40˚ - 100˚(F)
IRON BACTERIA: NONE
Your results may vary depending on regular maintenance, general condition of unit, and
initial water supply. Filter not designed to treat microbially unsafe or non-potable water
without adequate disinfection before and after unit.
Customer Service Hotline 1-877-693-PURE
Page 7
Home Master
®
Water Filter Owners Manual
APPENDIX A
Annual Water Consumption
1 person 25,000 gallons
2 people 55,000 gallons
4 people 100,000 gallons

Customer Service Hotline 1-877-693-PURE
Page 6
Home Master
®
Water Filter Owners Manual
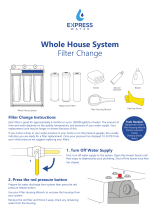
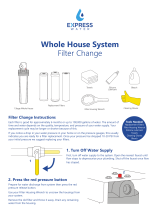
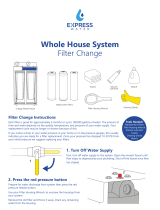
Filter Change Instructions
1. For well water—shock chlorinate your well and pipes prior to removing filters.
2. Turn off the water supply to the system. Depress the red pressure release button on the top of
the filter housing cap to relieve system pressure. If your system was not equipped with a
pressure relief valve, leave open a nearby faucet. This will make removing the filter housing
possible.
3. Unscrew the housing (sump) from the cap using the filter wrench included with your system, or
a commercially available “strap” type wrench. Remove and discard old filter cartridge.
4. Scrub the sump and cap with warm water mixed with about 2 tablespoons of household bleach
using a sponge or soft rag. Wear rubber gloves.
5. A) Pour 2 cups of unscented concentrated bleach in each empty sump and close the system to
hand tight and fit snug tight with the wrench. DO NOT over tighten. B) Drain your hot water
heater. C) Open the main water supply to the system. D) Open a faucet at the furthest point
from the system and run water until you smell the chlorine. Flush the toilet. Repeat at each point
of use moving towards the filter system. E) Close the main water supply to the system. F) Open
each housing.
6. Lubricate the o-ring with clean silicon grease if needed. DO NOT USE PETROLIUM JELLY.
Insert o-ring in grove and press into place taping the o-ring all the way around. Make sure the o-
ring is seated level. Replace o-ring if damaged or stretched.
7. Remove filter packaging and insert new filter cartridge into the sump, making sure that it slips
over the standpipe in the bottom of the sump.
8. Fit the bottom of the housing (sump) into the cap and hand tighten, then use the filter wrench to
fit snug. Do not over tighten.
9. Turn on the water supply slowly to allow the system to fill with water. Close any open valves
downstream of the system once water flows and air is purged. Inspect system carefully for
leaks. If a leak is found, first follow the shut off de-pressurization procedure and then remove
the housing to inspect the o-ring to ensure that it is seated properly. Then retighten.
10. Flush the system by turning on a few cold-water faucets. Allow the water to run until the air and
carbon has been purged. Water may be cloudy initially. New activated carbon filter cartridges
may contain loose carbon and air bubbles after installation.
Customer Service Hotline 1-877-693-PURE
Page 3
Home Master
®
Water Filter Owners Manual
Installing The Whole House Filtration System
Tools Required
Safety glasses hacksaw
Towels Soldering iron or torch
Flat head screwdriver Power drill
Medium Crescent wrench Teflon tape
Monkey wrench
Parts required (not included)
(2) shut off valves bypass valve (s) (optional)
(2) hex nipples or pipe nipples pressure gauge (s) (optional)
(2) pipe unions pressure regulator (as needed)
(1) ground jumper cable
(2) pipe hangers
USE A LICENECED PLUMBER TO INSTAL THIS PRODUCT
Preliminary Notes
This installation guide provides a step by step, start to finish procedure
for installing your Home Master® water filter.
All steps provided herein are for typical installations only. You application
may be different.
Pre-Installation
For well water - SHOCK CHLORINATE your well and pipes immediately
prior to installation and every filter change.
Filter should be protected from freezing, direct sunlight, extreme
temperatures, kept dry and level.
Make a list of all the plumbing fittings and tools you will need to
completely install the system according to your application.
Turn the water off to your house while installing the system.
Turn off the electricity to your electric water heater during installation.
After the system is installed and pressurized, turn on a few hot and cold-
water faucets, and let them run until there is no more air in your lines,
then turn the electricity back on to your water heater.
Use Teflon tape on threaded fittings.
Be sure to note inlet and outlet markings. The sediment filter is the first
stage of the water filter.

Customer Service Hotline 1-877-693-PURE
Page 4
Home Master
®
Water Filter Owners Manual
A three-valve by-pass valve and loop may be installed to loop the entire
system which makes servicing easier.
Hard copper pipe generally comes in two types. Use the thicker "L" type
copper pipe rather than thinner "M" type copper pipe.
Follow all local plumbing and building codes.
Installation
1. Turn off the main line water shutoff valve to the house.
2. Next, open all plumbing fixtures in the house in order to drain the lines of as much
water as possible.
3. The filter should be installed on the main water supply line near where it enters the
house, at any point past the main shut-off valve for the whole house, but before pipes
branch off into multiple directions. However you may choose to locate the filter after the
line branches to the inside and outside plumbing depending on your desire for filtered
water in your outdoor plumbing.
4. Measure, cut and remove a section of the main incoming water line near where the
system is to be installed. When determining the length of pipe to cut, account for filter
width, shut off valves, union fittings, nipple fittings, pressure gauges (if used) and by-
pass valve (if used). Allow this line to drain thoroughly. Smooth the newly cut ends
down to avoid jagged points or edges. Your filter should be located in a dry, level
area and protected from freezing, and direct sunlight.
5. Place a shutoff valve and/or a pressure gauge immediately on either side of the filter
for future ease of service.
6. Securely mount the whole house filter using supplied mounting bracket and bolts.
Ensure system is level.
7. You may now need to adjust pipe length or distance. Fit a pipe union onto the cut
section of the main Water Line IN. (see diagram).
8. Fit together pipe union and shut off valve. Use Teflon tape on threaded fittings.
9. Simultaneously fit together shut off valve and whole house filter using pipe nipple or
hex nipple to draw then together on the IN side of the filter.
10. Fit pipe hanger on water IN side for additional support.
11. Simultaneously fit together filter and the shut off valve on the OUT side of the filter.
Fit pipe union to shut off valve on OUT side.
Customer Service Hotline 1-877-693-PURE
Page 5
Home Master
®
Water Filter Owners Manual
12. Check pipe length and pipe union length to see if additional pipe length or union
required. Join pipe union and pipe.
13. Fit pipe hanger on water OUT side for additional support. Connect ground jumper
cable (if necessary)
14. A) Remove each filter from its packaging, B) replace it in the sump taking care
that it slots over the standpipe at the bottom of the sump, C) apply supplied silicone
grease and o-ring to the sump’s o-ring channel at the top of the sump, and D) fit to
housing cap hand-tighten, then fit snug with housing wrench. DO NOT over tighten.
The SEDIMENT filter treats the water first. The CARBON filter treats the water last. In 3
housing units the IRON or Nanofiber filter will be in the center position.
Turing the water back on
Turn your water on slowly. In a few minutes, the sound of water entering the system
will stop. After the unit is installed, it is necessary to flush the unit thoroughly. Do this
at the nearest COLD water faucet. DO NOT USE A HOT WATER FAUCET TO PERFORM
INITIAL SYSTEM FLUSH. The water will be blackish in color for some time - this is
normal carbon dust. Continue to run water until it runs clear and all air has been
purged. Shut the water off and let the unit sit for a while, and then flush it again. It is
not unusual for the water to appear "cloudy" for a day or so following installation - this
cloudiness is actually tiny air bubbles being purged from the carbon. This is normal,
harmless, and will clear up in a day or two.
Notes
Even though there is filtered water in the cold water lines, the hot water heater is
still full of raw water. Through normal use, this water will be replaced with filtered
water in about 2 or 3 days. If you wish to accelerate the process, or if you have not
done so in the past 2 years, then drain your hot water heater.
This filter system should not be used with water that is microbiologically
unsafe or of unknown quality without adequate disinfection before and/or
after the system.
Water filter systems should never be exposed to freezing temperatures -
severe damage to the filter and housings could result. Such damage is not
warrantied.
After prolonged periods of non-use (such as a vacation), it is recommended that the
system be flushed thoroughly for at least 5-10 minutes before using the water.
/