Page is loading ...

D26RS
User Guide
DASH CAM
AUTOMOTIVE
DIGITAL VIDEO RECORDER

2
TABLE OF CONTENT
What's Included ...................................................... 3
Welcome ................................................................. 3
Product Introduction .............................................. 4
Feature Descriptions ...........................................5-6
Dash Cam Installation .........................................7-8
Operations .........................................................9-14
Device Functions .............................................15-20
Troubleshooting .................................................... 21
Specifications ...................................................22-23
Precautions ............................................................ 24
Menu Options .................................................. 25-26
Warranty ...........................................................27-30

3
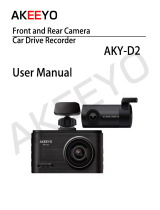
WHAT'S INCLUDED
Thank you for choosing a Whistler product. We are
dedicated to providing products that represent both
quality and value. Please read the user guide carefully
before using this product. If you have additional
questions, please visit the FAQ page on our website at
www.whistlergroup.com
or call toll free 800-531-0004
8am to 5pm CT, Monday through Friday
to speak to a Customer Service Representative.
D26RS
USER
GUIDE
USB CABLEPOWER CORD
WELCOME
MOUNT
MICRO SD
CARD
SPARE
ADHESIVE
PAD

4
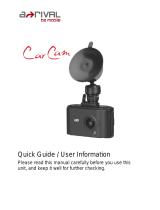
PRODUCT INTRODUCTION
1
1. Power
2. Microphone
3. LED indicator
4. Menu
5. Up
6. Down
7. OK
8. Mount connector
9. Monitor
10. Reset
11. MicroSD slot
12. USB port
13. USB for charging
14. Magnetic mount
2
3
4 5 6 7
8
9
10
11
12
13
14

5
FEATURE DESCRIPTIONS
1. Power – Press and release to turn on, Press and
Hold for 2 seconds to turn off.
When not recording, press to switch between
Video Record, Capture, and Playback modes.
When recording, a quick press locks the current file.
Press to exit any selected menu.
2. Microphone – Audio receiver for video recording.
3. LED Indicator – Blue = STBY, Red = charging,
Flashing Blue = Recording.
4. Menu – When not recording, press to access Mode
Settings menu. Press again to access Setup menu.
5. Up/Down – In the Main Menu, press to select next/
previous menu item or file.
In STBY or Video Recording mode press Down to
turn the microphone on/off.
In Capture mode, press to zoom in or out.
In Playback mode, press to fast forward and rewind.

6
FEATURE DESCRIPTIONS
7. OK – In Video Record mode, press to start
recording; press again to stop.
In Capture mode, press to take a picture.
In Playback mode, press to select a file, or pause/
un-pause a video.
In STBY or REC mode press and hold to capture
picture.
In any menu, press to select a menu item or to
confirm selected option.
8. Mount connector – Connects unit to magnetic
mount.
9. Monitor – View photo and video.
10. Reset – If device is not responding use a small pin,
push in to reset the device.
11. MicroSD slot – Slot for memory card.
12. USB port – Allows PC interface to access microSD
card.
13. USB for charging – Provides power to operate
device.
14. Magnetic mount – Windshield attachment.

7
DASH CAM INSTALLATION
1. Insert microSD card into the DVR. Use a high
speed SD card (Class10 or above); capacity
should be within 8-64 GB.
2. Peel off the 3M film to expose adhesive and
secure magnetic mount on the windshield in a
location that does not obstruct your view. The
USB connector faces the interior of the vehicle.
3. Connect the car charger to the cigarette lighter
socket.
4. Connect the USB connector to the magnetic
mount USB port.
5. Secure device to magnetic mount and adjust
the camera position.
6. Unit will automatically turn on and start
recording when power is applied. Unit will turn
off when power is removed.
NOTE: When installed correctly, the indicator
will glow red; the device will start up and begin
recording (indicated by flashing blue light).

8
DASH CAM INSTALLATION
Facing Outward Facing Inward
5º 5º
45º
45º
5º 5º
45º
45º
Tilt the unit slightly forward, backwards, clockwise
or counterclockwise on its axis up to 5º to center the
horizon as viewed on the display. In addition, you can
face the camera forward or backward on the mount and
rotate up to 45º left or right of center view.

9
OPERATIONS
Date & Time Setting
1. Once connected with car charger, the device
will power ON and start recording. Press OK
button to enter STBY mode.
2. Press the MENU button twice to get to Settings
menu. Press down button until you reach
Clock Settings. Press OK to enter settings.
3. Press Up/down button to set Year, then press
OK to move to set Month, Day, Hour, and
Minutes. When finished press OK at bottom of
screen to go back to Settings menu.
4. To exit Settings menu press the power button.
NOTE: Always turn dash cam off before inserting
or removing the micro SD card.
NOTE: You must format the SD card in the unit
prior to using the unit.

10
OPERATIONS
Video, Capture, Playback Quick Instruction
When the unit is placed in STBY, there are 4
modes accessible with a brief press and release
of the power button. Movie, Still Capture
Video Playback , Still Capture Playback .
NOTE: REC and Still Capture offer different
menu options. press the Menu button when in
each mode to see available settings.
Press the up or down button to scroll thru the
settings.
Press OK to make a selection
Video
Insert the microSD card, connect the device to
an external power supply, unit will start recording
automatically (indicated by the flashing blue
light). Press the OK button to stop recording (the
blue light will become steady). Press OK again to
record another video. Each video will be saved
automatically.

11
OPERATIONS
Movie Mode
In this menu you can choose the quality of the
video and additional features such as Clip Time,
Sound, Exposure, etc.
Photo
In Video Record mode, press and hold the
OK button to take a photo (it will be saved
automatically).
Still Capture Menu
In this mode you can select up to 4X zoom.
When in the Still Capture menu, choose Still
Image size / Still Quality / Exposure /Contrast.
Playback
When in STBY, press Power button twice to enter
Playback mode; press Up and Down buttons to
select a file; press OK button to play a file. During
Playback, press OK to pause/unpause; press Up
and Down keys to fast forward/rewind.

12
OPERATIONS
Lock File
In REC mode, press Power to protect the current
recording. “Lock current file” will appear on
screen and a symbol will appear to indicate
this file is protected. In Playback mode, select
a file, press Menu and select Protect, then Lock
Current or Lock All. Protected files cannot be
deleted or overwritten. Select Unlock Current/
Unlock All to remove protection.
NOTE: Format will erase ALL data on card.
Battery
Red indicator lights up when the device is
plugged into an external power supply; as the
battery is charging, the red will gradually dim;
the red light will shut off when the battery is full.
Full Battery Slightly Low Battery Low Battery Battery Empty

13
OPERATIONS
PC Player
You can playback recordings on your PC or MAC
using any Video Player program that supports
MP4.

14
OPERATIONS
Understanding the Display
2
1. STBY or REC Mode
2. File Time
3. Exposure setting -2 thru +2
4. Movie resolution FHD or HD
5. SD card installed
6. Motion Detect ON
7. Parking Mode ON
8. Frames per Second
9. Battery Gauge / Charging Status indicator
10. Microphone Status
11. Date and Time
6
3
5
7
10
11
1
4
8
9

15
DEVICE FUNCTIONS
Movie
Mode
In this menu section you can
choose the quality of the video
1920 x 1080 30fps
1080 x 720 30fps
Movie Clip
Time
Also known as Loop recording,
allows saving the recording
in separate files every few
minutes. For example, if set to
1 minute, 10 minutes of footage
will be saved as 10 one-minute
fragments. If the memory card
is full, all unprotected files will
be overwritten in the order they
were created.
Off / 1 Min / 2 Min / 3 Min /
5 Min / 10 Min
Movie Off
Time
Select extended time of
recording after power is
removed or unit is removed from
the window mount.
5 Sec / 30 Sec / 1 Min / 3 Min

16
DEVICE FUNCTIONS
Motion
Detect
When an object is moving in
front of the camera, REC will
start automatically. Recording
will stop at end of event (the
time selected in event time)
or when the object in front of
the camera does not move for
more than 10 seconds. These
recordings are not protected.
The Motion Detection Feature
needs to be enabled each
time the user manually enters
STBY or power cycles the
device. Select the motion event
recording time using “Motion
event REC”.
Motion
event REC
Select extended time of
recording after motion is no
longer detected.
5 Sec / 10 Sec / 30 Sec / 1 Min.

17
DEVICE FUNCTIONS
Sound
Record
Provides option to record video
with or without sound.
Exposure
Set exposure of sensor
-2 / -1 / 0 / +1 / +2

18
DEVICE FUNCTIONS
Beep
Configure unit to give Beep
confirmation when any button is
pressed
Power Off
Select auto shut off period
Never, 1 Min, 5 Min.
Clock
Settings
Set Date and Time
Date
Format
Select preferred format
None
YYYY MM DD
MM DD YYYY
DD MM YYYY
Stamp
Format
This function adds date stamp
or device logo to the video
recorded. Press OK to select
type of stamp or to switch the
function off.
Off / Date / Logo / Date+Logo

19
DEVICE FUNCTIONS
Language See list in Specifications
Flicker
Set refresh rate of Display
50 Hz / 60 Hz
LCD Power
Save
Automatically shut off the screen
to reduce power consumption.
Off / 1 Min / 3 Min

20
DEVICE FUNCTIONS
G-Sensor
The DVR will automatically
lock the current video if shock
exceeds G-Sensor setting.
EXAMPLE: (if vehicle is hit.)
Off / Low / Medium / High
Parking
Monitor
When enabled and camera is turned
OFF, unit will monitor vibration
and automatically wake to record
a protected file when vibration
exceeds the preset level.
Off / High / Medium / Low
Reset Setup
Factory default settings will be
applied, User settings will be
lost.
Format
SD-Card
Must format SD card in product
before first use
FW Version Displays current version of FW
/