1
Figure 1
Notes
1. This manual is written with the assumption that the
tractor is not supplied with rear remotes or backhoe.
2. This valve kit is designed to operate hydraulic
cylinders.
3. For further assistance write to:
Land Pride Service Department
P.O. Box 5060
Salina, Ks. 67402-5060
E-mail address: lpservicedept@landpride.com
Assembly Instructions
Initial Preparations
1. Park tractor on a flat surface, place gear shift lever in
park, turn off engine, and remove ignition key.
Valve Assembly
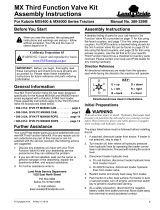
Refer to Figure 1 & Figure 2:
1. Remove hardware “A” used to mount the tractor’s
loader control valve assembly “B”.
2. Bolt Land Pride’s third function valve assembly in
place by positioning mount bracket (#2) under the
tractor’s loader control valve assembly “B”.
3. Reinstall hardware “A” removed in step 1 to secure
Land Pride’s third function valve as shown.
37117
A
B
2
1312
11
9
10
For color photos, visit
https://dealers.landpride.com/en/12036/dealer-training
and look for "Third Function Valves."
4. Route hydraulic hoses (#12 & #13) under the tractor’s
platform and back towards the rear of the tractor.
Figure 2
Connect Hydraulic Hoses to Power
Beyond Ports
1. Locate and remove hydraulic hose that connects
power beyond port of tractor’s loader valve assembly
to outlet block under the tractor platform.
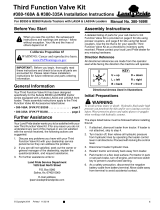
Refer to Figure 2:
2. Connect hydraulic hose (#13) from “P” port of
third function valve (#10) to fitting in outlet block
where hydraulic hose was removed in step (#1)
3. Connect hydraulic hose (#12) from “T” port of third
function valve (#10) to the fitting in the power beyond
port of loader valve where hydraulic hose was
removed in step #1 above.
4. Secure hoses (#12 & #13) to tractor as needed with
cable ties (#3).
5. Check tractor hydraulic fluid level. If low, add
recommended hydraulic fluid. Refer to your tractor
Operator's Manual for recommended hydraulic fluid
and procedure for checking hydraulic fluid level.
37118
Attach to positive
(+) post on the
tractor battery
Right-
Hand Side
Left-Hand
Side
T-Po rt
P-Port
IMPORTANT: Land Pride recommends that your
dealer connects hydraulic hoses (#12 & #13) to your
tractor’s power beyond ports. Improper hook-up
could cause damage to your tractor or valve.
For L2501, L3301 & L3901 Kubota Tractors with LA525 Loader
For L3200 & L3800 Kubota Tractors with LA524 Loader
For L4600 Kubota Tractor with LA764 Loader
For L4701 Kubota Tractor with LA765 Loader
380-153M
© Copyright 2016 Printed
5/3/19
Third Function Valve Kit #380-152A
Installation Instructions

2
Third Function Valve Kit #380-152A Installation Instructions 380-153M 5/3/19
Assembly Instructions
Figure 3
Control Lever Assembly
Refer to Figure 3 & Figure 4:
1. Remove existing knob (not shown) from end of
control lever “C”.
2. Install new joystick (#14) over end of control lever “C”
with push buttons facing operator as shown.
3. Tighten set screws (#4) against control lever “C”.
Tighten jam nuts (#5) to secure set screws (#4).
Refer to Figure 4:
4. Reference Connections “A”: Connect one
black wire in harness (#15) to one black wire in
harness (#10) and the other black wire in
harness (#15) to one white wire in harness (#10).
5. Reference Connection “B”: Connect the two red
wires from the joystick (#14) to one end of wire (#8)
with fuse holder (#16), and connect opposite end of
wire (#8) to the positive (+) post on the tractor battery.
Refer to Figure 3:
6. Secure wiring with cable ties (#3) as needed.
Cross Beam Mount For L2501, L3301,
L3901, L3200, & L3800 Tractors
Refer to Figure 4 & Figure 5:
1. Orient bulk head mount (#1) as shown and attach it to
right-hand side of loader crossbeam “D” with
u-bolt (#7) and hex whiz nuts (#6). Tighten hex whiz
nuts to the proper torque.
Cross Beam Mount For L4600, L4701
Tractors
Refer to Figure 4 & Figure 6:
1. Remove existing top and top rear hardware
(#18 & #19) from the right-hand side of loader cross
tube “E”.
2. Orient as shown and attach bulk head mount (#17) to
right-hand side of loader cross tube “E” with new W8-
1.25 x 35 bolt (#19) and new W8-1.25 x 20 bolt (#18),
lock washers (#20) and flat washer (#21). Tighten
bolts (#18 & #19) to the proper torque.
37119
Push Buttons
15
4
14
C
3
5
Figure 4
Figure 5
Figure 6
37118
Attach to positive
(+) post on the
tractor battery
Right-
Hand Side
Left-Hand
Side
T-Po rt
P-Port
37120
1
9
6
7
D
37245
19
9
17
20
21
21
20
18
E

3
5/3/19 Third Function Valve Kit #380-152A Installation Instructions 380-153M
Assembly Instructions
Figure 7
Hose Routing Along Loader Arm
Refer to Figures 4, 5, & 6 on page 2 & Figure 7:
1. Route hydraulic hoses (#9) along loader arm and
through loader loop bracket “F” to third function valve
assembly (#10).
2. Connect hoses to quick couplers (#11) on
“A” & “B” ports of valve block (#10).
3. Secure hydraulic hoses (#9) as needed with
cable ties (#3).
37121
9
F

Corporate Office: P.O. Box 5060
Salina, Kansas 67402-5060 USA
www.landpride.com
-
 1
1
-
 2
2
-
 3
3
-
 4
4