Page is loading ...

QUICK-ROTAN Elektromotoren GmbH
Königstraße 154
67655 Kaiserslautern, Germany
Tel: +49 (0) 631 200 38 80
Fax: +49 (0) 631 200 38 62
E-mail: [email protected]
www.quick-rotan.com
English 2008-06-04
DA104ED
Instruction manual
Part 2
Type
QE3760/QE5540
EcoDrive

Table of Contents Part 2
Chp. Contents Page
7.Description of the EcoDrive drive system7.1 - 7.
4
7.1 QE5540 motor
7.2 Control unit
7.3 External EcoTop II control panel
7.4 Start-up the machine / control for the first time
8.Application8.1 - 8.1
3
8.1 Speed menu
8.2 Heating duration in seconds menu
8.3 Bobbin thread counter menu
8.4 Curve and seam pattern menu
8.5 Entering soft stitches
8.6 Displaying the totals of the day/seam counter
8.7 Direct access to parameter 942 (angle of bobbin thread clamp)
8.8 Interrupt seam by raising clamp without variable sewing speed
8.9 Interrupt seam with/without raising clamp with variable sewing speed
8.10 Treadle switch mode
8.11 Using the SD card
8.12 Error messages (troubleshooting)
9. Parameter programming 9.1 - 9.6
9.1 Programming level a
9.2 Programming level b
9.3 Programming level c
9.4 Resetting -RESET-
10.Start of operation10.1 - 10.
8
10.1 Checking the direction of rotation and the reference position of the
needle bar (needle position NP0)
10.2 Teach process for the gear ratio
10.3 Checking needle positions NP1/NP2
10.4 Checking the maximum speed
10.5 Hardware test
DA104-ED-2-EN 08-06-04
Technical modifications reserved!

7. Description of the EcoDrive drive system
The EcoDrive drive system is an electronically commutated, brushless DC motor.
The drive system comprises the following main assemblies:
Fig. 7.1 Fig. 7.2
Motor QE5540 (Fig. 7.1) with an integrated opto-electronic angular rotation sensor for
commutation and positioning.
Control unit (Fig. 7.2) with
- mains connection with interference suppression circuit
- electronically controlled switched mode power supply (SMPS)
- d.c. link
- motor-guided inverter
- control electronics for the motor control unit and machine-specific functions
EcoTop II control panel (Fig. 7.3) with card reader on the right side of the housing.
7.1 QE5540 motor
The motor is a synchronous motor. It has a permanent-magnet rotor, an opto-electronic commutation
transmitter (rotor position sensor) that is mounted on the fan side, and a stator with three-phase
winding.
The rated output of the motor (shaft output) is 550W (QE5540) in S5 mode. The rated speed of the
motor is 4000 rpm (QE5540), the maximum speed is 4500 rpm.
The motor has two connection cables
a) four-conductor with four-contact AMP special plug (X1) for connecting the stator windings to the
control system
b) six-conductor shielded with nine-contact D-sub connector (X2) for connecting the commutation
transmitter to the control system.
DA104ED-2-EN 7.1 08-06-04
Fig. 7.3
A B C D P S L
1 2 3
4
5
6
7 8 9
ESC
0
PM TE F1 F2
+ + +
-- -- --

7.2 DA104ED control unit
Fig. 7.5 Fig. 7.6
The control system casing is suspended from below and screwed to the table top with four screws
which are included with delivery.
The mains connection is single-phase via the three-conductor cable exiting from the back.
The control unit has peripheral function controls
on the front (Fig. 7.5):
X0 9-contact D-sub socket for data transfer
on the back (Fig. 7.6):
the connection sockets and plugs
X1 four-contact socket for connecting the stator windings of the motor
X2 nine-contact D-sub socket for connecting the incremental encoder of the motor
X3 nine-contact D-sub connector for connecting the speed control unit SCU2
X4 nine-contact D-sub connector for connecting the PicoTop control panel
X5 37-contact D-sub socket for connecting process controls
(keys, switches, magnets, solenoid valves) to the machine
X6 six-contact Western socket for connecting a light barrier.
X1
X2
X3
X5
X4
X0
DA104ED-2-EN 7.2 08-06-04
X6

A B
C D
P
S L
1 2 3
4
5
6
7
8 9
ESC
0
PM TE F1 F2
+ + +
-- -- --
Number keys
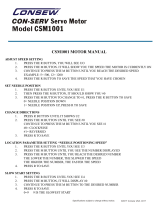
Fig. 7.7
Card reader
Bow,
can be pivoted
up
DA104ED-2-EN 7.3 08-06-04
T2 T3 T4 T5 T6 T7 T8 T9 T10 T11T1
The EcoTop II control panel (Fig. 7.7) has the following components:
- a two-line display with 16-digit LCD matrix
- an integrated card reader for SD memory card that is located on the right-hand side
under a bow that can be pivoted up.
- 7 setting ranges: A+ / A-, B+ / B-, C+ / C-, D+ / D-, P+ / P-, S+ / S-, L+ / L-
- an ESC key to cancel entries and actions
- an enter key for confirming entries and actions
- 11 keys (T1...T11) for machine functions
Function of keys T1 … T8 for machine functions
- T1 soft start (on / off)
- T2 preheating (t-heat), if switched on + / - with key A
- T3 acknowledgement for error 8 for bobbin and seam counters
- T4 PM key seam programs on/off (operated with variable sewing speed).
- T5 page key for changing the type of function e.g. backtack stitches, parameter values and speed.
- T6 TE key for switching on the „Changing set values“ mode e.g. backtack stitches and parameter values.
- T7 Speed change
- T8 Totals of daily or seam counters
- T9 quick access to parameter <942> for Release lower thread clamp
- T10 function key F1 for seam interruption
- T11 function key F2, currently unallocated.
The T1to T11 keys and the number keys each have a signal light (LED).
Each LED gives an optical response regarding the switch status of the function allocated to the respective key.
If the function is switched on, If the function is switched off,
the LED lights up! then the LED is off!
7.3 External EcoTop II control panel
n

7.4 Start-up the machine / control for the first time
1) Switch on the machine.
2) Display on the control panel is „PULLEY“
The transmission ratio must be learned.
Press the right pedal to lowering the clamps and start the machine with the
left pedal.
The machine runs with reduced speed into the home position (see chap. 10.2).
3) Adjust the reference position with parameter <700>.
To adjust the parameters the provided sd-card must be inserted into the
control panel (see chap. 8.11).
Therefor the level „C“ must be activated (see chap. 9).
The reference position from machine class 506-3 is „needle point into needle plate“.
- Press shortly left pedal
- With the hand wheel from the machine in rotating direction, bring the
needle point into the needle plate
- Press shortly left pedal
- Press TE-key to leave the programming level (see also chap. 10.1).
- Display on the control panel is: ERROR 7
Press the right pedal to lowering the clamps and start the machine with the
left pedal.
The machine runs with reduced speed into the home position.
The Stop-position at seam end is:
Thread take-up lever in the „upper position“ and the ejection of the bobbin must be
possible.
If necessary with parameter <700> or <703> readjust the position at seam end.
4) Cam disk adjustment.
In delivery status of the control box the cam disk 9 with 84 stitches is preselected.
With parameter <821> you can select the correct cam disk (see chap. 8.4).
If it is not the correct cam disk adjusted, than following procedure:
- if the inserted cam disk has 116 stitches for example (or more than 84 stitches):
The machine runs with preselected speed, up to 84 stitches further with slow speed
till the home position is reached.
- If the inserted cam disk has 72 stitches for example (less than 84 stitches):
The machine runs with preselected speed till the home position is reached.
The threads eventually will not be cutted from the burner at seam end.
DA104ED-2-EN 7.4 08-06-04

8.1 Speed menu
What is shown on the display (Fig. 8.1)
Set speed Operator level
Speed setting is only possible when the machine is at standstill:
Press key T7, LED lights up
with button L + (increase)
or
button L - (decrease)
Press key T7, LED goes out.
DA104ED-2-EN 8.1 08-05-29
8. Application
This EcoDrive drive system can only be operated with an external EcoTop II control panel.
Maximum speed
The maximum speed is set with the EcoTop II control panel using parameter <607>.
A+
A B
C D
P
S L
1 2 3
4
5
6
7
8 9
ESC
0
PM TE
F1 F2
+ + +
-- -- --
Number keys
Fig. 8.1
Card reader
Bow,
can be pivoted
up
T7
n

DA104ED-2-EN 8.2 08-05-29
8.2 Heating duration in seconds menu
With the paging function (T5) on/active, use P+ to reach the “Heating duration” menu.
What is shown on the display (Fig. 8.2)
Heating duration Heating duration in seconds
Setting the heating duration in seconds is only possible when the machine is at standstill:
Press key T2, LED lights up, pre-heating on
with button L + (increase)
or
button L - (decrease)
Press key T2, LED goes out, pre-heating off.
L+
P+
A B
C D
P
S L
1 2 3
4
5
6
7
8 9
ESC
0
PM TE
F1 F2
+ + +
-- -- --
T2
Number keys
Fig. 8.2
Card reader
Bow,
can be pivoted
up
T5
n

L+
DA104ED-2-EN 8.3 08-05-29
P+
A B
C D
P
S L
1 2 3
4
5
6
7
8 9
ESC
0
PM TE
F1 F2
+ + +
-- -- --
T3
8.3 Bobbin thread counter menu
With the paging function (T5) on/active, use P+ to reach
the “Bobbin thread counter” menu.
What is shown on the display (Fig. 8.3)
Bobbin thread counter Number of cycles
Setting the number of cycles is only possible when the machine is at standstill:
with button L + increase the number of cycles
or
button L - decrease the number of cycles
Note:
1) With Error 8, confirmation is made using the T3 key or S3 key (bobbin changeover) on the
machine
2) Bobbin changeover without Error 8:
With the T3 key bobbin thread reset
or
close the bobbin door and use the S3 key (bobbin changeover) at the machine.
Number keys
Fig. 8.3
Card reader
Bow,
can be pivoted
up
T5
n

DA104ED-2-EN 8.4 08-05-29
P+
A B
C D
P
S L
1 2 3
4
5
6
7
8 9
ESC
0
PM TE
F1 F2
+ + +
-- -- --
8.4 Curve and seam pattern menu
With the paging on/active, use P+ to reach the “Curve and seam pattern” menu.
What is shown on the display (Fig. 8.4)
Number of curves Number of stitches
that are firmly allocated to this curve
Setting the number of curves is only possible when the machine is at standstill.
The desired curves are selected using parameter <821>, which is
located on the parameter level “c” (see Setting parameters Chp. 9.3).
Curve No. 1 to No. 12 are available.
In parameter <821> the number of stitches allocated to the curves:
1 = 14 stitches
2 = 21 stitches
3 = 24 stitches
4 = 29 stitches
5 = 36 stitches
6 = 42 stitches
7 = 58 stitches
8 = 72 stitches
9 = 84 stitches (default)
10 = 116 stitches
11 = 144 stitches
12 = 168 stitches
Note:
The displayed number of stitches allocated to the curve are predetermined and cannot be altered.
Number keys
Fig. 8.4
Card reader
Bow,
can be pivoted
up
T5
n

DA104ED-2-EN 8.5 08-05-29
A B
C D
P
S L
1 2 3
4
5
6
7
8 9
ESC
0
PM TE
F1 F2
+ + +
-- -- --
8.5 Entering soft stitches
This function is switched on by pressing the T1 soft stitches key;
the LED for this key lights up.
What is shown on the display (Fig. 8.5)
The number of soft stitches is set with parameter <116>.
This function is switched off by pressing the T1 soft stitches key again;
the LED for this key goes out.
Number keys
Fig. 8.5
Card reader
Bow,
can be pivoted
up
T1
n

DA104ED-2-EN 8.6 08-05-29
A B
C D
P
S L
1 2 3
4
5
6
7
8 9
ESC
0
PM TE
F1 F2
+ + +
-- -- --
8.6 Display the totals of the daily/seam counter
This function is switched on by pressing the T8 totals of daily/seam counters;
the LED for this key lights up.
What is shown on the display (Fig. 8.6)
Piece counter
This function is switched off by pressing the T8 total of daily/seam counter again; the LED for this key
goes out.
The daily/seam counter (PC) is reset by pressing the 0 key on the ten-key field.
Ten-key field
Fig. 8.6
Card reader
Bow,
can be pivoted
up
T8
n
0 key

DA104ED-2-EN 8.7 08-05-29
8.7 Direct access to parameter <942> (angle of thread clamp)
This function is switched on by pressing the T9 direct access to parameter 942 key;
the LED for this key lights up.
What is shown on the display (Fig. 8.7)
Parameter No. Parameter value
Setting parameter 942 is only possible when the machine is at standstill:
with button L + to increase the parameter value
or
button L - to decrease the parameter value
This function is switched off by pressing the T9 direct access to parameter 942 key; the LED for this key
goes out.
L+
A B
C D
P
S L
1 2 3
4
5
6
7
8 9
ESC
0
PM TE
F1 F2
+ + +
-- -- --
Number keys
Fig. 8.7
Card reader
Bow,
can be pivoted
up
T9
n

DA104ED-2-EN 8.8 08-05-29
8.8 Interrupt seam by raising clamp without variable sewing speed
This function is switched on by pressing the F1 key; the LED for this key lights up.
The stitches set with parameter <102> can now be sewn; this is followed by a stop
and the clamp lifts according to the mode that was preset with parameter <424>.
With the left pedal you can lower the clamps, the start will following automatically.
What is shown on the display (Fig. 8.8)
Parameter No. Parameter value
Press the TE key to set parameter <102>; the LED lights up.
Parameter <102> is displayed and can be set as follows:
Parameter <102> can only be set when the machine is at standstill:
With button L + to increase the stitches (parameter value)
or
button L - to decrease the stitches (parameter value)
The “type of clamp lifting” can be set with parameter <424>,
1 = clamp left and right
2 = clamp left
3 = clamp right
4 = no clamp
See also Chp. 11.4, Parameter list, in section 3 of the operating manual.
To end parameter entry, press the TE key again; the LED goes out.
This function is switched off by pressing the F1 key again; the LED for this key goes out.
L+
A B
C D
P
S L
1 2 3
4
5
6
7
8 9
ESC
0
PM TE
F1 F2
+ + +
-- -- --
Number keys
Fig. 8.8
Card reader
Bow,
can be pivoted
up
F1 key
n

S +
L+
T9
8.9 Interrupt seam with/without raising clamp with variable sewing speed
This function is switched on by pressing the PM key; the LED for this key lights up.
The display shows the sewing speed, the number of sections, the selected sewing program and
the current section.
Teach in mode is started by then pressing the TE key.
What is shown on the display (Fig. 8.9)
Number of sections (max. 5) Stopp with clamps lifting at
Sewing speed Seam program (max. 5) the end from the current section
Current section 1
Procedure:
Press the PM key,
the display then shows the sewing speed, the number of sections, the selected seam program and
the current section.
Press the TE key to start teach in mode; the LED for the TE key flashes!
Select the number of sections (1 - 5 possible) using the D+ / D- key (only possible in teach in mode).
The program is selected using the keys P+ / P- (this is possible in PM, sewing and teach in mode).
Sewing start
After lowering the clamp, hold the start treadle,
the machine runs at low speed.
On reaching the set stitch number for the section, release the treadle; the machine positions.
Switch to the next seam segment (section) using the S+ key; repeat the process for this seam section.
When home position is reached, the teach in mode is finished; the LED for the TE key goes out.
If necessary, the number of seam sections is corrected.
Because of the heating calculation, the entire clamp range must be sewn.
The heating is switched off during teach in mode.
Speeds
Activate speed mode by pressing the T9 key (LED lights up).
Select the section range with the S+ / S- key.
Change the speed valid for this section using the L+ / L- key.
Lift clamp
At the end of the section, the lift clamp function can be activated as under parameter <424>using
the 1 key (in the ten-key field).
Lowering the clamps with the left pedal, the machine will starting automatically.
This function is switched off by pressing the PM key again; the LED for this key goes out.
DA104ED-2-EN 8.9 08-05-29
A+
D+ F1 key
Fig. 8.9
A B
C D
P
S L
1 2 3
4
5
6
7
8 9
ESC
0
PM TE
F1 F2
+ + +
-- -- --
Number keys
Card reader
Bow,
can be pivoted
up
n

8.10 Treadle switch mode
The treadle switch mode can be selected with parameter 423.
Treadle switch mode 1 is set on delivery.
Mode 1
Both clamps are lowered together after pressing the right-hand treadle switch once.
Both clamps are raised again by pressing the right-hand treadle switch again.
When the clamps are lowered, the sewing process is started by pressing the left-hand treadle switch.
Mode 2
The left-hand clamp is lowered by pressing the left-hand treadle switch.
The right-hand clamp is lowered by pressing the right-hand treadle switch.
Only when one clamp half is lowered can it be raised again by pressing the corresponding treadle switch.
When both clamps are lowered, the sewing process is started by pressing the left-hand treadle switch.
Mode 3
The left-hand clamp is lowered by pressing the right-hand treadle switch.
The right-hand clamp is lowered by pressing the right-hand treadle switch again.
Both clamps are raised by pressing the right-hand treadle switch again.
When both clamps are lowered the sewing process is started by pressing the left-hand treadle switch.
DA104ED-2-EN 8.10 08-05-29

DA104ED-2-EN 8.11 08-05-29
8.11 Using the SD card
Note: All keys are locked without the SD card!
Exception: the T3 key (delete Error 8 bobbin counter) and T5 key (paging) remain active!
For this reason, before switching on the machine, the SD card must be inserted in the SD card slot on the control
panel.
Precondition: The correct string (DA104ED.104) must be saved on the SD card.
Inserting the SD card:
Pivot the bow (Fig. 8.11) on the lower edge (see arrow) up.
This makes the SD card slot on the right accessible.
With the label on the SD card pointing forwards, carefully push the card into the SD card slot until the SD card
noticeably clicks into place.
All keys are released again once the machine is switched on.
Access, e.g. to the parameters on the parameter level, is possible again.
Removing the SD card:
Pivot the bow (Fig. 8.11) on the lower edge (see arrow) up.
This makes the SD card slot on the right accessible.
Carefully press the SD card in a bit and release again.
The SD card is now unlocked and can be removed.
After switch on the machine without an SD card, all keys are locked,
exception: the T3 key and T5 key, for example: programing from the parameters is not possible!
T3
T5
A B
C D
P
S L
1 2 3
4
5
6
7
8 9
ESC
0
PM TE
F1 F2
+ + +
-- -- --
Number keys
Fig. 8.11
SD card slot
Bow,
can be pivoted
up
n

DA104ED-2-EN 8.12 08-05-29
8.12 Error messages (troubleshooting)
The drive control system carries out cyclical checks of its own functional capacity and the functional
capacity of the entire drive system.
Malfunctions are shown via the external control panel display, e.g..:
Summary of error numbers:
Error No. Cause Remedy
1 Treadle not at rest Check the treadle
6 Clamp error reversible Check air pressure, clamp limit switch and
check treadle switch
7 Home position error Check limit switch on cam
8 Bobbin error Reset bobbin counter
9 Starting lock-out Check limit switches on bobbin door, top cover
and stop button
10 Wrong machine class Check setting parameter <799> machine class
12 Section sensor Check section sensor
17 Bobbin thread monitor Check light barrier and if necessary clean,
see also Dürkopp Adler manual
62 Short circuit on 24V (32V) direct voltage Find and resolve short circuit.
Switch drive system off and on again
63 Overload on 24V (32V) direct voltage, Switch drive system off and on again
I > 4A. Find consumer (magnet) that has
caused the error. Reduce mark-space ratio of
the magnet or replace magnet.
64 Mains voltage too low Have mains voltage checked.
(U < 150V)
65 Power electronics after switching on Switch drive system off and on again;
the mains switch not ready for operation. if error remains, then replace the control system.

DA104ED-2-EN 8.13 08-05-29
Error No. Cause Remedy
66 Ground fault; motor or motor supply line Replace motor.
has a protective earth short.
68 Power electronics shut-down Remove cause
during operation because:
a) Overcurrent or short circuit in motor
b) Overvoltage, mains voltage > 300V
Motor overloaded when braking
c) Undervoltage
69 No increments Replace motor and/or position sensor
or control unit
70 Machine blocked, no increment Check machine for sluggishness
from actual-value transmitter at maximum or see Error 70
motor current.
71 Actual-value transmitter not plugged in Plug in actual-value transmitter
74 No external SYMA Remove cause / PD3 missing
88 RAM defective Replace control unit
173 Start-up error Remove cause

9. Parameter programming
9.1 Programming level A (operator level)
At this level, the control parameters are programmed
that have a direct effect on the sewing process.
These are the parameters for the following functions:
- Soft start stitches speed parameter <117>
a) Switching programming level „a“ on
Mains switch on,
Drive system has not started
An „a“ appears on the display
Press the T/E key
Response:
T/E key lights up, the right-hand area of the display shows the first
parameter belonging to programming level „a“ (parameter number and parameter value)
Sewing is not possible
- Programming
The parameter number is set with keys P+ or P- (hundreds in the parameter number) and keys S+
or S- (tens and ones of the parameter number). The parameter value is programmed with keys L+
or L-.
DA104ED-2-EN 9.1 08-03-11
/