Page is loading ...

ORION® Gas Endpoints
Integral Endpoint for American® Residential Gas Meters
ORI-UM-00909-EN-04 (July 2014)
Installation Manual

ORION® Gas Endpoints, Integral Endpoint for American® Residential Gas Meters
CONTENTS
Disclaimer . . . . . . . . . . . . . . . . . . . . . . . . . . . . . . . . . . . . . . . . . . . . . . . . . . . . . . . . . . . . . . . . . . . . . . . . . . 5
Questions Or Service Assistance . . . . . . . . . . . . . . . . . . . . . . . . . . . . . . . . . . . . . . . . . . . . . . . . . . . . . . . . . . . . 5
Product Identication. . . . . . . . . . . . . . . . . . . . . . . . . . . . . . . . . . . . . . . . . . . . . . . . . . . . . . . . . . . . . . . . . . . 5
Scope Of Manual. . . . . . . . . . . . . . . . . . . . . . . . . . . . . . . . . . . . . . . . . . . . . . . . . . . . . . . . . . . . . . . . . . . . . . 5
Product Unpacking And Inspection . . . . . . . . . . . . . . . . . . . . . . . . . . . . . . . . . . . . . . . . . . . . . . . . . . . . . . . . . . 5
License Requirements . . . . . . . . . . . . . . . . . . . . . . . . . . . . . . . . . . . . . . . . . . . . . . . . . . . . . . . . . . . . . . . . . . 6
Installation Tools And Materials . . . . . . . . . . . . . . . . . . . . . . . . . . . . . . . . . . . . . . . . . . . . . . . . . . . . . . . . . . . . 6
Label Information . . . . . . . . . . . . . . . . . . . . . . . . . . . . . . . . . . . . . . . . . . . . . . . . . . . . . . . . . . . . . . . . . . . . . 6
American Gas Meters . . . . . . . . . . . . . . . . . . . . . . . . . . . . . . . . . . . . . . . . . . . . . . . . . . . . . . . . . . . . . . . . . . . 7
Meter and Indexes Before Endpoint . . . . . . . . . . . . . . . . . . . . . . . . . . . . . . . . . . . . . . . . . . . . . . . . . . . . . . . 7
Index Removal from an American Gas Meter . . . . . . . . . . . . . . . . . . . . . . . . . . . . . . . . . . . . . . . . . . . . . . . . . 7
American Meter Installation Materials . . . . . . . . . . . . . . . . . . . . . . . . . . . . . . . . . . . . . . . . . . . . . . . . . . . . . . . . 9
Assemble The Orion Endpoint And Index . . . . . . . . . . . . . . . . . . . . . . . . . . . . . . . . . . . . . . . . . . . . . . . . . . . . . . 9
Endpoint Gaskets Attachment . . . . . . . . . . . . . . . . . . . . . . . . . . . . . . . . . . . . . . . . . . . . . . . . . . . . . . . . . . 9
Place Four (4) Screws Into the Endpoint . . . . . . . . . . . . . . . . . . . . . . . . . . . . . . . . . . . . . . . . . . . . . . . . . . . 10
Index Installation . . . . . . . . . . . . . . . . . . . . . . . . . . . . . . . . . . . . . . . . . . . . . . . . . . . . . . . . . . . . . . . . . . . . 11
Place Screws in Slotted Index . . . . . . . . . . . . . . . . . . . . . . . . . . . . . . . . . . . . . . . . . . . . . . . . . . . . . . . . . . 11
Place Screws in Index With Holes. . . . . . . . . . . . . . . . . . . . . . . . . . . . . . . . . . . . . . . . . . . . . . . . . . . . . . . . 11
Drive Pawl Engagement and Index Installation. . . . . . . . . . . . . . . . . . . . . . . . . . . . . . . . . . . . . . . . . . . . . . . 11
Place The Endpoint And Index On An American Gas Meter . . . . . . . . . . . . . . . . . . . . . . . . . . . . . . . . . . . . . . . . . . 13
Placing a Two-Feet Dial . . . . . . . . . . . . . . . . . . . . . . . . . . . . . . . . . . . . . . . . . . . . . . . . . . . . . . . . . . . . . . 13
Placing a One-Foot Index . . . . . . . . . . . . . . . . . . . . . . . . . . . . . . . . . . . . . . . . . . . . . . . . . . . . . . . . . . . . 13
Place the Cover Over the Endpoint and Index . . . . . . . . . . . . . . . . . . . . . . . . . . . . . . . . . . . . . . . . . . . . . . . 14
Program The Endpoint . . . . . . . . . . . . . . . . . . . . . . . . . . . . . . . . . . . . . . . . . . . . . . . . . . . . . . . . . . . . . . . . . 15
Programming Procedure . . . . . . . . . . . . . . . . . . . . . . . . . . . . . . . . . . . . . . . . . . . . . . . . . . . . . . . . . . . . . 15
Insert Tamper Plugs . . . . . . . . . . . . . . . . . . . . . . . . . . . . . . . . . . . . . . . . . . . . . . . . . . . . . . . . . . . . . . . . . . . 16
Installation Complete. . . . . . . . . . . . . . . . . . . . . . . . . . . . . . . . . . . . . . . . . . . . . . . . . . . . . . . . . . . . . . . . . . 16
Page ii July 2014

Installation Manual
DISCLAIMER
The user/purchaser is expected to read and understand the information provided in this manual, follow any listed safety
precautions and instructions and keep this manual with the equipment for future reference.
Misuse, mishandling and/or inadequate maintenance may impair performance and/or compromise safety.
QUESTIONS OR SERVICE ASSISTANCE
If you have questions regarding the product or this document contact:
Badger Meter, Inc.
P.O. Box 245036
Milwaukee, WI 53224-9536
Telephone: (414) 355-0400, (800) 876-3837
Fax: (888) 371-5982
On the Web: www.badgermeter.com or call your local Badger Meter representative.
PRODUCT IDENTIFICATION
Record the product identification numbers from the nameplate.
Endpoint:
Model Number ________________________________________
Serial Number _________________________________________
Tag Number ___________________________________________
SCOPE OF MANUAL
This manual contains installation instructions for the Badger Meter ORION® and the Badger Meter ORION® Fixed Network
(SE) integral endpoint for American® Meter residential aluminum-case gas meters. Proper performance and reliability of the
ORION gas meter system depends upon installation in accordance with these instructions.
PRODUCT UNPACKING AND INSPECTION
OTE:N If damage to the shipping container is evident upon receipt, request the carrier to be present when the
product is unpacked.
Carefully open the shipping package, follow any instructions that may be marked on the exterior. Remove all cushioning
material surrounding the product and carefully lift the product from the package.
Retain the package and all packing material for possible use in reshipment or storage.
Visually inspect the product and applicable accessories for any physical damage such as scratches, loose or broken parts, or
any other sign of damage that may have occurred during shipment.
OTE:N If damage is found, request an inspection by the carrier’s agent within 48 hours of delivery and file a claim
with the carrier.
A claim for equipment damage in transit is the sole responsibility of the purchaser.
Page iii July 2014

ORION® Gas Endpoints, Integral Endpoint for American® Residential Gas Meters
LICENSE REQUIREMENTS
This device complies with Part 15 of FCC Rules. Operation of this device is subject to the following conditions: (1) This device
may not cause harmful interference, and (2) this device must accept any interference received, including interference that
may cause undesired operation.
IN ACCORDANCE WITH FCC REGULATIONS, “CODE OF FEDERAL REGULATIONS” TITLE 47, PART 2, SUBPART J, SECTION
1091, TRANSMITTERS (ENDPOINTS) PASS THE REQUIREMENTS PERTAINING TO RF RADIATION EXPOSURE. HOWEVER,
TO AVOID PUBLIC EXPOSURE IN EXCESS OF LIMITS FOR GENERAL POPULATION (UNCONTROLLED EXPOSURE), A 12 CM
DISTANCE BETWEEN THE TRANSMITTER (ENDPOINT) AND THE BODY OF THE USER MUST BE MAINTAINED
DURING TESTING.
No FCC license is required by a utility to operate an ORION meter reading system.
This device complies with Industry Canada license-exempt RSS standard(s). Operation is subject to the following two
conditions: (1) this device may not cause interference, and (2) this device must accept any interference, including interference
that may cause undesired operation of the device. Le présent appareil est conforme aux CNR d'Industrie Canada applicables
aux appareils radio exempts de licence. L'exploitation est autorisée aux deux conditions suivantes : (1) l'appareil ne doit pas
produire de brouillage, et (2) l'utilisateur de l'appareil doit accepter tout brouillage radioélectrique subi, même si le brouillage
est susceptible d'en compromettre le fonctionnement.
Any changes made, but not approved by Badger Meter, can void the user’s authority to operate the equipment.
INSTALLATION TOOLS AND MATERIALS
Magnetized screwdrivers:
• 1/8" flat screwdriver
• 1/4” flat screwdriver
• #1 Phillips screwdriver
OTE:N If a battery powered driver is used, ensure torque maximums are not exceeded (usually 15 inch-pounds)
Putty knife or flat blade scraper
Badger Meter handheld programmer/data collector
LABEL INFORMATION
Certification markings are noted on the product label. Label markings include:
• Serial number and bar code plus product description
• FCC identification
• Certification markings
Page iv July 2014

Installation Manual
AMERICAN GAS METERS
Gas meter models: AL, AC, AT, AM, AR with suffixes: 175, 210, 225, 250, 310, 350, 425, 630
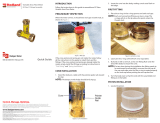
Meter and Indexes Before Endpoint
Odometer style index
Dial index
Figure 1: Gas meter and index styles
Index Removal from an American Gas Meter
1. Use a large screwdriver to puncture and remove tamper plugs, if present.
Tampter plug
Tamper plug
Figure 2: Tamper plug placement
2. Use a large screwdriver to remove and discard the four (4) mounting screws and the cover.
Figure 3: Remove mounting screws
Page 5 July 2014

ORION® Gas Endpoints, Integral Endpoint for American® Residential Gas Meters
3. Completely remove and discard the old gasket. Use a putty knife to clean the meter surface of all gasket remnants that
might limit the eectiveness of the new gasket.
Figure 4: Remove gasket
4. Use a small screwdriver to remove the index. Discard the two (2) screws.
Figure 5: Remove index screws
Shown below is an American gas meter with the tamper plugs, index and gasket removed.
Figure 6: American gas meter without index
Page 6 July 2014

Installation Manual
AMERICAN METER INSTALLATION MATERIALS
Rear gasket
Endpoint
4 screws
1/4-20 x 3/8”
Front gasket
Index from
existing meter
2 screws #8-16 x 1/2” or
2 screws #8-16 x 1/4”
4 screws
#8-16 x 1/2”
Cover
4 tamper plugs
ASSEMBLE THE ORION ENDPOINT AND INDEX
Endpoint Gaskets Attachment
The gaskets should be attached to the endpoint at the factory. If the gaskets are not attached:
1. Place the rear gasket on the back of the endpoint. Place the rear gasket so the tab is at the top of the endpoint, the drain
slots are pointing down, facing towards the gas meter. See Figure 7.
Tab on top
Drain slots pointing down
Drain slots towards gas meter
Figure 7: Rear gasket placement on endpoint
2. Place the front gasket on the other side of the endpoint.
a. Place the gasket so that its two holes go over the two protruding tines.
b. Be sure the notched end goes around the guide pin on the right side of the endpoint. See Figure 8.
Page 7 July 2014

ORION® Gas Endpoints, Integral Endpoint for American® Residential Gas Meters
Notched end around guide
pin on right of endpoint
Holes over tines
Figure 8: Front gasket placement on endpoing
c. Be certain that the stepped edge is toward the endpoint boot and seated between the endpoint sealing face and the
alignment tabs.
Endpoint sealing face
Endpoint boot
Stepped edge
Alignment tabs
Figure 9: Stepped edge toward endpoint boot
Page 8 July 2014

Installation Manual
Place Four (4) Screws Into the Endpoint
1. Place the four (4) ¼-20 X 3/8" screws through the endpoint and rear gasket from the front. See Figure 10.
Figure 10: Screw placement from front through endpoint and rear gasket
2. The screws are temporarily held in place by the rear gasket.
Drain slots towards down and
towards the gas meter
Gasket lip
Tab up
Screws held in place
Figure 11: Screws held in place by gasket
INDEX INSTALLATION
There are two (2) index capacities, ONE-FOOT and TWO-FEET; and two (2) index mounting styles, slots and holes.
Place Screws in Slotted Index
Place two (2) #8 X ½" self-tapping screws between the top metal dial and the lower plastic frame and into the holes on each
side of the index. See Figure 12.
2 screws
Figure 12: Self-tapping screw placement on slotted index
Page 9 July 2014

ORION® Gas Endpoints, Integral Endpoint for American® Residential Gas Meters
Place Screws in Index With Holes
Place two (2) #8 X ¼" self-tapping screws between the dial and lower plate and into the holes on each side of the meter.
See Figure 13.
2 screws
Figure 13: Self-tapping screw placement on index with holes
Drive Pawl Engagement and Index Installation
1. Use care when handling the ORION endpoint and index to insure the endpoint rear drive pawl and the mating drive
pawls are not subjected to any physical abuse. Abuse may cause the spindles to become bent, misaligned or otherwise
inoperative.
When attaching an index to a ORION endpoint, make sure the index mounts securely to the endpoint. The front and rear
drive pawls must mate without causing any binding or potential for disengagement.
2. Align the two (2) screws in the endpoint holes. See Figure 14.
Figure 14: Align screws in endpoing holes
a. On a TWO-FEET dial, engage the index drive pawl into the half round connection in the endpoint. See Figure 15.
Index drive pawl
Half round connection
in endpoint
Figure 15: Drive pawl connection on two-feet dial
b. On a ONE-FOOT dial, place the index pawl hole into the pawl sticking out of the endpoint. See Figure 16.
Page 10 July 2014

Installation Manual
Endpoint pawl
Hole in index pawl
Figure 16: Pawl placement on one-foot dial
3. Tighten the two (2) screws (6 inch-pounds max).
4. Test the drive pawl connection by turning the shaft on the rear of the endpoint several times. If dragging or friction is felt,
reposition the index to eliminate any drag. The dials should turn smoothly.
Figure 17: Testing the drive pawl connection
Page 11 July 2014

ORION® Gas Endpoints, Integral Endpoint for American® Residential Gas Meters
PLACE THE ENDPOINT AND INDEX ON AN AMERICAN GAS METER
Verify that the rear gasket does not interfere with the endpoint drive shaft. Verify that the gasket fits around the semi-circular
cut out guide.
Rear gasket
Endpoint
drive shaft
Cut out guide
Figure 18: Endpoint and index placement
Placing a Two-Feet Dial
Align the rear endpoint drive pawl and the gas meter pawl. Place the four (4) ¼-20 X 3/8" endpoint screws against the holes in
the gas meter. See Figure 19.
Gas meter pawl
Endpoint pawl
Figure 19: Align endpoint drive pawl and gas meter pawl
Placing a One-Foot Index
Place the endpoint against the gas meter. Place the endpoint drive pawl so it is around the gas meter pawl. See Figure 20.
Gas meter pawl
Endpoint
pawl
Figure 20: Endpoint drive pawl placement around gas meter pawl
Tighten the four (4) endpoint screws (20 inch-pounds max).
Page 12 July 2014

Installation Manual
Figure 21: Tighten endpoint screws
Move the TWO-FEET or ONE-FOOT dial back and forth to verify pawl connections. See Figure 22.
Figure 22: Verify pawl connections
Place the Cover Over the Endpoint and Index
1. Verify the front gasket is set properly.
Figure 23: Verify gasket is set properly
2. Place the cover on the gas meter and tighten it with the four (4) remaining screws (15 inch-pounds max).
Figure 24: Cover placement on meter
The endpoint unit is now ready for programming.
Page 13 July 2014

ORION® Gas Endpoints, Integral Endpoint for American® Residential Gas Meters
PROGRAM THE ENDPOINT
Badger Meter uses a handheld programmer/data collector system to process and display screens.
Figure 25: Sample handheld, IR read head and cable
Please reference the Programming Guide for ORION gas endpoints and the manual for the handheld system.
Programming Procedure
To program the endpoint, position the handheld optic read head with the endpoint IR port.
Endpoint IR port
Figure 26: Endpoint IR port
Align the IR port of the handheld optic read head with the endpoint IR port.
Figure 27: Line up the handheld IR port with the endpoint IR port
Page 14 July 2014

Installation Manual
INSERT TAMPER PLUGS
After programming the endpoint is complete and for security purposes, insert the four (4) red tamper plugs (supplied) in the
screw holes and push them in.
Tamper plug
Figure 28: Replace tamper plugs
INSTALLATION COMPLETE
Installation of the ORION endpoint for an American residential gas meter with dial or odometer index is now complete.
Figure 29: Completed installation
Page 15 July 2014

www.badgermeter.com
MAKING WATER VISIBLE and ORION are registered trademarks of Badger Meter, Inc. Other trademarks appearing in this document are the property of their respective entities.
Due to continuous research, product improvements and enhancements, Badger Meter reserves the right to change product or system specications without notice, except to the
extent an outstanding contractual obligation exists. © 2014 Badger Meter, Inc. All rights reserved.
The Americas | Badger Meter | 4545 West Brown Deer Rd | PO Box 245036 | Milwaukee, WI 53224-9536 | 800-876-3837 | 414-355-0400
México | Badger Meter de las Americas, S.A. de C.V. | Pedro Luis Ogazón N°32 | Esq. Angelina N°24 | Colonia Guadalupe Inn | CP 01050 | México, DF | México | +52-55-5662-0882
Europe, Middle East and Africa | Badger Meter Europa GmbH | Nurtinger Str 76 | 72639 Neuen | Germany | +49-7025-9208-0
Europe, Middle East Branch Oce | Badger Meter Europe | PO Box 341442 | Dubai Silicon Oasis, Head Quarter Building, Wing C, Oce #C209 | Dubai / UAE | +971-4-371 2503
Czech Republic | Badger Meter Czech Republic s.r.o. | Maříkova 2082/26 | 621 00 Brno, Czech Republic | +420-5-41420411
Slovakia | Badger Meter Slovakia s.r.o. | Racianska 109/B | 831 02 Bratislava, Slovakia | +421-2-44 63 83 01
Asia Pacic | Badger Meter | 80 Marine Parade Rd | 21-06 Parkway Parade | Singapore 449269 | +65-63464836
China | Badger Meter | 7-1202 | 99 Hangzhong Road | Minhang District | Shanghai | China 201101 | +86-21-5763 5412 Legacy Document Number: ORI-I-56 62014-097
Making Water Visible®
/