Page is loading ...

Raymarine
45STV Satellite
TV System
Owner’s
Handbook
Document Number: 81258-2
Date: August 2005

ii Raymarine 45 STV Satellite TV System - Owner’s Handbook
Trademarks and registered trademarks
Autohelm, HSB Raymarine, RayTech, RayTech RNS, Sail Pilot, SeaTalk and
Sportpilot are registered trademarks of Raymarine Limited.Apelco is a registered
trademark of Raymarine Holdings Limited (Registered in all major marketing
territories).
AST, Autoadapt, Auto GST, Autoseastate, Autotrim, Bidata, Marine Intelligence,
Maxiview, On Board, Raychart, Raynav, Raypilot, Raystar, ST40, ST60, Seaclutter,
Smart Route, Tridata and Waypoint Navigation are trademarks of Raymarine
Limited.
DIRECTV is an official trademark of DIRECTV Inc., a unit of GM Hughes
Electronics.
DISH
TM
Network is an official trademark of EchoStar Communications
Corporation.
ExpressVu is a property of Bell ExpressVu, a wholly owned subsidiary of Bell
Satellite Services.
All other product names mentioned are trademarks or registered trademarks (if
applicable) of their respective companies.
Handbook contents © Raymarine Ltd 2005.
- Powered by Intellian Technologies -

1
Contents
Important information .........................................................................................3
Introduction .................................................................................................... 3
Safety notices ................................................................................................. 3
Product installation ..................................................................................... 3
Geographic location ....................................................................................... 4
Television reception ........................................................................................ 4
EMC conformance .......................................................................................... 5
Declaration of conformity ............................................................................... 5
Warranty ......................................................................................................... 5
Handbook information ................................................................................... 5
What does a typical system look like? ............................................................. 6
Installation ..............................................................................................................7
EMC installation guidelines ............................................................................ 7
What’s in the box?.... ...................................................................................... 8
What tools do I need to install my TV system?.... ............................................ 9
How do I plan the installation?.... ................................................................. 10
Cables .................................................................................................. 10
Power requirements ............................................................................. 11
Extending the cables ..................................................................................... 11
How do I install the ACU?.... ......................................................................... 12
ACU dimensions ................................................................................... 12
Installing the ACU ................................................................................ 12
How do I install the antenna?.... ................................................................... 14
Preparing the antenna ......................................................................... 14
Preparing the mount ............................................................................ 14
Securing the antenna ........................................................................... 14
How do I connect the system cables?.... ........................................................ 15
Connecting the antenna ....................................................................... 15
Connecting the ACU ............................................................................. 15
How do I configure the system?... ................................................................. 16
Single IRD ............................................................................................. 16
Twin IRDs ............................................................................................. 17
Three or four IRDs ................................................................................. 17
System set up .......................................................................................................21
Introduction .................................................................................................. 21
Set up using the ACU .................................................................................... 22
Start up ................................................................................................ 22
Changing the default satellite .............................................................. 22
Monitoring the current status of the antenna ....................................... 23
Set up mode ......................................................................................... 24

2 Raymarine 45 STV Satellite TV System - Owner’s Handbook
Setting the satellite pair ........................................................................25
Setting the GPS .....................................................................................27
Edit satellite information ......................................................................29
Setting the local frequency ...................................................................33
Setting the DiSEqC method ...................................................................35
Display version .....................................................................................36
Setting antenna go position .................................................................37
Setting antenna move step ...................................................................39
Setting defaults ....................................................................................40
Set up using the Graphical User Interface ......................................................41
GUI main menu ....................................................................................42
Serial port set up ...................................................................................43
The GUI control soft keys ......................................................................44
Setting the GPS .....................................................................................45
Editing the satellite information ...........................................................47
Setting antenna angle, move step and diagnosis. .................................48
Setting the skew angle ..................................................................................50
Maintenance and troubleshooting ...................................................................51
Introduction ..................................................................................................51
Maintenance .................................................................................................51
Troubleshooting ............................................................................................51
Antenna diagnosis ................................................................................54
Technical support ..........................................................................................56
Satellite information ..........................................................................................57
Introduction ..................................................................................................57
Satellite coverage areas ................................................................................57
European satellites ...............................................................................57
US satellites ..........................................................................................61
Satellite coverage by geographic location .....................................................62
Europe ..................................................................................................62
Satellite tracking ...........................................................................................64
Satellite service providers ..............................................................................64
European satellites ...............................................................................65
North American satellites .....................................................................66
Appendix A:Technical specification .................................................................67
Appendix B: List of abbreviations .....................................................................71
Raymarine World Wide Warranty ......................................................................73
Raymarine Inc. ..............................................................................................73
Raymarine UK Ltd. ........................................................................................75

Important information 3
Important information
Introduction
This handbook contains an explanation of how to
install, connect and maintain your Raymarine
45 STV Satellite TV system.
The 45 STV Satellite TV system provides
uninterrupted television access to hundreds of TV
channels in all types of weather conditions.
On the open sea or at the dock, the 45 STV
automatically identifies, acquires and tracks
compatible signals from all digital video broadcast
(DVB) satellites.
However, no machine can perform its intended
function unless installed, operated and
maintained properly. Please carefully read and
follow the recommended procedures contained in
this handbook.
INTENDED USE - The intended application for the Raymarine 45 STV
Satellite TV system is for leisure marine boats and workboats not
covered by IMO carriage regulations. IT IS NOT intended for
installation and use in any other situation.
Safety notices
WARNING: Product installation
This equipment must be installed and operated in accordance
with the instructions contained in this handbook. Failure to do so
could result in poor product performance, personal injury and/or
damage to your boat.
CAUTION: In-line fuse
If you do not have a breaker in the power circuit, an in-line 5 A
quick blow fuse should be fitted to the positive (white) lead of
the power cable.
D7943_1

4 Raymarine 45 STV Satellite TV System - Owner’s Handbook
Geographic location
Your Raymarine 45 STV Satellite TV system is programmed to receive signals from
either North American TV satellites or European TV satellites according to your
location. You cannot receive North American TV satellite signals on a European
system, or European TV satellite signals on a North American system. If your
geographic location changes it will be necessary to change the antenna low noise
block (LNB) for one appropriate to the area in which you are operating. You may
also need to change your IRD(s) and TV receivers. For full details of changing your
geographic area of operation refer to “Satellite coverage by geographic location”
on page 62.
Television reception
For full functionality of your Raymarine 45 STV Satellite TV system, it is necessary
to subscribe to the relevant service(s) from the appropriate service provider(s).
Full details of service providers can be found in “Satellite information” on
page 57.
CAUTION: Antenna unit cover
To prevent damage to the antenna unit cover always use the base
plate when lifting the unit.
CAUTION: Connectors
Take care not to damage the exposed connectors below the base
plate when moving the unit. DO NOT use these connectors to lift
the unit.
CAUTION: Transit packaging
Before installing or operating the unit, open the unit cover and
remove the foam transit packaging inserts from the unit base.
CAUTION: Antenna coating
Application of paint or other finishes to the antenna unit exterior
may degrade performance beyond acceptable limits.
CAUTION: Product disposal
When you want to dispose of this product (for example, at the
end of its working life), please do so in accordance with local
regulations.

Important information 5
EMC conformance
All Raymarine equipment and accessories are designed to the best industry
standards for use in the leisure marine market.
The design and manufacture of Raymarine equipment and accessories conform to
the appropriate Electromagnetic Compatibility (EMC) standards, but correct
installation is required to ensure that performance is not compromised.
Declaration of conformity
This product conforms with EU Directive 89/336/EC and is labelled with
the CE conformity mark.
Warranty
To register your Raymarine 45 STV Satellite TV system ownership, please take a
few minutes to fill out the warranty registration card found in the box, or visit
www.raymarine.com and register on-line.
It is important that you register your product to receive full warranty benefits. Your
system package includes a barcode label indicating the serial number of the unit.
You should stick this label to the warranty registration card.
Handbook information
To the best of our knowledge, the information in this handbook was correct as it
went to press. However, Raymarine cannot accept liability for any inaccuracies or
omissions it may contain. In addition, our policy of continuous product
improvement may change specifications without notice. As a result Raymarine
cannot accept lability for any differences between the product and the handbook.

6 Raymarine 45 STV Satellite TV System - Owner’s Handbook
What does a typical system look like?
Note:
Satellite receivers, televisions and subscription services must be purchased
separately.
Raymarine 45 STV
Satelite TV Antenna
Antenna
Control Unit
Satellite Receiver (IRD)
Television
DC
Power
D7944_1

Installation 7
Installation
EMC installation guidelines
All Raymarine equipment and accessories are designed to the best industry standards for use in
the recreational marine environment.
Their design and manufacture conforms to the appropriate Electromagnetic Compatibility
(EMC) standards, but correct installation is required to ensure that performance is not
compromised. Although every effort has been taken to ensure that they will perform under all
conditions, it is important to understand what factors could affect the operation of the product.
The guidelines given here describe the conditions for optimum EMC performance, but it is
recognized that it may not be possible to meet all of these conditions in all situations. To ensure
the best possible conditions for EMC performance within the constraints imposed by any
location, always ensure the maximum separation possible between different items of electrical
equipment.
For optimum EMC performance, it is recommended that wherever possible:
•Raymarine equipment and cables connected to it are:
• At least 3 ft. (1m) from any other equipment transmitting or carrying radio signals.
In the case of Single Side Band (SSB) radio, the distance should be increased to 7
ft. (2m).
• More than 7 ft. (2m) from the path of a radar beam. A radar beam can normally be
assumed to spread 20 degrees above and below the radiating element.
•The equipment is supplied from a separate battery to that used for engine start.
Voltage drops below 10 V, and starter motor transients, can cause the
equipment to reset. This will not damage the equipment, but may cause the
loss of some information and may change the operating mode.
•Raymarine specified cables are used. Cutting and rejoining these cables can
compromise EMC performance and must be avoided unless doing so is detailed
in the installation manual.
Suppression Ferrite
If a suppression ferrite is attached to a cable, this ferrite should not be
removed. If the ferrite needs to be removed during installation it must
be reassembled in the same position.
The illustration shows typical cable suppression ferrites used with
Raymarine equipment. Always use the ferrites supplied by Raymarine.
Connections to other equipment
If your Raymarine equipment is to be connected to other equipment using a cable not
supplied by Raymarine, a suppression ferrite MUST always be attached to the cable near to
the Raymarine unit.
D7166_1

8 Raymarine 45 STV Satellite Television System - Owner’s Handbook
What’s in the box?....
Raymarine 45 STV Antenna Unit
houses the antenna positioning mechanism, low noise block
(LNB), power supply and control elements within a molded glass
fiber radome.
Connectors on the underside of the base plate join the power,
signal and control cabling from the below decks units.
Antenna Control Unit (ACU)
controls power to the antenna unit via the On/Off switch. The
three soft keys enable satellite programming and antenna
diagnostics to be carried out.
Installation kit
contains the items required for securing the antenna unit and
ACU to your boat.
• 4 x Hexagonal bolts.
•4 x Spring washers.
• 4 x Flat washers.
• 4 x Self tapping screws.
System cables
Your Raymarine 45 STV package also includes the following cables:
• RO8134 - 15 m Power and Data cable - used for connecting the antenna and ACU.
• RO8133 - 10 m Power cable - used for connecting the ACU to the DC power supply.
• RO 8135 - 15 m RF cable - used for connecting the Antenna and Integrated Receiver
Decoder (IRD).
• RO8138 - 1.8 m PC cable - used for connecting the ACU to a personal computer for
system set up and diagnostics.
CD-ROM
Contains the software for programming your system and carrying out system diagnostics
using a personal computer.
D7945_1
D7946_1
D7947_1

Installation 9
What tools do I need to install my TV system?....
Power drill
13 mm (1/2 in)
socket
10 mm (3/8 in)
drill
13 mm (1/2in)
spanner
Socket wrench
80 mm (3 in)
hole saw
Pencil
Adhesive tape
Cross-head
screwdriver
5 mm
Allen key
Suitable waterproof
sealant
D7948_1

10 Raymarine 45 STV Satellite Television System - Owner’s Handbook
How do I plan the installation?....
When choosing a location for the antenna, consider the following points:
• Make sure you place it where there is an all round clear view of the horizon.
• It should not be too high above the water - the maximum recommended height
is one not exceeding half the length of your boat.
• It should be as near to the centerline of the boat as possible.
• The mounting platform should be rigid and not subject to excessive vibration.
• It should be away from the edge of the boat - this will avoid unnecessary motion
which can affect reception.
It should be clear of any radar as this may prevent
the antenna working correctly.
Make sure nearby objects do not block the
antenna. It requires a +15
0
to +90
0
look angle
to receive satellite signals
Cables
You need to consider the following points
before installing the system cables:
• All cables need to be adequately clamped and protected from physical damage
and exposure to heat - avoid running cables through bilges, doorways, or close
to moving objects.
• Acute bends must be avoided.
• Where a cable passes through an exposed bulkhead or deckhead, a watertight
gland or swan neck tube should be used.
Clear view of sky
D7949_1
Above the beam
Below the beam
In the
beam
Min 1.2 m (4 ft)
Min 1.2 m (4 ft)
D7950_1
+15
90
0
0
Mast
Blocked!
D7951_1

Installation 11
Power requirements
You need to consider the following power requirements:
• Your Raymarine 45 STV Satellite TV system has been designed to work on a
boat’s power supply rated at 12 V DC.
• If your boats power supply is rated at 24 V DC you will need to install a suitable
DC power inverter to reduce the supply voltage to 12 V DC.
• If your IRD(s) and television(s) require a 220/240 V AC power supply, you will
need to install a suitable DC to AC converter to operate the units from your
boat’s DC power supply.
Extending the cables
The cables that have been supplied with your satellite TV system should be of
adequate length to complete the installation on most boats. However, should it
be necessary to extend a cable the following points should be considered:
Power and data cable
This cable is supplied at a length of 15 m.
If a longer length is required you should replace this cable with Part No. E96007
which will extend the available cable length to 30m.
Power cable
This cable is supplied at a length of 10 m.
If a longer length is required you should replace this cable with Part No. E96006
which will extend the available cable length to 30 m.
RF cable
This cable is supplied at a length of 15 m.
If a longer length is required you should replace this cable with Part No. E96008
which will extend the available cable length to 30m. Additional length can be
achieved by joining the supplied RF cable and the extension together to give a
maximum available cable length of 45m.
Note:
The stated cable lengths should not be exceeded as this may result in reduced
performance of your system.

12 Raymarine 45 STV Satellite Television System - Owner’s Handbook
How do I install the ACU?....
ACU dimensions
The dimensions of the ACU are shown below:
Installing the ACU
The ACU should be installed below decks, in a position that is:
•dry.
• well ventilated.
• easily accessible.
The ACU should be installed using the two fixing brackets supplied. These
brackets can be placed on the sides of the unit to provide a top or bottom fix.
195 mm (7.67 in) 224.6 mm (8.84 in)
D7952_1
160 mm (6.3 in)
229 mm (9.0 in)
195 mm (7.67 in)
65 mm (2.56 in)
62.7 mm (2.47 in)

Installation 13
To install the ACU:
1. Select the installation site, ensuring that the proposed site meets the criteria
described above.
2. Using the screws supplied fix the mounting brackets to the sides of the ACU.
3. Place the ACU in the position where it is going to be installed.
4. Connect the cables to the rear of the ACU.
5. Using a pencil, mark the 4 hole positions (2 each side) for securing the
mounting brackets.
6. Using a suitable drill bit, drill the 4 holes in the required position.
It is good practice to countersink the mounting holes to avoid damage to the
mounting surface.
7. Using suitable screws, secure the ACU into position.
D7953_1

14 Raymarine 45 STV Satellite Television System - Owner’s Handbook
How do I install the antenna?....
Preparing the antenna
1. Using a 5 mm allen key, remove the
antenna dome retaining bolts and
dome.
2. Remove the foam transit restraints
from the antenna base.
3. Replace and secure the antenna
dome .
Preparing the mount
1. Using adhesive tape, attach the template to the
mounting surface, ensuring that it is parallel to
your boat’s centerline as marked on the
template.
2. Using an 80 mm hole saw, remove the shaded
center portion
3. Drill four 10 mm holes in the positions indicated.
It is good practice to countersink the mounting
holes, and smooth the edges of the center hole
with a suitable file to avoid damage to the
mounting surface.
Securing the antenna
Secure the antenna to the base using
bolts, spring washers and flat washers.
The bolts should be tightened to a
torque of 30 Nm (22.1 ft.lb.) to ensure
that the foam sealing ring is
compressed to prevent water ingress.
Foam
restraint
Foam
restraint
D7954_1
D
rill
h
ol
e
,
10
m
m
(
4
/
10
inc
h
)
d
ia
m
e
ter
i
n
4
p
os
it
io
ns
C
u
t
ho
l
e,
8
0
m
m
(3
3
/
2
0
i
nc
h
es)
d
ia
m
et
e
r
22
8
.6
m
m
(9
i
nc
h
es)
228
.6 m
m
(9
inches
)
1
14
.3
m
m
(4
1
/
2
inche
s)
1
1
4.
3
m
m
(
4
1
/
2
i
n
c
he
s)
A
ntenn
a Ba
se Un
it
Te
mp
lat
e
D
ri
ll h
ole
,
10
m
m
(
4
/
10
i
n
ch
)
d
i
am
ete
r
in
4
p
o
s
itio
n
s
C
ut
h
ol
e
,
8
0
m
m
(
3
3
/
2
0
in
ch
e
s)
di
am
e
t
er
22
8.
6
m
m
(9
in
ch
es
)
22
8
.6
m
m
(9
inche
s
)
1
1
4
.3
m
m
(
4
1
/
2
in
ch
es)
11
4
.3
m
m
(4
1
/
2
i
nc
he
s)
A
n
te
nna Ba
se U
nit
T
em
plat
e
D7955_1
D7956_1

Installation 15
How do I connect the system cables?....
Connecting the antenna
1.Pass the power/data cable through the access hole of the
mounting plate and connect it to the power/data connector
on the antenna base plate.
Note:
It is good practice to coat the threads of all connector s
with a small amount of a suitable waterproof marine sealant prior
to securing them.
2.Secure the connector using a 13 mm spanner. Take care
not to over-tighten the nut, as this will damage the
connector.
3.Slide the cable shroud of the power/data cable over the
connection and fix in place using a suitable malleable
waterproof tape.
4.Remove the protective cap from the RF 1 connector.
5.Connect the RF cable to the RF 1 connector and secure
using a 13 mm spanner.Take care not to over-tighten the
nut, as this will damage the connector.
Note:
The baseplate connectors must be suitably protected from water ingress when the
antenna unit is installed on an open structure, e.g. a tuna tower.
Connecting the ACU
RF1
RF2
POWER
D7958_1
PC INTERFACE FUSE ANTENNA DC10.8 - 15.6V
Power and data
Boat's
DC power supply
D7959_1
RF1
RF2
POWER
IRD
(not supplied)

16 Raymarine 45 STV Satellite Television System - Owner’s Handbook
CAUTION: In-line fuse
If you do not have a breaker in the power circuit, an in-line 5 A
quick blow fuse should be fitted to the positive (white) lead of the
power cable.
To connect the antenna control unit:
1. Connect the power and data cable to the connector on the rear panel of the
ACU.
2. Connect the RF cable to the connector on the rear panel of the IRD.
3. Connect the DC power supply to the connector on the rear of the ACU.
How do I configure the system?...
Your Raymarine 45 STV Satellite TV system can be connected with up to four IRDs
at the same time to receive pictures in different cabins offering the maximum
choice of channels. The following section shows the different combinations
available and their connections. In all cases the ACU must be connected to the
power/data connector of the antenna base plate.
Single IRD
This is the basic method for connecting your Raymarine 45 STV system.
The RF cable from the antenna base plate should be connected to ‘LNB’, ‘ANT’ or
‘Satellite In’ on the rear panel of the IRD.
Television Monitor
(not supplied)
IRD
(not supplied)
Antenna baseplate
D7960_1
RF1
RF2
POWER

Installation 17
Twin IRDs
You can connect two IRDs to your antenna as shown in the following
diagram.However, only one of the IRDs can be configured as a two satellite
receiver. The other IRD needs to be configured as a one satellite receiver.
The two satellite receiver determines which satellite is tracked, while the other
receiver can watch any channel which is available from the tracked satellite.
As in the single IRD option the RF cables from the antenna base plate should be
connected to ‘LNB’, ‘ANT’, or ‘Satellite In’ on the rear panel of the IRD.
Full details on configuring your system IRDs will be found in the relevant
Manufacturer’s handbook.
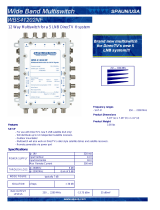
Three or four IRDs
IMPORTANT: Due to satellite polarization, incorrect connection in systems using
three or four IRDs will result in signal degradation. Make sure you select correct
method of connection for your area of operation.
North American systems
In order to connect three or four IRDs to the antenna, you will need to purchase an
active multi-switch (Raymarine recommends the Channel Master 6314 IFD), and
the necessary additional RF cables.
The multi-switch has to be installed between the antenna unit and the IRDs as
shown in the following diagram.
As in the two IRD system only one of the IRDs can be configured as a two satellite
receiver. The other IRDs need to be configured as one satellite receivers. The two
Television Monitor 1
IRD 1
Television Monitor 2
IRD 2
Antenna baseplate
D7961_1
RF1
RF2
POWER

18 Raymarine 45 STV Satellite Television System - Owner’s Handbook
satellite receiver determines which satellite is tracked, while the other receivers
can watch any channel which is available from that satellite.
To connect three or four IRDs:
1. Connect an RF cable to RF1 and another to RF2 on the antenna base plate.
2. Connect the RF1 cable to LNB LHCP/+18 V on the multi-switch.
3. Connect the RF2 cable to LNB RHCP/+13 V on the multi-switch.
4. For each output required, connect an RF cable from an OUT connector of the
multi-switch to the LNB or ANT connector of the individual IRD units.
5. Terminate any unused connections with a suitable 75 Ohm DC terminator
block.
6. Connect the multi-switch to a 24 V DC power supply.
RF1
RF2
POWER
Multiswitch
LNB
RHCP/+13V
VHF/UHF
INPUT
POWER
24V DC
LNB
LHCP/ +18V
OUT 1 OUT 2
OUT 3 OUT 4
GROUND
Antenna
baseplate
IRD 1
IRD 2
IRD 3 IRD 4
D7962_1
/