Page is loading ...

KODAK 7015 Photo Printer
7015 Photo Printer
User’s Guide

TM/MC/MR Licensed from Eastman Kodak Company: Kodak
Kodak Alaris Inc.
2400 Mount Read Blvd., Rochester, N.Y. 14615
© 2014 Kodak Alaris Inc.
All rights reserved. Printed in U.S.A.
P/N 4J6747

i
Table of Contents
1 Setting Up the Printer
Package Contents............................................................................................................................................ 1-1
Preparing the Printer for Use........................................................................................................................1-2
Connecting the Cables .................................................................................................................................. 1-4
Connecting the Power Cable................................................................................................................. 1-4
Connecting the USB Cable..................................................................................................................... 1-4
Turning On the Printer ...................................................................................................................................1-5
Handling and Storing the Paper and Ribbons...........................................................................................1-5
Loading the Ribbons........................................................................................................................................1-5
Loading the Photo Ribbon .......................................................................................................................1-5
Loading the Backprinter Ribbon Cartridge..........................................................................................1-7
Loading the Paper..........................................................................................................................................1-14
Making a Test Print.......................................................................................................................................1-17
2 Operating the Printer
Making Prints....................................................................................................................................................2-1
Handling and Storing Prints ..........................................................................................................................2-1
Operator Panel Lights.....................................................................................................................................2-1
Operator Panel Buttons.................................................................................................................................2-2
Printer Settings................................................................................................................................................2-3
3 Maintaining the Printer
Performing Routine Maintenance ...............................................................................................................3-1
Cleaning the Exterior ................................................................................................................................3-1
Cleaning the Thermal Print Head and the Peel Roller.....................................................................3-2
Cleaning the Paper Guide.......................................................................................................................3-3
Cleaning the Platen Roller ......................................................................................................................3-4
Cleaning the Cleaning Rollers ...............................................................................................................3-5
4 Troubleshooting
Resolving Operator Panel Error Messages ..............................................................................................4-2
Clearing a Paper Jam .....................................................................................................................................4-3

ii
Table of Contents
Recovering from a Power Interruption ..................................................................................................... 4-5
Appendix A: Additional Information
System Requirements....................................................................................................................................A-1
Printer Specifications .....................................................................................................................................A-1
Printer Supplies ..............................................................................................................................................A-2
Paper and Ribbon.....................................................................................................................................A-2
Thermal Printer Cleaning Kit ................................................................................................................A-2
Packing and Transporting the Printer.......................................................................................................A-3
Getting Help ....................................................................................................................................................A-3
Appendix B: Safety and Regulatory Information
Important Safety Information ...................................................................................................................... B-1
Safety Labels ....................................................................................................................................................B-2
Regulatory and Safety Compliance ............................................................................................................B-3
Safety ...........................................................................................................................................................B-3
Electromagnetic Compatibility (EMC) ...............................................................................................B-3
Noise Emission ..........................................................................................................................................B-5
Disposal.......................................................................................................................................................B-5
China RoHS ............................................................................................................................................... B-6

Setting Up the Printer
1-1
1
Setting Up the Printer
Package Contents
The KODAK 7015 Photo Printer is packaged with the following
items:
1. Printer
2. Trim tray (not installed)
3. Paper flange without gear (gray)
4. Spacer (gray)
5. Spacer (green)
6. Paper flange with gear (green)
1
3
2
6
4
5

1-2
Setting Up the Printer
Preparing the Printer for Use
IMPORTANT: The printer weighs approximately 63 lbs (29 kg) and is
heavier at the front than at the back. Use caution when
lifting or moving the printer.
NOTE: Keep the carton and packaging in case you ever need to
transport the printer.
1. Remove the tape from the top cover and paper door.
2. Slide the top cover latch release toward you.
3. Carefully open the top cover.
IMPORTANT: The top cover does not open beyond a 90° angle.
CAUTION:
There are sharp cutter blades inside the printer. Follow
instructions carefully to avoid touching any areas that may
be hazardous.

Setting Up the Printer
1-3
4. Check to make sure the paper guide is securely in place by
pressing down on each of the knobs. For steps on removing
and reinstalling the paper guide, see “Cleaning the Paper
Guide” on page 3-3.
5. Close the top cover.
6. Check the backprinter cover to make sure it is fully closed
7. Insert the trim tray into the printer as shown.
NOTE: If the backprinter cover is not fully closed, the trim tray
cannot be inserted or removed, and the printer will not
print.
Backprinter cover

1-4
Setting Up the Printer
Connecting the Cables
Connecting the Power
Cable
If you received more than one power cable with your printer, make
sure to use the correct power cable for your country.
1. Check that the power switch is turned off ( ).
CAUTION:
The power outlet must be grounded. An ungrounded outlet
can cause fire, electric shock, or harmful interference to
nearby electrical devices.
2. Connect the power cable to the power connector on the back
of the printer and to a grounded power outlet.
Connecting the USB Cable
1. Check that the power switch is turned off ( ).
2. Connect the USB cable that was included with the printer to
the USB connector on the back of the printer and to the USB
connector on the computer.

Setting Up the Printer
1-5
Turning On the Printer
Move the power switch to on ( | ).
On the operator panel, the orange Power light illuminates. If paper
and ribbon are loaded, a Ready message appears.
To turn off the printer, move the power switch to off ( ).
Handling and Storing the Paper and Ribbons
For the best quality prints, carefully handle and store the paper
and ribbons.
• To avoid fingerprints, handle the photo ribbon by the spool
ends. Handle the backprinter ribbon by the cartridge. Do not
touch the ribbon material. Do not touch the glossy side of the
paper.
• Store the paper and ribbons away from direct sunlight.
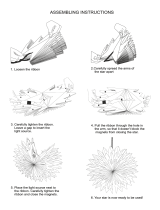
Loading the Ribbons
Loading the Photo Ribbon Make sure you have a KODAK 7000 Print Kit 5R (sold separately)
available. This kit contains the correct photo ribbon for your
printer (see “Printer Supplies” on page A-2).
1. Carefully open the top cover.
CAUTION:
The thermal head becomes extremely hot during normal
operation. Do not touch it.
2. If you are replacing the photo ribbon, remove the used ribbon.
NOTE: Images remain on the photo ribbon after printing. If you
need to maintain confidentiality, dispose of the used
ribbon appropriately.

1-6
Setting Up the Printer
3. Insert your fingers into the holes in the plastic wrapper on the
end of the photo ribbon. Remove the plastic wrapper from the
ribbon.
IMPORTANT: Do not remove the label from the ribbon at this time.
4. Push the bar code end of the supply spool onto the front spool
holder on the right.
5. Insert the left side of the supply spool onto the front spool
holder on the left. Align the notches on the supply spool with
the lugs on the spool holder.
6. Adjust the supply spool until the spool locks into the spool
holder.
7. Remove the label.
Plastic wrapper
Label

Setting Up the Printer
1-7
8. Push the right side of the take-up spool onto the rear spool
holder on the right.
9. Insert the left side of the take-up spool onto the spool holder
on the left.
10. Rotate the take-up spool until it locks into place.
11. If there is any slack in the ribbon, remove it by turning the
supply spool.
IMPORTANT: Slack in the ribbon can cause a paper jam.
12. Close the top cover.
Loading the Backprinter
Ribbon Cartridge
Make sure you have a Backprinter Media Kit for KODAK 701X
Photo Printers (sold separately) available. This kit contains the
correct ribbon cartridge for your printer (see “Printer Supplies” on
page A-2).
1. Remove the trim tray.
NOTE: If space is limited, the trim tray can be removed by tilting
then pulling it out of the printer.

1-8
Setting Up the Printer
2. Use the lever on the backprinter cover to release the cover
from the magnets that hold it in place. Carefully, allow the
cover to swing open.

Setting Up the Printer
1-9
3. Pull the carriage link downward and outward to move the
carriage to the loading position.

1-10
Setting Up the Printer
4. Carefully remove the installed cartridge:
a. Grasp the cartridge by the edges, near the bottom.
b. Remove the cartridge, lifting the bottom end first. Pull the
cartridge the rest of the way out, making sure the ribbon
clears the print head.
5. Locate the new ribbon. If there is slack in the new ribbon,
remove it by turning the tension knob counterclockwise.
IMPORTANT: Slack in the ribbon can cause a jam.

Setting Up the Printer
1-11
6. Carefully install the new cartridge:
a. Insert the cartridge into the carriage as shown, ribbon end
first. Slide the ribbon between the guide plate and the print
head. If necessary, use the tension knob on the cartridge to
maintain tension on the ribbon.
CAUTION:
Do not thread the ribbon by hand. The ribbon could become
twisted and cause damage to the guide.
b. With the ribbon in place, press down on the cartridge to
seat it.

1-12
Setting Up the Printer
7. Press the carriage inward then upward back into the printer
position. The carriage locks into place when it is in the correct
position.
IMPORTANT: Allow the carriage to follow the guide slots along the
carriage plate. Do not force.

Setting Up the Printer
1-13
8. Close the backprinter cover, making sure it is seated against
the magnets. (If the cover is not fully closed, the trim tray
cannot be inserted or removed, and the backprinter will not
print.)

1-14
Setting Up the Printer
9. Replace the trim tray.
NOTE: If space is limited, the trim tray can be installed by tilting
then inserting it into the printer.
Loading the Paper
Make sure you have a KODAK 7000 Print Kit 5R (sold separately)
available. This kit contains the correct paper for your printer (see
“Printer Supplies” on page A-2).
1. Make sure the printer power is on ( | ).
2. Open the paper door. If you are replacing the paper, remove
the used paper roll.
3. Remove the plastic from the new paper roll.
IMPORTANT: Do not remove the label from the paper roll until you
have successfully loaded the paper in the printer.
Paper
door

Setting Up the Printer
1-15
4. Attach the paper flanges and spacers to each end of the paper
roll:
a. Locate the green flange and the green spacer.
b. Orient the flange and spacer so that the labels face the
same direction.
c. Align the lugs on the flange with the corresponding
notches on the spacer, then place the spacer over the
flange hub.
d. Insert the flange-spacer assembly into the notched end of
the paper roll.
e. Repeat steps a-c for the gray flange and spacer, then insert
the gray flange-spacer assembly into the other end of the
paper roll.
NOTE: If the paper flanges and spacers are improperly assembled
or improperly attached to the roll, the paper roll will not fit
into the printer.
5. Carefully lower the paper roll into the slots. Match the geared
flange (green) with the geared slot (green) on the printer.
6. Remove the label from the paper roll.
NOTE: Verify that the paper unrolls from the top of the roll.
Notches
Lugs
(green flange)
Slot
Label
(green)

1-16
Setting Up the Printer
7. Feed the paper into the rear printer slot until the red LED light
turns off and the green LED light turns on.
8. Gently close the paper door.
NOTE: The photo ribbon must be loaded in the printer (see
page 1-5) before the paper automatically advances.
The printer advances the paper, then cuts and discharges 6 blank
test prints—about 24 in. (61 cm). This reduces the possibility of
fingerprints or other damage to the prints. It does not decrease the
1000 4 x 6 in. (10 x 15 cm) print capacity of the paper roll.
The operator panel displays the Ready message.
9. Empty and replace the trim tray.
NOTE: To keep your prints dust-free and to prevent paper jams,
empty the trim tray each time you change the paper.
/