Page is loading ...

Digital label and decal press 3Digital label and decal press 3

Notices
The information in this document is subject to change without notice.
PRIMERA TECHNOLOGY, INCORPORATED, MAKES NO WARRANTY OF ANY KIND
WITH REGARD TO THIS MATERIAL, INCLUDING, BUT NOT LIMITED TO, THE
IMPLIED WARRANTIES OF MERCHANTABILITY AND FITNESS FOR A PARTICULAR
PURPOSE.
PRIMERA shall not be liable for errors contained herein or for incidental damages in
connection with the furnishing, performance, or use of this material.
This document contains proprietary information which is protected by copyright. All rights
are reserved. No part of this document may be photocopied, reproduced, or translated into
another language without the prior written consent of Primera Technology, Incorporated.
Patent Pending
Trademark Acknowledgements
Digital Label Press 3 and PrimaColor are trademarks and Primera is a registered trademark
of Primera Technology, Incorporated. PANTONE® is a registered trademark of PANTONE,
Inc. IBM is a registered trademark of International Business Machines Corporation.
Windows is a registered trademark of Microsoft Corporation. Apple and Macintosh are
registered trademarks of Apple Computer, Inc. ColorSync, QuickDraw, System 7, LocalTalk,
and TrueType are trademarks of Apple Computer, Inc. Adobe, Adobe Illustrator, and Type
Manager are trademarks and Postscript is a registered trademark of Adobe Systems,
Incorporated. All other trademarks are the property of their respective owners.
Printing History
Edition 0.0, #010922
© Copyright 2001 by Primera Technology, Incorporated
Two Carlson Parkway, Plymouth, MN 55447
All rights reserved.
iii
Digital Label Press 3 User’s Manual
Impressa3.qxd 10/22/01 9:29 PM Page iii

iv
Digital Label Press 3 User’s Manual
For Users in the United States:
This equipment has been tested and found to comply with the limits for a Class B digital
device, pursuant to Part 15 of the FCC Rules. These limits are designed to provide
reasonable protection against harmful interference in a residential installation. This
equipment generates, uses, and can radiate radio frequency energy and, if not installed and
used in accordance with the instructions, may cause harmful interference to radio
communications. However, there is no guarantee that interference will not occur in a
particular installation. If this equipment does cause harmful interference to radio or
television reception, which can be determined by turning the equipment off and on, the user
is encouraged to try to correct the interference by one or more of the following measures:
Re-orient or relocate the receiving antenna.
Increase the separation between the equipment and receiver.
Connect the equipment into an outlet on a circuit different from that to which the
receiver is connected.
Consult the dealer or an experienced radio/TV technician for help.
Use of a shielded cable is required to comply with the Class A limits of Part 15 of the
FCC Rules.
You are cautioned that any changes or modifications not expressly approved in this manual
could void your authority to operate and/or obtain warranty service for this equipment.
For Users in Canada:
This digital apparatus does not exceed the Class A limits for radio noise for digital
apparatus set out on the Radio Interference Regulations of the Canadian Department of
Communications.
Le present appareil numerique n'emet pas de bruits radioelectriques depassant les limites
applicables aux appareils numeriques de la class A prescrites dans le Reglement sur le
brouillage radioelectrique edicte par le ministere des Communications du Canada.
Impressa3.qxd 10/22/01 9:29 PM Page iv

Table of Contents
v
Section 1: Introduction
A. How Your Press Works. . . . . . . . . . . . . . . . . . . . . . . . . . . . . . . . . . . . . . . . . . . . . . . . . . 1
B. Special Features . . . . . . . . . . . . . . . . . . . . . . . . . . . . . . . . . . . . . . . . . . . . . . . . . . . . . . . . 2
Section 2: Safety Precautions. . . . . . . . . . . . . . . . . . . . . . . . . . . . . . . . . . . . . . . . . . . . 3
Section 3: Getting Started
A. Choosing a Good Location. . . . . . . . . . . . . . . . . . . . . . . . . . . . . . . . . . . . . . . . . . . . . . . 9
B. About Moisture Condensation. . . . . . . . . . . . . . . . . . . . . . . . . . . . . . . . . . . . . . . . . . . . 9
C. Unpacking and Inspection . . . . . . . . . . . . . . . . . . . . . . . . . . . . . . . . . . . . . . . . . . . . . . 10
D. Identifying the Parts . . . . . . . . . . . . . . . . . . . . . . . . . . . . . . . . . . . . . . . . . . . . . . . . . . . 10
E. Removing the Ribbon Cartridge and Blade Holder . . . . . . . . . . . . . . . . . . . . . . . . . . 14
F. Installing the Blade Holder . . . . . . . . . . . . . . . . . . . . . . . . . . . . . . . . . . . . . . . . . . . . . . 15
G. Installing the Media Input Assembly . . . . . . . . . . . . . . . . . . . . . . . . . . . . . . . . . . . . . 16
H. Installing the Media Output Assembly. . . . . . . . . . . . . . . . . . . . . . . . . . . . . . . . . . . . 17
I. Applying Power . . . . . . . . . . . . . . . . . . . . . . . . . . . . . . . . . . . . . . . . . . . . . . . . . . . . . . . 18
Section 4: Ribbons and Print Media
A. Introduction. . . . . . . . . . . . . . . . . . . . . . . . . . . . . . . . . . . . . . . . . . . . . . . . . . . . . . . . . . 19
B. About Ribbons . . . . . . . . . . . . . . . . . . . . . . . . . . . . . . . . . . . . . . . . . . . . . . . . . . . . . . . . 19
C. Loading Ribbon into the Ribbon Cartridge . . . . . . . . . . . . . . . . . . . . . . . . . . . . . . . . 20
D. Placing the Ribbon Cartridge into the Printer . . . . . . . . . . . . . . . . . . . . . . . . . . . . . . 21
E. About Print Media. . . . . . . . . . . . . . . . . . . . . . . . . . . . . . . . . . . . . . . . . . . . . . . . . . . . . 22
F. Loading the Print Media Roll into the Press . . . . . . . . . . . . . . . . . . . . . . . . . . . . . . . . 23
G. Paper and Ribbon Descriptions for the Control Panel LCD Display . . . . . . . . . . . . 31
Section 5: Connecting the Press
A. Running the Self Test . . . . . . . . . . . . . . . . . . . . . . . . . . . . . . . . . . . . . . . . . . . . . . . . . . 33
B. Connecting the USB-to-Parrallel Interface Cable . . . . . . . . . . . . . . . . . . . . . . . . . . . . 35
Section 6: Installing and Setting Up the Printer Driver for Windows
A. Installing the Windows Printer Driver . . . . . . . . . . . . . . . . . . . . . . . . . . . . . . . . . . . . 39
B. Setting up the Windows 98/ME Printer Driver . . . . . . . . . . . . . . . . . . . . . . . . . . . . . 42
Impressa3.qxd 10/22/01 9:29 PM Page v

vi
Digital Label Press 3 User’s Manual
Section 7: Installing and Using the PressPrint Software for Windows
A. About PressPrint . . . . . . . . . . . . . . . . . . . . . . . . . . . . . . . . . . . . . . . . . . . . . . . . . . . . . . 47
B. Installing PressPrint. . . . . . . . . . . . . . . . . . . . . . . . . . . . . . . . . . . . . . . . . . . . . . . . . . . . 47
C. Using PressPrint . . . . . . . . . . . . . . . . . . . . . . . . . . . . . . . . . . . . . . . . . . . . . . . . . . . . . . 48
D. Printing to Your Press . . . . . . . . . . . . . . . . . . . . . . . . . . . . . . . . . . . . . . . . . . . . . . . . . . 52
E. Helpful PressPrint Hints . . . . . . . . . . . . . . . . . . . . . . . . . . . . . . . . . . . . . . . . . . . . . . . . 54
Importing Files. . . . . . . . . . . . . . . . . . . . . . . . . . . . . . . . . . . . . . . . . . . . . . . . . . . . . . 54
Importing Macintosh Files . . . . . . . . . . . . . . . . . . . . . . . . . . . . . . . . . . . . . . . . . . . . 54
Importing Vector vs. Bitmap Files . . . . . . . . . . . . . . . . . . . . . . . . . . . . . . . . . . . . . . 55
Show Bitmaps Outlines/Show Reduced Bitmaps. . . . . . . . . . . . . . . . . . . . . . . . . . 55
Purge Undo . . . . . . . . . . . . . . . . . . . . . . . . . . . . . . . . . . . . . . . . . . . . . . . . . . . . . . . . 55
Aligning Objects. . . . . . . . . . . . . . . . . . . . . . . . . . . . . . . . . . . . . . . . . . . . . . . . . . . . . 56
Creating a Die Cut . . . . . . . . . . . . . . . . . . . . . . . . . . . . . . . . . . . . . . . . . . . . . . . . . . . 56
Selecting Objects . . . . . . . . . . . . . . . . . . . . . . . . . . . . . . . . . . . . . . . . . . . . . . . . . . . . 56
Rotating Images to Maximize Space . . . . . . . . . . . . . . . . . . . . . . . . . . . . . . . . . . . . 56
Anti-Aliasing . . . . . . . . . . . . . . . . . . . . . . . . . . . . . . . . . . . . . . . . . . . . . . . . . . . . . . . 57
Printing Multiple Pages of the Same Label . . . . . . . . . . . . . . . . . . . . . . . . . . . . . . . 57
F. Creating Serialized Labels . . . . . . . . . . . . . . . . . . . . . . . . . . . . . . . . . . . . . . . . . . . . . . . 58
G. Printing Multiple Spot Color Labels . . . . . . . . . . . . . . . . . . . . . . . . . . . . . . . . . . . . . . 61
Section 8: Maintenance
A. Supplies Required. . . . . . . . . . . . . . . . . . . . . . . . . . . . . . . . . . . . . . . . . . . . . . . . . . . . . 65
B. Cleaning the Print Head . . . . . . . . . . . . . . . . . . . . . . . . . . . . . . . . . . . . . . . . . . . . . . . . 65
C. Cleaning The Press's Case . . . . . . . . . . . . . . . . . . . . . . . . . . . . . . . . . . . . . . . . . . . . . . 66
D. Cleaning the Inside of the Press. . . . . . . . . . . . . . . . . . . . . . . . . . . . . . . . . . . . . . . . . . 66
E. Cleaning the Platen Roller . . . . . . . . . . . . . . . . . . . . . . . . . . . . . . . . . . . . . . . . . . . . . . 67
F. Clearing a Ribbon Jam . . . . . . . . . . . . . . . . . . . . . . . . . . . . . . . . . . . . . . . . . . . . . . . . . . 68
G. Clearing a Minor Print Media Jam . . . . . . . . . . . . . . . . . . . . . . . . . . . . . . . . . . . . . . . 68
H. Clearing a Major Print Media Jam. . . . . . . . . . . . . . . . . . . . . . . . . . . . . . . . . . . . . . . . 68
I. Replacing the Cutter Blade . . . . . . . . . . . . . . . . . . . . . . . . . . . . . . . . . . . . . . . . . . . . . . 69
Section 9: Troubleshooting . . . . . . . . . . . . . . . . . . . . . . . . . . . . . . . . . . . . . . . . . . . . 73
Section 10: Technical Specifications . . . . . . . . . . . . . . . . . . . . . . . . . . . . . . . . . . . . . 85
Appendix A: Interfacing Information
A. Introduction. . . . . . . . . . . . . . . . . . . . . . . . . . . . . . . . . . . . . . . . . . . . . . . . . . . . . . . . . . 87
B. Centronics-Type Parallel Interface . . . . . . . . . . . . . . . . . . . . . . . . . . . . . . . . . . . . . . . . 87
Index . . . . . . . . . . . . . . . . . . . . . . . . . . . . . . . . . . . . . . . . . . . . . . . . . . . . . . . . . . . . . . . 89
Impressa3.qxd 10/22/01 9:29 PM Page vi

Section 1: Introduction 1
Digital Label Press 3 User’s Manual
Introduction
1
Thank You...
...for choosing the Digital Label and Decal Press. This press has been designed to
provide you with stunning, custom cut, high-quality color output on durable
adhesive-backed paper, vinyl, polyester, and even heat transfer material. It offers
many features which allow you to simultaneously print and cut professional-
quality labels, decals, signs, photos, and much more - quickly and easily!
A. HOW YOUR PRESS WORKS
This Digital Label and Decal Press utilizes two different, yet closely related
printing technologies to achieve its remarkable output - thermal transfer and
dye-sublimation.
Thermal Transfer
Thermal transfer is a process which uses a resin-based ribbon roll as a carrier for
transferring color to the print media (see Section 4 for more information on these
ribbons and the appropriate print media for each). Such ribbons are available in
single spot colors or in a paneled form which includes each of the yellow, magenta,
and cyan process colors on the same ribbon roll. By providing each of the process
colors, paneled ribbons allow you to conveniently produce full-color images
automatically, from a single ribbon.
As the ribbon and print media pass simultaneously beneath the press's print head,
thousands of thermal elements within the print head melt the colored inks, thus
transferring thousands of tiny colored dots from the ribbon onto the print media. If
using a paneled ribbon, the print media automatically makes a separate pass for
each colored panel on the ribbon. By combining different colored dots from each
ribbon panel in different combinations (this process is called "dithering"), the press
is able to print up to 16.7 million colors.
Impressa3.qxd 10/22/01 9:29 PM Page 1

2 Section 1: Introduction
Digital Label Press 3 User’s Manual
Dye-Sublimation
Dye-sublimation is similar to thermal transfer in that it still involves a paneled,
multi-pass process beneath the same thermal print head. The difference, however,
lies within the special dye-sublimation ribbon, the print media, and in the transfer
process itself.
Unlike a thermal transfer ribbon, each colored panel on a dye-sublimation ribbon is
composed of colored dye rather than colored ink. When the dyes on the ribbon are
heated beneath the thermal Print head, they vaporize and diffuse into the surface of
the special dye-receptive print media. By varying the heat intensity of each thermal
element within the Print head, the press is able to change the value and hue of each
transferred dot of color. This results in the blending of one colored dot into the next,
producing continuous-tone, photo-realistic, color-accurate images with no dithering.
Digital Printing and Cutting… Simultaneously!
Your press has two prosessors, one that controls printing, and another that controls
cutting. It also has a memory buffer which stores commands allowing your press to
print and cut at the same time.
The plotter-style drag knife cutter allows the press to cut any shape that can be
imported into our easy to use layout software. The cut line is treated just like a
graphic and can be edited to match any shape. The software can even trace around
an image to create a perfect contour cut.
B. SPECIAL FEATURES
With its dual function thermal transfer/dye-sublimation color printing capability,
this press offers you incredible printing versatility. The press's resin thermal transfer
mode prints outdoor-durable labels, signs, and decals on long-lasting vinyl or
polyester media. And with its dye-sublimation mode, this press delivers continuous-
tone, photo-quality output no other color printing technology can match.
Switching back and forth between these printing methods is easy. All you do is load
either the thermal transfer ribbon with the appropriate print media or the dye-
sublimation ribbon and print media, and select the appropriate printing choice from
within the press's software driver. The entire change-over process only takes just a
few minutes.
And, best of all, operation is simple and straight forward. This press will print from
any IBM-PC® or compatible running Windows™. This means that you can use
virtually any software application running under Windows to create your custom
labels or decals. Then, just import your design into PressPrint printing software to
duplicate, print, and cut as many labels as needed.
To begin using your press, please refer to the remainder of this manual. The User's
Manual is your complete step-by-step guide to setting up and printing with your
powerful, new Digital Label and Decal Press.
Impressa3.qxd 10/22/01 9:29 PM Page 2

Safety Precautions
Section 2: Safety Precautions 3
2
Before operating the unit, please read the following safety precautions carefully.
CAUTION!
TO PREVENT FIRE OR SHOCK HAZARD, DO NOT EXPOSE THE UNIT
TO RAIN OR MOISTURE. TO REDUCE THE RISK OF ELECTRIC
SHOCK, DO NOT REMOVE FRONT, TOP, SIDE, OR REAR PANELS. NO
USER-SERVICEABLE PARTS INSIDE. REFER SERVICING TO QUALIFIED
SERVICE PERSONNEL.
WARNINGS
Operate the unit only on 110-120 VAC, 50/60 Hz, if operating within the United
States or Canada. For printers that have been shipped outside of the United
States and Canada, operate the unit only on 220-240 VAC, or 100 VAC in Japan.
If you have any doubt as to whether you have a unit with the correct voltage
rating for your country's power supply, DO NOT ATTEMPT TO USE THE
UNIT. Contact your dealer or the factory.
Stop operation immediately if any liquid or solid object should fall into the
cabinet. Unplug the unit and have it checked by qualified service personnel.
Do not disassemble the cabinet. Refer servicing only to qualified personnel.
Impressa3.qxd 10/22/01 9:29 PM Page 3

4 Section 2: Safety Precautions
Digital Label Press 3 User’s Manual
Impressa3.qxd 10/22/01 9:29 PM Page 4

Section 2: Safety Precautions 5
Digital Label Press 3 User’s Manual
Impressa3.qxd 10/22/01 9:29 PM Page 5

6 Section 2: Safety Precautions
Digital Label Press 3 User’s Manual
Impressa3.qxd 10/22/01 9:29 PM Page 6

Section 2: Safety Precautions 7
Digital Label Press 3 User’s Manual
Impressa3.qxd 10/22/01 9:29 PM Page 7

8 Section 2: Safety Precautions
Digital Label Press 3 User’s Manual
Impressa3.qxd 10/22/01 9:29 PM Page 8

Section 3: Getting Started 9
Digital Label Press 3 User’s Manual
Getting Started
3
A. CHOOSING A GOOD LOCATION
Place the unit in a location with adequate air circulation to prevent internal heat
build up.
Use the dimensions specified in Section 10 as a guideline for the minimum
clearances to the unit.
NOTE: Allow for adequate clearance above the unit to accommodate the height of the unit with its
cover open.
Do not place the unit in a location where the ventilation holes located on the
left of the unit could become blocked.
Do not install unit near heat sources such as radiators or air ducts, or in a place
subject to direct sun-light, excessive dust, mechanical vibration or shock.
B. ABOUT MOISTURE CONDENSATION
If the unit is brought directly from a cold to a warm location, or is placed in a very
damp room, moisture may condense inside the unit. Should this occur, print
quality may not be optimum. Leave the unit turned off in a warm, dry room for
several hours before using. This will allow the moisture to evaporate.
Impressa3.qxd 10/22/01 9:29 PM Page 9

10 Section 3: Getting Started
Digital Label Press 3 User’s Manual
C. UNPACKING AND INSPECTION
Your Press 3 ships in two separate cartons, one for the printer, and one for the
Media Input Assembly and Media Output Tray. While unpacking your printer,
inspect the cartons to ensure that no damage has occurred during shipping. Make
sure that all supplied accessories are included with your unit. The following items
should be included:
Printer
Power Cord
USB Interface Cable
Media Supply Unwind Assembly
Media Output Tray
Ribbon Cartridge (1)
Cutter Blade Holder with Blade (1)
Printer Driver Software
PressPrint Label Software
PANTONE Software
Warranty Statement and Registration Card
This manual and other printed information
Save the carton and packing materials. They will come in handy when
transporting the unit.
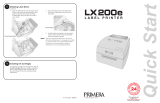
D. IDENTIFYING THE PARTS
This illustration shows the features found on the front of your Press Digital Label
and Decal Press.
Printer Hood
Printer Hood Release
Print Media
Input Assembly
Print Media
Roll Release
Cancel Button
Menu Button
Retry/Enter Button
Print Media
Output Assembly
Cutter Hood
LCD Display
Control Panel
Impressa3.qxd 10/22/01 9:29 PM Page 10

Section 3: Getting Started 11
Digital Label Press 3 User’s Manual
Control Panel
Notice that Press's Control Panel LCD Display shows information on both cutting
and printing. The reason for this is that each of these functions works
independently of each other. This means that if the print job is canceled, for
example, the cutter will continue to cut and vice- versa. The following describes
the function of each button as well as the information found on the LCD display:
LCD Display
This display is used to convey useful information to the user. The following table
shows some of the normal messages you will see during normal operation:
Message Description
POWER UP This is displayed during “boot up” sequence when
INITIALIZING power has been applied to the unit. During this
sequence you will see helpful information on the
firmware version for both the cutter and the printer
displayed.
PRINTER: READY The press is ready to receive a job.
CUTTER: READY
#200 ABR (paper type) This useful message identifies the type of paper
QUANTITY: XXX installed as well as the number of prints remaining
(number of prints) on the roll. Please refer to section 4-H for a
description of paper types shown in this display
PAGE COUNT: XXXX This message displays the number of pages that
(number of prints) have been printed since the press has been turned
on. This number can also be reset to "0". This is
described later in this section.
Table 3.1. Normal Display Messages
More messages can be seen in Section 9: Troubleshooting.
Impressa3.qxd 10/22/01 9:29 PM Page 11

12 Section 3: Getting Started
Digital Label Press 3 User’s Manual
Cancel/-
The Cancel button cancels cutting and ejects the page. As a fail-safe, the Retry
button must first be pressed to pause cutting. When the Printer Hood is opened,
pressing Cancel will force the paper to reverse through the paper path. This is
useful in unloading the paper roll. The Cancel key also functions as "-" to step back
through previously displayed options when using the Menu feature of your press
as described below. When the Printer Hood is closed, press Cancel and Retry
simultaneously to reset the press's processors and clear its memory buffer.
Menu/+
The Menu/+ will open the menu options. The menus will allow you to load paper
and select some cutter settings. Once in the menu, this button performs the "+"
feature to advance through available options while Cancel/- allows you to display
the previous selection of the menu item. The following table describes the menu
items available on your press:
Menu Item Description
PAPER LOAD SEQ This will initialize a paper load sequence that cuts
ENTER WHEN READY the leading edge of the sheet and positions the
paper for printing. This is used when loading a new
roll and is describe in detail in section 4-G.
PAGE COUNT: 0000 This will reset the PAGE COUNT feature (described
ENTER TO ZERO on page 13) to 0.
TEST PRINT This will initiate a printer self test described in
ENTER WHEN READY detail in section 5-A
PAGE LOAD TEST This tests the paper path of the press and is
ENTER WHEN READY described further in section 5-A
Table 3.2. Menu Items in the Control Panel Display
NOTE: The Menu will automatically close if no button is pressed for a period of 10 seconds.
Retry/ Enter
The Retry button is used to continue press operation after an error has occurred.
For example, if your press runs out of ribbon, the machine will stop printing and
an OUT OF RIBBON error will be displayed on the LCD. Once a new ribbon has
been installed, you can press the Retry button to continue the job. The Enter
feature is used to select a choice in Menu mode as described above. When the
Printer Hood is open, pressing Retry will force-feed the media through the paper
path. With the Printer Hood closed, pressing Retry and Cancel simultaneously will
reset the press's processors and clear its memory buffer.
Impressa3.qxd 10/22/01 9:29 PM Page 12

Section 3: Getting Started 13
Digital Label Press 3 User’s Manual
Cutting Pressure
The Cutting Pressure slide adjusts the amount of pressure used by the press's
cutter. It is very important that this cut pressure be adjusted properly. If cut
pressure is too high, The press may cut all the way through the print media. This
will cause premature wear on the cutting blade and may even cause the cutter to
stall. If cut pressure is too low, the press may not cut deeply enough. This makes it
difficult to remove the matrix or "weed" the excess print media from the finished
labels. When optimum cut pressure is set, the press will cut completely through
the adhesive-backed portion of the print media and ever so slightly into the
backing.
When switching between the press's variety of print media, it will most likely be
necessary to adjust the cut pressure in order to accommodate the unique
characteristics of each media type. In most cases, optimum cut pressure can be
determined after just one sheet of media has been cut. If cutter adjustment is
required, the cut pressure can be adjusted at any time, even while print media is
being cut.
The default position of the Cutting Pressure slide is in the exact center. To increase
pressure, move the slide toward the positive (+) end. To decrease pressure, move
the slide toward the negative (-) end. A corresponding number value will be
displayed on the LCD when the slide switch is moved to allow you to easily note
the cutter pressure setting. Do not make extreme adjustments to the Cutting
Pressure slide. It is recommended increases or decreases to the cut pressure do not
exceed 5 units on the LCD (or 1 bar on the slide switch) at a time.
NOTE: An additional cut pressure adjustment option is provided within the PressPrint software.
This option should rarely need to be adjusted, however, since its optimum setting is preset
at the factory. See page 82 for more information on this option.
Impressa3.qxd 10/22/01 9:29 PM Page 13

14 Section 3: Getting Started
Digital Label Press 3 User’s Manual
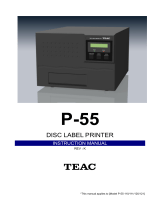
This illustration shows the input ports found on the rear panel of the printer. When
connecting Press to your computer, you will use its Parallel Interface Port. For more
information on this port, please refer to Appendix A.
E. REMOVING THE RIBBON CARTRIDGE AND BLADE HOLDER
A single Ribbon Cartridge and Blade Holder are included with Press. The Ribbon
Cartridge holds print ribbons in place inside the printer. The Blade Holder holds
the cutter blade in place inside the cutter. For your convenience, the Blade Holder
ships with a blade already installed. During shipment, these items are fastened to
each other inside the unit.
Power Switch
Power Input Port Parrallel Interface
Media Input Assembly
Interface Cable
Impressa3.qxd 10/22/01 9:29 PM Page 14

Section 3: Getting Started 15
Digital Label Press 3 User’s Manual
Additional ribbon cartridges can be purchased to make switching between Press's
various print ribbons more convenient. Additional cutter blades can also be
purchased as needed. To remove these items from the inside of the printer, refer to
the following steps:
1. Press the Cover Release Button. Allow the cover to swing up and open.
2. With the cover open, you can see the Ribbon Cartridge.
3. Remove the shipping tape from both sides of the cartridge. Grasping each side
of the cartridge, lift it straight up and carefully remove it from the printer.
4. Remove the shipping tape fastening the Blade Holder to the Ribbon Cartridge
and separate the two items. Remove the Blade Holder from its packaging, and
refer to the next procedure for instructions on installing the Blade Holder into
Press's cutter.
THE CUTTER BLADE IS RAZOR-SHARP AND CAN EASILY CUT YOU. BE
EXTREMELY CAREFUL WHEN HANDLING THIS BLADE!
F. INSTALLING THE BLADE HOLDER
Refer to the following steps to install the Blade Holder into Press's cutter.
1. Open the Cutter Door by pulling up on the end of the cover closest to the paper
output tray.
2. Locate the black, plastic Cutter Arm. This is what holds the aluminum Blade
Holder in place.
CAUTION!
!
Blade Holder
Cutter Arm
Securing Knob
Impressa3.qxd 10/22/01 9:29 PM Page 15
/