Page is loading ...

1-800-237-6666 www.discmakers.com T
T
Reflex1 DVD User Guide
Version 1.1

1-800-237-6666 www.discmakers.com T
01
COPYRIGHT
Copyright 2003 by Disc Makers. All rights reserved. This item and the informa-
tion contained herein are the property of Disc Makers. No part of this document
may be reproduced, transmitted, transcribed, stored in a retrieval system, or
translated into any language or computer language in any form or by any
means, electronic, mechanical, magnetic, optical, chemical, manual, or other-
wise, without the express written permission of Disc Makers.
DISCLAIMER
Disc Makers makes no representation or warranties with respect to the con-
tents of this document and specifically disclaims any implied warranties of
merchantability or fitness for any particular purpose. Further, Disc Makers
reserves the right to revise this publication without obligation of Disc Makers
to notify any person or organization of such revision or changes.
REVISION HISTORY
Revision Date Description
1.0 10/31/2003 Updates by Disc Makers Technical Staff
CONTACTING DISC MAKERS, USA
Disc Makers
7905 North Route 130
Pennsauken, NJ 08110-1402
(856) 663-9030
TRADEMARK NOTICES
All product names are trademarks or registered trademarks of their respective
owners. Disc Makers and the Disc Makers logo © Disc Makers

WELCOME
Congratulations on the purchase of your Disc Makers Reflex duplication sys-
tem. This sturdy unit has been professionally designed and manufactured
under strict quality guidelines to provide you with years of dependable and
trouble-free operation. Please be sure to read this instruction guide thoroughly
before operating the unit.
TECHNICAL SUPPORT
Disc Makers backs your duplicator purchase with free lifetime technical sup-
port. Tech support hours are from 9:00 a.m. to 6:00 p.m. EST Monday through
Friday at 1-888-800-4041. Or you can email our tech support team at:
techsupport@discmakers.com. For FAQs, downloadable manuals, product
updates, and warranty registration, go to:
www.discmakers.com/support.
WARRANTY
Disc Makers warrants to the original purchaser that the duplication equipment
you have purchased is free from defects in materials and workmanship for a
period of one year. This warranty is applicable when the warranty registration
has been completed and returned to Disc Makers within a reasonable period of
time following the purchase. This warranty is not transferable.
This warranty does not apply to malfunctions caused by misuse, negligence,
accident, or alteration. Disc Makers is not responsible for or liable for conse-
quential damages related to the use or misuse of this equipment. Disc Makers’
liability under this warranty extends solely to the obligation to repair or replace
a covered product. Disc Makers’ liability under this warranty shall not exceed
the cost of the covered product.
WARRANTY REPAIR
Any item that needs to be returned for a warranty repair must be returned in
original packaging. You must call Disc Makers for a return authorization number
(RMA) before returning any product. In the event that the original packaging
has been discarded, you can purchase replacement packaging from Disc
Makers. The sender will be responsible for any damage incurred if product is
not returned in original or replacement packaging. To obtain replacement pack-
aging, call Disc Makers technical support at 1-888-800-4041 with the model of
your duplicator.
PLEASE NOTE
The copying of audio, video, or software without the permission of the copy-
right holder is illegal. Disc Makers accepts no responsibility for the copyright
use or misuse of this equipment. It is the sole responsibility of the user to
ensure that the legal rights of the copyright owners are respected.
1-800-237-6666 www.discmakers.com
T
02

NEED BLANK MEDIA OR SUPPLIES?
Disc Makers offers a range of top-quality blank CD-Rs and DVD-Rs at unbeat-
able prices, including our own Disc Makers Premium brand. We also have an
extensive line of packaging and mailing supplies, as well as inkjet cartridges
and other peripherals for your duplication and printing system. For the latest
products and lowest prices, shop securely online at
www.discmarket.com, or
call 1-888-800-4041.
CUSTOM PRINTING ON BLANK CD-RS
AND
DVD-RS — IN JUST 5 DAYS!
Disc Makers gives you the same high-quality silk screen
technology on your blank media that we use on our profes-
sionally replicated discs. Call 1-888-800-4041, or go
to
www.discmakers.com/CDR105 for details and pricing.
HAVE A CD OR DVD PROJECT THAT’S TOO BIG
FOR DUPLICATION
?
With our state-of-the-art replication and printing facilities, no order is too small
or too large. Our turnkey packages make shopping for the right CD-ROM or DVD
package a snap. We offer hard-to-find packaging options in small or large quan-
tities, or we’ll create a custom package to fit your needs. And fast turn times
are our specialty. Many of our complete CD-ROM packages are ready in just 7
working days! No one does it faster. Call your Disc Makers product specialist at
1-800-CD-ROM-NOW, or go to
www.discmakers.com/rom for complete informa-
tion and package pricing.
1-800-237-6666 www.discmakers.com
T
03

The Reflex1 DVD is a high performance DVD/CD-R one to one disc duplicator
designed for both the novice and professional user. The Reflex1 DVD is
designed for a variety of applications that require the exchange of audio, video
or data content. The following is a User Guide that outlines the menu com-
mands of the unit and immediate functions of the unit. For additional technical
support please call 888-800-4041.
GETTING STARTED
Carefully remove the DVD duplicator from its shipping container. Please inspect
the contents and verify them against the packing slip. Be sure to report any
errors in shipping immediately to Disc Makers.
Packing materials: Please save the original box and packaging in the event the
unit requires future service or you need to move the unit from one location to
another. This will help reduce the possibility of damage in transit.
Please Note: Any item that needs to be returned for a warranty repair must be
returned in original packaging.
INSTALLATION AND SETUP
1. Unpack the Reflex1 DVD to a clean and cool work area. Keep the external
packaging for future storage and transportation.
2. Place the unit on a flat, clean and dust free surface.
3. Connect the power cord from the back of the unit to an electrical outlet. Do
not bypass the Ground.
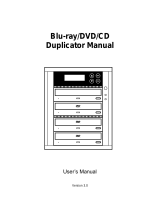
4. The Front panel should appear as below.
FUNCTIONS
1. COPY
1. Power on the system by pressing the button on the lower right front of the
unit. You will then see the system initializing and performing a self test on
the front panel LED. The LED will show “Detect Drives”, and then switch to
copy mode.
2. To begin the duplication operation, load the top drive (reader) with the mas-
ter disc. Load the lower drive (writer) with high quality DVD-R, DVD+R, or CD-
R media.
3. Press the “ENT” button to begin duplicating. The unit will automatically ana-
lyze the master disc, and begin duplicating at the maximum recording
speed.
4. The LCD will display the progress and display OK when the duplication is
complete. Upon successful duplication the copied disc will be ejected, if the
duplication fails the disc will remain in the bottom drive.
The LCD will display:
To continue the same duplication job; reload the writer drive with another blank
recordable media and press the “ENT” button to start duplicating again. To start
a new job, place a new master disc in the reader drive.
2. TEST
The test function is used to check whether a disc will successfully copy. It sim-
ulates the copying process, no data will be written to the recordable media.
1. Select the function using the up and down arrows.
1-800-237-6666 www.discmakers.com
T
04
Copy
OK: 01

2. Load the top drive (reader) with the master disc and load the lower drive
(writer) with high quality blank DVD-R, DVD+R, or CD-R media.
3. Press the “ENT” button to start the process. The unit will analyze the master
disc, and the source disc and display a message.
Upon successful testing the following will display on the LCD.
If the target disc has already been written to, or is damaged and cannot be
written to, the LCD will display the message: “Target Drive Not ready”
If the data on the master CD will not fit on the target media then the LCD display
will read “Target Overflow”.
3. TEST AND COPY
The test and copy function incorporates the first two functions into one opera-
tion. It is used to check whether a disc will successfully copy and then goes on
to do the copy. First, the copy process is simulated and then the data is actual-
ly copied to the recordable media.
1. Select the function using the up and down arrows.
2. Load the top drive (reader) with the master disc and load the lower drive
(writer) with high quality blank DVD-R, DVD+R, or CD-R media.
3. Press the “ENT” button to start the process. The unit will display test the
master disc, then check the target disc, and finally copy to the blank record-
able media.
Upon successful testing the following will display on the LCD.
If the target disc has already been written to, or is damaged and cannot be
written to, the LCD will display the message: “Target Drive Not ready”
If the data on the master disc will not fit on the blank target media then the LCD
display will read “Target Overflow”.
4. VERIFY
The verify function is used to confirm that the master and the copy read the
same.
1. Select the function using the up and down arrows.
2. Load the top drive (reader) with the master disc and load the lower drive
(writer) with the recorded disc.
3. Press the “ENT” button to start the process.
Upon successful verification the following will display on the LCD and the
recorded media will be ejected. To verify another disc, place the next disc in the
writer drive and press the “ENT”button.
If the verification was unsuccessful the following will display:
5. COMPARE
The compare function takes the verify function one step farther, it gives details
about the master and recorded disc. It also, ejects the recorded disc upon a
successful comparison.
1-800-237-6666 www.discmakers.com
T
05
Test
OK: 01
Test and Copy
OK: 01
Verify
OK: 01
Verify F->
Fail: 01

1. Select the function using the up and down arrows.
2. Load the top drive (reader) with the master disc and load the lower drive
(writer) with high quality blank DVD-R, DVD+R, or CD-R media..
3. Press the “ENT” button to start the process. The unit will make the compari-
son and display whether the target comparison was OK or failed.
Upon successful testing the following will display on the LCD.
Pressing the up arrow will display whether the copied (Tgt) disc is identical or
not, pressing the down button will show the size of the master (Src) disc. The
“ENT” key will display information about master(Src) first then the copied disc
(Tgt). Press the “ESC” key to return to the main menu.
6. PRESCAN
The prescan function only looks at the master disc. This is used to verify that
the master can be read correctly without errors
1. Select the function using the up and down arrows.
2. Load the top drive (reader) with the master disc.
3. Press the “ENT” button to start the process. The unit will make the scan and
display “PreScan OK!”
7. DISC INFO
The disc info function only looks at the master disc. It will display the session
and tracks (if any) on the disc, total time of the disc and size of the disc.
1. Select the function using the up and down arrows.
2. Load the top drive (reader) with the master disc.
3. Press the “ENT” button to start the process. Pressing the up and down arrow
will scan through the information.
8. SELECT SOURCE
This function is used to select which drive will be the writer drive and which
will be the reader drive, changing this may render your unit inoperable.
9. IMAGE
This option is not used in the Reflex 1.
10. EDIT TRACK
The Reflex 1 can be used to create custom audio CDs. This function allows the
user to take audio tracks from different CDs and compile them to a single CD.
1. Select the function using the up and down arrows.
2. Load the top drive (reader) with the master disc and load the lower drive
(writer) with high quality blank CD-R media.
3. Press the “ENT” button once to see the main screen for this function, “10-01
Edit Track CD to CD Edit.” Press the ENT button again to see the following
screen:
4. Press the up or down arrow to change the track in view. To select a track to
copy to the blank disc press the ENT key, a + will appear next to the track in
view. In the following example track 3 is in view and is selected for copying.
More than one track can be choosen from a CD but they will be recorded
tothe destination CD in the order in which they are on the original CD. To
change the order of play record each track individually.
1-800-237-6666 www.discmakers.com
T
06
Compare OK: 01
Fail: 0 Diff: 0
Select Track:
1/31 3:18
TRACK IN VIEW
TOTALTRACKS ON DISC
TIME OF TRACK
1
Select Track:
+5/31 2:41

5. After selecting a track to copy press the up arrow until “End” appears. In this
example one track is selected and the time for this track is 2:41. If four
tracks were selected the screen would show “4 Trk” and give the total time
for all four tracks.
6. Press the ENT button and the Reflex 1 will ask if all the selections are made
for this CD. Use the up or down arrow to change between Yes and No.
Pressing ENT with No on the LCD will take the user back to Select Track.
Pressing ENT with Yes on the screen will start the copying of the track (or
tracks) to the target CD.
7. When the copying ends the unit will display “Burn Complete! OK: 01”. Press
the ENT button. The LCD will display “Continue edit next Disc? NO”. To change
to another CD, Load the top drive (reader) with another master disc, press
the up arrow to change the “No” to “Yes”and press ENT. This will take you to
the screen from step 3. Repeat steps 3 through 6 to put more tracks on the
CD.
8. When there are no more tracks to write to the CD leave the “Continue edit
next Disc? NO” set to “No” and press the ENT key again. The following screen
will appear:
Press ENT and the Reflex 1 will close the CD.
Note: the Edit Track CD to CD Edit is the only function enabled for the Reflex 1 in
the Edit Track section.
11. SETUP
This function allows the user to specify specific parameters for copying discs.
There are 16 sub items. From the main menu screen pressing “ENT” will show
the sub heading, pressing the up and down arrows allows the user to move
between the settings.
1. Language: allows the user to set English or Spanish as the display language.
2. CD Burn Speed: allows the user to change the speed at which the unit burns
CD-R recordable media. By pressing the “ENT” button the current setting will
be displayed, the user can then press the up and down arrows to change to
the desired speed. Pressing the “ENT” button will set the speed. Press “ESC”
to go back to the main menu.
3. DVD Burn Speed: allows the user to change the speed at which the unit
burns DVD-R and DVD+R recordable media. By pressing the “ENT” button the
current setting will be displayed, the user can then press the up and down
arrows to change to the desired speed. Pressing the “ENT” button will set the
speed. Press “ESC” to go back to the main menu.
4. Read Speed: The read speed can be changed after the master disc is placed
in the reader drive. With a disc in the reader drive and “11.04 Read Speed”
showing in the LED window, press “ENT” then the up or down arrows to scroll
1-800-237-6666 www.discmakers.com
T
07
Select Track:
End 1 Trk 02:41
End edit disc
and burn? YES
Close all discs
session? YES

through the usable read speeds. When the desired speed is displayed press
“ENT” to set the speed. This will stay the read in speed until changed.
5. Auto Start Drive set to ‘On’ will start a copy function as soon as blank media
is detected in the writer drive. The default setting is ‘Off”.
6. Startup Menu allows the user to have the Reflex 1 start up to any of the first
seven options in the main menu.The default setting is ‘Copy’.
7. Auto Verify set to ‘On’ will do a verify after every copy is made. The default
setting is ‘Off”.
8. Auto Compare set to ‘On’ will do a comparison after every copy is made. The
default setting is ‘Off”.
9. Auto PreScan set to ‘On’ will do a prescan on every CD placed in the reader
drive. The default setting is ‘Off”.
10. Eject Disc allows the user to choose what will happen at the end of a func-
tion. The three choices are: Eject Good Only, Eject All Disc, and Do Not Eject.
The eject option is only available on the Copy, Test and Copy, Verify, and
Compare functions.
11. Burn on the Fly is not used in the Reflex 1.
12. Burn Mode allows the user to choose Disc at Once or Track at Once for the
burn function. The default setting is ‘DAO’ Disc at Once.
13. Display Time set to On causes the Reflex1 DVD to show the time it took to
complete a function. The default setting is Off.
14. Button Sound set to ‘On’ will cause any pressing of the control buttons to
make a sound. The default setting is ‘On”.
15. Device Info has information on the writer and reader drives.
16. System Info has information on the controller of the Reflex 1 DVD.
17. Quick Erase erases the TOC of rewritable recordable media.
18. Full Erase erases all the data on rewritable recordable media.
08
PHILADELPHIA AREA Plant & Main Office • 7905 N. Route 130, Pennsauken, NJ 08110-1402 • 1-800-237-6666 • Outside USA: 856-663-9030
NEW YORK CITY 11 West 17th Street, New York, NY 10011-5504 • 1-800-446-3470
LOS ANGELES 3445 Cahuenga Blvd. W., Los Angeles, CA 90068-1329 • 1-800-731-8009
SILICON VALLEY 42650 Christy Street, Fremont, CA 94538-3135 • 1-800-869-0715
SEATTLE 730 Andover Park West, Tukwila, WA 98188-3322 • 1-800-553-8906
CARIBBEAN Avenida Blvd., Arturo Cadilla EB18, Levittown, Toa Baja, PR 00949-2701 • 1-800-804-9588
/