Page is loading ...

INSTALLATION
GUIDE
Powerfoil
®
X2.0 Washdown
For help, call 1-877-BIG-FANS
or visit www.bigassfans.com

8’–24’ POWERFOIL
®
X2.0 WASHDOWN & POWERFOIL
®
X2.0PLUS WASHDOWN
Installation Checklist
Do you have the appropriate mount to accommodate your roof pitch? If you are uncertain or feel
you have the incorrect mount for your building structure, please contact Customer Service.
Did a structural engineer approve the mounting structure? See page 9 for Big Ass Fans-approved
mounting structures.
Are you familiar with the function and use of the safety cable? See page 19 for information on
properly securing the safety cable.
Will the fan be installed so that the airfoils are at least 10 ft (3.05 m) above the oor?
Will the fan be installed so that the airfoils have at least 2 ft (0.61 m) of clearance from
obstructions?
Will the fan be installed so that it is not subjected to high winds such as from an HVAC system
or near a large garage door? If the fan is mounted at the same level or higher than a diffuser, the
winglets must be at a distance that is at least 1x the measure of the fan’s diameter. If the fan is mounted
at the same height or below a diffuser, the winglets must be at a distance that is at least 2x the measure
of the fan’s diameter.
Will the distance between multiple fans be at least 2.5x the fans’ diameter when measured from
the centers of the fans.
If installing the fan on an I-beam, ensure the upper yoke is the correct size. See page 12 for more
information on installing the fan to an I-beam.
If you ordered multiple fans, did you keep the parts for each fan together? It is critical that the airfoils
be properly matched with the motor unit.
Do you have the correct power circuit for the fan controller? See pages 2–3 for information
concerning power requirements for the fan controller.
Customer Service: 1-877-BIG-FANS
(International: +1 859 233 1271)

8’–24’ POWERFOIL
®
X2.0 WASHDOWN & POWERFOIL
®
X2.0PLUS WASHDOWN
i
WWW.BIGASSFANS.COM ©2012 DELTA T CORP. ALL RIGHTS RESERVED
8’–24’ POWERFOIL
®
X2.0 WASHDOWN & POWERFOIL
®
X2.0PLUS WASHDOWN
Installation Guide
8’–24’ Powerfoil
®
X2.0 Washdown
Installation Guide:
January 2017
Rev. L
This product was manufactured in a plant whose Management System is certied as being in conformity with ISO 9001.
PowerfoilX2.0 and the PowerfoilX2.0 logo are trademarks of Delta T Corporation, registered in the United States and/or other countries. All other trademarks used herein are the properties
of their respective owners. No part of this document may be reproduced or translated into a different language without the prior written consent of Big Ass Fan Company. The information
contained in this document is subject to change without notice.
www.bigasssolutions.com/patents ▪ www.bigasssolutions.com/warranties
Contact Information
Manufacturing
2425 Merchant Street
Lexington, KY 40511
1-877-BIG-FANS
www.bigassfans.com
Customer Service
2348 Innovation Drive
Lexington, KY 40511
1-877-BIG-FANS
Intl.: +1 859 233 1271
www.bigassfans.com
Warranty Returns
800 Winchester Road
Lexington, KY 40505
1-877-BIG-FANS
www.bigassfans.com
Australia Ofce
Unit 22, 1029 Manly Road
Tingalpa QLD 4173, Australia
(07) 3292 0100
www.bigassfans.com/au
Conforms to ANSI/UL STD 507: Electric Fans
Certied to CAN/CSA C22.2 No.113: Fans & Ventilators

8’–24’ POWERFOIL
®
X2.0 WASHDOWN & POWERFOIL
®
X2.0PLUS WASHDOWN
WWW.BIGASSFANS.COM ©2012 DELTA T CORP. ALL RIGHTS RESERVED
ii
IMPORTANT SAFETY INSTRUCTIONS
READ AND SAVE THESE INSTRUCTIONS
TO REDUCE THE RISK OF FIRE, ELECTRIC SHOCK, OR INJURY TO PERSONS, OBSERVE THE FOLLOWING:
WARNING: Before servicing or cleaning unit, switch power off at service panel and lock the service disconnecting means to prevent
power from being switched on accidentally. When the service disconnecting means cannot be locked, securely fasten a prominent
warning device, such as a tag, to the service panel.
WARNING: Big
Ass Fans must be installed with Big Ass Fan-supplied controllers. Other parts cannot be substituted.
CAUTION: The installation of a Big
Ass Fan must be in accordance with the requirements specied in this installation manual
and with any additional requirements set forth by the National Electric Code (NEC), ANSI/NFPA 70-2011, and all local codes. Code
compliance is ultimately YOUR responsibility! Failure to comply with these codes could result in personal injury or property damage.
WARNING: The fan controllers contain high voltage capacitors which take time to discharge after removal of mains supply. Before
servicing the fan controller, ensure isolation of mains supply from line inputs at the controller. Wait three minutes for capacitors
to discharge to safe voltage levels. Failure to do so may result in personal injury or death. Note: Darkened display LEDs are not an
indication of safe voltage levels.
CAUTION: Exercise caution and common sense when powering the fan. Do not connect the fan to a damaged or hazardous power
source. Do not attempt to resolve electrical malfunctions or failures on your own. Contact Big
Ass Fans if you have any questions
regarding the electrical installation of this fan.
CAUTION: When service or replacement of a component in the fan requires the removal or disconnection of a safety device, the
safety device is to be reinstalled or remounted as previously installed.
WARNING: Risk of re, electric shock, or injury to persons during cleaning and user-maintenance! Disconnect the fan from the power
supply before servicing.
CAUTION: Do not bend the airfoils when installing, adjusting, or cleaning the fan. Do not insert foreign objects between rotating fan
airfoils.
WARNING: Stay alert, watch what you are doing, and use common sense when installing fans. Do not install fans if tired or under the
inuence of drugs, alcohol, or medication. A moment of inattention while installing fans may result in serious personal injury.
CAUTION: Installation work and electrical wiring must be done by qualied person(s) in accordance with all applicable codes and
standards.
CAUTION: Use this fan only in the manner intended by the manufacturer. If you have questions, contact the manufacturer.
CAUTION: The installation of this fan requires the use of some power tools. Follow the safety procedures found in the owner’s
manual for each of these tools and do not use them for purposes other than those intended by the manufacturer.
CAUTION: The Big
Ass Fans product warranty will not cover equipment damage or failure that is caused by improper installation.
CAUTION: Do not operate fan with a damaged cord or plug. Return fan to an authorized service facility for examination or repair.
WARNING: This appliance is not intended for use by persons (including children) with reduced physical, sensory or mental
capabilities, or lack of experience and knowledge, unless they have been given supervision or instruction concerning use of the
appliance by a person responsible for their safety. Children should be supervised to ensure that they do not play with the appliance.
Leave this installation guide with the owner of the fan after installation.
Suitable for use in wet locations and outdoor use when installed in a GFCI protected branch circuit.
ATTENTION: If installing the fan in the United States, the fan must be installed per the following National Fire Protection Association
(NFPA) guidelines:
• The fan must be centered approximately between four adjacent sprinklers.
• The vertical distance from the fan to the sprinkler deector must be at least 3 ft (91.4 cm).
• The fan must be interlocked to shut down immediately upon receiving a waterow signal from the alarm system.
WARNING: To reduce the risk of re, electric shock, or personal injury, mount directly to a structural framing member.

8’–24’ POWERFOIL
®
X2.0 WASHDOWN & POWERFOIL
®
X2.0PLUS WASHDOWN
Mounting Reference Guide
The following is intended as a reference guide for Powerfoil
®
X2.0 Washdown and Powerfoil
®
X2.0 Plus Washdown fan mounting methods. See the referenced pages for complete fan
installation and operating instructions. Consult a structural engineer to determine which mounting method best suits your building structure.
Bar Joists
See page 12 for mounting
instructions.
8’–24’ POWERFOIL
®
X2.0 WASHDOWN & POWERFOIL
®
X2.0PLUS WASHDOWN
WWW.BIGASSFANS.COM ©2012 DELTA T CORP. ALL RIGHTS RESERVED
See page 13 for mounting
instructions.
I-Beam Z-Purlins
See complete instructions
included with the Z-Purlin
Installation Kit.
See complete instructions
included with the Compound
Angle Mount Installation Kit.
Solid Beam
See complete instructions
included with the L-Bracket
Installation Kit.
I-Beam (Angled)


WWW.BIGASSFANS.COM ©2012 DELTA T CORP. ALL RIGHTS RESERVED
8’–24’ POWERFOIL
®
X2.0 WASHDOWN & POWERFOIL
®
X2.0PLUS WASHDOWN
Contents
Introduction
Safety Instructions ii
Mounting Reference Guide iii
Thank You 1
About Big Ass Fans 1
About the Fan 1
Technical Specications 2
Pre-Installation
What’s in the Box 4
Parts and Hardware 5
Tools Needed 6
Understanding Roof Pitch 6
Fan Diagram 7
Controller Diagram 8
Preparing the Work Site 9
Understanding Airow Patterns 10
Mounting Structure:
I-Beam
Attach Upper Yoke (to I-Beam) 12
Mounting Structure:
Bar Joists
1. Select Proper Angle Irons 13
2. Pre-drill Angle Irons 14
3. Secure Angle Irons (span is longer than 8 ft) 14
4a. Fasten Single Angle Irons to Roof Structure 15
4b. Fasten Double Angle Irons to Roof Structure 16
5a. Attach Upper Yoke (to Angle Irons) 17
5b. Attach Main Fan Unit (to Angle Irons) 18
Hanging the Fan
1. Attach Extension Tube (to Upper Yoke) 19
2. Secure Upper Safety Cable 19
3. Attach Lower Yoke (to Extension Tube) 20
4. Attach Main Fan Unit (to Lower Yoke) 20
5. Conrm Orientation 20
Installing Guy Wires
1. Attach Locking Carabiners to Main Fan Unit 21
2. Attach Beam Clamp 21
3. Route Guy Wire through Gripple
®
23
4. Install Remaining Guy Wires 23
Installing Airfoils
1. Attach Winglets to Airfoils 24
2. Position Airfoils 24
3. Attach Airfoils to Hub 25
Electrical Installation
Safety Guidelines 27
Power Wiring Guidelines 28
Grounding 29
Delta Secondary 30
Branch Circuit Protection 31
Mounting the Variable Frequency Drive (VFD) 32
Wiring: Fan Controller (200–250 V Single-Phase, 1 HP) 33
Wiring: Fan Controller (200–250 V Single-Phase, 2 HP) 34
Wiring: Fan Controller (200–250 V Three-Phase, 1 HP & 2 HP) 35
Wiring: Fan Controller (400–480 V Three-Phase, 1 HP & 2 HP) 36
Wiring: Fan Motor 37
Daisy Chaining 38
Basic Distributed I/O Interface; LOCAL Control 40
Basic Distributed I/O Interface; EXTERNAL Control 41
Interfacing with Basic Timers, Thermostats, and Other Equipment 42
Controller Operation 43
Starting, Stopping, and Direction Control 43

8’–24’ POWERFOIL
®
X2.0 WASHDOWN & POWERFOIL
®
X2.0PLUS WASHDOWN
WWW.BIGASSFANS.COM ©2012 DELTA T CORP. ALL RIGHTS RESERVED
Electrical Installation
(cont.)
Changing the Fan Speed 43
Cycling through the LED Display Modes 44
Toggling the Fan’s Command Source 44
Understanding and Clearing Fan Faults 45
Programming and Parameter Changes 45
Locking and Unlocking Procedures 46
Operating the Fan
Heating Season 48
Cooling Season 48
Preventive Maintenance
Annual Preventive Maintenance 49
General Preventive Maintenance 49
Annual Maintenance Checklist 51
Troubleshooting
General Troubleshooting 53
E Series Fan Error Codes 54
M Series Fan Error Codes 56
Warranty Return
Instructions
Return Instructions 58
Warranty Claim Form Instructions 59
Warranty Claim Form 61
Responsibility Agreement 62
Big Ass Fan Certied
Installers
Check-In Procedure 63
Close-Out Procedure 65
Contents (cont.)

8’–24’ POWERFOIL
®
X2.0 WASHDOWN & POWERFOIL
®
X2.0PLUS WASHDOWN
1
WWW.BIGASSFANS.COM ©2012 DELTA T CORP. ALL RIGHTS RESERVED
8’–24’ POWERFOIL
®
X2.0 WASHDOWN & POWERFOIL
®
X2.0PLUS WASHDOWN
Introduction
You’ve made a great choice! Big Ass Fans
®
are an efcient, cost-effective and seriously cool way to stay comfortable and save energy
all year long. More importantly, everything about your new fan—from the design of the motor to the angle of the airfoils—is based on
extensive research, testing, and innovative engineering. It will keep you and your space comfortable for years to come.
Any questions or comments? We’d love to talk. Just call 1-877-BIG-FANS (1-877-244-3267) or visit bigassfans.com/contact-us/.
About Big Ass Fans
Our provocative moniker originated with the massive overhead fans we perfected to bring comfort and energy savings to large industrial
buildings. Today, though, Big Ass Solutions is much more than industrial—and much more than Big Ass Fans or Big Ass Light. Big
Ass means quality, form, and function to solve problems in the built environment. It means having a herd of engineers on staff and the
world’s only R&D facility dedicated to testing air movement on a grand scale. It means speaking to our customers directly to understand
and solve their problems—if they need air movement, we do it bigger and better. If they need light, we make incredibly bright, long-
lasting LEDs. But mostly it means an insatiable drive to improve, engineer, design, test, re-engineer, re-design, and re-test until we get
it just right. That’s why there’s No Equal
™
.
About the fan
The Powerfoil
®
X2.0 Washdown is the rst and only fan of its kind, developed in direct response to requests from food manufacturers
for an air-movement solution that would meet the needs of the strictest food processing facilities. Features and benets of the
Powerfoil X2.0 Washdown include:
• Stainless steel and aluminum components
• Stainless steel, washdown motor for frequent intense cleaning
• Food duty epoxy
• Completely sealed NitroSeal gearbox with food-grade oil
• Nonporous, nonabsorbent, and corrosion-resistant materials

8’–24’ POWERFOIL
®
X2.0 WASHDOWN & POWERFOIL
®
X2.0PLUS WASHDOWN
WWW.BIGASSFANS.COM ©2012 DELTA T CORP. ALL RIGHTS RESERVED
2
Introduction (cont.)
Powerfoil
®
X2.0 specications
Fan size
Motor size,
HP (kW)
Minimum required
supply circuit size
Nominal output
voltage, 3 Φ
1
Maximum full load
current
Max RPM Airfoil length
Suggested
distance from
ceiling
2
8 ft
(2.4 m)
1.0
(0.75)
20 A @ 200–250 V, 1 Φ
10 A @ 200–250 V, 3 Φ
10 A @ 400–480 V, 3 Φ
10 A @ 575–600 V, 3 Φ
240 V
240 V
480 V
600 V
4.4 A
3.2 A
1.5 A
1.3 A
113
RPM
37.5 in (1 m) 4 ft (1.2 m)
10 ft
(3 m)
1.0
(0.75)
20 A @ 200–250 V, 1 Φ
10 A @ 200–250 V, 3 Φ
10 A @ 400–480 V, 3 Φ
10 A @ 575–600 V, 3 Φ
240 V
240 V
480 V
600 V
4.4 A
3.2 A
1.5 A
1.3 A
113
RPM
49.5 in (1.26 m) 4 ft (1.2 m)
12 ft
(3.6 m)
1.0
(0.75)
20 A @ 200–250 V, 1 Φ
10 A @ 200–250 V, 3 Φ
10 A @ 400–480 V, 3 Φ
10 A @ 575–600 V, 3 Φ
240 V
240 V
480 V
600 V
4.4 A
3.2 A
1.5 A
1.3 A
106
RPM
61.5 in (1.56 m) 5 ft (1.5 m)
14 ft
(4.3 m)
1.5
(1.1)
30 A @ 200–250 V, 1 Φ
20 A @ 200–250 V, 3 Φ
10 A @ 400–480 V, 3 Φ
10 A @ 575–600 V, 3 Φ
240 V
240 V
480 V
600 V
8.7 A
5.0 A
2.5 A
1.9 A
95
RPM
73.5 in (1.87 m) 5 ft (1.5 m)
16 ft
(4.9 m)
1.5
(1.1)
30 A @ 200–250 V, 1 Φ
20 A @ 200–250 V, 3 Φ
10 A @ 400–480 V, 3 Φ
10 A @ 575–600 V, 3 Φ
240 V
240 V
480 V
600 V
8.7 A
5.0 A
2.5 A
1.9 A
95
RPM
85.5 in (2.17 m) 6 ft (1.8 m)
18 ft
(5.5 m)
1.5
(1.1)
30 A @ 200–250 V, 1 Φ
20 A @ 200–250 V, 3 Φ
10 A @ 400–480 V, 3 Φ
10 A @ 575–600 V, 3 Φ
240 V
240 V
480 V
600 V
8.7 A
5.0 A
2.5 A
1.9 A
77
RPM
97.5 in (2.48 m) 6 ft (1.8 m)
20 ft
(6.1 m)
2.0
(1.5)
30 A @ 200–250 V, 1 Φ
20 A @ 200–250 V, 3 Φ
10 A @ 400–480 V, 3 Φ
10 A @ 575–600 V, 3 Φ
240 V
240 V
480 V
600 V
10.7 A
6.2 A
3.0 A
2.3 A
70
RPM
109.5 in (2.78 m) 7 ft (2.1 m)
24 ft
(7.3 m)
2.0
(1.5)
30 A @ 200–250 V, 1 Φ
20 A @ 200–250 V, 3 Φ
10 A @ 400–480 V, 3 Φ
10 A @ 575–600 V, 3 Φ
240 V
240 V
480 V
600 V
10.7 A
6.2 A
3.0 A
2.3 A
55
RPM
133.5 in (3.39 m) 7 ft (2.1 m)
1. Output voltage will not exceed Input voltage, with the exception of 120 V models. All controllers produce 3 Φ output power, regardless of input phase.
2. The distance of the fan from the ceiling should be measured from the top of the winglets to the ceiling.
CAUTION: Big Ass Fans requires that the Powerfoil X2.0 fan be supplied from one of the following types of transformers:
575–600 V models: 575/330 V Wye secondary (neutral not utilized)
400–480 V models: 480/277 V Wye secondary (neutral not utilized)
200–250 V models: 208/120 V Wye secondary (neutral not utilized)
240/120 V Delta secondary (Wild/High Phase B)
Integration into any other power distribution scheme may result in improper fan operation or premature hardware failure! See
page 27 for more information.

8’–24’ POWERFOIL
®
X2.0 WASHDOWN & POWERFOIL
®
X2.0PLUS WASHDOWN
3
WWW.BIGASSFANS.COM ©2012 DELTA T CORP. ALL RIGHTS RESERVED
8’–24’ POWERFOIL
®
X2.0 WASHDOWN & POWERFOIL
®
X2.0PLUS WASHDOWN
Introduction (cont.)
Powerfoil
®
X2.0 Plus specications
Fan size
Motor size,
hp (kW)
Minimum required supply
circuit size
Nominal output
voltage, 3 Φ
1
Maximum full load
current
Max RPM Airfoil length
Suggested
distance from
ceiling
2
10 ft
(3 m)
1.0
(0.75)
20 A @ 200–250 V, 1 Φ
10 A @ 200–250 V, 3 Φ
10 A @ 400–480 V, 3 Φ
10 A @ 575–600 V, 3 Φ
240 V
240 V
480 V
600 V
4.4 A
3.2 A
1.5 A
1.3 A
115
RPM
49.5 in
(1.26 m)
5 ft (1.5 m)
12 ft
(3.6 m)
1.5
(1.1)
30 A @ 200–250 V, 1 Φ
20 A @ 200–250 V, 3 Φ
10 A @ 400–480 V, 3 Φ
10 A @ 575–600 V, 3 Φ
240 V
240 V
480 V
600 V
8.7 A
5.0 A
2.5 A
1.9 A
95
RPM
61.5 in
(1.56 m)
6 ft (1.8 m)
14 ft
(4.3 m)
1.5
(1.1)
30 A @ 200–250 V, 1 Φ
20 A @ 200–250 V, 3 Φ
10 A @ 400–480 V, 3 Φ
10 A @ 575–600 V, 3 Φ
240 V
240 V
480 V
600 V
8.7 A
5.0 A
2.5 A
1.9 A
95
RPM
73.5 in
(1.87 m)
6 ft (1.8 m)
16 ft
(4.9 m)
1.5
(1.1)
30 A @ 200–250 V, 1 Φ
20 A @ 200–250 V, 3 Φ
10 A @ 400–480 V, 3 Φ
10 A @ 575–600 V, 3 Φ
240 V
240 V
480 V
600 V
8.7 A
5.0 A
2.5 A
1.9 A
77
RPM
85.5 in
(2.17 m)
7 ft (2.1 m)
18 ft
(5.5 m)
2.0
(1.5)
30 A @ 200–250 V, 1 Φ
20 A @ 200–250 V, 3 Φ
10 A @ 400–480 V, 3 Φ
10 A @ 575–600 V, 3 Φ
240 V
240 V
480 V
600 V
10.7 A
6.2 A
3.0 A
2.3 A
70
RPM
97.5 in
(2.48 m)
7 ft (2.1 m)
20 ft
(6.1 m)
2.0
(1.5)
30 A @ 200–250 V, 1 Φ
20 A @ 200–250 V, 3 Φ
10 A @ 400–480 V, 3 Φ
10 A @ 575–600 V, 3 Φ
240 V
240 V
480 V
600 V
10.7 A
6.2 A
3.0 A
2.3 A
58
RPM
109.5 in
(2.78 m)
8 ft (2.4 m)
24 ft
(7.3 m)
2.0
(1.5)
30 A @ 200–250 V, 1 Φ
20 A @ 200–250 V, 3 Φ
10 A @ 400–480 V, 3 Φ
10 A @ 575–600 V, 3 Φ
240 V
240 V
480 V
600 V
10.7 A
6.2 A
3.0 A
2.3 A
48
RPM
133.5 in
(3.39 m)
8 ft (2.4 m)
1. Output voltage will not exceed Input voltage, with the exception of 120 V models. All controllers produce 3 Φ output power, regardless of input phase.
2. The distance of the fan from the ceiling should be measured from the top of the winglets to the ceiling.
CAUTION: Big Ass Fans requires that the Powerfoil X2.0 Plus fan be supplied from one of the following types of
transformers:
575V–600 V models: 575/330V Wye secondary (neutral not utilized)
400V–480 V models: 480/277V Wye secondary (neutral not utilized)
200V–250 V models: 208/120V Wye secondary (neutral not utilized)
240/120V Delta secondary (Wild/High Phase B)
Integration into any other power distribution scheme may result in improper fan operation or premature hardware failure! See
page 27 for more information.

8’–24’ POWERFOIL
®
X2.0 WASHDOWN & POWERFOIL
®
X2.0PLUS WASHDOWN
WWW.BIGASSFANS.COM ©2012 DELTA T CORP. ALL RIGHTS RESERVED
4
(10) Winglet
1
(10) Airfoil
2
Airfoil Box
What’s in the box
The fan is shipped in multiple boxes. Refer to the illustrations below. If the extension tube is 4 ft or longer, it will be shipped in a
separate box. All accessories are shipped in separate boxes. This installation guide should remain with the owner of the fan.
Note: Dashed lines indicate internal boxes. The drawings below are not to scale.
(2) Lower Yoke
(2) Beam Clip &
(2) Spacer Upper Yoke
Extension Tube
3
& Safety Cable
Main Box
1. Powerfoil
®
winglet shown. Powerfoil or PowerfoilPlus winglets are available.
2. Airfoil retainers are packed in a bag with the Installation Guide.
3. The safety cable is attached to the extension tube. If the extension tube is 4 ft or longer, it will be shipped in a separate box. Guy wires (if ordered)
are bagged separately in main box.
(2) Hardware
Boards
Main Fan Unit
Extension Tube Box
Pre-Installation
Variable Frequency Drive
with Controller Keypad
If you ordered multiple fans, be sure to keep the components of each fan together. The fans each have differently rated
components that are not interchangeable.

8’–24’ POWERFOIL
®
X2.0 WASHDOWN & POWERFOIL
®
X2.0PLUS WASHDOWN
5
WWW.BIGASSFANS.COM ©2012 DELTA T CORP. ALL RIGHTS RESERVED
8’–24’ POWERFOIL
®
X2.0 WASHDOWN & POWERFOIL
®
X2.0PLUS WASHDOWN
Airfoils
(10) Airfoils
(10) Powerfoil
®
Winglets
3
(10) Powerfoil
®
Plus
Winglets
3
(10) Airfoil Retainers
Hardware
Upper Yoke Hardware
(4) 1/2-13 x 2” GR 8 Bolt
(8) 1/2” Flat Washer
(4) 1/2-13 Nylock Nut
Extension Tube Hardware
(2) 1/2-13 x 4-1/2” GR 8 Bolt
(4) 1/2” Flat Washer
(2) 1/2-13 Nylock Nut
Lower Yoke Hardware
(2) 1/2-13 x 4-1/2” GR 8 Bolt
(4) 1/2” Flat Washer
(2) 1/2-13 Nylock Nut
Guy Wire Hardware
1
(8) Locking Carabiner
(4) 1/4” Beam Clip
(4) 1/4-20 x 1” Eyebolt
(4) 1/4-20 Hex Nut
(4) Gripple
®
(4) Guy Wire
(16) Wire Rope Clip
Winglet Hardware
(10) 10-24 x 1/2” Bolt
(10) 10-24 x 3/4” Barrel
Airfoil Hardware
(20) 5/16-18 x 2” GR 8 Bolt
(40) 5/16” Flat Washer
(20) 5/16-18 Nylock Nut
Main Fan Unit Hardware
(4) 1/2-13 x 1 3/4” GR 8 Bolt
(8) 1/2” Flat Washer
(4) 1/2-13 Nylock Nut
Parts and hardware
Note: The drawings below are not to scale. No hardware substitutions are acceptable.
1. Guy wires are designed to constrain fan’s lateral movement and are only included in some fan
packages. Big Ass Fans recommends using guy wires if the fan’s extension tube is 4 ft or longer, if
the fan is exposed to high winds or similar conditions, or if the fan is close to any building xtures.
Guy Wire hardware is bagged separately from hardware boards.
2. Ensure you have the correct upper yoke for your mounting method. The upper yoke may differ from
the illustration.
3. Powerfoil winglets are standard. PowerfoilPlus winglets are only included if ordered.
4. Safety cable is attached to extension tube.
5. Shackle included on hardware boards.
Mounting
(2) Beam Clip &
Spacer
Upper Yoke
2
(2) Lower Yoke
Main Fan Unit & Hub Cover
Extension Tube,
Safety Cable
4
, &
Shackle
6
Electrical
Variable Frequency Drive
(VFD) with Keypad
or
Pre-Installation (cont.)

8’–24’ POWERFOIL
®
X2.0 WASHDOWN & POWERFOIL
®
X2.0PLUS WASHDOWN
WWW.BIGASSFANS.COM ©2012 DELTA T CORP. ALL RIGHTS RESERVED
6
Tools needed
Big Ass Fans recommends gathering the following tools prior to beginning installation. Note: This list of suggested tools is not
exhaustive. Additional tools may be necessary.
Mechanical installation Electrical installation
Standard wrench set Phillips and at head screwdriver
Standard socket set with ratchet 1/4” nut driver
Torque wrench capable of 40 ft·lb (54.2 N·m) 5/16” nut driver
Phillips and at head screwdriver Pair of #10 to #14AWG strippers
Standard allen wrench set Pair of medium channel locks
Multimeter
Pre-Installation (cont.)
Understanding roof pitch
To ensure the fan is properly mounted, the fan must always hang plumb to the ground and the yoke must be installed using the bolt
holes at the widest locations possible. To accommodate building structures on which the standard upper yoke does not allow the fan to
properly orient itself, the 90-Degree Offset mount should be purchased.
The example below shows one situation in which the 90-Degree Offset mount must be used so that the fan hangs plumb to the ground
and the widest stance for the upper yoke is ensured. If you are uncertain of your roof pitch or do not have the correct mount to properly
hang your fan, consult a structural engineer or contact Big Ass Fans Customer Service.
90-Degree Offset MountStandard Upper Yoke
Before beginning installation, conrm that you have the appropriate mount for your roof pitch.

8’–24’ POWERFOIL
®
X2.0 WASHDOWN & POWERFOIL
®
X2.0PLUS WASHDOWN
7
WWW.BIGASSFANS.COM ©2012 DELTA T CORP. ALL RIGHTS RESERVED
8’–24’ POWERFOIL
®
X2.0 WASHDOWN & POWERFOIL
®
X2.0PLUS WASHDOWN
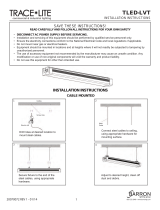
Fan diagram
A. Safety Cable. A redundant safety feature that secures the fan to the
mounting structure.
B. Upper Yoke. Secures the fan to the mounting structure and allows the fan
to adjust its center of gravity.
C. Extension Tube. Extends the fan from the ceiling.
D. Lower Yoke. Connects the main fan assembly to the extension tube.
E. VFD Enclosure (not shown). Contains the variable-frequency drive with
the controller keypad mounted on the front of the enclosure.
F. Gearbox. NitroSeal Drive
™
custom gearbox for increased durability and
cooler operation.
G. Motor. See pages 2–3 for more information.
H. Hub. Secures the airfoils to the gearbox output shaft.
I. Airfoil. Provides air movement. The unique, patented design provides
efcient and effective air movement.
J. Winglet (Powerfoil
®
[shown] or Powerfoil
®
Plus). Improves the efciency
and performance of the fan.
Pre-Installation (cont.)
I
C
D
B
A
J
G
F
H

8’–24’ POWERFOIL
®
X2.0 WASHDOWN & POWERFOIL
®
X2.0PLUS WASHDOWN
WWW.BIGASSFANS.COM ©2012 DELTA T CORP. ALL RIGHTS RESERVED
8
Controller diagram
Note: The illustration below does not show wiring.
A. Controller Keypad. Controls fan operation.
B. Disconnect. Emergency disconnect for the fan controller. The
switch must be used to disconnect power when servicing the
VFD or other electrical components.
C. Variable Frequency Drive (VFD). The VFD controls AC power
to the motor.
D. Fire Relay. Shutdown relay for re-control panel integration.
E. Fuses. Protects the system against power surges and
over-current.
F. Category 5 Cable and Connector. Data cable between the
controller keypad and the VFD.
Pre-Installation (cont.)
A
B
C
D
E
F
B
VFD Enclosure (Front View)
VFD Enclosure (Inner View)

8’–24’ POWERFOIL
®
X2.0 WASHDOWN & POWERFOIL
®
X2.0PLUS WASHDOWN
9
WWW.BIGASSFANS.COM ©2012 DELTA T CORP. ALL RIGHTS RESERVED
8’–24’ POWERFOIL
®
X2.0 WASHDOWN & POWERFOIL
®
X2.0PLUS WASHDOWN
Preparing the work site
Before beginning installation, review the mechanical and electrical installation guidelines below.
Mechanical installation
• A 24-ft (7.3-m) Powerfoil
®
X2.0 fan weighs, at maximum, 500 lbs (227 kg). A suitable means for lifting the weight of the fan, such as a
scissor lift, and at least two (2) installation personnel will be required.
• Big Ass Fans can only be mounted to an I-beam or angle irons. If mounting to an I-beam, the I-beam must be part of the existing
building structure. Do not mount the fan to a single purlin, truss, or bar joist. Consult a structural engineer for installation methods not
covered in the guide.
• The mounting structure must be able to withstand the torque forces generated by the fan. A 24-ft fan generates nearly 300 ft·lb
(406.7 N·m) of torque during operation.
• Fans mounted on fabricated I-beams, which are common in steel buildings, could cause the beam to ex and the fan to move
signicantly during operation. If this exing causes a clearance problem, we suggest installing the I-Beam Stabilizer kit.
• If the fan’s extension tube is 4 ft (1.2 m) or longer or if the mounting structure requires it, the fan’s lateral movement must be secured
using guy wires. If the fan is close to any building xtures it is recommended to secure the fan with guy wires as a safety measure.
• Adhere to the safety requirements in the table below when selecting where to mount the fan.
Safety requirement Minimum distances
Clearance
≥2 ft from all fan parts. The fan installation area must be free of obstructions such as lights, cables,
sprinklers, or other building structure. See the tables on pp. 2–3 for recommended minimum ceiling
clearances.
Airfoil height ≥10 ft above the floor
HVAC equipment ≥1x fan diameter if above diffuser. ≥2x fan diameter if below diffuser. Refer to the illustration below.
Fan spacing 2.5x fan diameter, center-to-center
Radiant/IR heaters See the manufacturer’s requirements for the minimum clearance to combustibles.
Electrical installation
• To reduce the risk of electric shock, wiring should be performed by a qualied electrician! Incorrect assembly can cause electric
shock or damage the motor and the controller!
• The installation of a Big Ass Fan must be in accordance with the National Electrical Code (NEC), ANSI/NFPA 70-2011, and all local
codes.
• AC supply feeds for one fan controller may share the same conduit with AC supply feeds for one or more controllers.
• All unused conductors that share a conduit with the AC supply feeds must be grounded on both ends.
• If required, a local disconnect should be installed per NEC and all local codes.
• Refer to specications on pages 2–3 for appropriate circuit requirements.
• Each fan requires dedicated branch circuit protection.
• To avoid damage to the VFD and fan controller, test the VFD and fan controller with a test cable before wiring the CAT 5 cable!
Pre-Installation (cont.)
I-Beam Angle Iron
HVAC
Diffuser
≥1x fan’s diameter (24 ft)
24-ft diameter
24-ft diameter
HVAC
Diffuser
≥2x fan’s diameter (48 ft)
The fan is located at or above
the HVAC discharge or intake.
The fan is located below the
HVAC discharge or intake.

8’–24’ POWERFOIL
®
X2.0 WASHDOWN & POWERFOIL
®
X2.0PLUS WASHDOWN
WWW.BIGASSFANS.COM ©2012 DELTA T CORP. ALL RIGHTS RESERVED
10
Understanding airow patterns
Airow with streamlined obstruction
Obstructions on the oor tend to block the
horizontally moving air. Thin or streamlined
obstructions do not block much airow,
regardless of size. The air tends to ow
smoothly around these obstructions, losing little
momentum, and leaving only a small stagnant
area behind the obstruction.
Airow with wide, blunt obstruction
A wide, blunt, or at-faced obstruction forces
airow to change direction, turning it upward
and outward. There is a stagnant area behind
these obstructions that is wider and higher than
the obstructions themselves.
Airow in an enclosed area
The oor jet radiates outward until it reaches the
walls, which deect the jet upward. After it hits
the ceiling, the upward ow is directed inward
to the low pressure area above the fan where
it is then pulled down toward the oor. This
creates a convection-like air current that gathers
momentum. Once this current is established,
the fan begins to move air outside of the
current, escalating its cooling effects.
Airow in an open area
The airow moves from the fan toward the oor.
Once airow hits the oor, it moves outward in
all directions. The deection of air off the oor is
called a “oor jet.”
Airow with multiple fans
Where there are multiple fans appropriately
spaced, the expanding jets of adjacent fans
meet to create a pressure zone. The pressure
zone acts like a wall, causing each fan to
behave like a single enclosed fan. Typically,
a single fan’s performance will increase when
working in conjunction with other fans.
Pre-Installation (cont.)

8’–24’ POWERFOIL
®
X2.0 WASHDOWN & POWERFOIL
®
X2.0PLUS WASHDOWN
11
WWW.BIGASSFANS.COM ©2012 DELTA T CORP. ALL RIGHTS RESERVED
8’–24’ POWERFOIL
®
X2.0 WASHDOWN & POWERFOIL
®
X2.0PLUS WASHDOWN
Powerfoil
®
X2.0Plus
The PowerfoilPlus winglet creates a jet of air that ows outward at a 45° angle, passing over oor obstructions and delivering
airow in a much broader pattern. When planning fan placement, consider the Powerfoil X2.0Plus fan’s larger coverage area. Note:
PowerfoilPlus winglets are optional and may not be included in your fan order.
Tips
Below are some techniques that can make a dramatic difference in congested areas of your facility. Treat air like water, and scoop,
direct, and channel it to where it is needed most. Note: Powerfoil X2.0Plus fans deliver air from a much higher angle, resolving many of
the issues outlined below.
• Make sure people are not hidden behind structures that would block airow. This may seem obvious, but work areas are routinely
blocked by shelving, crates, and machinery.
• Position large obstructions so that their smallest proles are perpendicular to the direction of air movement. For example, a sheet
metal press brake might have ve times the frontal area if it is facing the airow rather than if it is turned sideways.
• Wherever possible, position welding curtains, partitions, sheet materials, etc., to scoop air into the work area rather than deect it.
• Take advantage of the air moving near the oor by creating ground level openings in your work area. It is better to have a work area
blocked by materials stacked to the ceiling with an opening below than to have low stacks 3 ft (0.9 m) to 6 ft (1.8 m) high sitting on
the oor.
Pre-Installation (cont.)

8’–24’ POWERFOIL
®
X2.0 WASHDOWN & POWERFOIL
®
X2.0PLUS WASHDOWN
WWW.BIGASSFANS.COM ©2012 DELTA T CORP. ALL RIGHTS RESERVED
12 Mounting Structure: I-Beam
WARNING: The fan should not be installed unless the structure on which the fan is to be mounted is of sound
construction, undamaged, and capable of supporting the loads of the fan and its method of mounting. A structural
engineer should verify that the structure is adequate prior to fan installation. Verifying the stability of the mounting
structure is the sole responsibility of the customer and/or end user, and Big Ass Fans hereby expressly disclaims any
liability arising therefrom, or arising from the use of any materials or hardware other than those supplied by Big Ass Fans
or otherwise specied in these installation instructions.
CAUTION: It is not recommended to mount a Big Ass Fan to a fabricated I-beam. The I-beam on which the fan will mount
must be part of the existing building structure. Do not direct mount the fan to an I-beam.
CAUTION: Install the spacers only if the thickness of the I-beam ange exceeds 3/8” (1 cm). The mounting holes on the
spacer are closer to one edge than the other. Make sure this edge of the spacer is facing the I-beam.
Before beginning installation, conrm that you have the appropriate mount for your roof pitch.
Attach upper yoke (to I-beam)
Measure the ange width of the I-beam from which the fan will be hung. Select the upper yoke mounting holes that match the ange
width of the I-beam.
Secure the upper yoke to the I-beam with the Upper Yoke Hardware as shown. Tighten the bolts to 40 ft·lb (54.2 N·m) using a torque
wrench and 3/4” socket.
Proceed to “Hanging the Fan” (p. 19).
Upper Yoke Hardware (BAF-Supplied):
a. (4) 1/2-13 x 2” GR 8 Bolt
b. (8) 1/2’’ Flat Washer
c. (4) 1/2-13 Nylock Nut
d. (2) Beam Clip
e. (2) Spacer
Side View
a
b
c
b
d
e
Note: Ensure the spacers are oriented as shown above.
Spacers are only used if
the beam ange exceeds
3/8” (1 cm).
Small Upper Yoke
13-3/4’’ (349 mm) x 10” (258 mm)
I-beam
ange width
Upper yoke
mounting holes
5” (127 mm) to
6-5/8” (168 mm)
Inner holes
>6-5/8” (168 mm) to
8-1/4” (210 mm)
Middle holes
>8-1/4”(210 mm) to
9-7/8”(250 mm)
Outer holes
Large Upper Yoke
18-1/2’’ (470 mm) x 10” (258 mm)
I-beam
ange width
Upper yoke
mounting holes
9-7/8” (250 mm) to
11-3/8” (289 mm)
Inner holes
>11-3/8” (289 mm) to
13” (330 mm)
Middle holes
>13” (330 mm) to
14-5/8” (371 mm)
Outer holes
outer holes
middle holes
inner holes
Upper Yoke
(top view)
Big Ass Fans can only be hung from an I-beam or bar joists. See the following page for bar joist mounting instructions.
Consult a structural engineer for installation methods not covered in this manual.
/