Page is loading ...

Rockefeller
888-230-2225
319 Ridge Rd. Dayton, NJ 08810, New Jersey - United States
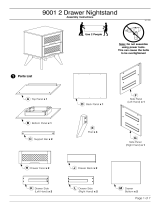
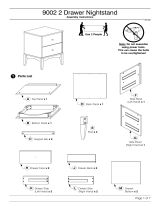
Shoe Storage Rack

Included in the package
01
02
03
Base
Shelf
Crossbar
01
05
06
01
01
01
Part Description Qty Box
1x
Hardware
Tools needed (not included)
Rockefeller Shoe Storage Rack
04 Lateral 02 01
05 Rear Panel 01 01
02/07
12 Feet 04 01
E = 34x
A = 16x
B = 36x C = 06x D = 02x
F = 01x G = 01x H = 01x
05
03
01
12
04
02
02
02
02
02
03
03
03
03
03
04

01
Connect the part (03) onto the parts (01, 02) with the hardware (B + C).
C = 06x
03/07
Rockefeller
3 lb
3 lb
3 lb
3 lb
3 lb
3 lb
59.72"
19.96"
9.64"
14.25"
15.19"
9.64"9.64" 9.64" 9.64"
0303
01 02
B = 12x
B
B
CC
B
B
Shoe Storage Rack
18.78"

02
03
B = 04x
Connect the parts (04) onto the part (01) using the hardware (B).
Connect the parts (12) onto the part (01) with the hardware (A).
A = 16x
04/07
Rockefeller
B
B
B
B
01
04
04
A
12
12
01
Shoe Storage Rack

04
Connect the parts (02) onto the parts (04) using the hardware (B).
B = 20x
05/07
Rockefeller
05 E = 34x
Connect the part (05) using the hardware (E).
05
E
B
B
B
B
B
B
B
B
B
B
B
BB
B
B
B
B
B
B
B
04
04
02
02
02
02
02
Shoe Storage Rack

06
06/07
wall
First, approach as close
as possible to the wall
Then, pass the hardware (H)
through the hole of the
part (05) as shown in the figure above.
You will need a pencil to mark where you
should drill the wall with a 3/8" drill bit
to put in the hardware (G).
H
*press the hardware wings (G) to put in the hole that
you drilled in the wall. G
wings
wings
Hardware (G), plugged in the wall.
G
H
D
Then fasten with the hardware (D) the
hardware (H) on the part (02)
F
D
Attention! Tipover System
F = 01x H = 01xG = 01xD = 02x
Rockefeller
05
02
Shoe Storage Rack
Connect the hardware (H) onto the wall
with the hardware (F).

Rockefeller
888-230-2225
319 Ridge Rd. Dayton, NJ 08810, New Jersey - United States
35.24" Floating Open Hanging Closet

Included in the package
01
02
03
Base
Top
Lateral
01
01
02
01
01
01
Part Description Qty Box
2x
Hardware
Tools needed (not included)
Rockefeller 35.24" Floating Open Hanging Closet
04 Rear Panel 01 01
05 Hanger Bar 01 01
04
02
03
03
01
05
02/07
A = 08x B = 12x C = 04x D = 02x
E = 02x F = 02x G = 01x H = 02x I = 02x

11 lb
01
Connect the part (01) onto the parts (03) with the hardware (A + B).
35.24"
17.32"
13"
12.40"
33.94"
16.14"
A = 04x B = 04x
01
03
B
B
A
03
B
B
A
03/07
Rockefeller 35.24" Floating Open Hanging Closet
11 lb

02
03
B = 02x
Observe the correct position of the part (04) before connect onto the part (01) with the hardware (B).
04
01
B
B
Connect the part (02) onto the parts (03, 04) with the hardware (B) and the hardware (A).
A = 04x B = 06x
B
B
B
A
02
03
B
B
B
A
03
04
04/07
Rockefeller 35.24" Floating Open Hanging Closet

04
05
F = 02x
Connect the hardware (F) onto the part (01) using the hardware (C).
Pass the part (05) through the hardware (F) and use the hardware (G) to tight the screw as shown on detail.
G = 01x
C = 04x
C
C
C
C
F
F01
I
I
05
I = 02x
Connect the hardware (I) into the part (05).
F
F
G
05/07
Rockefeller 35.24" Floating Open Hanging Closet
05

06
H = 02x
Observe the indicated height of the Floating Open Hanging Closet using the floor as reference (around of 72").
You will need a pencil to mark where you should drill the wall with a 1 /2" drill bit to put in the hardware (H).
You will need apply the hardware (H) into the hole that you drilled on the wall.
72"
06/07
Rockefeller 35.24" Floating Open Hanging Closet

07
D = 02x E = 02x
Connect the Floating Open Hanging Closet on the wall with the hardware (E + D)
DEDE
07/07
Rockefeller 35.24" Floating Open Hanging Closet

Rockefeller
888-230-2225
319 Ridge Rd. Dayton, NJ 08810, New Jersey - United States
20.08" Floating Open Hanging Closet

Included in the package
01
02
03
Base
Top
Lateral
01
01
02
01
01
01
Part Description Qty Box
2x
Hardware
Tools needed (not included)
A = 08x B = 12x C = 04x D = 02x
E = 02x F = 02x
Rockefeller 20.08" Floating Open Hanging Closet
04 Rear Panel 01 01
05 Hanger Bar 01 01
04
02
03
03
01
05
G = 01x H = 02x
02/07
I = 02x

01
Connect the part (01) onto the parts (03) with the hardware (A + B).
20.08"
17.32"
13"
12.40"
18.78"
16.14"
Rockefeller 20.08" Floating Open Hanging Closet
A = 04x B = 04x
01
03
03
B
B
B
B
A
A
03/07
11 lb
11 lb

02
Rockefeller 20.08" Floating Open Hanging Closet
03
B = 02x
Observe the correct position of the part (04) before connect onto the part (01) with the hardware (B).
01
04
B
B
Connect the part (02) onto the parts (03, 04) with the hardware (B) and the hardware (A).
B
B
B
B
B
BA
A
A = 04x B = 06x
02
03
03
04
04/07

04
Rockefeller 20.08" Floating Open Hanging Closet
05
F = 02x
Connect the hardware (F) onto the part (01) using the hardware (C).
Pass the part (05) through the hardware (F) and use the hardware (G) to tight the screw as shown on detail.
G = 01x
C = 04x
C
C
C
C
F
F01
I
I
05
05
I = 02x
Connect the hardware (I) into the part (05).
F
F
G
05/07

06
H = 02x
Rockefeller 20.08" Floating Open Hanging Closet
Observe the indicated height of the Floating Open Hanging Closet using the floor as reference (around of 72").
You will need a pencil to mark where you should drill the wall with a 1 /2" drill bit to put in the hardware (H).
You will need apply the hardware (H) into the hole that you drilled on the wall.
72"
06/07

07
D = 02x E = 02x
Rockefeller 20.08" Floating Open Hanging Closet
Connect the Floating Open Hanging Closet on the wall with the hardware (E + D)
DEDE
07/07
/