Page is loading ...

Service Manual
Domestic Series 7000 Compact Tractor
MTD Products Inc. - Product Training and Education Department
FORM NUMBER - 769-01634
12/2004
NOTE: These materials are prepared for use by trained technicians who are experienced in the service and repair of equipment of the
kind described in this publication, and are not intended for use by untrained or inexperienced individuals. Such individuals should seek
the assistance of an authorized service technician or dealer. Read, understand, and follow all directions when working on this equip-
ment. This includes the contents of the Operators Manual, which came with your equipment. No liability can be accepted for any inac-
curacies or omission in this publication, although every care has been take to make it as complete and accurate as possible. The right
is reserved to make changes at any time to this document without prior notice and without incurring an obligation to make such
changes to previously published documents. All information contained in this publication is based on product information available at
the time of publication. Photographs and illustrations used in this publication are for reference use only and may not depict actual
model and component parts.


Domestic Series 7000 Hydraulics
Orientation ................................................................................................................. 1
Hydrostatic Drive: Basic Operation ............................................................................ 4
External Checks ......................................................................................................... 6
Best Practices: Hydraulic Systems ............................................................................ 8
Flow and Pressure tests: Hydrostatic Drive ............................................................... 8
Auxiliary Pumps ....................................................................................................... 11
Steering Pump and Cylinder .................................................................................... 14
Hydraulic Lift Cylinder and Control Valve ................................................................ 18
Tandem Pump ......................................................................................................... 22
Loader Valve ............................................................................................................ 24
Component Breakdown: Auxiliary Pump (tandem pump similar) ............................. 26
Component Breakdown: Steering Unit ..................................................................... 28
Domestic Series 7000 MFD
Identify the MFD: ...................................................................................................... 31
MFD Removal: Preparation ..................................................................................... 33
Removal ................................................................................................................... 34
MFD Installation ....................................................................................................... 36
In-Frame Repairs: Drop Axle Service ...................................................................... 37
In-Frame Repairs: Drop Axle Cover ......................................................................... 38
In-Frame Repairs: Drop-Axle Removal .................................................................... 40
Bench Repairs: Drop axle and kingpin housing assemblies .................................... 42
Bench Repair: Axles and Differential. ...................................................................... 46
Torque Specifications .............................................................................................. 57
Domestic Compact Dash and Steering Pump
Dash Panel Removal ............................................................................................... 59
The Dash Panel ....................................................................................................... 63
Steering Shaft and Pump: Sauer ............................................................................. 65
Steering Shaft and Pump: Ross ............................................................................... 67
Domestic Series 7000 Damped Driveshaft
Preparation: ............................................................................................................. 69
Driveshaft Removal .................................................................................................. 69
Electrical System
Electrical System ...................................................................................................... 72
Componants.............................................................................................................. 73
Eelstric Clutch and Fuel Pump.................................................................................. 81
TABLE OF CONTENTS


Domestic Series 7000 Hydraulics
1
1. STANDARD HYDRAULIC SYSTEMS ON THE
DOMESTIC SERIES 7000: ORIENTATION
NOTE: Subsections 1 and 2 of the Domestic
Series 7000 Hydraulics portion of this manual
provide a basic orientation to the system. Sub-
section 3 and those that follow it contain specific
test procedures.
NOTE: Hydraulic diagrams are contained in an
apendix to this section.
1.1. The transmission housing acts as a reservoir for
all of the hydraulic systems on the tractor: hydro-
static drive pump, hydrostatic steering system,
lift cylinder, and accessories.
1.2. Fluid: the transmission and hydraulic system are
filled with 6.5 gallons (24.6 L) of Cub Cadet
Hydraulic Transmission Fluid (P/N: 737-3025
1Qt., 737-3062 1Gal., 737-3063 10 Qt., 737-
3035 5 Gal.).
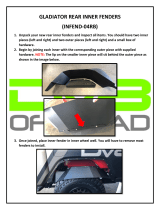
1.3. Filtration: The hydraulic system filter (P/N:723-
0405) is located on a boss on the front surface of
the transmission housing, adjacent to the mid-
mount, 2000 R.P.M. P.T.O. shaft. The hydro-
static drive filter (P/N: 723-3014) is located on
the front surface of the hydrostatic pump.
See Figure 1.3.
NOTE: Other than sharing a reservoir, the
hydrostatic drive operates independently of the
rest of the hydraulic system.
Figure 1.3
Hydrostatic
Drive Filter
Hydraulic system
filter
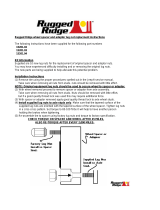
1.4. The hydrostatic drive is a Sauer model BDU15.
It has an integrated gerotor charge pump that
draws fluid up the suction pipe from the base of
the transmission housing. See Figure 1.4.
1.5. The steering and lift cylinder are powered by a
Sauer-Danfoss SKP 1/4.3 S auxiliary pump.
1.6. If hydraulically powered accessories are
installed, they are driven by a second auxiliary
pump that mounts to and is driven by the stan-
dard auxiliary pump. The add-on auxiliary pump
is a Sauer-Danfoss model SNP 1/7.8 S.
NOTE: Domestic Series 7000 tractors produced
before 2004 included a single auxiliary pump as
standard equipment. Later tractors include both
auxiliary pumps and the valve used to operate a
front-end loader.
Figure 1.4
Hydrostatic
drive pump
Auxiliary
pump
Second auxiliary
pump
Domestic Series 7000 Hydraulics

Domestic Series 7000 Hydraulics
2
1.7. The steering pump, located in the dash pedestal
contains it’s own back-up gerotor charge pump
that will enable steering control when the engine
is not running. See Figure 1.7.
1.8. The steering pump directs fluid pressure to one
end of the double-acting differential steering cyl-
inder while allowing it to return from the other
end of the cylinder in order to provide steering
action.
1.9. The lift cylinder is operated by a control valve
and feedback rod under the right rear fender.
See Figure 1.9.
1.10. The control valve directs fluid pressure to a sin-
gle-acting hydraulic cylinder that lifts the three-
point lift arms.
1.11. The hydraulic fluid flow is as follows:
1.12. Through the pick-up tube from the transmission
sump and filter, to the auxiliary pump.
See Figure 1.12.
1.13. Under pressure from the auxiliary pump the fluid
goes to the steering pump, connecting to the “P”
port on Sauer steering pumps. On Ross steer-
ing pumps, it connects to the “IN” port.
Figure 1.7
Steering
pump
Figure 1.9
From Steering
unit
To lift cylinder
To return manifold
Direct return
Figure 1.12
Auxiliary pump
Filter
Flow
Figure 1.13
Auxiliary pump
(steering and
lift cylinder)
Line to
steering
unit

Domestic Series 7000 Hydraulics
3
1.14. The steering unit distributes pressure to the
steering cylinder according to the position of the
steering wheel. On Sauer pumps this involves
the ports labeled “L” and “R”. See Figure 1.12.
1.15. On Ross pumps, this involves the ports labeled
“LT” and “RT”. See Figure 1.14.
Figure 1.14
Sauer steering unit:
note labeled ports
Figure 1.15
RT
LT
OUT IN
AUX
1.16. The power steering unit is first in line, and has
priority over the rest of the system. From the
steering unit, the fluid may follow one of two
return paths:
1.17. The fluid may pass through the return manifold,
through the oil cooler, then back to the transmis-
sion. See Figure 1.17.
1.18. The oil cooler is located on the front of the radia-
tor. See Figure 1.18.
Figure 1.17
Return
manifold
To cooler
From steering unit
“T” port on Sauer
“OUT” port on Ross
Unused ports
capped
valve
From lift
Figure 1.18
Oil
cooler

Domestic Series 7000 Hydraulics
4
1.19. If the fluid is required by the lift cylinder, it will go
to the bottom port of the lift valve instead of the
return manifold.
1.20. The lift valve sends fluid to the single-acting lift
cylinder when operator demand and the feed-
back rod direct it to do so. See Figure 1.20.
1.21. Fluid not required to lift the cylinder will be
directed back to the transmission through the
return manifold, via the cooler. See Figure 1.21.
1.22. Excess fluid volume beyond normal return flow
rate is generated when the lift arms are lowered.
This flow is exhausted directly back into the
transmission housing.
2. HYDROSTATIC DRIVE: BASIC OPERATION
2.1. The input shaft to the D15U turns a shaft that
passes completely through the housing of the
hydro., driving an engine speed input shaft in the
transmission.
2.2. The input shaft drives the auxiliary hydraulic
pump and the P.T.O. They are driven at rela-
tively constant engine speed, rather than in rela-
tion to ground speed. See Figure 2.2.
2.3. The input shaft also turns a gerotor style charge
pump and an axial piston variable displacement
hydraulic pump. See Figure 2.3.
NOTE: Figure 2.3 is a similar model hydrostatic
drive unit with some see-through components.
Figure 1.20
Lift
cylinder
rod
Feedback
Figure 1.21
Line from return
manifold and oil cooler
Lift valve
Direct return line from
lift cylinder (when lowered)
To return
manifold
Figure 2.2
Auxiliary
hydraulic
pump
Input
shaft
for PTO
Hydro.
Figure 2.3
Charg
e
pump
Charge check valves
Fixed displacement
motor

Domestic Series 7000 Hydraulics
5
2.4. The lower part of the pump contains a fixed dis-
placement axial piston hydraulic motor. The
motor is driven by the output of the variable dis-
placement pump.
2.5. The hydro. control arm (scissors bracket) moves
a swash plate that controls the output of the
pump: tilting the swash plate in one way causes
the variable displacement pump to drive fluid
through the fixed displacement pump in one
direction. See Figure 2.5.
NOTE: In figure 2.5, the pistons in the variable
displacement pump are alternately pressed into
the bores, and then released from bores of the
rotating pump block by the tilt of the swashplate.
• On the right side of the pump block in figure 2.5,
the pistons are down.
• The pistons are extended on the left side of the
pump block. They are forced up by springs con-
tained in the pistons.
• This action causes the pistons to pump fluid in
one direction.
• The further the swash plate is tilted, the greater
the movement of the pistons as the pump block
rotates.
• As the travel of the pistons is increased, the dis-
placement of the pump is increased, and more
fluid is pumped.
• The more fluid is pumped, the faster the fixed
displacement motor is driven.
Figure 2.5
Input shaft
Fixed displacement
motor
Variable displacement pump
Pump
block
angle
Swash plate
Swash
plate
Motor block
2.6. Tilting the swash plate the other way causes the
variable displacement pump to drive fluid
through the fixed displacement pump in the
opposite direction. See Figure 2.6.
2.7. When the swash plate is flat, the pump pistons
do not move up and down, no fluid is displaced
and no power is transmitted to the fixed dis-
placement pump.
2.8. The charge pump maintains a supply of pressur-
ized fluid to the variable displacment pump to
feed and lubricate the pump.
2.9. The charge check valves direct the flow of pres-
surized fluid to the ports that feed the pistons of
the variable displacement pump.
• When driving forward, fluid flows into the
varaible displacment pump thorugh one set of
ports, and out through a second set.
• When driving backwards, the flow is reversed.
• One check valve opens and the other one
closes, depending on the direction of fluid flow.
• If the hydro. is in “neutral”, lubrication is provided
to ths spinning (but not pumping) pump and
motor blocks through separate channels in the
housing.
2.10. If the hydrostatic drive is not performing cor-
rectly, begin diagnosing with simple things that
can bee seen with minimal disassembly.
Figure 2.6
S
was
h
p
l
a
t
e
angle
Pistons
Pistons
Fixed displacement
motor

Domestic Series 7000 Hydraulics
6
3. EXTERNAL CHECKS
NOTE: Linkage adjustment procedures are cov-
ered in the 2003 Cub Cadet Technical Hand-
book, pages 6-129 through 6-131.
3.1. Remove the fender cover using a phillips head
screwdriver and a 1/2” wrench. See Figure 3.1.
NOTE: It will be necessary to pry-up the inside
edges of the black rubber floor pads to get the
fender cover off.
3.2. If the transmission creeps, or the tractor fails to
achieve normal ground speed, check the neutral
control adjustment and control linkages to the
hydro. See Figure 3.2.
NOTE: Complete neutral control adjustment pro-
cedures can be found in the 2003 Cub Cadet
Technical Handbook, page 6-129 through 6-131
3.3. If the brake and drive pedals “fight” with each
other, the drive control linkage is out of adjust-
ment. See Figure 3.3.
3.4. If the tractor fails to achieve normal ground
speed, and the hydro pump emits an unusual
amount of noise, check for brake drag:
• Confirm that the neutral return and hydro control
linkages are correctly adjusted.
• With the tractor on a smooth, firm, level surface,
place the gear selector in neutral, release the
parking brake, and attempt to push the tractor.
• If the tractor does not roll with a reasonable
amount of effort, check the brakes.
• The left and right brakes can be checked individ-
ually by jacking-up the rear of the tractor and
attempting to rotate the rear wheels individually.
Leave the transmission in neutral.
• If either or both brakes drag, confirm that the
linkage moves firmly and is properly adjusted.
• If the linkages are properly adjusted, and brake
drag is still present, remove the wheel and brake
assembly on the side that drags. Inspect the
brake assembly.
NOTE: Complete brake adjustment procedures
can be found in the 2003 Cub Cadet Technical
Handbook, page 6-131 through 6-133.
Figure 3.1
Fender cover
Bolts
Holes for
screws
Foot pad
Figure 3.2
Shoulder
bolt
Neutral
return
assembly
Figure 3.3
Hydro control
rod
ferrule
Adjustment
Forward shaft
assembly
Brake shaft
assembly

Domestic Series 7000 Hydraulics
7
3.5. If there is no drive at all, confirm whether the
problem lies in the hydro or elsewhere.
• With the engine running, confirm that the PTO
operates when it is turned-on. This confims that
the input shaft is turning.
• On smooth, firm, level ground, with the engine
turned-off and the parking brake released:
• Place the gear selector in high range and
attempt to push the tractor. It should not roll.
• Place the gear selector in low range and attempt
to push the tractor. It should not roll.
• If the tractor rolls, the problem is gear-related.
• Place the gear selector in neutral and attempt to
push the tractor. It should roll. If it does not, the
problem may be gear or brake related.
3.6. Check the fluid by removing the plug / fluid level
gauge on the back of the transmission. Check
the level, and compare the fluid to a sample of
Cub Cadet Hydraulic Transmission Fluid. Top-
up or replace the fluid as necessary.
See Figure 3.6.
3.7. Replace the hydrostatic filter if there is any ques-
tion of it’s condition.
Figure 3.6
3.8. Visually inspect the suction tube that feeds fluid
to the hydrostatic drive from the sump of the
transmission. If it is kinked or crushed, replace
it. See Figure 3.8.
NOTE: Drain the transmission fluid before
removing the suction tube.
3.9. Check that the set screw holding the control arm
to the hydro control shaft has not backed-out,
worn, or sheared. See Figure 3.9.
Figure 3.8
Suction tube
Hydro.
Filter
Figure 3.9
Set screw Hydro control arm
Neutral
return arms

Domestic Series 7000 Hydraulics
8
4. BEST PRACTICES: HYDRAULIC SYSTEMS
NOTE: TESTS All hydraulic tests should be
done with the fluid at normal operating tempera-
ture, and the engine at normal operating speed.
In practical terms, normal operating temperature
means that the tractor should be operated (if not
disabled) for about 5 minutes before testing in
normal temperate climates. This should achieve
a fluid temperature of 180 deg. f. (82 deg. c.) If
the tractor has been sitting outside for a week
during February in Green Bay, Wisconsin, it is
advisable to store the tractor in a heated shop
for 12 hours before testing. Normal operating
speed is 3,000RPM.
NOTE: CLEANLINESS It is very important to
keep dirt out of hydraulic systems.
• Cleaning the areas around any joint to be dis-
connected, or component to be removed is
advisable.
• Contaminated fluid should be disposed of prop-
erly, not re-used.
• Tools and work benches used for work on
hydraulic systems should also be kept clean.
• Catch pans beneath work will ease clean-up.
NOTE: CAUTION High pressure hydraulic
leaks can be dangerous.
• Wear eye protection while performing tests.
• Do not operate any equipment with obvious
damage to parts such as hoses.
• Do not disconnect any fittings that may be under
pressure. Turn-off the engine and operate the
circuit to relieve pressure.
• Remember that anything (front-end loaders,
backhoe buckets, three-point hitches, etc....) that
is supported by hydraulic pressure will be sub-
ject to gravitational force when that pressure is
relieved.
NOTE: Sealants
• O-ring fittings require no sealant, though light
lubrication with the fluid used in the system is
sometimes helpful.
• Teflon tape is to be avoided. “Flash” from the
tape can dislodge, blocking valves and damag-
ing pumps.
5. FLOW AND PRESSURE TESTS:
HYDROSTATIC DRIVE
5.1. If the problem is not revealed by any of the
external checks, check the charge-pump pres-
sure.
5.2. Clean the area surrounding the set screw in the
top of the hydrostat. Remove the set screw
using a 3/16” allen wrench. See Figure 5.2.
NOTE: The port accessed by removing the set
screw will be pressurized by the charge pump
when the engine is running.
5.3. Connect a gauge that is capable of reading
1,000 PSI (69 Bars) to the port that the set screw
was removed from. The port is threaded to
accept a 1/8” pipe thread.
NOTE: The gauge should be equipped with a
hydraulic snubber or needle valve to damp the
pressure pulses created by the pump.
CAUTION: Confirm that no unsafe conditions
will be created by starting the engine or operat-
ing the drive system before perfoming the test.
Remember that the front drive axle on four-
wheel drive Domestic Series 7000 tractors will
engage automatically.
Figure 5.2
Set screw
Port

Domestic Series 7000 Hydraulics
9
5.4. The charge pump should generate between 70
and 150 PSI (4.8 to 10.3 Bars) @ 1,200 RPM.
See Figure 5.4.
5.5. As the RPM is increased to the governed top no-
load sped, the pressure may increase someh-
wat. If pressure goes down as engine speed
increases, turn-off the engine and determine the
cause. See Figure 5.5.
5.6. Operate the system at full input and output
speeds in both directions,and confirm that
charge pressure is maintained.
Figure 5.4
Figure 5.5
5.7. Assuming the supply to the pump is good, low
pressure or a complete lack of pressure at this
port indicates a charge pump that is not working.
5.8. The charge pump could be disabled by a stick-
ing charge pump relief valve. See Figure 5.8.
• This valve is located under the hexagonal cap
next to the pressure test port for the charge
pump.
• The valve consists of a light compression spring
and a ball that seats in a bore.
• The cap can be easily removed to inspect the
valve using a 5/8” wrench. Failure of this valve
would be unusual, but if the ball fails to seat,
charge pump pressure will leak off.
NOTE: The charge pump is not available sepa-
rately through Cub Cadet.
NOTE: The reason for testing the charge pump
is to help distinguish between a problem within
the hydrostatic drive and a problem that lies
elsewhere in the drive system.
Figure 5.8

Domestic Series 7000 Hydraulics
10
5.9. If the charge pump is working, but drive has
been lost in one direction only, one of the charge
check valves may not be working.
See Figure 5.9.
• There is a charge relief valve located in each cir-
cuit: one for forward, one for reverse.
• These check valves enable the charge pump to
provide charge oil to the side of the circuit that
has the lowest pressure, while sealing-off the
side that has higher pressure.
• The charge check valves are located on either
side of the hydrostatic drive.
• The one on the left side maintains pressure in
the forward circuit, the one on the right side
maintains pressure in the reverse circuit.
5.10. The charge check valves can be removed using
a 5/16” allen wrench.
NOTE: The one on the right side is easy to
reach. The one on the left side will be obscured
by the auxiliary pump and a steel hydraulic line if
the tractor is equipped with a second auxiliary
pump to operate a loader or backhoe.
5.11. When removed, each charge relief valve comes
out as a cartridge. See Figure 5.11.
5.12. The output of the variable displacement pump is
dependent upon the performance of the check
valves
5.13. If the hydrostatic drive must be replaced, it can
be removed from the tractor without removing
the fenders.
Figure 5.9
Charge
check valves
Figure 5.11

Domestic Series 7000 Hydraulics
11
6. AUXILIARY PUMPS
6.1. The standard auxiliary pump provides pressure
for the hydrostatic power steering unit and the lift
cylinder attached to the three-point hitch.
6.2. Domestic Series 7000 tractors produced before
the 2004 season came with a single auxiliary
pump. See Figure 6.2.
6.3. Current production Domestic Series 7000 trac-
tors are fitted with a tandem auxiliary pump to
power attachments such as a back-hoe or front-
end loader. See Figure 6.3.
6.4. If performance of hydraulic features (steering or
lift cylinder) or attachments (front-end loader or
back-hoe) is poor, it is necessary to confirm that
sufficient hydraulic power is being supplied by
the pump that drives it.
Figure 6.2
Auxiliary pump
to drive steering
and lift cylinder
Hydraulic pressure
to steering unit
Figure 6.3
First auxiliary
pump
Tandem
auxiliary pump
Hydraulic pressur
e
to steering unit
Hydraulic
pressure to
loader valve
6.5. As with the hydrostatic drive, confirm that the
pump drive and supply are intact before drawing
conclusions about the pump itself by making
these preliminary checks:
• Check the fluid. If the fluid level is low, or the
fluid is not the correct type, both the hydrostat
and the auxiliary pump will perform poorly.
• Replace the hydraulic filter if there is any ques-
tion of its condition.
• Confirm that the suction tube that provides fluid
to the auxiliary pump from the sump of the trans-
mission is not crushed or kinked, and that the
connections are free of leaks.
• If there is no hydraulic pressure, confirm that the
pump drive is intact. The auxiliary pump is
driven by a series of gears at the front of the
transmission.
6.6. The filter and suction tubes are easily reached
for inspection with little or no disassembly.
See Figure 6.6.
Figure 6.6
Suction tube
for tandem
pump
Suction tube
for auxiliary
pump
Suction tube for
hydrostatic drive
Hydraulic
filter

Domestic Series 7000 Hydraulics
12
6.7. If the tractor has a speed sensor mounted in the
transmission cover, it is a hall effect device that
employs the auxiliary pump drive gear as a tone-
ring to generate a tachometer signal. This was
done on early (2003 production) tractors.
See Figure 6.7.
6.8. On tractors with the transmission mounted
speed sensor, if the tachometer works, the pump
drive is confirmed to be working as well.
6.9. The speed sensor is visible without removing the
fenders. It is located on the transmission cover,
directly above the auxiliary pump.
6.10. Current production uses an engine-mounted
speed sensor, or an ignition generated tachome-
ter signal on gasoline engines. See Figure 6.10.
6.11. The rear fenders must be removed to access the
auxiliary pump itself. Fender removal is detailed
in the 2003 Cub Cadet Technical Handbook on
pages 6-21 through 6-27.
6.12. If the tractor has an engine mounted speed sen-
sor, the pump drive can be inspected with a
flashlight and probe.
6.13. Remove the pipe plug that fills the hole previ-
ously used for the speed sensor.
6.14. The auxiliary pump drive gear should be visible
through the hole. See Figure 6.14.
6.15. To test the auxiliary pump that powers the steer-
ing and lift cylinder, use a flow and pressure
gauge set. See Figure 6.15.
NOTE: Equipment will vary from shop to shop,
but operating principles are similar.
Figure 6.7
Auxiliary pump
drive gear
Eary style
speed sensor
NOTE: see-through
transmission coverissi
Figure 6.10
Engine
mounted
speed sensor
(front of
crankshaft on
CAT engine)
Figure 6.14
Transmission
cover
Plug (removed)
Auxilieary pump
drive gear (visible
through port)
Figure 6.15

Domestic Series 7000 Hydraulics
13
6.16. Disconnect the output line from the top of the
pump using a 3/4” wrench and a 9/16” wrench.
6.17. Install the gauge set in-line between the auxiliary
pump and the steering pump. The pressure
gauge should be near the auxiliary pump, and
the flow meter should be near the steering unit.
6.18. Set the parking brake, place the gear selector in
neutral, open the flow valve on the gauge set all
the way, and confirm that no unsafe conditions
will be created by starting the tractor engine.
See Figure 6.18.
6.19. Start the engine, allow the engine and hydraulics
to warm-up.
6.20. Performance:
• The SKP1/4.3 S auxiliary pump does not contain
a relief valve. It is capable of producing roughly
3600 PSI (250 bars) at engine speeds beyond
1,200 RPM.
• This is far in excess of the needs of the rest of
the system, which is designed to operate at
1,500 PSI (103 Bars).
•For our purposes, it is not necessary to test the
pump to its full capacity, only to establish that it
produces enough flow and pressure to operate
the hydrostatic steering and hydraulic lift cylin-
der.
• The auxiliary pump was observed to move about
4.6 Gal./min. (15 L/min.) at an engine speed of
3,000 RPM, with no load applied.
• Flow will vary with engine speed, but pressure
tests can be done at lower engine speeds:
1,200-1,500 RPM.
Figure 6.18
Pressure
guage
Flow
valve
Flow
meter
• Set the throttle to maintain an engine speed in
this range, and note the reading on the flow
meter.
6.21. Close the flow valve until the pressure gauge
reads 1,500 PSI (103 Bar). Note the flow read-
ing. See Figure 6.21.
6.22. As soon as the flow reading is noted, open the
the flow valve completely, relieving pressure
from the system. Turn -off the engine.
6.23. The flow readings noted at zero pressure and
1,500 PSI (103 Bars) should not vary signifi-
cantly. Flow is more related to engine RPM than
to pressure.
Figure 6.21

Domestic Series 7000 Hydraulics
14
7. STEERING PUMP AND CYLINDER
7.1. Two steering units have been used in domestic
Series 7000 production: one produced by Sauer/
Danfoss, and one produced by Ross (Parker-
Hannifin).
NOTE: It is normal for the spokes of the steering
wheel on an open-center hydrostatic power
steering system to change orientation with use.
There is no mechanical connection between the
steering wheel and the front wheels.
7.2. Identification: The Sauer OSPM 63 PB unit has
a round body. The Ross steering unit has a
square body. See Figure 7.2.
7.3. R&R: instructions for removal and replacement
of the steering units can be found in the DASH
PANEL AND STEERING PUMP section of this
manual.
7.4. If there is a warrantable problem with the power
steering unit, it is to be replaced as a complete
unit. Cub Cadet does not stock any internal
components for the steering units.
7.5. The following set of symptoms, causes, and
solutions has been adapted from a list compiled
by Sauer-Danfoss to aid in the diagnosis of
hydrostatic steering issues. Internal steering
unit problems are described to aid technicians in
distinguishing internal steering unit problems
from problems that lie elswhere in the system.
Internal problems dictate replacement of the
steering unit.
• High Effort Required to Turn Steering Wheel:
Cause 1: The auxiliary pump is not supplying sufficient
fluid to the steering unit. Confirm by testing auxiliary
pump out-put.
Solution 1: Correct the problem with the auxiliary
pump.
Cause 2: The priority spool within the steering unit is
not moving, causing fluid to be directed to other parts
of the system when the steering system needs it.
Solution 2: Internal problem; priority spool.
Cause 3: The relief valve in the steering unit is stuck
open.
Solution 3: Internal problem; relief valve.
• “Motoring” Steering Wheel: rotates on its
own:
Cause 1: Bad leaf spring in steering unit.
Solution 1: Internal problem; leaf spring.
Cause 2: The relief valve is stuck open.
Solution 2: Internal problem: relief valve.
• Poor Straight Line Steering Charactersistics:
Cause 1: There is a bind in the steering column.
Solution 1: Binds may be created by angular or radial
misalignment between the steering column and the
steering unit. Binds may also be created by a lack of
axial clearance between the steering column and the
steering unit. Correct any situation that may create
friction or binding in the steering column.
Cause 2: Bad leaf spring in steering unit.
Solution 2: Internal problem; leaf spring.
• Backlash
Cause 1: Wear or play between the steering column
and the cardan shaft.
Solution 1: If the wear is in the steering column,
replace the steering column (steering shaft per Cub
Cadet IPL). If the wear is in the cardan shaft, this is an
internal problem.
Cause 2: Bad leaf spring in steering unit.
Solution 2: Internal problem; leaf spring.
Figure 7.2
Sauer Steering Unit Ross Steering Unit

Domestic Series 7000 Hydraulics
15
• Shimmy:
Cause 1: Air in steering system.
Solution 1: Repair any leaks in the hydraulic system.
Be aware that a leak on the suction side of the auxiliary
pump would entrain air into the hydraulic fluid, but may
not display significant fluid loss.
Cause 2: Worn mechanical connections.
Solution 2: Inspect the MFD and steering linkage for
sources of excessive play: worn wheel bearings, worn
tie rod ends, worn king pins, worn steering cylinder
mounting points, etc... Replace the worn components.
• Steering Wheel Input Does Not Cause Steer-
ing cylinder to Move:
Cause 1: No fluid in the system.
Solution 1: Fill the system.
Cause 2: Worn steering cylinder / blow-by. Confirm
with flow test in line to cylinder.
Solution 2: Replace the steering cylinder.
• Heavy Impacts to Steering Wheel in Both
Directions:
Cause 1: The hydraulic hoses are incorrectly con-
nected; the hose that should connect to the “P” port is
connected to the “ L” port or the “R” port.
Solution 1: Correct the hydraulic connections.
Cause 2: Incorrect setting of the cardan shaft to the
gear wheel (timing).
Solution 2: Internal problem; cardan shaft / gear wheel
timing.
• Slow Steering:
Cause 1: Insufficient fluid flow to the steering unit.
Confirm by testing the out-put of the auxiliary pump.
Solution 1: Repair of replace the auxiliary pump or
delivery line from the pump to the “P” port on the steer-
ing unit.
Cause 2: The priority valve in the steering unit is not
working properly. This valve normally maintains preci-
dence of the steering system over all subsidiary sys-
tems (lift cylinder).
Solution 2: Internal problem; priority valve.
• The Steering Wheel Does Not Return to Cen-
ter:
Cause 1: There is a mechanical bind in the steering
column.
Solution 1: Repair or adjust the steering column
(steering shaft) to eliminate the bind.
Cause 2: Bad leaf springs.
Solution 2: Internal problem; leaf springs.
Cause 3: The spool is pressing against the sleeve in
the steering unit.
Solution 3: Internal problem; relief valve causing too
much pressure to build, displacing the spool.
Cause 4: Binding between spool and sleeve caused by
fluid contamination.
Solution 4: Internal problem; contamination. If this is
a possibility, cleaning, fluid replacement, and filter
replacement will help prevent a repeat failure.
• Steering Action is Opposite of Input:
Cause 1: The “L” and “R” hoses are reversed at their
conections to tht steering cylinder or steering unit.
Solution 1: Correct the connections of the hydraulic
lines from the steering unit to the steering cylinder.
Cause 2: Incorrect setting of cardan shaft to gear
wheel.
Solution 2: Internal problem; cardan shaft / gear wheel
timing.
• Steering Power Too Low:
Cause 1: The relief valve is set too low or malfunction-
ing.
Solution 1: Internal problem; relief valve.
• Fluid Leakage:
Cause 1: The seal around the cardan shaft is leaking.
Solution 1: Internal problem; cardan shaft seal.
Cause 2: The port fittings are leaking.
Soluton 2: Replace port adaptors or O-rings. Tighten
the fittings to a maximum torque of 221 in-lbs. (25 NM)
on the “T”, “R”, and “L” ports. Tighten the fittings to a
maximum of 239 in-lbs. (27 Nm) on the “P”, and “E”
ports.

Domestic Series 7000 Hydraulics
16
7.6. Engine-off test: With the engine turned-off so
that no pressure is supplied by the auxiliary
pump, the pump within the steering unit should
work well enough in manual mode to turn the
front wheels from one steering stop to the other
(full travel) with roughly 2.75 turns of the steering
wheel.
NOTE: The tractor was engineered to comply
with German TUV directive #38stVZo. It will pro-
vide steering action without pressure from the
auxiliary pump, maintaining steering wheel force
within a specified limit.
7.7. If there is air in the system, it will not perform to
design intent:
• If there are any leaks in the steering hydraulics,
air will be drawn into the system, degrading pre-
formance.
• If the system has been disassembled for any
reason, the engine must be started to provide
pressure from the auxiliary pump. With auxiliary
pump pressure to assist, turn the steering wheel
lock-to-lock three times, to purge air from the
steering system.
• After the air is purged, the engine-off test can be
performed with validity.
7.8. If the hydraulic steering lacks speed, test the
auxiliary pump as described in the previous sec-
tion of this manual.
7.9. Once it has been established that the auxiliary
pump is developing enough flow and pressure,
then test the steering unit.
7.10. Install the hydraulic test kit in either one of the
two hydraulic lines leading from the steering
pump to the steering cylinder.
7.11. Disconnect the hydraulic line between the steer-
ing unit and the steering cylinder using a 5/8”
wrench and a 3/4” wrench. See Figure 7.11.
7.12. Connect the test kit so that the pressure gauge
side (as opposed to the flow meter side) is near
the source (steering unit). See Figure 7.12.
7.13. Confirm that the test kit valve is all the way open,
and that no unsafe conditions will arise from
starting the tractor engine.
7.14. Start the engine, warm-up the engine and
hydraulic system, then position the throttle to
1,200-1,500 RPM.
Figure 7.11
Steering cylinder
Hydraulic line
(pressurized
to turn left)
Hydraulic line
(pressurized
to turn right)
Figure 7.12
Pressure test kit
installed in right
turn hydraulic line
/