Digital Monitoring Products 2W-BLX Installation guide

Category
Smoke detectors
Type
Installation guide
2W-BLX/2WT-BLX ADDRESSABLE
SMOKE DETECTOR
Installation Guide
DESCRIPTION
Models 2W-BLX and 2WT-BLX are
addressable photoelectric smoke
detectors. Both models incorporate
a state-of-the-art optical sensing
chamber and an advanced
microprocessor. These smoke
detectors include an addressable
single-point module for connection
to the LX-Bus of XR150/XR550
Series panels.
Compatibility
XR150/XR550 Series Panels
What is Included?
One 2W-BLX or 2WT-BLX smoke
detector
4-wire harness
Harware pack
1ADDRESS THE DETECTOR
Set the two on-board rotary switches to match the last two zone
number digits.
INSTALL THE DETECTOR
2The detector has a tamper-
resistant feature that prevents
removal from the mounting
base without the use of a
tool.
To engage, cut the small
plastic tab located on the
mounting base (Figure 3),
and then install the detector.
To remove the detector head,
use a small screw driver to
depress the square tamper
release tab on the skirt of the
mounting base and turn the
detector counterclockwise.
Figure 1: 2W-BLX/2WT-BLX
Addressable Smoke Detector Figure 2: Rotary Switches
Set for Zone Address 569
0
1
2
3
4
5
6
7
8
9
0
1
2
3
4
5
6
7
8
9
Tens Ones
Figure 3: Locking Mount
Plastic Tab
Head
Base
S2
J3
0
1
2
3
4
5
6
7
8
9
0
1
2
3
4
5
6
7
8
9
A
B
C
A
B
C
Example: On an XR550 panel, to
set the detector to zone number
569 on LX-Bus 500, set the left
rotary switch (TENS) to 6 and the
right rotary switch (ONES) to 9. See
Figure 2.
3Mount the Base:
The detector can be mounted to any of the following surfaces:
A single gang box
A 3.5- or 4-inch octagonal box
A 4-inch square box with a plaster ring
A ceiling using drywall fasteners
Do Not Install the Detector:
Where particles of combustion are normally present such as
in kitchens or garages (vehicle exhaust) or near furnaces, hot
water heaters, or gas space heaters.
In very cold or very hot areas.
In wet or excessively humid areas or next to bathrooms with
showers.
In dusty, dirty, or insect-infested areas.
Near fresh air inlets or returns or excessively drafty areas.
These can drive smoke away from the detector.
SELECT A LOCATION
2 2W-BLX AND 2WT-BLX INSTALLATION GUIDE | DIGITAL MONITORING PRODUCTS
MOUNT THE DETECTOR
Wiring the Detector
1. Pull wire through electrical box, then through the
detector’s mounting base center opening.
2. Connect the 4-wire harness to the 4-pin header
according to the wiring diagram in Figure 4.
Note: Tie the red wire (smoke power) to the smoke
terminal (SMK) of the panel. The other wires go to
the LX-Bus™ for addressing.
4
5TEST THE DETECTOR
Detectors must be tested after installation and following maintenance. After power up, allow 80 seconds for
the detector to stabilize before testing.
Figure 4: 2W-BLX/2WT-BLX Wiring
Black (common)
Green (data)
Yellow (data)
Red (smoke power)
To LX-Bus
S2
0
1
2
3
4
5
6
7
8
9
S1
TENS
J3
0
1
2
3
4
5
6
7
8
9
ONES
AB
Figure 5: Mounting Detector Head
Figure 6: Sensitivity Testing
the 2W-BLX/2WTBLX
Push resessed
switch with a
0.18” maximum
diameter tool
Sensitivity Test Switch
1. Insert a small screwdriver or allen wrench (0.18”
max.) into the test switch opening located on the
detector housing. Push and hold (See Figure 6).
2. If the detector is within the listed sensitivity limits,
the detector’s Red LED should turn on within five
seconds.
3. To measure the detector’s sensitivity, use the
System Sensor i3 Series Model SENS-RDR Infrared
Sensitivity Reader® tool.
Smoke Entry Test
Hold a smoldering stick or cotton wick at the side of the
detector and gently blow through the detector until it
alarms.
Caution: Be sure to properly extinguish the smoke
source after testing.
Direct Heat Method (Model 2WT-BLX only)
Direct the heat of a 1000-1500 watt hair dryer toward either of the thermistors. Thermistors are located on
each side of the screen/sensing chamber. Hold the heat source about 12 inches from the detector to avoid
damage to the plastic.
Note: For the above tests, the detector will reset only after a Sensor Reset is performed.
If the detector fails any of the above tests, check the wiring and clean the detector as outlined in the
Maintenance Section. If the detector still fails, it should be replaced.
Mounting the Detector
1. Place detector on the base and rotate clockwise.
The detector will drop into the base and lock into
place with a click. See Figure 5.
2. After all the detectors have been installed, apply
power to the control panel.
2W-BLX AND 2WT-BLX INSTALLATION GUIDE | DIGITAL MONITORING PRODUCTS 3
ADDITIONAL INFORMATION
Location Advice
Consult the Local Authority Having Jurisdiction (AHJ) and NFPA 72 for specific installation information about smoke
detector spacing, placement, location, and special applications.
Maintenance and Cleaning
This detector must be tested and maintained regularly following NFPA 72 requirements. At a minimum, cleaning should
be performed annually.
Before performing maintenance on the detector, notify the proper authorities that maintenance is being performed
and the system will be temporarily out of service. Disable the circuit undergoing maintenance to prevent any unwanted
alarms. Power must be removed from the detector before performing maintenance of any kind.
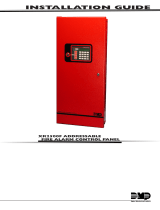
Figure 7: 2W-BLX/2WT-BLX
Exploded View
Removable
Detector
Cover
Screen/Sensing
Chamber
(Top Half)
Detector
Housing
1. Remove the detector cover by turning counterclockwise.
2. Vacuum the cover or use canned air to remove any dust or
debris.
3. Remove the top half of the screen/sensing chamber by
lifting straight up (See Figure 7.)
4. Vacuum or use canned air to remove any dust particles that
are present on both chamber halves.
5. Replace the top half of the screen/sensing chamber by
aligning the arrow on the screen/sensing chamber with the
arrow on the housing. Press down firmly until the screen/
sensing chamber is fully seated.
6. Replace the detector cover by placing it over the screen/
sensing chamber and turning it clockwise until it snaps into
place.
7. Reinstall the detector and test. (See Test the Detector.)
Wiring Specifications
When planning an LX-Bus installation, keep in mind the following specifications:
1. DMP recommends using 18-gauge unshielded wire for all LX-Bus circuits. Do Not use twisted pair or shielded wire
for LX-Bus circuits. To maintain auxiliary power integrity when using 18-gauge wire do not exceed 1,000 feet. To
increase the wire length or to add devices, install an additional power supply.
2. Maximum distance for any one circuit (length of wire) is 2,500 feet regardless of the wire gauge. This distance can
be in the form of one long wire run or multiple branches with all wiring totaling no more than 2,500 feet. As wire
distance from the panel increases, DC voltage on the wire decreases.
3. Maximum number of devices per 2,500 feet circuit is 40.
4. Maximum voltage drop between the panel (or auxiliary power supply) and any device is 2.0 VDC. If the voltage at
any device is less than the required level, add an auxiliary power supply at the end of the circuit. When voltage is
too low, the devices cannot operate properly.
For additional information refer to the 710 Installation Sheet (LT-0310) and/or the LX-Bus/Keypad Bus Wiring
Application Note (LT-2031).
Single Point Addressable
A factory-mounted, addressable single-point zone expander is integrated in the base of the smoke detector. The
included 4-wire harness allows a direct connection to the LX-Bus of XR150/XR550 Series panels. The integrated zone
expander reports to the panel as a single zone. See Addressing the 2W-BLX and 2WT-BLX.
A Green LED is included on the integrated zone expander PCB which flashes every 2 seconds to confirm device polling.
Fixed Temperature Thermal Detector
The Model 2WT-BLX features a restorable, built-in, fixed temperature thermal detector and is capable of sensing a
temperature higher than 135°F. If the detector senses a higher temperature than 135 °F, the Red LED latches on, and an
alarm condition is sent to the control panel.
Designed, engineered, and
manufactured in Springfield, MO
using U.S. and global components.
LT-1364 1.01 20442
2W-BLX/2WT-BLX ADDRESSABLE
SMOKE DETECTOR
Specifications
Operating Voltage 12 Vdc (Nominal)
Standby Current 15 mA
Alarm Current 35 mA
Maximum Ripple 30% (V) peak to peak
Operating Temperature (Ambient Room)
2W-BLX 32°F to 120°F
2WT-BLX 32°F to 100°F
Operating Humidity Range 0 to 95% RH non-condensing
Heat Sensor (2WT-BLX Only) 135°F
Power Up Time 80 seconds
Sensitivity Photoelectric 1-4%/ft.
Detector Dimensions
Diameter 5.3 inches
Height 2.0 inches
Weight 6.3 ounces
Ordering Information
2W-BLX/10 Photoelectric smoke detector
2WT-BLX/10 Photoelectric smoke detector with
fixed-temperature thermal detector
Certifications
California State Fire Marshal (CSFM)
Underwriters Laboratories (UL) Listed
ANSI/UL 268 Smoke-Automatic Fire Detectors
INTRUSION FIRE ACCESS NETWORKS
2500 North Partnership Boulevard
Springfield, Missouri 65803-8877
800.641.4282 | DMP.com
ADDITIONAL INFORMATION (CONTINUED)
GREEN LED RED LED
Power-Up Blink 10 seconds Blink 10 seconds
Normal (Standby) Blink 5 seconds
Out of Sensitivity Blink 5 seconds
Alarm — Solid
Table 1: Detector LED Modes
Built-In Drift Compensation
The detector automatically adjusts its sensitivity back to the factory setting when it becomes more sensitive due to
contaminants settling in its chamber. In order for this feature to work properly, the chamber must never be opened while
power is applied to the smoke detector. This includes cleaning, maintenance, or screen replacement.
LED Operation
After power-up has completed and the detector is
functioning normally within its listed sensitivity range, the
Green LED blinks once every five seconds.
If the detector needs maintenance because its sensitivity
has shifted outside the limits, the Red LED blinks once
every five seconds. See Table 1.
The LED indication must not be used in lieu of the tests
specified under Testing.
  • Page 1 1
  • Page 2 2
  • Page 3 3
  • Page 4 4

Digital Monitoring Products 2W-BLX Installation guide

Category
Smoke detectors
Type
Installation guide

Ask a question and I''ll find the answer in the document

Finding information in a document is now easier with AI