Sunbeam Aroma Coffee PC3600 User manual
- Category
- Coffee making accessories
- Type
- User manual

Aroma Coffee
™
12 cup drip filter coffee maker
Instruction Booklet
This book covers the use and care of the following coffee makers:
PC4700 Aroma Coffee
™
12 Digital
PC3610 Aroma Coffee
™
12 Black
PC3600 Aroma Coffee
™
12 White
Please read these
instructions carefully
and retain for future
reference.

Contents
Sunbeam’s Safety Precautions 1
Features of your Aroma Coffee
™
12 2
Using your Aroma Coffee
™
12 4
Care and Cleaning 7
Important instructions – retain for
future use.

Sunbeam is very safety conscious when
designing and manufacturing consumer products,
but it is essential that the product user also exercise
care when using an electrical appliance. Listed
below are precautions which are essential for the
safe use of an electrical appliance:
• Read carefully and save all the instructions
provided with an appliance.
• Always turn the power off at the power outlet
before you insert or remove a plug. Remove
by grasping the plug - do not pull on the cord.
• Turn the power off and remove the plug when the
appliance is not in use and before cleaning.
• Do not use your appliance with an extension cord
unless this cord has been checked and tested by
a qualified technician or service person.
• Always use your appliance from a power outlet of
the voltage (A.C. only) marked on the appliance.
• This appliance is not intended for use by persons
(including children) with reduced physical,
sensory or mental capabilities, or lack of
experience and knowledge, unless they have been
given supervision or instruction concerning use
of the appliance by a person responsible for their
safety.
• Children should be supervised to ensure that they
do not play with the appliance.
• The temperature of accessible surfaces may be
high when the appliance is operating.
• Never leave an appliance unattended while
in use.
• Do not use an appliance for any purpose other
than its intended use.
• Do not place an appliance on or near a hot gas
flame, electric element or on a heated oven.
• Do not place on top of any other appliance.
• Do not let the power cord of an appliance hang
over the edge of a table or bench top or touch any
hot surface.
• Do not operate any electrical appliance with a
damaged cord or after the appliance has been
damaged in any manner. If damage is suspected,
return the appliance to the nearest Sunbeam
Appointed Service Centre for examination, repair
or adjustment.
• For additional protection, Sunbeam recommend
the use of a residual current device (RCD)
with a tripping current not exceeding 30mA in
the electrical circuit supplying power to your
appliances.
• Do not immerse the appliance in water
or any other liquid unless recommended.
• Appliances are not intended to be operated
by means of an external timer or separate remote
control system.
• This appliance is intended to be used in
household and similar applications such as: staff
kitchen areas in shops, offices and other working
environments; farm houses; by clients in hotels,
motels and other residential type environments;
bed and breakfast type environments.
If you have any concerns regarding the performance and use of your appliance,
please visit www.sunbeam.com.au or contact the Sunbeam Consumer Service Line.
Ensure the above safety precautions are understood.
1
SAFETY PRECAUTIONS FOR YOUR SUNBEAM
COFFEE MAKER
• Do not overfill the water tank.
• Ensure the carafe is empty before starting a new
brew of coffee.
• Operate on a flat level surface.
• Allow the coffee maker to cool down before
cleaning.
• Do not open the product whilst brewing coffee.
• Ensure the lid is correctly secured to the carafe
before serving.
• Scalding may occur if the cover is lifted or
removed during the brewing cycle.
• Never use warm or hot water to fill the water
reservoir. Use cold water only.
Sunbeam’s Safety Precautions

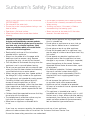
Features of your Aroma Coffee
™
12
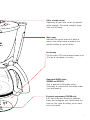
Permanent mesh filter
The permanent filter eliminates the need for
costly paper filters and is removable for easy
cleaning.
Anti-drip valve
At any time during the brewing cycle
the Anti-drip valve system allows you to
temporarily remove the carafe and pour a cup
of hot coffee.
Glass carafe with hinged lid
Heat resitant glass carafe allows you to view
the coffee brewing and indicates the quantity
of cups produced.
Thermostatically controlled warming plate
Automatically keeps coffee hot once brewing
has finished and is non-stick for an easy wipe
down clean.
2

Coffee strength selector
Depending on your taste, select the desired
coffee strength. The coffee strengths range
from mild to strong.
Water gauge
Indicates the correct amount of water to
place in the coffee maker to produce the
desired number of cups of coffee.
Fast brewing
The fast brew 1000 watt element brews up to
12 cups of hot coffee in minutes.
Illuminated ON/OFF switch
(PC3600 and PC3610)
Easy to operate On/Off power switch,
illuminates to indicate that the coffee maker
is on and brewing.
Electronic programming (PC4700 only)
A 24 hour clock with automatic operation
allows you to program your coffee maker any
time you like. Ideal for waking up to a fresh
hot cup of coffee.
3

Using your Aroma Coffee
™
12
Before first use
Before brewing coffee in your new coffee
maker, clean thoroughly as follows;
1.With warm soapy water clean the carafe
and removable filter basket. Rinse with
clean water and dry.
2.Open the hinged top lid and fill the
water reservoir with cold tap water to the
maximum level marked on the water level
gauge.
3.Place the glass carafe into position on the
warming plate of the coffee maker.
4.Plug the coffee maker into a 230-240 volt
AC power outlet and switch power on.
5.Press the power switch ‘ON’ to commence
the brewing cycle, without ground coffee or
the mesh filter.
6.At the end of the first cycle turn the coffee
maker off and wait ten minutes. Remove
the carafe and empty out water.
7.Replace the carafe, refill the water reservoir
and commence the brewing cycle without
ground coffee or mesh filter.
Your Aroma Coffee™ 12 is now ready for use.
Brewing coffee
1.Place your coffee maker on a flat, level
surface.
2.Open the hinged top lid and fill the water
reservoir with cold tap water up to the
maximum level marked on the water level
gauge for the desired amount of coffee.
Note: A minimum of two cups is required.
Note: Do not use the carafe to fill the unit
with water as it may contaminate the insides
of your coffee maker with coffee residue.
3.Insert the permanent mesh filter into the
filter holder.
4.Spoon the desired amount of ground coffee
into the filter.
Note: We recommend that you allow one
tablespoon of ground coffee for each cup of
brewed coffee. However you may vary the
quantity according to your taste.
Note: If you place too much ground coffee
into the filter, coffee grinds may overflow
during the brewing process and be deposited
in the carafe.
5.Close the hinged top lid so it clicks shut.
6.Place the empty glass carafe into position
on the warming plate.
7.Plug the coffee maker into a 230-240 volt
AC power outlet and switch power on.
8.Press the power switch ‘On’.
Aroma Coffee 12 (PC3600 and PC3610);
once the coffee maker is switched on, the
power switch will illuminate.
Aroma Coffee 12 Digital (PC4700); once
the coffee maker is switched on, the small
power light next to the power button will
illuminate. See ‘How to use the Electronic
Programming’ section for further details on
programming the automatic brew feature.
9.When the brewing cycle is completed the
warming plate will keep the coffee hot as
long as the coffee maker is switched on.
Note: There is no need to wait between
brewing cycles. As soon as you have brewed
one pot of coffee, you may immediately brew
another carafe.
10. Switch the coffee maker ‘Off’ after use
and unplug from the power outlet.
4

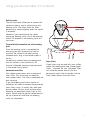
Anti-drip valve
The anti-drip valve allows you to remove the
carafe and pour a cup of coffee during the
brewing cycle. The valve under the filter
prevents any coffee dripping when the carafe
is removed.
However if you are removing the carafe
during the brewing cycle it must be returned
within 20 seconds as the brewing cycle still
continues.
Thermostatically controlled non-stick warming
plate
Once the brewing cycle is completed the
warming plate will automatically heat to
maintain the coffee at the ideal serving
temperature as long as the coffee maker is
left on.
For optimum coffee flavour we recommend
that the coffee is consumed within 20
minutes. Extended standing time may result
in the coffee tasting bitter.
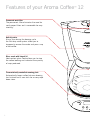
Permanent mesh filter
Your coffee maker comes with a permanent
mesh filter. This eliminates the need for
costly paper filters. The filter is removable for
easy cleaning.
If you are brewing continuous carafes of
coffee you will need to remove the permanent
mesh filter, rinse it in water, then add more
ground coffee. Caution must be taken when
removing the permanent mesh filter as the
plastic handle and the ground coffee remains
hot for a period of time after the brewing
cycle has completed.
Paper filters
Paper filters may be used with your coffee
maker. We recommend cone shaped paper
filters – standard #4 size. The paper filter
can either be placed directly into the
permanent mesh filter or straight into the
filter holder without the mesh filter.
Using your Aroma Coffee
™
12 (contined)
5
Permanent
mesh filter
Filter holder
Anti-drip
valve

How to use the Electronic Programming
(PC4700 model only)
Setting the clock
1. Plug the coffee maker into a 230-240 volt
AC power outlet and switch power on, the
numbers on the LCD will flash until you set
time of day.
2. To set time of day press H (hour) button
to set the current hour. AM or PM will be
displayed.
3. Press M (minutes) button until you reach
the current time.
Setting the automatic operation
After you have set the time, you may now set
the Automatic Operation.
1. Make sure the clock is set for the correct
time of day.
2. Fill coffee maker with the desired amount
of water and coffee. Place the carafe into
position on the warming plate.
3. While holding down the PROGRAM button,
press the H and M buttons until the desired
brewing time is reached.
4. Once the desired brewing time has been
reached, release the PROGRAM button and
the current time will be displayed on the
LCD.
5. Press the AUTO button to set the coffee
maker to come on automatically at the
desired time.
6. An illuminated small green light to the left
of the AUTO button indicates that the brew
cycle will begin at the set time.
7. Press the AUTO button again to cancel the
automatic brew.
Using your Aroma Coffee
™
12 (contined)
6

7
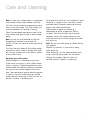
Care and cleaning
Note: Ensure your coffee maker is unplugged
and allowed to cool down before cleaning.
Lift the lid and remove the permanent mesh
filter using the handle. The filter holder can
also be removed for thorough cleaning.
Clean the removable permanent mesh filter,
filter holder and glass carafe in warm soapy
water.
Note: Do not use a dishwasher as the hot
temperatures reached may distort the
plastic. Do not use abrasive scouring pads or
powders.
To clean the main body of the coffee maker,
wipe with a damp cloth or sponge and wipe
dry. Do not immerse the main body in water
or any other liquid.
Descaling your coffee maker
Mineral deposits in tap water may cause
scale build up to form in your coffee maker,
which is normal. Therefore periodically your
coffee maker will require cleaning to remove
any calcium or mineral deposits that may
form. We recommend regular descaling every
2 months. You will know when your coffee
maker requires descaling as there will be an
obvious increase in brewing time.
To remove this build up, use Sunbeam Liquid
Descaler, a simple to use, non-toxic cleaner
available from Sunbeam appointed Service
Agents and selected Retailers.
Alternatively, prepare a solution of 1
tablespoon of white vinegar and 500ml
of water. Pour the solution into the water
reservoir, switch the coffee maker on and
allow the solution to filter through to remove
any build up.
Note: Do not use filter paper or coffee during
this process.
Repeat this process in the case of heavy
scale build up.
After descaling, fill the water reservoir with
clean, cold tap water and filter the water
through the coffee maker to clean any
residue solution. Repeat if necessary.

Notes

Should you experience any difficulties with
your appliance, please phone our customer
service line for advice on 1300 881 861 in
Australia, or 0800 786 232 in New Zealand.
Alternatively, you can send a written claim
to Sunbeam at the address listed below.
On receipt of your claim, Sunbeam will
seek to resolve your difficulties or, if the
appliance is defective, advise you on how
to obtain a replacement or refund.
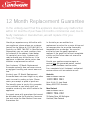
Your Sunbeam 12 Month Replacement
Guarantee naturally does not cover misuse
or negligent handling and normal wear and
tear.
Similarly your 12 Month Replacement
Guarantee does not cover freight or any other
costs incurred in making a claim. Please
retain your receipt as proof of purchase.
The benefits given to you by this guarantee
are in addition to your other rights and
remedies under any laws which relate to the
appliance.
Our goods come with guarantees that cannot
be excluded under the Australian Consumer
Law and under the New Zealand Consumer
Guarantees Act.
In Australia you are entitled to a
replacement or refund for a major failure and
for compensation for any other reasonably
foreseeable loss or damage. You are also
entitled to have the goods repaired or
replaced if the goods fail to be of acceptable
quality and the failure does not amount to
a major failure.
Should your appliance require repair or
service after the guarantee period, contact
your nearest Sunbeam service centre.
For a complete list of Sunbeam’s authorised
service centres visit our website or call:
Australia
www.sunbeam.com.au
1300 881 861
Units 5 & 6, 13 Lord Street
Botany NSW 2019 Australia
New Zealand
www.sunbeam.co.nz
0800 786 232
26 Vestey Drive, Mt Wellington
Auckland, New Zealand
In the unlikely event that this appliance develops any malfunction
within 12 months of purchase (3 months commercial use) due to
faulty materials or manufacture, we will replace it for you
free of charge.
12 Month Replacement Guarantee

is a registered trademark.
Need help with your appliance?
Contact our customer service team or visit
our website for information and tips on
getting the most from your appliance.
In Australia
Visit www.sunbeam.com.au
Or call 1300 881 861
In New Zealand
Visit www.sunbeam.co.nz
Or call 0800 786 232
‘Aroma Coffee’ is a trademark of Sunbeam Corporation.
Made in China.
Due to minor changes in design or otherwise,
the product may differ from the one shown in this leaflet.
© Copyright.
Sunbeam Corporation Limited 2010.
ABN 45 000 006 771
Units 5 & 6, 13 Lord Street
Botany NSW 2019 Australia
Unit 3, Building D
26 Vestey Drive
Mt Wellington Auckland
New Zealand
Sunbeam Corporation is a division of GUD Holdings Ltd.
6/11
-
 1
1
-
 2
2
-
 3
3
-
 4
4
-
 5
5
-
 6
6
-
 7
7
-
 8
8
-
 9
9
-
 10
10
-
 11
11
-
 12
12


Sunbeam Aroma Coffee PC3600 User manual
- Category
- Coffee making accessories
- Type
- User manual
Ask a question and I''ll find the answer in the document
Finding information in a document is now easier with AI
Related papers
-
Sunbeam PC7900 User manual
-
Sunbeam 3289 User manual
-
-
-
Sunbeam GrindFresh EM0440 Owner's manual
-
-
-
-
-
Sunbeam CA2800 User manual
Other documents
-
Magic Chef HNIM27SV User guide
-
Aigostar Buck - Coffee Makers, 4 Cup Coffee Maker User manual
-
Toastmaster ME5CB User manual
-
 Cookworks Signature Coffee Maker User manual
-
 Fine elements SDA77 User manual
-
SEVERIN KA 4770 Owner's manual
-
Mueller Ultra Brew DC 750 User manual
-
 Russell Hobbs 13406 User manual
-
SEVERIN KAFFEEAUTOMAT MIT TIMER KA 4031 User manual
-
SEVERIN KA4767 User manual


