Page is loading ...

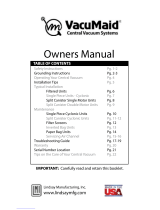
OWNERS MANUAL
READ BEFORE OPERATING YOUR SYSTEM
For free technical support and installation or
product questions, please contact us.
1-800-228-0285
Speak directly with the manufacturer.

• Do not leave room when hose is
plugged in to the inlet. Disconnect power
before servicing.
• Electric shock could occur if used on wet
surfaces.
• Do not allow to be used as a toy. Close
attention is necessary when used by or
near children.
• Use only as described in this manual.
Use only those attachments that are rec-
ommended.
• Do not use with damaged cord or plug.
If applicance is not working as it should, has
been dropped, damaged, left outdoors, or
dropped into water, return it to a service
center.
• Do not pull or carry by cord, use cord as
a handle, close a door on cord, or pull cord
around sharp edges or corners. Do not run
appliance over cord. Keep cord away from
heated surfaces.
• Do not unplug by pulling on cord. To
unplug, grasp the plug, not the cord.
• Do not handle plug or appliance with
wet hands.
• Do not unplug hose from system by
pulling on vacuum hose. To unplug hose,
grasp the cu, located on the end of the
hose, pull out with a twisting motion.
• Do not put anything into vacuum inlet or
vents. Keep inlet free of things that might
slow airow, such as lint, dust and hair. Do
not use the vacuum system if something
is blocking an opening.
When using an electrical appliance, basic precautions should always be
followed, including the following:
* Read all instructions before using this appliance.
WARNING: To reduce the risk of re, electric shock or injury:
* Always follow these safety instructions
IMPORTANT SAFETY INSTRUCTIONS
• Ifequippedwithanairturbinepower
brush unplug the vacuum hose before
attaching power brush. Keep ngers,
hands and toes away from the base of the
power brush. Failure to do so could result in
injury from moving parts.
• Notintentedasawetpickup.Donotuse
to pick up liquids of any kind. Doing so will
void warranty.
• In the event the power unit should
get wet, do not use the vacuum system
until it has been properly serviced and
examined by a serviceman or installer.
• Keephair,looseclothing,ngersandall
parts of the body away from wand, other
openings and moving parts.
• If so equipped,do not use your vacuum
system without dustbag in place.
• Alwaysdisconnectvacuumsystembefore
emptying dirt canister or replacing dustbag.
• Useextracarewhencleaningonstairs.
• Donotusetopickupammableorcom-
bustible liquids such as gasoline or use in areas
where such liquids may be present.
• Donotusetopickupdrywallorcement
dust. Doing so will void warranty.
• Do not pick up anything that is burn-
ing or smoking, such as cigarettes,
matches or hot ashes.
• Whennishedputthevacuumhoseandat-
tachments away to prevent tripping accidents.
• Foragroundedappliance,connecttoa
properly grounded outlet only. See
grounding instructions.

CAUTION: Do not use when rug (or oor) is wet.
ATTENTION: Ne pas utiliser lorsque le tapis (ou le plancher) est moduille.
SAVE THESE INSTRUCTIONS
-WARNING-
ELECTRIC SHOCK COULD OCCUR IF USED ON WET SURFACES
FOR CORD CONNECTED APPLIANCE
This appliance must be grounded. If it should malfunction or breakdown, grounding
provides a path of least resistance for electric current to reduce the risk of electric
shock. Your vacuum system is supplied with an electrical cord having a grounding
pin. It is recommended that this plug be used only with an appropriate outlet that
is properly installed and grounded in accordance with all local codes and ordinanc-
es. This appliance is for use on a nominal 120-volt circuit (U.S. only) or 230/250 volt
circuits where applicable, and has a grounded plug that looks like the plug shown
in Figure A. A temporary adapter, that looks like the adapter illustrated in Figure
B, may be used to connect this plug to a 2-pole receptacle as shown in Figure B if a
properly grounded outlet is not available.
GROUNDING INSTRUCTIONS
The temporary adapter should be used only until a properly grounded outlet (Fig-
ure A) can be installed by a qualied electrician. NOTE: Temporary adapters are
not permitted in Canada. The green colored rigid ear, lug or the like, extending
from the adapter, must be connected to a permanent ground such as a properly
grounded outlet box cover. Whenever the adapter is used, it must be held in place
by a metal screw.
DANGER---
GROUNDING
PIN
GROUNDED
OUTLET
Improper connection of the equipment - grounding
conductor can result in a risk of electric shock. Check with a qualied electrician
or your installer if you are in doubt as to whether the outlet is properly grounded.
Do not modify the plug provided with the appliance - if it will not t the outlet
use a temporary adaptor as shown and have a proper outlet installed by a qualied
electrician as soon as possible.
ADAPTER
METAL
SCREW
TAB FOR
GROUNDING SCREW
FIGURE A
FIGURE B
Your vacuum does not require any oil. The bearings in the motor are greased
and sealed for life. Do not add lubricant.
* THIS IS NOT A WET VAC *

3
PARTS
2-Hole Disposable Bag
Must be installed onto both inlet stems
before use.
See Pg. 8 for details.
Replacement Bags - Part #: HPB2HD
3 pack - Part # HPB2HDPK
Protector Plate (PP101)
This plate should already be installed
in your unit when you receive it, just
below the HEPA bag.
Be sure it is face up, prongs down.
(Pg. 6 for details.)
DO NOT USE AS
A WET VAC
Utility Valve Inlet
Use for “Vacuuming”
Lid
Disposable Bag is located
inside the unit, below the lid.
On/O switch
Additional tools needed for installation:
•Level
•RubberMallet
•ElectricDrill
•1/8”drillbit
(If mounting on block or concrete wall,
you will need masonry bit & plastic or
lead anchors - not provided)
Latches
Low Voltage
Wire Quick Clip
Use if wanting to add
additional valves
See pg 5 for details
Intake
Inlet stem attaches here.
For use when adding
additional wall valves.
Cap inlet stem if not adding valves.
Inlet Stem Cap
UsedonendofinletstemifNOT
running additional valves.
Inlet Stem
Will be inserted into side of
unit if wanting to add addi-
tional wall valves.
See Pg. 6 for details.
SC12 Safety Screen
Located inside unit on top of
protector plate. (See page 6
for details.)
If plumbing in additional inlet valves, you can use central vacuum tubing or Schedule 40 pipe. If
using Schedule 40, you will need to use reducer coupling when connecting to inlet stem at unit. See
pg 5 for more details and pg 10 for inlet valve kits.
NOTE: A 20 amp breaker is required for this system.
INSTALLATION QUESTIONS, CALL US AT 1-800-228-0285

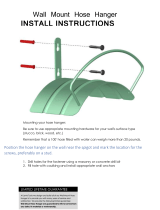
INSTALLATION & MOUNTING
CHOOSE THE MOUNTING LOCATION
• The unit must be mounted within 5 feet of an
electrical outlet. Do not use an extension cord.
• The unit should be mounted so that it is in a dry
location and out of the way, but still accessible for
emptying and accessing the utility valves.
Suggested mounting: Minimum of 12 inches
between unit lid and ceiling or shelving. (See pg 5)
• Do not install this unit where ambient temperature
regularly exceeds 120 degrees F.
• Vacuums must breathe...do not enclose. Be sure to
mount 6 inches from sidewalls.
MOUNTING THE WALL BRACKET SHEETROCK *
If installing direct from the factory, you will rst need
to slide the wall bracket out of the unit bracket. (Fig. 2)
These brackets are found on the back of the unit. There
may be a long narrow aluminum brace holding them
together. This piece is there for shipping purposes and
can be thrown away.
1. Find center of stud and mount the wall bracket.
Note,thebracketmountsinthemiddleoftheunit,
so you will need to mount approx. 3” below your
desired unit height. See g. 1 for more details.
2. Use wall hanger bracket as a template. Use the two
vertical holes (approximately 10” apart). Then, mark
the location on the stud.
3. Use a 1/8” drill bit and drill two pilot holes for these
two vertical holes.
4. Mount the wall hanger bracket with washers and lag
screws provided. (Side grommets are for vibration.
Use the two vertical holes for mounting.)
5. Tighten screws until the washers are snug against
the rubber grommets. (Fig. 3)
ATTACHING UNIT TO MOUNTING BRACKET
Mount the VacuMaid® Utility Vac by sliding the attached
unit bracket onto the wall bracket (Fig. 4) and slide it
down until the unit rests securely into the bracket.
Fig. 1 You will need to be able to
remove the bag from the top of
the unit. Be sure to leave enough
room when mounting.
Fig. 3 Mount the wall bracket.
Fig. 4 Slide the unit bracket into
the mounted wall bracket.
*If mounting on a block or concrete wall, drill the holes with masonry bit and insert plastic or lead anchors (not included).
If mounting on plaster, wall board or panel walls, be sure mounting bolts enter studs.
4
Fig. 2 To remove the mounting
bracket as shipped from factory,
tap lightly with a mallet. The
mounting bracket will slide down.

NOTE:
* Power unit must
be mounted at
least 6 inches from
sidewall
& oor. Leave
minimum of 12”
from ceiling or
shelving.
44” from oor
to top hole of
can bracket
44”
Hanger Bracket
Suggested
Guidelines
Typical Installation Design of Utility Vac
5
Strip the wire, press the Quick
Clips to the right and insert the
wire into the holes.
Low Voltage Wire Connections
To add additional utility valves (optional)
If plumbing in additional inlet valves, you
can use central vacuum tubing or Schedule
40 pipe. If using Schedule 40, you will need
to use reducer couplings when connecting
to inlet stem at the unit.
Inlet valve kits available. See page 10.
If you have questions, please contact us at
1-800-228-0285
and speak directly with the manufacturer.
Low Voltage Wiring to Inlets

FIRST TIME USE
1 PROTECTOR PLATE
Make sure the Protector Plate is in place. This is
necessary for proper suction.
Upon receiving your vacuum system, lift o the lid.
The protector plate should be located inside the can
just below the disposable bag and safety screen (if
equipped) .
The protector plate is installed correctly when it lays
at, prong side down, directly under the disposable
bag. The warning label should be facing up. The plate
provides a barrier between the bag and mesh screen.
This allows air to circulate preventing the motor from
overheating.
Do not throw this part away.
PP101
Protector Plate
Protector plate must be
installed properly for the
vacuum to work
Before using your system for the rst time, follow these 4 steps.
2 SAFETY SCREEN
Be sure the SC12 safety screen is installed properly.
It goes on top of metal protector plate in the
bottom of the can.
NotchededgetsaroundAirChannel.Pressinto
place in bottom of can above protector plate.
6
3 INLET STEM
The inlet stem comes inside the unit for shipping pur-
poses and will need to be installed before use.
To install: Insert the inlet stem all the way into the
canister. You may have to twist it to get it all the way in.
There is a small hook that protrudes from the ange of
the inlet stem. Rotate the inlet stem so that the hook on
the side of the ange lines up and points to 9 o’clock (see
gure 1a).
If running additional wall valves or utility valves, your
PVC tubing will attach to this stem with a coupling.
IMPORTANT: If you are not running additional valves
and are only using the utility valve on the front of the
unit, the white inlet stem cap MUST be on the end of the
inletstem.Notdoingso,willresultinlossofsuction.
12:00
(Top of Power Unit)
Figure 1a
9:00

Vacuuming
Inserting the hose
The hose connects to the system through the utility valve
inlet on the front of the unit by lifting the door open
and inserting the hose. (Fig. 1) If your system has been
plumbed for additional valves, you insert the hose into
the valve you want to use. Only one valve can be used at
a time.
USING YOUR SYSTEM
7
1
4 Install the HEPA bag onto the 2 inlet stems inside the
canister.
First, take the bag and fully expand it.
Then place it in the canister and slide each gasket onto
the inlet stems until they drop into place in the ridge that
is around the inlet stems.
Place the lid onto the dirt canister and ensure that it seals
properly.
REMINDER: This is not a wet pickup and cannot be used with liquid.
Doing so will void warranty.
If plumbed with additional valves:
Leave the on/o switch turned OFF. Each valve is wired with low
voltage and will turn on once the hose is inserted and will go o
once hose is removed.
If using utility valve on front of unit:
Insert the hose before turning the unit on. The system is turned on
and o by ipping the switch on the side of the unit.

This system uses a sealed HEPA type bag (Part # HPB2HD).
The mass of dirt and debris is picked up by your vacuum
and deposited into the bag inside your dirt canister.
Emptying your Dirt Can
To remove accumulation, follow these steps:
Remove the lid by unhooking the clamps & releasing
the latches on the top of the canister. (Fig. 1) Lift lid
straight up. (Fig. 2)
Remove the bag by sliding the rubber gasket that sur-
rounds the holes in the paper bag o the plastic inlet stems
that protrude through the front & side of canister. (Fig. 3)
Once the bag is o of the inlet stem, seal the bag by re-
moving the backing from the tabs and cover the holes
with the aps. Press the aps so that they securely seal
over the holes (Fig. 4). This will help prevent dirt and
dustfromescaping.Now,liftthepaperbagfromthe
dirt canister and place in a suitable trash container.
Take a new bag and extend it fully (Fig. 5).
1
2
3
4
5
If bag breaks...
In the event of a bag breaking while in the unit, it is necessary
to lift the protection plate located under the bag and clean the
small mesh screen as well as the notched safety screen.
The bag should be changed or cleaned when there is 3-6 inches of dirt or
anytime there is a noticeable reduction of air ow at the cleaning
HOW OFTEN SHOULD I CHECK OR EMPTY THE HEPA BAG?
?
tool. Initially, the dirt canister should be checked or emptied weekly until some
idea can be obtained as to how long it takes to half ll the canister under your
normal cleaning routine. All vacuum systems will function more eectively
if they are emptied frequently. Under no circumstances should you allow your
dirt canister to become more than 3/4 full before emptying.
5
6
MAINTENANCE
Installing a New Bag
8
4
3
2
1
1
Place bag in the canister, and slide its rubber gaskets
onto each inlet stem until the rubber gasket drops into
place in the ridge that is around the inlet stem (Fig. 6).
Do so for both inlet stems.
Carefully replace the lid onto the dirt canister to
ensurethatitsealsproperly.Notdoingsocouldcause
a vacuum leak and reduce the cleaning eciency of
your system. Once properly on top, secure the lid with
the latches by hooking the clip over the side of the
lid and pushing down on the lever to lock into place.
Repeat for each side.
6

WARRANTY
ITEMS COVERED
* The VacuMaid® UTILITY VAC system is warranted for
a period of 5 years. Hoses, oor brushes, and cleaning
tools are warranted for a period of 2 years. All warranties
commence from the original date of purchase. Any
warranted defects will be repaired or replaced without
cost to the customer except for transportation charges
and/or charges associated with removal and reinstalla-
tion. This Warranty is given only to the original owner
and cannot be transferred.
ITEMS NOT COVERED
This Warranty does not cover such conditions as normal
wear to the power unit resulting from normal usage or
from damage caused by accidents, negligence, misuse,
or improper alteration, or from damage by re, ood, or
other acts of God. Motor brush wear is normal and is not
considered to be a defect in material or workmanship.
Further, this Warranty does not apply to vacuum tubing,
ttings, inlets, or to the act of installing the VacuMaid®
UTILITY VAC system, including installation materials,
installation damages, or damage to the power unit
caused by defective or improper installation of the
VacuMaid® UTILITY VAC. This warranty also does not
cover pick up, delivery or house calls.
Picking up liquid of any kind will void warranty.
5 YEAR LIMITED* WARRANTY
Domestic Residential Use only
(1 Year - Commercial Use)
This Warranty gives you specic legal rights, you may also have other rights
which vary from State to State (or Province).
LINDSAY MANUFACTURING, INC. / P.O. BOX 1708 / PONCA CITY, OK 74602
VacuMaid
®
is the registered trademark of Lindsay Manufacturing, Inc.
DISCLAIMER OF OTHER WARRANTIES
LINDSAY MANUFACTURING, INC., HEREBY DISCLAIMS ALL LIABILITY WHATSOEVER FOR ANY INCIDENTAL OR
CONSEQUENTIAL DAMAGES WHICH OCCUR AS A RESULT OF DEFECTS IN MATERIAL AND WORKMANSHIP IN THE
PRODUCT. LINDSAY MANUFACTURING, INC., ALSO HEREBY DISCLAIMS ALL IMPLIED WARRANTIES, INCLUDING THE
WARRANTIES OF MERCHANTABILITY AND FITNESS FOR A PARTICULAR PURPOSE.
SOME STATES (or provinces) DO NOT ALLOW THE EXCLUSION OR LIMITATION OF INCIDENTAL OR CONSEQUENTIAL
DAMAGES, SO THE ABOVE LIMITATION OR EXCLUSION MAY NOT APPLY TO YOU. SOME STATES (or provinces) DO
NOT ALLOW LIMITATIONS ON HOW LONG AN IMPLIED WARRANTY LASTS, SO THE ABOVE LIMITATIONS MAY NOT
APPLY TO YOU. TO THE EXTENT THAT ANY LAW PROHIBITS, IN WHOLE OR PART, THE LIMITATION OF IMPLIED
WARRANTIES, ANY IMPLIED WARRANTY APPLICABLE TO THE PRODUCT SHALL NOT EXCEED A PERIOD OF 5 YEARS
FOR SINGLE RESIDENTIAL APPLICATIONS OR 90 DAYS FOR COMMERCIAL/INDUSTRIAL AND OTHER APPLICATIONS.
This warranty is exclusive and is in lieu of all other expressed warranties, and in lieu of all other obligations or liabilities on
the part of Lindsay Manufacturing, Inc., for damage to person or property. We do not authorize any person, including any
dealer, agent, supplier, or representative of Lindsay Manufacturing, Inc., to make any other warranty or guarantee on our
behalf, or assume for us any liability on the VacuMaid® UTILITY VAC Vacuum System other than that contained herein.
NooralrepresentationsregardingwarrantyshallbebindinguponLindsayManufacturing,Inc.,whetherextendedbefore
or after sale of that product.
TERMS OF WARRANTY AND RESTRICTIONS
*The 5 year/2 year term of this limited Warranty is
eective for single family residential applications only.
In commercial/industrial and other applications, this
limited warranty is valid for1 year only from the date
of purchase for all components of the system. In com-
mercial/industrial and other applications, this warranty
shall be for the benet only of the original owner of the
VacuMaid® UTILITY VAC system. Any failure caused by
an unsupported or third-party component will not be
covered by warranty.
HOW TO INVOKE THIS WARRANTY
If it should ever become necessary to invoke the rights
and privileges of this Warranty during the period of
eectiveness the following procedures should be
followed:
a) Refer to operating maintenance instructions
to ascertain that a malfunction of the vacuum
cleaner has actually occurred.
b) Notify the VACUMAID representative, at
1-800-228-0285, that you have a problem
and describe the nature of your diculty.
9

Vacuum cleaner won’t run
• Be sure the unit is plugged in.
• Be sure you turned the system on.
• Check your circuit breaker panel.
Make sure there is not too much on
that circuit causing it to trip.
Low suction or no suction
• First, see instructions above.
• Usually low suction is caused by a full
bag. Change your bag. See
Operating Instructions for details.
• Is the dirt canister lid o or loose?
Be sure the lid is replaced squarely on
the top of the canister and that the
gasket has not been pulled loose or it
could allow a vacuum leak. If gasket is
loose, reattach with contact cement
or super glue.
• Is there blockage in the hose or tools?
Disconnect the hose from power unit,
use a blunt item to push the clog out.
If the blockage is in the tools, remove it.
• Is Protector Plate in place?
Lift the lid. The metal plate should
be located just beneath the HEPA bag
inside the can, laying at with the
smooth side up, prong side down.
Most problems that develop can be xed easily by following the below suggested solutions:
TROUBLESHOOTING
10
ADDITIONAL KITS & ACCESSORIES
1. 1-1/4” Hose (30 or 50’) 2. Hose Hanger
3. Industrial Crevice Tool 4. Industrial Upholstery
Tool
CKP30/CKP50 - 30 ft. or 50 ft.
Commercial Tool kit
1. 1-1/4” Hose (30 or 50’) 2. Hose Hanger 3. Dusting
Brush 4. Upholstery Tool 5. Crevice Tool
6. Telescopic Wand 7. Floor Brush 8. Tool Storage Bag
GKP30/GKP50 - 30 ft. or 50 ft.
Garage Kit
MK3 - Muer Kit
12” round muer, 90° medium
sweep elbow, 2 street couplers
UVK1 - Utility Valve Kit
1-1/4” plastic utility valve, two
reducer couplings (2” to schedule
40), 90° sharp radius street ell
UVK3 - 3 Valve Utility Kit
Three 1-1/4” plastic utility valves, four
reducer couplings (2” to schedule 40),
& three 90° sharp radius street ell
Available at www.vacumaid.com
or on Amazon.

L6277
PO Box 1708
Ponca City, OK 74602
1-800-228-0285
For replacement bags or to order additional
tools or accessories,
visit us at www.vacumaid.com
or give us a call at
1-800-228-0285
To register your product online, go to
www.vacumaid.com/registration
1/19
For free technical support and installation or
product questions, please contact us.
1-800-228-0285
Speak directly with the manufacturer.
/