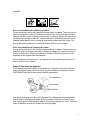
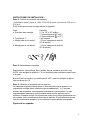
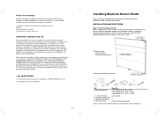
Perfect Lift Window Treatment QFLG250640 Installation guide
- Type
- Installation guide

CORDLESS TOP-DOWN BOTTOM-UP
BLACKOUT SHADE
SAFETY INFORMATION
Please read and understand these instructions before attempting to assemble,
install, or operate this product.
INSTALLATION INSTRUCTIONS
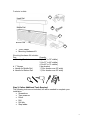
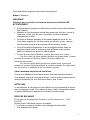
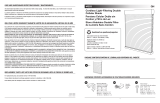
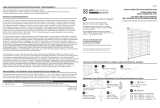
Step 1: Check Package Contents
Before installing your shade, make sure all parts listed below are present. If any
part is missing or damaged, please do not assemble, install, or operate. To
request replacement parts, contact customer service at 1-844-318-6168, Monday
through Friday from 8:00 a.m. to 4:30 p.m. EST.
1

Contents include:
TDBU Shade
Mounting Hardware Kit
Mounting Hardware Kit includes:
Part Quantity
a. Mounting Brackets 2 (for 18” to 36” widths)
3 (for 37” to 48” widths)
4 (for 49” to 72: widths)
b. 1” Screws 2 per bracket
c. Handle for Middle Rail 1 (2 for shades over 59” wide)
d. Handle for Bottom Rail 1 (2 for shades over 59” wide)
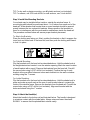
Step 2: Gather Additional Tools Required
The following tools are not included, but will be needed to complete your
installation.
Screwdriver
Tape measure
Pencil
Drill
Drill bits
Step ladder
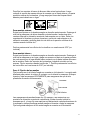
a
b
c
d
Head Rail
Middle Rail
Bottom Rail
2

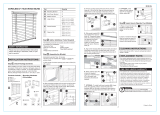
TIP: For dry wall or plaster mounting, use #6 plastic anchors (not included).
TIP: For screws, use 3/32-inch drill bit; for wall anchors, use ¼-inch drill bit.
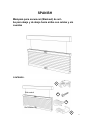
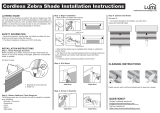
Step 3: Install the Mounting Brackets
Your shade may be installed either inside or outside the window frame. A
mounting bracket should be positioned about 1 to 6 inches from each end of the
head rail. Wider shades that require three or more brackets should be spaced
evenly between the two outermost brackets. Always position the brackets so
there is no interference with the cords and/or mechanisms inside the head rail.
The procedure outlined below will assure proper bracket placement.
To Attach the Brackets:
Place the locking arm facing out. Next, position the bracket so that it engages the
inner front and outer back of the head rail, and then push the locking arm inward
to lock it in place.
For Outside Mounting:
Clip the brackets onto the head rail as described above. Hold the shade level at
the height desired and center it over the window opening. Mark the exact location
of each bracket with a pencil. Remove the brackets from the head rail. Pre-drill
the screw holes using a 3/32” drill bit (not included). Position the top of each
bracket at the pre-drilled holes and screw each bracket into the wall or window
molding using the 1” screws.
For Inside Mounting:
Clip the brackets onto the head rail as described above. Hold the shade level in
place and make a pencil mark at the rear of each bracket where it contacts the
inside of the window frame. Remove the brackets from the head rail. Pre-drill the
screw holes using a 3/32” drill bit (not included). Align each bracket with the
holes and attach using the 1” screws.
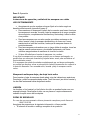
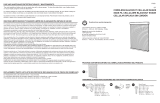
Step 4. Attach the Handle(s)
Attach the handle to the bottom rail as illustrated below. The handle is designed
to minimize contact with the shade fabric. Always raise and lower the shade
SLOWLY to assure that the pleated fabric stacks neatly.
3

Wider shades have two handles. To precisely determine the correct position for
each handle, divide the total width of the shade by 4, and then attach one handle
that distance from each outside edge of the shade. Always grasp both handles
when lifting and lowering the shade.
Attach the second handle to the middle rail as illustrated.
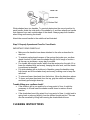
Step 5. Properly Operate and Care For Your Shade
IMPORTANT: READ CAREFULLY
Make sure the handles have been attached to the rails as described in
step four.
To maintain optimal performance of the springs that make your cordless
shade function, lift and lower the shade through its full range of motion—
all the way up and down—every day if possible.
For shades with single handle, which must be centered on the rails, lift or
lower the shade slowly and evenly, keeping the rails level, until the shade
is positioned as desired.
For wider shades with a double set of handles, grasp the handles using
both hands and lift the shade slowly and evenly, making sure to keep the
rails level.
To raise and lower the shade from the bottom, follow the directions above.
To lower and raise the shade from the top, grip the middle rail handle(s)
and slowly pull straight down/up.
Trouble lifting your cordless shade?
If the shade is left in one position for a long period of time, it might be
necessary to lift and lower the shade several times to restore normal
function.
If the shade has been fully raised for a long period of time, it might tend to
spring back or rebound slightly from the desired length position. This can
also be remedied by lifting and lowering the shade several times.
CLEANING INSTRUCTIONS
Bottom Rail
Middle Rail
Head Rail
4

The vinyl head rail, middle rail, and bottom rail can be wiped clean with a damp
sponge. To clean the fabric, use a feather duster or vacuum lightly using a soft
brush attachment.
REPLACEMENT PARTS
If you require replacement parts, contact customer service at 1-844-318-6168,
Monday through Friday from 8:00 a.m. to 4:30 p.m. EST. Please be sure to
provide the following information, if possible:
• The complete model or item number of your product
• A description of the product
• A description of the part needed
ONE-YEAR LIMITED WARRANTY
For a period of one (1) year from the date of purchase, the manufacturer will
replace this window covering with one of equal or superior value, if this window
covering is found to be defective in material or workmanship. To obtain warranty
service, contact our customer service department at 1-844-318-6168. This
warranty does not cover damage of defects caused by or resulting from improper
maintenance, negligent or improper use, abuse, misuse, neglect, accidents, act
of God, alterat
ion, commercial use, installation, removal, or reinstallation.
This warranty is restricted to normal consumer use within the United States and
Canada. MANUFACTURER WILL NOT BE LIABLE FOR INCIDENTAL OR
CONSEQUENTIAL DAMAGES; SOME STATES DO NOT ALLOW THE
EXCLUSION OR LIMITATION OF INCIDENTAL OR CONSEQUENTIAL
DAMAGES, SO THE ABOVE LIMITATION OR EXCLUSION MAY NOT APPLY
TO YOU. This warranty gives you specific legal rights, and you may also have
other rights, which vary from state to state.
QUESTIONS?
Contact customer service at 1-844-318-6168, Monday through Friday from 8:00
a.m. to 4:30 p.m. EST.
5
Printed in Taiwan
Page is loading ...
Page is loading ...
Page is loading ...
Page is loading ...
Page is loading ...
Page is loading ...
Page is loading ...
Page is loading ...
Page is loading ...
Page is loading ...
Page is loading ...
-
 1
1
-
 2
2
-
 3
3
-
 4
4
-
 5
5
-
 6
6
-
 7
7
-
 8
8
-
 9
9
-
 10
10
-
 11
11
-
 12
12
-
 13
13
-
 14
14
-
 15
15
-
 16
16


Perfect Lift Window Treatment QFLG250640 Installation guide
- Type
- Installation guide
Ask a question and I''ll find the answer in the document
Finding information in a document is now easier with AI
in other languages
Related papers
-
 Perfect Lift Window Treatment 3QCC610720 Installation guide
-
 Perfect Lift Window Treatment QHWT354720 Installation guide
-
 Perfect Lift Window Treatment 3QCC610720 Installation guide
-
 Perfect Lift Window Treatment QNLG380720 Installation guide
-
Perfect Lift Window Treatment QDLG550480 Installation guide
-
 Perfect Lift Window Treatment QEGRWT280480 Installation guide
-
 Perfect Lift Window Treatment QJWT284720 User guide


Other documents
-
Allen + Roth TDLFLG340640 Installation guide
-
SelectBlinds 1-2 Inch Single Cell Day Night Honeycomb Shades Owner's manual
-
Achim RSBC29GY04 Installation guide
-
 Lumi ZBLF-3072G Installation guide
-
Lumi ZBLF-3072G User manual
-
SelectBlinds Cordless Lift and Lock User manual
-
HOME basics CDHD_LA4772-44.5 Operating instructions
-
HOME basics CDHD_LB5572-51 Operating instructions
-
HOME basics CDHD_LB3972-31.5 Operating instructions
-
 SelectBlinds Casual User manual

