Page is loading ...

CORDLESS 2" FAUX WOOD BLIND
SAFETY INFORMATION
Please read and understand these instructions
before attempting to assemble, install, or oper-
ate this product.
ONE-YEAR LIMITED WARRANTY
For a period of one (1) year from the date of purchase, the
manufacturer will replace this window covering with one of equal
value, if this window covering is found to be defective in material or
workmanship. This warranty does not cover damage of defects
caused by or resulting from improper maintenance, negligent or
improper use, abuse, misuse, neglect, accidents, act of God,
alteration, commercial use, installation, removal, or reinstallation.
This warranty is restricted to normal consumer use within the
United States and Canada. To obtain warranty service, contact our
customer service department at 1-844-318-6168
INSTALLATION INSTRUCTIONS:
Step Check Package Contents
Contents include: Mounting Hardware
Kit includes:
1
Step Gather Additional Tools Required
2
Before installing your blind, make sure all parts listed below
are present. If any part is missing or damaged, please do
not assemble, install, or operate. To
request replacement
parts, contact customer service at 1-844-318-6168,
Monday through Friday from 8:00 a.m. to 4:30 p.m. EST.
4.
Slide center bracket (EE)
onto headrail from back of
blind (A). Temporarily hang
blind (A) by sliding headrail
into attached mounting
brackets (AA). Mark
location of center bracket
(EE) with pencil. Remove
blind (A).
5. Align center bracket (EE) with pencil marks and attach
using large screws (DD); pre-drill holes with 1/16 inch
drill bit. Next, hang blind (A) and snap the locking tab of
the mounting bracket (AA).
8.
OPTIONAL: Slide
valance
(B) onto valance
clips (FF) as needed to
center valance (B).
6. Attach valance clips (FF)
to blind (A) headrail
(optional). Install the wand
(C) to the wand hook
attached to the blind (A)
headrail.
7.
OPTIONAL:
To install hold down brackets (BB), lower
blind (A) to desired position. Screw the hold down
brackets (BB) into the wall or windowsill using medium
screws (CC) and attach blind (A) at the hole in the cap
on the bottom rail.
1. Raise or lower the blind (A)
by lifting or lowering the
bottom rail to the desired
height.
2. Open or close the blind (A)
slats by turning the wand (C)
until the slats are opened or
closed to the desired amount.
Clean using damp cloth or vacuum using proper attach-
ments or duster.
REPLACEMENT PARTS:
If you require replacement parts, contact customer service at
1-844-318-6168, Monday through Friday from 8:00 a.m. to 4:30
p.m. EST. Please be sure to provide the following information,
if possible:
*The complete model or item number of your product
*A description of the product
*The description of the part needed
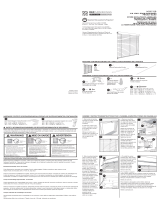
3. Remove mounting brackets (AA) from blind (A). Pre-drill
holes with 1/16-inch drill bit. Align with holes and attach to
window frame or wall using large screws (DD). Choose 2
diagonal holes that work best for your window frame or wall.
A. Blind x 1
B. Valance x 1
C. Wand x 1
Mounting Hardware Kit
Part
AA
BB
CC
DD
EE
FF
Quantity
2
2
4
4
(23 in. to 28 in. widths)
6 (29 in. to 36 in. widths)
8 (39 in. to 47 in. widths)
10 (48 in. to 72 in. widths)
1 (29 in. to 36 in.)
2 (39 in. to 47 in.)
3 (48 in. to 72 in.)
2 (23 in. to 36 in.)
3 (39 in. to 47 in.)
4 (48 in. to 72 in.)
Mounting Bracket
Hold Down Bracket
Medium Screw
Large Screw
Center Bracket
Valance Clip
The following tools are not included, but will be needed
to complete your installation.
Step Learn How to Operate Your Blind(s)
4
*Measuring Tape
*Drill with 1/16-inch bit
*Pencil
*Phillips-Head screwdriver
*Level
*Safety goggles
*Step ladder (optional)
EE
FF
DD
BB
CC
AA
1 2
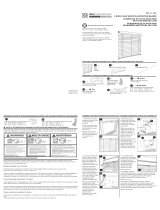
1. Mark center of window opening and center of blind (A)
with a pencil.
2. Slide mounting brackets (AA) on each end of the blind
(A) headrail. Position blind (A) in window, on either the
inside or outside, and align center marks. Mark position
of mounting brackets (AA) with a pencil.
Step Assemble the Blind(s)
3
Estimated Assembly Time: 30 minutes
The blind may be installed either inside or outside the
window frame.
1a
1b
AA
3b
5a
DD
EE
Inside Mount
Installation à l’intérieur du châssis
Montaje interior
5b
DD
EE
Outside Mount
Installation à l’extérieur du châssis
Montaje exterior
1
A
C
A
2
4
A
EE
7a
BB
A
CC
Inside Mount
Installation à l’intérieur du châssis
Montaje interior
Outside Mount
Installation à l’extérieur du châssis
Montaje exterior
7b
BB
A
CC
CLEANING INSTRUCTIONS:
DD
AA
3a
?
Questions
Contact customer service at 1-844-318-6168,
Monday through Friday from 8:00 a.m. to 4:30 p.m. EST.
Printed in China
A
B
FF
8
6
C
2a
AA
A
Inside Mount
Installation à l’intérieur
du châssis/Montaje interior
2b
AA
A
Outside Mount
Installation à l’extérieur
du châssis/Montaje exterior
Inside Mount
Installation àl’intérieur
du châssis/Montajeinterior
Outside Mount
Installation à l’extérieur
du châssis/Montaje exterior
DD
A
FF
M380.QJ
/
