Panasonic KX-TG7150 Owner's manual
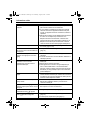
- Category
- Telephones
- Type
- Owner's manual

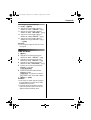
This unit is Caller ID compatible. To display the caller’s phone
number, you must subscribe to Caller ID service.
Charge the batteries for about 7 hours before initial use.
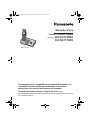
Please read these operating instructions before using the unit and save them for
future reference.
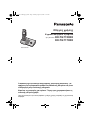
Operating Instructions
Model No. KX-TG7150EX
KX-TG7170EX
Digital Cordless Phone
KX-TG7150
1
–
36
(1)
–
(36)
<1>
–
<36>
((1))
–
((36))
[1]
–
[36]
{1}
–
{36}
Contents/Inhalt/Table des matières/
Indice/Contenido/
English instructions
Deutsche Anleitung
Instructions en français
Istruzioni in italiano
Instrucciones en español
Page/Seite/Page/
Pagina/Página/
TG7150-7170EX(e).book Page 1 Thursday, August 10, 2006 10:40 AM

Introduction
2
Introduction
Thank you for purchasing a new Panasonic digital cordless phone.
For your future reference
Attach or keep original receipt to assist with any repair under warranty.
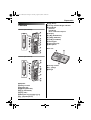
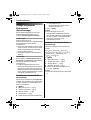
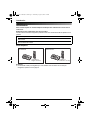
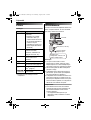
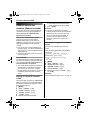
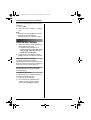
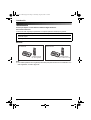
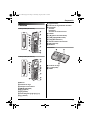
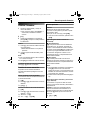
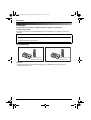
Your phone
Note:
L The handsets have been pre-registered for use with their base unit. If not registered, see
page 25.
Serial No. (found on the bottom of the base unit)
Date of purchase
Name and address of dealer
KX-TG7150
(Big button type
handset)
KX-TG7170
(Bone conduction
type handset)
TG7150-7170EX(e).book Page 2 Thursday, August 10, 2006 10:40 AM

Table of Contents
3
Preparation
Accessory information . . . . . . . . . . . . . . . 4
Expanding your phone system. . . . . . . . . 6
Important information. . . . . . . . . . . . . . . . 7
Bone conduction earpiece (KX-TG7170
only) . . . . . . . . . . . . . . . . . . . . . . . . . . . . . 8
Controls . . . . . . . . . . . . . . . . . . . . . . . . . . 9
Displays . . . . . . . . . . . . . . . . . . . . . . . . . 10
Connections. . . . . . . . . . . . . . . . . . . . . . 10
Battery installation/replacement. . . . . . . 11
Battery charge . . . . . . . . . . . . . . . . . . . . 11
Turning the power on/off . . . . . . . . . . . . 12
Symbols used in these operating
instructions. . . . . . . . . . . . . . . . . . . . . . . 12
Display language . . . . . . . . . . . . . . . . . . 12
Date and time . . . . . . . . . . . . . . . . . . . . 13
Accessibility features
Talking number display
(Voice announce). . . . . . . . . . . . . . . . . . 14
Making/Answering Calls
Making calls . . . . . . . . . . . . . . . . . . . . . . 15
Answering calls . . . . . . . . . . . . . . . . . . . 16
Phonebook
Handset phonebook. . . . . . . . . . . . . . . . 17
Chain dial. . . . . . . . . . . . . . . . . . . . . . . . 18
Quick dial for Call-by-Call: Making calls
using a telephone carrier access code
(Germany only) . . . . . . . . . . . . . . . . . . . 18
Handset Settings
Handset settings . . . . . . . . . . . . . . . . . . 19
Time settings . . . . . . . . . . . . . . . . . . . . . 21
Base Unit Settings
Base unit settings . . . . . . . . . . . . . . . . . 22
Caller ID Service
Using Caller ID service . . . . . . . . . . . . . 23
Caller list . . . . . . . . . . . . . . . . . . . . . . . . 23
Voice mail service . . . . . . . . . . . . . . . . . 24
Multi-unit Operation
Operating additional units . . . . . . . . . . . 25
Registering a handset to the base unit . 25
Intercom between handsets . . . . . . . . . 26
Transferring calls between handsets. . . 26
Copying phonebook entries. . . . . . . . . . 27
Useful Information
Using the belt clip . . . . . . . . . . . . . . . . . 28
Using the shoulder rest attachment . . . . 28
Character entry . . . . . . . . . . . . . . . . . . . 29
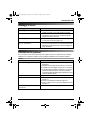
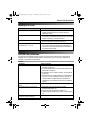
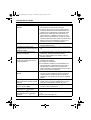
Error messages . . . . . . . . . . . . . . . . . . . 31
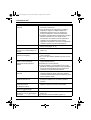
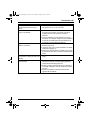
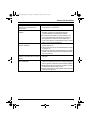
Troubleshooting . . . . . . . . . . . . . . . . . . . 31
Specifications. . . . . . . . . . . . . . . . . . . . . 34
Index
Index . . . . . . . . . . . . . . . . . . . . . . . . . . 35
TG7150-7170EX(e).book Page 3 Thursday, August 10, 2006 10:40 AM

Preparation
4
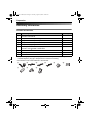
Accessory information
Included accessories
*1 Prepare the appropriate telephone plug needed for use in your country. For Italy, attach the
included telephone plug 5 to telephone line cord before connecting.
*2 The handset cover comes attached to the handset.
No. Accessory items Quantity
1 AC adaptor for base unit
Part No. PQLV207CE
1
2 Telephone line cord (Germany) 1
3 Telephone line cord (France) 1
4 Telephone line cord (Other countries)
*1
1
5 Telephone plug (Italy) 1
6 Rechargeable batteries AAA (R03) size
Part No. HHR-55AAAB or HHR-4EPT
2
7 Handset cover
*2
1
8 Belt clip 1
9 Shoulder rest 1
123456
789
TG7150-7170EX(e).book Page 4 Thursday, August 10, 2006 10:40 AM

Preparation
5
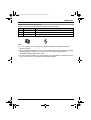
Additional/replacement accessories
Please contact your nearest Panasonic dealer for sales information.
Note:
L You can expand your phone system by registering additional compatible Panasonic
handsets (page 6).
L When replacing the batteries, use only 2 rechargeable AAA (R03) size nickel metal hydride
(Ni-MH) batteries of capacity up to 750 mAh. We recommend using Panasonic
rechargeable batteries (Model No. P03P).
L We cannot be responsible for any damage to the unit or degradation of performance which
may occur from using non-Panasonic rechargeable batteries.
No. Model No. Description
1 KX-TCA717EX Wall-Mounting Adaptor
2 KX-TCA94EX Headset
3 KX-A272 DECT repeater
12
TG7150-7170EX(e).book Page 5 Thursday, August 10, 2006 10:40 AM

Preparation
6
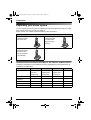
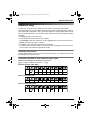
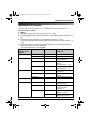
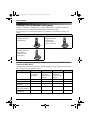
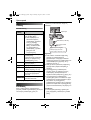
Expanding your phone system
You can expand your phone system by registering the following optional handsets to a single
base unit (KX-TG7150 or KX-TG7170): max. 6
Please contact your nearest Panasonic dealer for sales information.
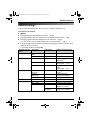
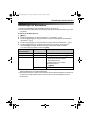
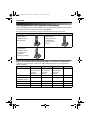
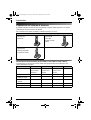
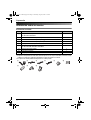
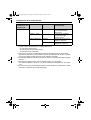
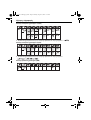
Handset feature overview for KX-TGA711, KX-TGA715, and KX-TGA717
Operations and features of the 3 different accessory handsets have certain differences as
indicated in the table below.
Handsets: max. 6
Additional digital
cordless handset
KX-TGA711EX
Additional digital
cordless handset
KX-TGA715EX
(Big button type
handset)
Additional digital
cordless handset
KX-TGA717EX
(Bone conduction
type handset)
Feature KX-TGA711 KX-TGA715 KX-TGA717 Page
Description Available as
accessory
handset only
Same handset
supplied with
KX-TG7150
Same handset
supplied with
KX-TG7170
—
Big button — rr—
Bone conduction
earpiece
——r page 8
Call restriction r ———
Headset jack — rrpage 9
Voice announce — rrpage 14
TG7150-7170EX(e).book Page 6 Thursday, August 10, 2006 10:40 AM

Preparation
7
Important information
General
L Use only the AC adaptor included with this
product, noted on page 4.
L Do not connect the AC adaptor to any AC
outlet other than a standard 220–240 V
AC outlet.
L This product is unable to make calls when:
– the portable handset battery(ies) need
recharging or have failed.
– there is a power failure.
L Do not open the base unit, charger, or
handset other than to replace the
battery(ies).
L This product should not be used near
emergency/intensive care medical
equipment and should not be used by
people with pacemakers.
L Care should be taken that objects do not
fall onto, and liquids are not spilled into,
the unit. Do not subject this product to
excessive smoke, dust, mechanical
vibration or shock.
Environment
L Do not use this product near water.
L This product should be kept away from
heat sources such as radiators, cookers,
etc. It should also not be placed in rooms
where the temperature is less than 5 °C or
greater than 40 °C.
L The AC adaptor is used as the main
disconnect device. Ensure that the AC
outlet is installed near the product and is
easily accessible.
Warning:
L To prevent the risk of electrical shock, do
not expose this product to rain or any
other type of moisture.
L Unplug this product from power outlets if it
emits smoke, an abnormal smell, or
makes unusual noise. These conditions
can cause fire or electric shock. Confirm
that smoke has stopped emitting and
contact an authorised service centre.
Battery caution
L We recommend using the battery(ies)
noted on page 5. Use only rechargeable
battery(ies).
L Do not mix old and new batteries.
L Do not dispose of the battery(ies) in a fire,
as they may explode. Check with local
waste management codes for special
disposal instructions.
L Do not open or mutilate the battery(ies).
Released electrolyte from the battery(ies)
is corrosive and may cause burns or injury
to the eyes or skin. The electrolyte may be
toxic if swallowed.
L Exercise care when handling the
battery(ies). Do not allow conductive
materials such as rings, bracelets or keys
to touch the battery(ies), otherwise a short
circuit may cause the battery(ies) and/or
the conductive material to overheat and
cause burns.
L Charge the battery(ies) in accordance
with the information provided in these
operating instructions.
L Only use the included base unit (or
charger) to charge the battery(ies). Do not
tamper with the base unit (or charger).
Failure to follow these instructions may
cause the battery(ies) to swell or explode.
TG7150-7170EX(e).book Page 7 Thursday, August 10, 2006 10:40 AM

Preparation
8
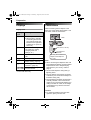
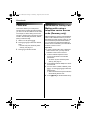
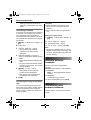
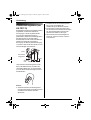
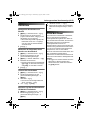
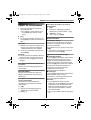
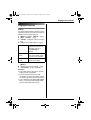
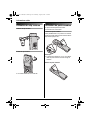
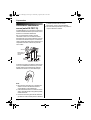
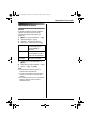
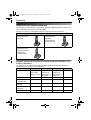
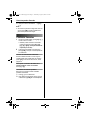
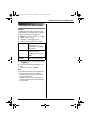
Bone conduction earpiece
(KX-TG7170 only)
The handset features a bone conduction
earpiece that uses vibrations to create
sound during your telephone conversations.
For proper operation press the bone
conduction earpiece against your face near
the ear.
Normally, sound enters the ear canal and
vibrates the eardrum. People feel the
vibration within the inner ear and
comprehend it as it is received by the
auditory nerve.
Place the bone conduction earpiece against
your face (not your ear). Try different
locations to find which location works best.
Start with the temple area.
Note:
L Do not place the bone conduction
earpiece on a hearing aid. Howling or
other interference may be heard.
L The effectiveness of the bone conduction
earpiece will vary by the type and degree
of hearing loss of the user.
L As sound is generated by vibration, users
with normal hearing can use the handset
by placing the bone conduction earpiece
against the ear, as an ordinary telephone.
L If the bone conduction earpiece gets dusty
or greasy, clean it with a soft, dry cloth.
External ear
Middle ear
Inner ear
Auditory
nerve
Sound
Bone
conduction
earpiece
TG7150-7170EX(e).book Page 8 Thursday, August 10, 2006 10:40 AM

Preparation
9
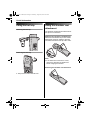
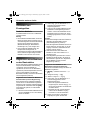
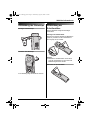
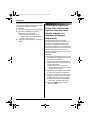
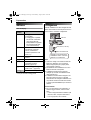
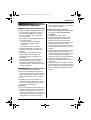
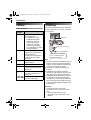
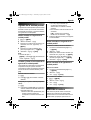
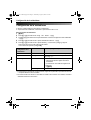
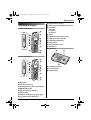
Controls
Handset (KX-TG7150)
Handset (KX-TG7170)
A Speaker
B Charge contact
C Headset jack
D {j/OK} (Menu/OK)
E {k} (Phonebook)
F {C} (Talk)
G Navigator key ({^}/{V}/{>}/{<})
H {s} (Speakerphone)
I {R} (Recall)
J Charge indicator/Ringer indicator
K KX-TG7150
Receiver
KX-TG7170
Bone conduction earpiece
L Display
M {R} (Redial/Pause)
N {ih} (Off/Power)
O {C/T} (Clear/Mute)
P Dial keypad
Q {INT} (Intercom)
R Microphone
Base unit
A Charge contact
B {x} (Page)
C Ringer
N
B
A
O
P
Q
R
L
K
M
F
G
I
H
J
D
C
E
B
A
N
O
Q
R
L
K
M
F
G
I
H
J
D
C
E
P
A B
C
TG7150-7170EX(e).book Page 9 Thursday, August 10, 2006 10:40 AM

Preparation
10
Displays
Display icons
*1 Voice mail users only
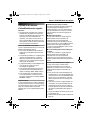
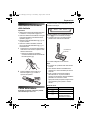
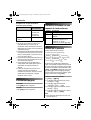
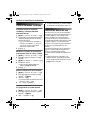
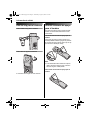
Connections
When connecting the AC adaptor to the
base unit, a short beep will be heard. If it is
not heard, check the connections.
Note:
L When connecting the telephone line cord
to the telephone network, use the included
telephone line cord or telephone plug
appropriate to your country, noted on
page 4.
L Never install telephone wiring during a
lightning storm.
L The AC adaptor must remain connected
at all times. (It is normal for the adaptor to
feel warm during use.)
L The AC adaptor should be connected to a
vertically oriented or floor-mounted AC
outlet. Do not connect the AC adaptor to a
ceiling-mounted AC outlet, as the weight
of the adaptor may cause it to become
disconnected.
Location
L For maximum distance and noise-free
operation, place your base unit:
Display
icon
Meaning
w Within range of a base unit
L When flashing: Handset
is searching for base unit.
(out of range of base unit,
handset is not registered
to base unit, no power on
base unit)
L Handset is accessing base
unit. (intercom, paging,
changing base unit
settings, etc.)
k Handset is on an outside
call.
5 Battery strength
[2] Handset number (Standby
display setting, page 19)
0 New voice mail message
received
*1
(page 24)
Line is being used by
another handset.
Use only the included AC
adaptor and telephone
line cord.
(220–240 V, 50 Hz)
To telephone
network
Hook
TG7150-7170EX(e).book Page 10 Thursday, August 10, 2006 10:40 AM

Preparation
11
– away from electrical appliances such as
TVs, radios, personal computers or
other phones.
– in a convenient, high and central
location.
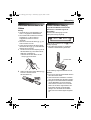
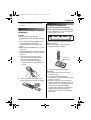
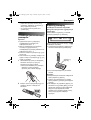
Battery
installation/replacement
Important:
L Use only the included rechargeable
batteries noted on page 4, 7.
L When replacing batteries, we recommend
using the Panasonic rechargeable
batteries noted on page 5, 7.
L Wipe the battery ends (S, T) with a dry
cloth.
L When installing the batteries, avoid
touching the battery ends (S, T) or the
unit contacts.
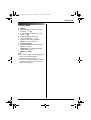
1 Press the notch on the handset cover
firmly and slide it in the direction of the
arrow.
L When replacing batteries, remove the
old batteries positive (S) end first.
2 Insert the batteries negative (T) end
first. Close the handset cover.
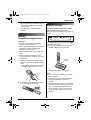
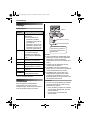
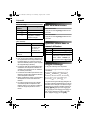
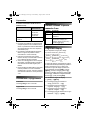
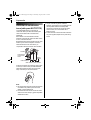
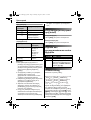
Battery charge
Place the handset on the base unit for
about 7 hours before initial use.
When charging, the battery icon is shown as
follows.
When the batteries are fully charged, 5
remains on the display.
L The charge indicator lights up when the
handset is placed on the base unit.
L The pictured model is KX-TG7150.
Note:
L It is normal for the handset to feel warm
during charging.
L If you want to use the unit immediately,
charge the batteries for at least 15
minutes.
L Clean the charge contacts of the handset
and base unit with a soft, dry cloth once a
month, otherwise the batteries may not
charge properly. Clean more often if the
unit is exposed to grease, dust, or high
humidity.
Charge
contact
TG7150-7170EX(e).book Page 11 Thursday, August 10, 2006 10:40 AM

Preparation
12
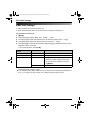
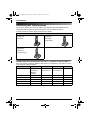
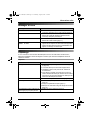
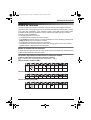
Battery strength
Panasonic Ni-MH battery performance
(included batteries)
Note:
L It is normal for batteries not to reach full
capacity at the initial charge. Maximum
battery performance is reached after a few
complete cycles of charge/discharge
(use).
L Actual battery performance depends on a
combination of how often the handset is in
use and how often it is not in use
(standby).
L Battery operating time may be shortened
over time depending on usage conditions
and ambient temperature.
L Even after the handset is fully charged,
the handset can be left on the base unit
without any ill effect on the batteries.
L The battery strength may not be displayed
correctly after you replace the batteries. In
this case, place the handset on the base
unit and charge for at least 7 hours.
Turning the power on/off
Power on
Press {ih} for about 1 second.
Power off
Press {ih} for about 2 seconds.
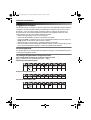
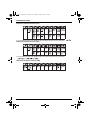
Symbols used in these
operating instructions
Display language
14 display languages are available.
1 {ih} i {j/OK}
2 Press {^} or {V} to select “Handset
Setup”. i {>}
3 Press {^} or {V} to select “Display
Setup”. i {>}
4 Press {^} or {V} to select “Select
Language”. i {>}
5 Press {^} or {V} to select the desired
language. i {>} i {ih}
Battery icon Battery strength
5 High
6 Medium
7 Low
When flashing: Needs
to be charged.
Operation Operating time
In continuous use KX-TG7150:
12 hours max.
KX-TG7170:
10 hours max.
In continuous
standby mode
150 hours max.
Symbol Meaning
{j/OK} Press {j/OK}.
i Proceed to the next operation.
“ ” Select the words in quotations
shown on the display (e.g.,
“Handset Setup”) by
pressing {^} or {V}.
You can select
You can select
“Deutsch
Deutsch
”,
,
“English
English
”,“Espa
Espa
ñol
ol
”,
,
“NORSK
NORSK
”,
,
“FRANCAIS
FRANCAIS
”,
,
“Italiano
Italiano
”,
“Dansk
Dansk
”,
,
“Nederlands
Nederlands
”,
,
“Svenska
Svenska
”,
“Suomi
Suomi
”,
,
“EKKGMIJA
EKKGMIJA
”,
,
“Türk
rk
çe”,
“Portugu
Portugu
ês”,
,
or
or
“Catal
Catal
à”.
TG7150-7170EX(e).book Page 12 Thursday, August 10, 2006 10:40 AM

Preparation
13
Note:
L If you select a language you cannot read,
press {ih}, press {j/OK}, press {^} 3
times, press {>}, press {V} 2 times, press
{>}, press {V}, press {>}, select the
desired language, press {>}, then press
{ih}.
L To change the voice announce language,
see page 14.
Date and time
1 {j/OK}
2 Press {^} or {V} to select “Handset
Setup”. i {>}
3 Press {^} or {V} to select “Time
Settings”. i {>}
4 Press {^} or {V} to select “Set Date &
Time”. i {>}
5 Enter the current day, month, and year.
Example: 17 May, 2006
{1}{7} {0}{5} {0}{6}
6 Enter the current hour and minute.
Example: 3:30 PM
{0}{3} {3}{0} i Press {*} until
“03:30 PM” is displayed.
7 {j/OK} i {ih}
Note:
L To correct a digit, press {<} or {>} to
move the cursor to the digit, then make
the correction.
L The date and time may be incorrect after a
power failure. In this case, set the date
and time again.
TG7150-7170EX(e).book Page 13 Thursday, August 10, 2006 10:40 AM

Accessibility features
14
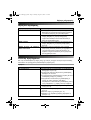
Talking number display
(Voice announce)
The voice announce features allow the
handset to announce displayed phone
number. (Caller ID announce/List
announce)
Caller ID announce
When you receive an outside call which has
phone number information, the handset
announces the displayed phone number
from the handset speaker.
L To announce outside caller’s phone
number, you must first subscribe to Caller
ID service (page 23).
L The announcement is heard at the ringer
volume (page 19).
List announce
The handset announces phone numbers
from the handset speaker while you are
viewing the redial list, caller list, and
phonebook.
L If the displayed phone number has a
P(pause), the handset inserts a 0.5
second pause for each P and if the
number has the other symbols, (for
example, ;, #, etc.) the handset skips the
symbols and announces the next number.
Setting volume for voice
announce
You can set the volume for list announce.
The volume for caller ID announce is set
when setting the ringer volume on page 19.
1 {j/OK}
2 “Handset Setup” i {>}
3 “Other Options” i {>}
4 “Voice Announce” i {>}
5 “Volume” i {>}
6 Select the desired volume.
L To turn the voice announce feature off,
select the volume “Off”.
7 {>} i {ih}
Note:
L The caller ID announce is heard at the
handset ringer volume (page 19). When
the volume for voice announce is set to
“Off”, the handset does not announce
the phone number regardless of the ringer
volume.
Selecting language for voice
announce
8 voice announce languages are available.
1 {j/OK}
2 “Handset Setup” i {>}
3 “Other Options” i {>}
4 “Voice Announce” i {>}
5 “Select Language” i {>}
6 Select the desired language. i {>}
i {ih}
Note:
L To change the display language, see page
12.
You can select
You can select
“Deutsch
Deutsch
”,“English
English
”,
“Espa
Espa
ñol
ol
”,“FRANCAIS
FRANCAIS
”,
,
“Italiano
Italiano
”,
“Nederlands
Nederlands
”,
,
“EKKGMIJA
EKKGMIJA
”,
,
or
or
“Türk
rk
çe”.
TG7150-7170EX(e).book Page 14 Thursday, August 10, 2006 10:40 AM

Making/Answering Calls
15
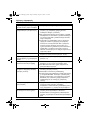
Making calls
1 Lift the handset and dial the phone
number.
L To correct a digit, press {C/T}, then
enter the correct number.
2 {C}
3 When finished talking, press {ih} or
place the handset on the base unit.
Speakerphone
1 During a conversation, press {s} to turn
on the speakerphone.
L Speak alternately with the caller.
2 When finished talking, press {ih}.
Note:
L For best performance, use the
speakerphone in a quiet environment.
L To switch back to the receiver, press
{C}.
To adjust the receiver or speaker volume
Press {^} or {V} while on a call.
Redial feature
Previously dialled phone numbers (each 24
digits max.) can be redialled.
To make a call using the redial list
The last 10 phone numbers dialled are
stored in the redial list.
1 {R}
2 Press {^} or {V} to select the desired
number.
3 {C} / {s}
To erase numbers in the redial list
1 {R}
2 Press {^} or {V} to select the desired
number. i {>}
3 “Erase” i {>}
4 “Yes” i {>} i {ih}
Other features
Mute
While mute is turned on, you will be able to
hear the other party, but the other party will
not be able to hear you.
To mute your voice, press {C/T}.
L To return to the conversation, press
{C/T} again.
{R} button (to use the recall feature)
■ Germany/Austria:
{R} is used to access special telephone
services, such as call waiting. If your
telephone line supports call waiting, you can
press {R} to switch between the first and
second caller during a conversation.
Contact your service provider/telephone
company for details.
■ Other countries:
{R} is used to access optional telephone
services. Contact your service
provider/telephone company for details.
Note:
L If your unit is connected to a PBX (private
branch exchange), pressing {R} can allow
you to access certain features of your host
PBX such as transferring an extension
call. Consult your PBX dealer for details.
L You can change the recall time (page 22).
Pause button (for PBX/long distance
service users)
A pause is sometimes required when
making calls using a PBX or long distance
service.
Example: If you have to dial {0} before
dialling outside numbers manually, you will
probably need to pause after dialling {0}
until you hear a dial tone.
1 {0} i {R}
TG7150-7170EX(e).book Page 15 Thursday, August 10, 2006 10:40 AM

Making/Answering Calls
16
2 Dial the phone number. i {C} / {s}
Note:
L A 3 second pause is inserted each time
{R} is pressed. Press repeatedly to
insert longer pauses.
Answering calls
1 Lift the handset and press {C} or {s}
when the unit rings.
L You can also answer a call by pressing
any dial key from {0} to {9}, {*} , {#},
or {INT}. (Any key answer feature)
2 When finished talking, press {ih} or
place the handset on the base unit.
Auto talk feature
You can answer calls simply by lifting the
handset off the base unit. You do not need to
press {C}. To turn this feature on, see
page 19.
To adjust the handset ringer volume
when receiving a call
Press {^} or {V}.
Handset locator
Using this feature, you can locate the
handset if it has been misplaced.
1 Press {x} on the base unit.
2 To stop paging, press {x} on the base
unit or press {ih} on the handset.
TG7150-7170EX(e).book Page 16 Thursday, August 10, 2006 10:40 AM

Phonebook
17
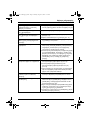
Handset phonebook
The handset phonebook allows you to make
calls without having to dial manually. You
can add 50 names and phone numbers to
the handset phonebook.
Adding entries to the handset
phonebook
1
{k} i {j/OK}
2 “New Entry” i {>}
3 Enter the party’s name (16 characters
max.; page 29). i {j/OK}
4 Enter the party’s phone number (24
digits max.). i {j/OK}
5 “Save” i {>} i {ih}
Note:
L Step 1 variation:
{j/OK} i Press {^} or {V} to select
“Ph.Book Setup”. i {>}
Finding and calling a handset
phonebook entry
Handset phonebook entries can be
searched for by first character or by scrolling
through all handset phonebook entries.
When you have found the desired entry,
press {C}.
Scrolling through all entries
1 {k}
2 Press {^} or {V} to display the desired
entry.
Searching by first character (index
search)
1 {k}
2 Press the dial key ({0} to {9}) which
contains the character you are
searching for (page 29).
L Press the same dial key repeatedly to
display the first entry corresponding to
each letter located on that dial key.
L If there is no entry corresponding to
the letter you selected, the next entry
will be displayed.
L To change the character entry mode:
{R} i Select the character entry
mode. i {>}
3 Press {^} or {V} to scroll through the
phonebook if necessary.
Editing entries in the handset
phonebook
Changing a name, phone number
1 Find the desired entry (page 17). i
{j/OK}
2 “Edit” i {>}
3 Edit the name if necessary (16
characters max.; page 29). i
{j/OK}
4 Edit the phone number if necessary (24
digits max.). i {j/OK}
5 “Save” i {>} i {ih}
Erasing entries from the handset
phonebook
Erasing an entry
1 Find the desired entry (page 17). i
{j/OK}
2 “Erase” i {>}
3 “Yes” i {>} i {ih}
Erasing all entries
1 {k} i {j/OK}
2 “Erase All” i {>}
3 “Yes” i {>}
4 “Yes” i {>} i {ih}
TG7150-7170EX(e).book Page 17 Thursday, August 10, 2006 10:40 AM

Phonebook
18
Chain dial
This feature allows you to dial phone
numbers in the handset phonebook while
you are on a call. This feature can be used,
for example, to dial a calling card access
number or bank account PIN that you have
stored in the handset phonebook, without
having to dial manually.
1 While on a call, press {k}.
2 Press {^} or {V} to select the desired
entry.
L To search by first character (index
search), see page 17.
3 Press {>} to dial the number.
Quick dial for Call-by-Call:
Making calls using a
telephone carrier access
code (Germany only)
Different telephone carriers charge different
rates to call to different areas. If you store
the telephone carrier access codes you use
into the handset phonebook beforehand,
you can select the appropriate telephone
carrier access code when you make calls in
an effort to save on costs.
Important:
L In order to make calls using a telephone
carrier access code, you may need to
subscribe to that carrier’s service.
1 Find the desired telephone carrier
access code stored in the handset
phonebook.
L To search by first character (index
search), see page 17.
2 Press {C} to dial the telephone carrier
access code.
3 As soon as the number is dialled, press
{k} i Press {^} or {V} to select the
desired entry.
L Select the desired entry before the line
automatically disconnects.
4 Press {j/OK} to dial the desired entry.
TG7150-7170EX(e).book Page 18 Thursday, August 10, 2006 10:40 AM

Handset Settings
19
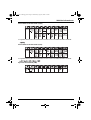
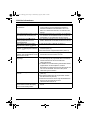
Handset settings
L When customising the handset, the current item or setting is indicated by >.
To customise the handset:
1 {j/OK}
2 Press {^} or {V} to select “Handset Setup”. i {>}
3 Press {^} or {V} to select the desired item in the handset settings menu. i {>}
4 Press {^} or {V} to select the desired item in the sub-menu. i {>}
L In some cases, you may need to select from a second sub-menu. i {>}
5 Press {^} or {V} to select the desired setting then press {>} or follow the instruction in the
rightmost column of the chart.
L To exit the operation, press {ih}.
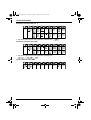
Handset settings
menu
Sub-menu Sub-menu 2 Feature (default setting)
Time Settings Set Date &
Time
— Date and time: page 13
Alarm — Set the alarm: page 21
Ringer Setup Ringer Volume — Handset ringer volume
(Maximum)
*1
Ext. Ringtone — Ringtones for outside calls
(“Ringtone 1”)
*2*3
Int. Ringtone — Ringtones for intercom
calls
(“Ringtone 3”)
*3
Display Setup Standby
Display
— Standby mode display
(“Off”)
*4
Select
Language
— Display language
(“English”): page 12
Contrast — Display contrast (Level 3)
Registration Register H.set — page 25
Other Options Keytones — Keytones on/off (“On”)
Auto Talk — Auto talk on/off (“Off”)
*5
Voice Announce Volume Voice announce volume
(“Middle”): page 14
Select
Language
Voice announce language
(“English”): page 14
TG7150-7170EX(e).book Page 19 Thursday, August 10, 2006 10:40 AM

Handset Settings
20
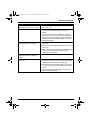
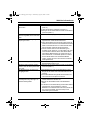
*1 When the ringer is turned off, the handset will ring:
– at the minimum level for alarm
– at the minimum level for intercom calls
– at the maximum level for paging
*2 If you select one of the melody ringtones, the ringtone will continue to sound for several
seconds if the caller hangs up before you answer. You may hear a dial tone or no one
on the line when you answer a call.
*3 The preset melodies in this product are used with permission of © 2006 Copyrights
Vision Inc.
*4 If “Off” is selected, only current date and time are displayed.
If “Handset Number” is selected and the current handset number is 2, “[2]” is
displayed.
*5 Auto talk feature allows you to answer calls simply by lifting the handset off the base
unit. You do not need to press {C}.
TG7150-7170EX(e).book Page 20 Thursday, August 10, 2006 10:40 AM
Page is loading ...
Page is loading ...
Page is loading ...
Page is loading ...
Page is loading ...
Page is loading ...
Page is loading ...
Page is loading ...
Page is loading ...
Page is loading ...
Page is loading ...
Page is loading ...
Page is loading ...
Page is loading ...
Page is loading ...
Page is loading ...
Page is loading ...
Page is loading ...
Page is loading ...
Page is loading ...
Page is loading ...
Page is loading ...
Page is loading ...
Page is loading ...
Page is loading ...
Page is loading ...
Page is loading ...
Page is loading ...
Page is loading ...
Page is loading ...
Page is loading ...
Page is loading ...
Page is loading ...
Page is loading ...
Page is loading ...
Page is loading ...
Page is loading ...
Page is loading ...
Page is loading ...
Page is loading ...
Page is loading ...
Page is loading ...
Page is loading ...
Page is loading ...
Page is loading ...
Page is loading ...
Page is loading ...
Page is loading ...
Page is loading ...
Page is loading ...
Page is loading ...
Page is loading ...
Page is loading ...
Page is loading ...
Page is loading ...
Page is loading ...
Page is loading ...
Page is loading ...
Page is loading ...
Page is loading ...
Page is loading ...
Page is loading ...
Page is loading ...
Page is loading ...
Page is loading ...
Page is loading ...
Page is loading ...
Page is loading ...
Page is loading ...
Page is loading ...
Page is loading ...
Page is loading ...
Page is loading ...
Page is loading ...
Page is loading ...
Page is loading ...
Page is loading ...
Page is loading ...
Page is loading ...
Page is loading ...
Page is loading ...
Page is loading ...
Page is loading ...
Page is loading ...
Page is loading ...
Page is loading ...
Page is loading ...
Page is loading ...
Page is loading ...
Page is loading ...
Page is loading ...
Page is loading ...
Page is loading ...
Page is loading ...
Page is loading ...
Page is loading ...
Page is loading ...
Page is loading ...
Page is loading ...
Page is loading ...
Page is loading ...
Page is loading ...
Page is loading ...
Page is loading ...
Page is loading ...
Page is loading ...
Page is loading ...
Page is loading ...
Page is loading ...
Page is loading ...
Page is loading ...
Page is loading ...
Page is loading ...
Page is loading ...
Page is loading ...
Page is loading ...
Page is loading ...
Page is loading ...
Page is loading ...
Page is loading ...
Page is loading ...
Page is loading ...
Page is loading ...
Page is loading ...
Page is loading ...
Page is loading ...
Page is loading ...
Page is loading ...
Page is loading ...
Page is loading ...
Page is loading ...
Page is loading ...
Page is loading ...
Page is loading ...
Page is loading ...
Page is loading ...
Page is loading ...
Page is loading ...
Page is loading ...
Page is loading ...
Page is loading ...
Page is loading ...
Page is loading ...
Page is loading ...
Page is loading ...
Page is loading ...
Page is loading ...
Page is loading ...
Page is loading ...
Page is loading ...
Page is loading ...
Page is loading ...
Page is loading ...
Page is loading ...
Page is loading ...
Page is loading ...
Page is loading ...
Page is loading ...
Page is loading ...
Page is loading ...
Page is loading ...
Page is loading ...
Page is loading ...
Page is loading ...
Page is loading ...
Page is loading ...
Page is loading ...
Page is loading ...
Page is loading ...
Page is loading ...
Page is loading ...
Page is loading ...
Page is loading ...
Page is loading ...
Page is loading ...
Page is loading ...
Page is loading ...
Page is loading ...
Page is loading ...
Page is loading ...
Page is loading ...
Page is loading ...
Page is loading ...
Page is loading ...
Page is loading ...
Page is loading ...
Page is loading ...
Page is loading ...
Page is loading ...
Page is loading ...
Page is loading ...
Page is loading ...
Page is loading ...
Page is loading ...
Page is loading ...
Page is loading ...
-
 1
1
-
 2
2
-
 3
3
-
 4
4
-
 5
5
-
 6
6
-
 7
7
-
 8
8
-
 9
9
-
 10
10
-
 11
11
-
 12
12
-
 13
13
-
 14
14
-
 15
15
-
 16
16
-
 17
17
-
 18
18
-
 19
19
-
 20
20
-
 21
21
-
 22
22
-
 23
23
-
 24
24
-
 25
25
-
 26
26
-
 27
27
-
 28
28
-
 29
29
-
 30
30
-
 31
31
-
 32
32
-
 33
33
-
 34
34
-
 35
35
-
 36
36
-
 37
37
-
 38
38
-
 39
39
-
 40
40
-
 41
41
-
 42
42
-
 43
43
-
 44
44
-
 45
45
-
 46
46
-
 47
47
-
 48
48
-
 49
49
-
 50
50
-
 51
51
-
 52
52
-
 53
53
-
 54
54
-
 55
55
-
 56
56
-
 57
57
-
 58
58
-
 59
59
-
 60
60
-
 61
61
-
 62
62
-
 63
63
-
 64
64
-
 65
65
-
 66
66
-
 67
67
-
 68
68
-
 69
69
-
 70
70
-
 71
71
-
 72
72
-
 73
73
-
 74
74
-
 75
75
-
 76
76
-
 77
77
-
 78
78
-
 79
79
-
 80
80
-
 81
81
-
 82
82
-
 83
83
-
 84
84
-
 85
85
-
 86
86
-
 87
87
-
 88
88
-
 89
89
-
 90
90
-
 91
91
-
 92
92
-
 93
93
-
 94
94
-
 95
95
-
 96
96
-
 97
97
-
 98
98
-
 99
99
-
 100
100
-
 101
101
-
 102
102
-
 103
103
-
 104
104
-
 105
105
-
 106
106
-
 107
107
-
 108
108
-
 109
109
-
 110
110
-
 111
111
-
 112
112
-
 113
113
-
 114
114
-
 115
115
-
 116
116
-
 117
117
-
 118
118
-
 119
119
-
 120
120
-
 121
121
-
 122
122
-
 123
123
-
 124
124
-
 125
125
-
 126
126
-
 127
127
-
 128
128
-
 129
129
-
 130
130
-
 131
131
-
 132
132
-
 133
133
-
 134
134
-
 135
135
-
 136
136
-
 137
137
-
 138
138
-
 139
139
-
 140
140
-
 141
141
-
 142
142
-
 143
143
-
 144
144
-
 145
145
-
 146
146
-
 147
147
-
 148
148
-
 149
149
-
 150
150
-
 151
151
-
 152
152
-
 153
153
-
 154
154
-
 155
155
-
 156
156
-
 157
157
-
 158
158
-
 159
159
-
 160
160
-
 161
161
-
 162
162
-
 163
163
-
 164
164
-
 165
165
-
 166
166
-
 167
167
-
 168
168
-
 169
169
-
 170
170
-
 171
171
-
 172
172
-
 173
173
-
 174
174
-
 175
175
-
 176
176
-
 177
177
-
 178
178
-
 179
179
-
 180
180
-
 181
181
-
 182
182
-
 183
183
-
 184
184
-
 185
185
-
 186
186
-
 187
187
-
 188
188
-
 189
189
-
 190
190
-
 191
191
-
 192
192
-
 193
193
-
 194
194
-
 195
195
-
 196
196
-
 197
197
-
 198
198
-
 199
199
-
 200
200
-
 201
201
-
 202
202
-
 203
203
-
 204
204
-
 205
205
-
 206
206
-
 207
207
-
 208
208
-
 209
209
-
 210
210
-
 211
211
-
 212
212
-
 213
213
-
 214
214
-
 215
215
-
 216
216


Panasonic KX-TG7150 Owner's manual
- Category
- Telephones
- Type
- Owner's manual
Ask a question and I''ll find the answer in the document
Finding information in a document is now easier with AI
in other languages
Related papers
-
Panasonic kx-tca181 Owner's manual
-
Panasonic KXTCD220G Operating instructions
-
-
-
-
Panasonic KXTS560FX1 Operating instructions
-
-
-
-