Page is loading ...

Vol-Con
®
Elite Voltage / Continuity Tester with Audible and
Visual Indicators
WARNING
Safety Information:
• Before each use perform a continuity test by touching the probe tips together, an audible sound should be heard and the continuity
LED should light. This test verifies the functionality of the battery and test leads.
• Verify tester operation before each use by measuring a known voltage.
• Visually inspect the meter and leads for damage before each use. Replace leads if insulation is damaged or leads appear suspect.
• Voltage is not to exceed 1000V.
• To avoid electrical shock hazards and/or damage to the meter:
- Never ground yourself when taking electrical measurements.
- Use caution when measuring voltage.
- Do not use during electrical storms.
- Turn off power to the circuit or device before testing for continuity.
- Do not use in wet weather.
• Test Non-Contact Voltage function on known live voltage before using.
Features:
• Noncontact Voltage Sensor • Auto-Switching Voltage/Continuity Technology
• Vibration Mode (61-092) • Low Impedance Measuring Device
• Audible and LED Indication of Voltage Levels • Replaceable Silicone Test Leads
To Measure AC Voltage:
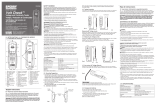
• Place the black test lead into the "COM" input and the red test lead into the "v+" input on the tester.
• Connect the tester in parallel with the load or circuit.
• The tester will automatically turn on, indicating both the voltage type and the voltage level.
To Measure DC Voltage:
• Place the black test lead into the "COM" input and the red test lead into the "v+" input on the tester.
• Connect the tester in parallel with the load or circuit.
• The tester will automatically turn on, indicating the voltage type, polarity, and the voltage level.
To Test for Continuity:
• Place the black test lead into the "COM" input and the red test lead into the "v+" input on the tester.
• De-Energize circuit before performing continuity test. Note, if voltage is present in the circuit, the tester
will automatically switch to voltage indication mode.
• Test for continuity by connecting the meter to the circuit.
• If circuit is complete, an audible indication will be heard and the Continuity LED will light.
• Continuity is indicated at less than 20kΩ.
To Use The Non-Contact Voltage Sensor:
• The non-contact voltage sensor indicates AC Voltage from 24 to 600 VAC.
• The non-contact voltage sensor protrudes from the top of the tester.
• While placing the sensor near the circuit to be tested, press the button labeled "NCV".
• If 24 to 600 VAC is present, an audible indication will be heard and the "NCV" LED will light.
• The closer the NCV sensor is to the AC voltage, the louder the beep.
• To differentiate between the hot and neutral in an outlet, insert the tab into each slot of the outlet. The beeper will be louder on
the hot side of the outlet rather than the neutral.
• The red test lead can also be used to further differentiate between the hot and neutral. Insert the red test lead into the "v+"
input of the tester, slide the red probe into test probe holder. While pressing the "NCV" button, insert the red probe into the
outlet. The beeper will sound and the "NCV" LED will light on the hot side of the outlet.
Shaker Function:
61-092 Only
• Tester vibrates on AC Volts.
• Tester starts shaking at 30VAC.
• The tester shakes at an increasingly variable level that allows the user to feel the difference between 60V, 120V, 240V, and 480 VAC.
V+ Input Terminal
This is the positive input terminal. Connection is made to it using the red test lead.
COM Input Terminal
This is the negative (ground) input terminal. Connection is made to it using the black test lead.
Safety Information
The instrument complies with class II, overvoltage CAT III, 1000V of the IEC 1010-1 (EN61010-1); UL3111-1 and CAN/CSA C22.2 #1010.1-92 standards. Pollution degree 2 in accordance with
IEC-664 indoor use. If the equipment is used in a manner not specified, the protection provided by the equipment may be impaired.
The symbols used on this instrument are:
Caution, refer to accompanying documents Direct current
Equipment protected throughout by Double insulation (Class II) Ground
Alternating current
Maintenance
Maintenance consists of periodic cleaning and battery replacement. The exterior of the instrument can be cleaned with a dry clean cloth to remove any oil, grease or grime. never use liquid
solvents or detergents. Repairs or servicing not covered in this manual should only be performed by qualified personnel.
Replacing the Battery
This meter is powered by four 1.5 volt (AAA size) batteries. (Total Voltage: 6Vdc, Total Current: 120mA) When the meter is not able to perform the continuity test, the battery must be
replaced to maintain proper operation. Use the following procedure to replace the battery:
1. Disconnect test leads from any live source and remove the test leads from the input terminals.
2. The battery cover is secured to the bottom case by two screws. Using a Phillips-head screwdriver, remove the screws from the battery cover and remove the battery cover.
3. Remove battery and replace with four new 1.5 volt (AAA size) batteries.
4. Replace the battery cover and reinstall the screws.
Service, and Replacement Parts:
For replacement parts or to inquire about service information contact IDEAL INDUSTRIES, INC. at 1-800-304-3578 or visit our website www.testersandmeters.com.
Test Leads - TL-102
Soft sided carrying case - C-90
#61-090 NCV
#61-092 NCV, Shaker
~
Warning
To avoid electrical shock, disconnect the test leads and any input
signals before replacing the battery. Replace only the same type of
battery.
ND 3039-3 61-090/092 Instructio 7/1/04 10:48 AM Page 1

Specifications:
VAC Ranges: 24V, 120V, 208V, 240V, 277V, 480V, 600V. (45Hz ~ 66Hz) Over-range Indication: Over 600V~ or 220V , All LED’s will bright up
VAC Accuracy: 70% to 100% of the LED labeled voltage Operating Environment: 32°F to 122°F (<70% humidity), Indoor use
88% to 100% of the LED labeled voltages of 240V and 277V Sound Power Level: Max. 65dB
80% to 100% of the LED labeled 600V Storage Temp.: -4°F to 140°F (<80% humidity)
VDC Ranges: 6V, 12V, 24V, 36V, 48V, 110V, 220V Altitude: Up to 6561.7 feet (2000M)
VDC Accuracy: 70% to 100% of the LED labeled voltage Battery: AAA size, 1.5V x4, 120mA
80% to 100% of the LED labeled voltage of 48V Battery Life: 200 hours typical on 61-090; 100 hours typical on 61-092
Continuity: Continuous LED and audible indication at less than 20Ω Accessories included: Test Leads, (4) 1.5V "AAA" batteries, operating
Response time of 100ms instructions
Input Inpedance: 1MΩ Dimensions: 7.83" (H), 1.73" (W), 1.53" (D)
Overload Protection: 1000VDC/750VAC rms Safety: EN61010, CAT-III 1000V, CE,
Warranty Statement:
This tester is warranted to the original purchaser against defects in material and workmanship for the lifetime of the tester. During this warranty period, IDEAL INDUSTRIES, INC. will, at it’s
option, replace or repair the defective unit, subject to verification of the defect or malfunction. This warranty does not apply to defects resulting from abuse, neglect, accident, unauthorized
repair, alteration, or unreasonable use of the instrument.
Any implied warranties arising out of the sale of an IDEAL product, including but not limited to implied warranties of merchantability and fitness for a particular purpose, are limited to the
above. The manufacturer shall not be liable for loss of use of the instrument or other incidental or consequential damages, expenses, or economic loss, or for any claim or claims for such
damage, expenses or economic loss. State laws vary, so the above limitations or exclusions mat not apply to you. This warranty gives you specific legal rights, and you may also have other
rights which vary form state to state.
Probador de voltaje / continuidad
Vol Con
®
Elite con indicadores sonoros y visuales
ADVERTENCIA
Información de seguridad:
• Antes de cada uso, realice una prueba de continuidad tocando las puntas de la sonda entre sí. Se deberá oír un sonido y encender el LED de continuidad. Esta prueba verifica el fun-
cionamiento de la pila y los cables de prueba.
• Verifique la operación del probador antes de usarlo midiendo un voltaje conocido.
• Inspeccione visualmente el medidor y los cables para ver si están dañados antes de usarlos. Sustituya los cables si el aislamiento está dañado o los cables parecen sospechosos.
• El voltaje no debe ser mayor que 1000 V.
• Para evitar descargas eléctricas y daños en el medidor:
- No se conecte a tierra cuando esté tomando medidas eléctricas.
- Tenga cuidado al medir el voltaje.
- No lo use durante tormentas eléctricas.
- Desconecte la corriente del circuito o dispositivo antes de probar si existe continuidad.
- No lo use en tiempo húmedo.
• Pruebe la función de voltaje sin contacto en un voltaje conectado conocido antes de usar.
Características:
• Sensor de voltaje sin contacto • Tecnología de voltaje/continuidad de conmutación automática
• Modalidad de vibración (61-092) • Dispositivo de medida de baja impedancia
• Indicación sonora y de LED de los niveles de voltaje • Cables de prueba de silicona reemplazables
Para medir el voltaje de CA:
• Ponga el cable de prueba negro en la entrada “COM” y el cable de prueba rojo en la entrada “+” del probador.
• Conecte el probador en paralelo con la carga o circuito.
• El probador se encenderá automáticamente, indicando el tipo y nivel de voltaje.
Para medir el voltaje de CC:
• Ponga el cable de prueba negro en la entrada “COM” y el cable de prueba rojo en la entrada “+” del probador.
• Conecte el probador en paralelo con la carga o circuito.
• El probador se encenderá automáticamente, indicando el tipo, polaridad nivel de voltaje.
Para probar la continuidad:
• Ponga el cable de prueba negro en la entrada “COM” y el cable de prueba rojo en la entrada “+” del probador.
• Desconecte el circuito antes de realizar la prueba de continuidad. Nota, si hay voltaje presente en el circuito, el probador pasará
automáticamente a la modalidad de indicación de voltaje.
• Pruebe si existe continuidad conectando el medidor al circuito.
• Si el circuito está completo, se oirá una indicación sonora y se encenderá el LED de continuidad.
• La continuidad viene indicada a menos de 20KΩ
Para usar el sensor de voltaje sin contacto:
• El sensor de voltaje sin contacto indica un voltaje de CA de 24 a 600 VCA.
• El sensor de voltaje sin contacto sobresale de la parte de arriba del probador.
• Al poner el sensor cerca del circuito que se vaya a probar, pulse el botón “NCV”.
• Si hay presente un voltaje de 24 a 600 VCA, se oirá una indicación sonora y se encenderá el LED “NCV”.
• Cuanto más se aproxime el sensor NCV al voltaje de CA, más alto será el pitido.
• Para distinguir entre el cable con corriente y neutral de una toma, introduzca la lengüeta en cada ranura de la toma. El lado con corriente de la
toma emitirá un pitido más alto que el neutro.
• El cable de prueba rojo también se puede usar para diferenciar aún más entre el cable con corriente y neutral. Introduzca el cable de prueba rojo
en la entrada “+” del probador, encaje el cable de prueba en el portador de la sonda de prueba. Al pulsar el botón “NCV”, introduzca la sonda en la toma. Se emitirá un sonido y el LED
“NCV” se encenderá en el lado con corriente de la toma.
Función de agitación:
61-092 sólo
• El probador vibra con voltios de CA.
• El probador empieza a agitarse a 30 VCA.
• El probador se agita a un nivel crecientemente variable que permite al usuario notar la diferencia entre 60 V, 120 V, 240 V y 480 V.
Terminal de entrada V+
Se trata del terminal de entrada positivo. La conexión se establece por medio del conductor de prueba rojo.
Terminal de entrada COM
Se trata del terminal de entrada negativo (tierra). La conexión se establece por medio del conductor de prueba negro.
Información sobre seguridad
Este instrumento cumple con la clase II, sobretensión CAT III, 1000 V de las normas IEC 1010-1 (EN61010-1) ; UL3111-1 y CAN/CSA C22.2 N° 1010.1-92. Grado de contaminación 2
según la norma IEC-664 para utilizar en interiores. En caso de usar el equipo de una forma no especificada, podrá deteriorarse la protección proporcionada por este último. Los símbolos uti-
lizados en este instrumento son:
Precaución, consulte la documentación incluida Corriente continua
Equipo completamente protegido por un aislamiento doble (Clase II) Tierra
Corriente alterna
Mantenimiento
El mantenimiento consiste en una limpieza periódica y en reemplazar las pilas. El exterior del instrumento puede limpiarse con un paño limpio y seco a fin de eliminar el aceite, grasa o
suciedad. No utilice nunca disolventes o detergentes líquidos. Las reparaciones y servicios que no estén cubiertos en este manual serán efectuados por personal capacitado.
#61-090 NCV
#61-092 NCV, agitador
CUS
~
ND 3039-3 61-090/092 Instructio 7/1/04 10:48 AM Page 2
/